- Take and edit Live Photos
- How to take a Live Photo
- How to find and play your Live Photos
- How to change the key photo
- How to add Live Photo effects
- How to edit Live Photos
- How to share your Live Photos
- How to turn off Live Photos
- Take a screenshot on your iPhone
- How to take a screenshot on iPhone 13 and other models with Face ID
- How to take a screenshot on iPhone models with Touch ID and side button
- How to take a screenshot on iPhone models with Touch ID and top button
- Where to find screenshots
- How to Take a Picture on Mac Using the Camera
- How to Take Pictures with the Mac Webcam
- Saving & Sharing Selfies Taken on the Mac
- Take and edit photos on your iPhone, iPad, and iPod touch
- Open your Camera app
- Home screen
- Control Center
- Lock screen
- Take a photo or video
- Edit your photo or video
- Adjust light and color
- Apply filters
- Crop and straighten
- Take screenshots or screen recordings on Mac
- Take pictures or screen recordings using Screenshot
- Take pictures using keyboard shortcuts
Take and edit Live Photos
With Live Photos, your iPhone records what happens 1.5 seconds before and after you take a picture. You take a Live Photo just like you do a traditional photo. Then you can pick a different key photo, add a fun effect, edit your Live Photo, and share with your family and friends.
How to take a Live Photo
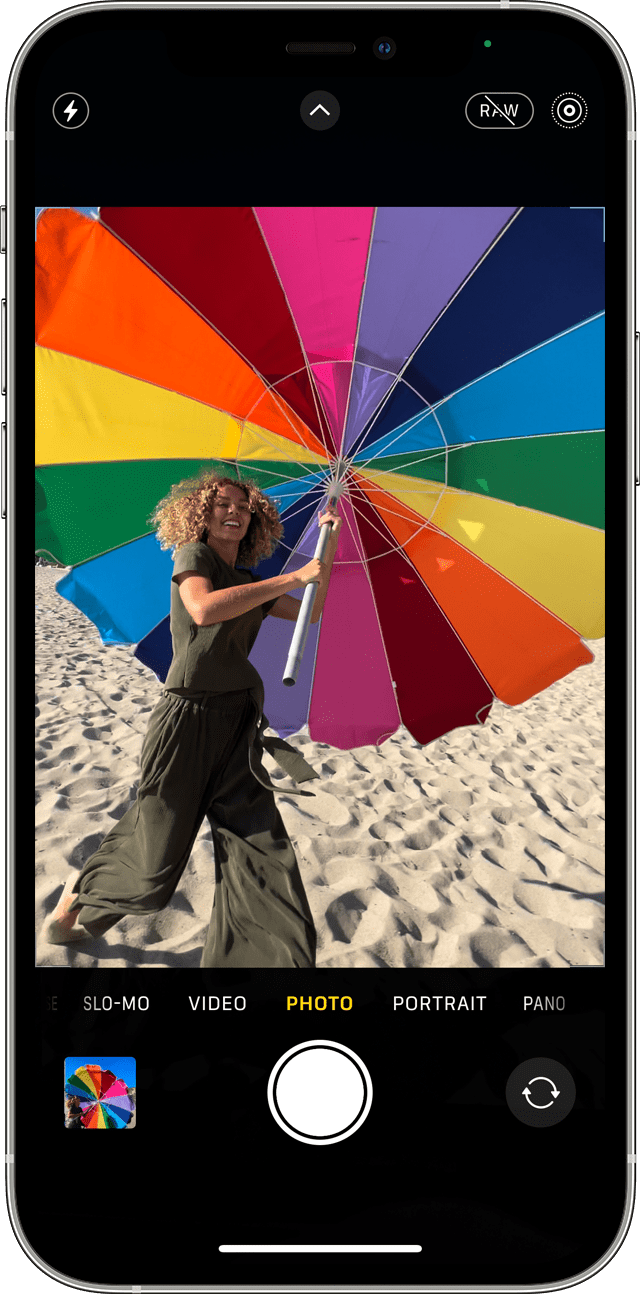
- Open the Camera app.
- Make sure that your Camera is set to photo mode and that Live Photos is turned on. When it’s on, you see the Live Photos button at the top of your Camera.

- Hold your device* still.
- Tap the shutter button .
Live Photos is on by default. You can turn Live Photos off temporarily or permanently.
How to find and play your Live Photos
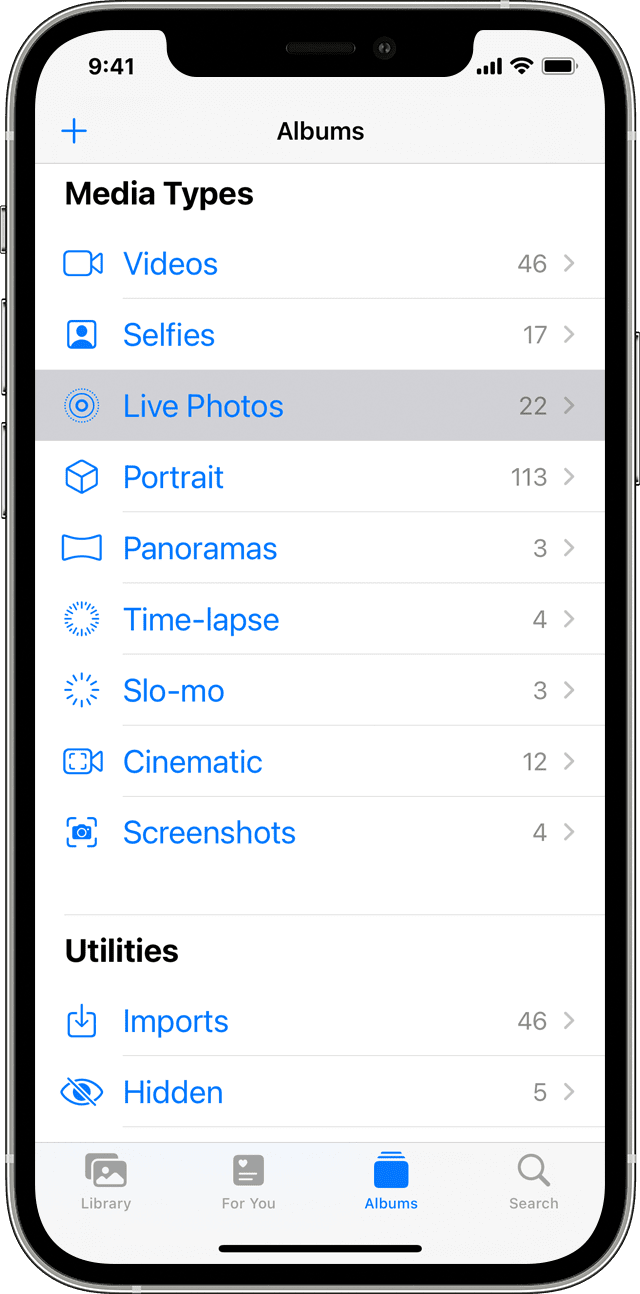
- Open the Photos app.
- Tap the Albums tab.
- Scroll down to Media Types and tap Live Photos.
- Tap one of the photos to open it.
- Press and hold the screen to play the Live Photo.
You can enjoy your Live Photo every time you unlock your device too. Just set it as your Lock Screen wallpaper.
How to change the key photo
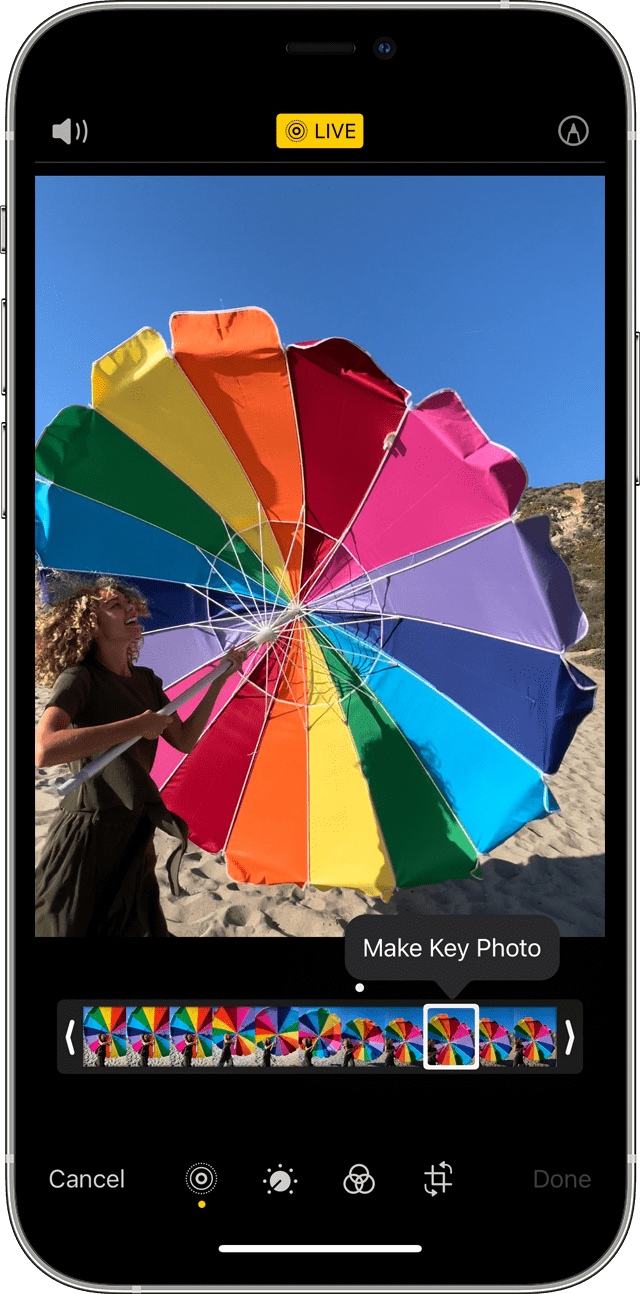
- Open the Live Photo and tap Edit.
- Tap the Live Photos button .
- Move the slider to change the frame.
- Release your finger, then tap Make Key Photo.
- Tap Done.
You can also toggle the Live Photo effect between off and on. When you’re editing a Live Photo, tap the LIVE button at the top of the screen to turn Live Photo off or back on.
How to add Live Photo effects
- Open the Live Photo.
- Tap the Live Photos button near the top of the screen.
- Choose Loop, Bounce, or Long Exposure.
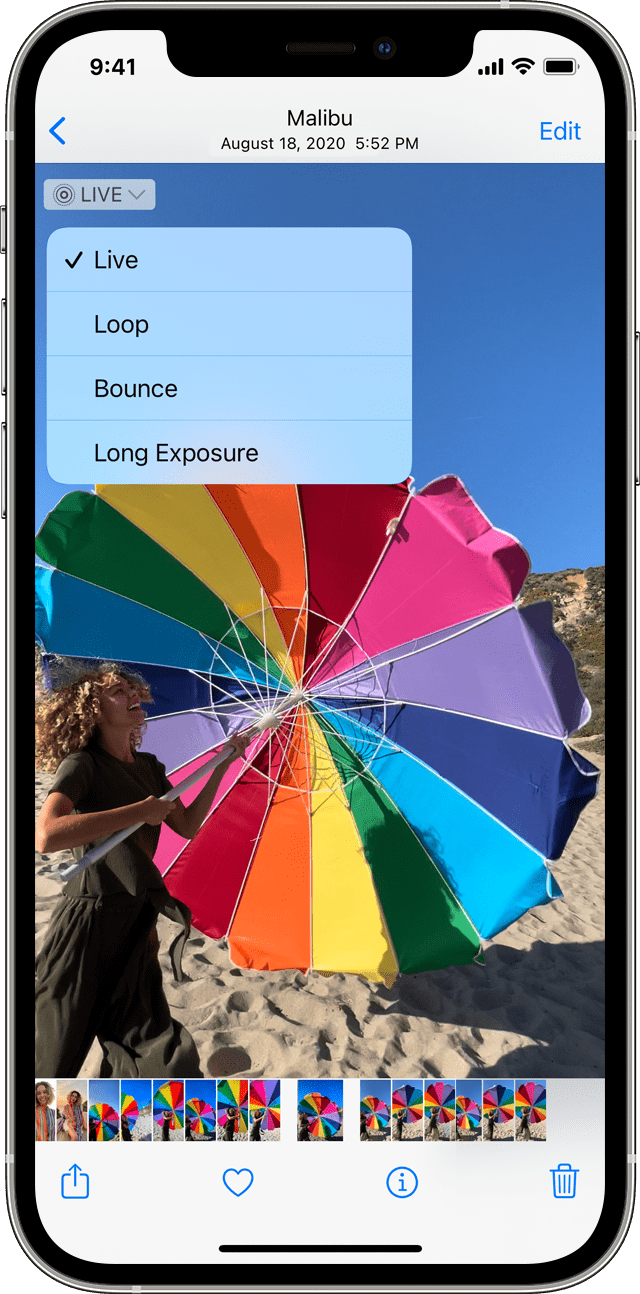
Loop: Turn a Live Photo you love into a video loop. Choose an image yourself, or look in the For You tab to see photos that would make great loops.
Bounce: Make your Live Photo rock back and forth. Watch your Live Photo as it happened, then it instantly plays in reverse.
Long Exposure: Capture the elements of time and movement. Create a beautiful effect that used to be possible only with a DSLR camera. Fireworks become bright streaks across the night sky. A waterfall becomes a magical blur.
How to edit Live Photos
- Open the Photos app and tap the Albums tab.
- Go to Live Photos under Media Types.
- Tap the Live Photo that you want to edit.
- Tap Edit, then make your adjustments.
- Tap Done.
If you edit your Live Photo in a third-party app, you might lose any Live Photo effects that you’ve applied.
How to share your Live Photos
- Open the photo that you want to share, then tap the Share button .
- If you want to share the still photo and not the Live Photo, tap Live in the upper-left corner of the photo.
- Choose how you want to share your photo. Note that if you share via Mail, the Live Photo is sent as a still image.
When you receive a Live Photo on your iPhone, iPad, or iPod touch via Messages, tap the photo to open it, then firmly press and hold to see it come to life.
If you’re using Messages on your Mac, double-click the Live Photo to open it. The Live Photo plays through once. To play it again, click the LIVE button in the bottom-left corner of the photo.
How to turn off Live Photos
From the Camera app, tap the Live Photos button to turn off Live Photos. A slash through the Live Photos button means that the feature is off.
The Camera app turns Live Photos on again automatically. To keep Live Photos off permanently, follow these steps:
- Go to Settings.
- Tap Camera > Preserve Settings.
- Make sure that the switch next to Live Photo is turned on.
Источник
Take a screenshot on your iPhone
Quickly save what’s on your screen.
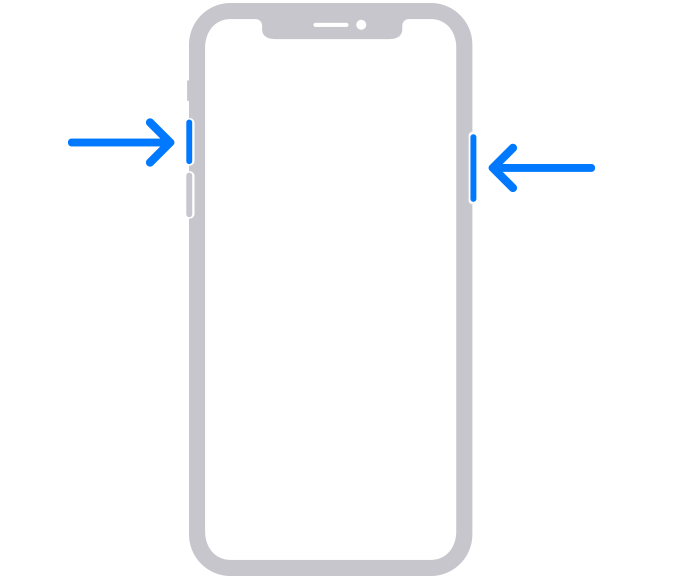
How to take a screenshot on iPhone 13 and other models with Face ID
- Press the side button and the volume up button at the same time.
- Quickly release both buttons.
- After you take a screenshot, a thumbnail temporarily appears in the lower-left corner of your screen. Tap the thumbnail to open it or swipe left to dismiss it.

How to take a screenshot on iPhone models with Touch ID and side button
- Press the side button and the Home button at the same time.
- Quickly release both buttons.
- After you take a screenshot, a thumbnail temporarily appears in the lower-left corner of your screen. Tap the thumbnail to open it or swipe left to dismiss it.
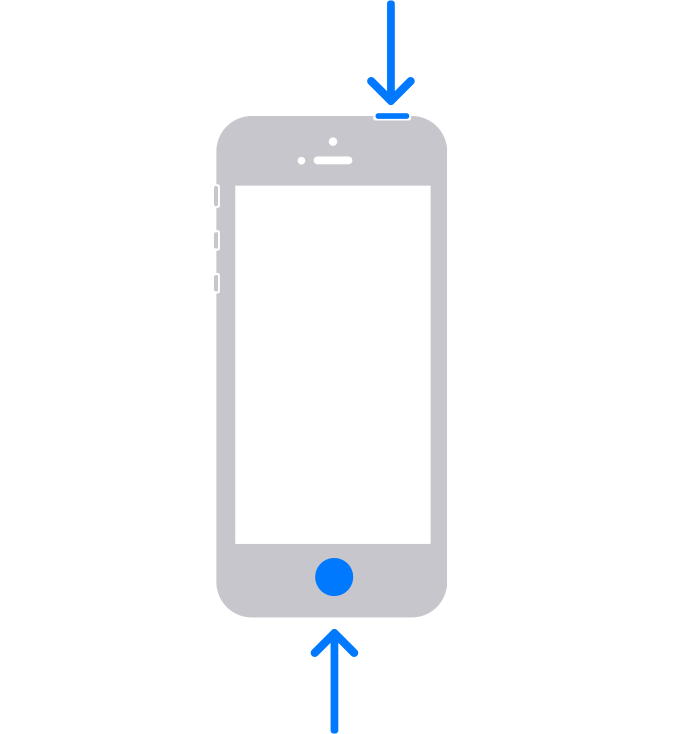
How to take a screenshot on iPhone models with Touch ID and top button
- Press the top button and the Home button at the same time.
- Quickly release both buttons.
- After you take a screenshot, a thumbnail temporarily appears in the lower-left corner of your screen. Tap the thumbnail to open it or swipe left to dismiss it.
Where to find screenshots
Open Photos, then go to Albums > Screenshots.
Источник
How to Take a Picture on Mac Using the Camera

Have you ever wanted to take a picture with your Mac webcam? Maybe you want to post a new profile picture to the internet or send a funny face to a friend or relative. Whatever the intention, it’s easy to snap pictures with a Macs built-in camera, allowing you to take selfies with your Mac. Exciting, right?
Nearly every Mac comes with a webcam built-in to the display, the camera is located near the top and middle of the screen bezel. Obviously if the Mac does not have a camera it won’t be able to take a picture, but every MacBook, MacBook Pro, MacBook Air, and modern iMac contain the bezel screen camera. The quality of the pictures will depend on the quality of the Macs FaceTime camera, newer models tend to have higher resolution cameras.
How to Take Pictures with the Mac Webcam
Ready for taking selfies with your Mac? I bet you are, here we go:
- Open the Photo Booth application, it’s found within the /Applications/ folder on every Mac
When you’re ready to take a picture, click the red camera button to begin a countdown to snap the photo
Take additional pictures as desired
Once you have captured a picture or two (or many if you are a selfie addict), you can save them.
Saving & Sharing Selfies Taken on the Mac
Photo Booth allows you to export pictures through the “File” menu and save any images as a file somewhere else in your file system. If you didn’t export a file you can also extract it manually by digging around for the raw Photo Booth file location.
Another export option is to use the “Share” button in Photo Booth, this allows you to quickly send a photo through AirDrop, Messages, eMail, add it to notes or Photos, or post it to a social media service like Twitter or Facebook.
Photo Booth can also take short video clips, but a better way to record video on the Mac using the camera is to use QuickTime.
The Photo Booth app has several other tricks up its sleeve, you can disable the countdown or screen flash if you want, flip the images, use the app as a mirror (I’ve seen this multiple times), and if you really want to get crazy you can add additional hidden special effects to the app.
By the way, if you disabled your camera or put some tape on the lens, you’ll need to address that before you can indulge in selfie-snapping with your Mac camera, but I’m sure you already knew that.
Have any other fun tips for Photo Booth, taking pictures with your Mac, or other selfie action? Let us know in the comments.
Источник
Take and edit photos on your iPhone, iPad, and iPod touch
Learn how to take and edit photos on your iPhone, iPad, and iPod touch.
Open your Camera app
There are a few ways to open your Camera app.
Home screen
From your Home screen, tap the Camera app.

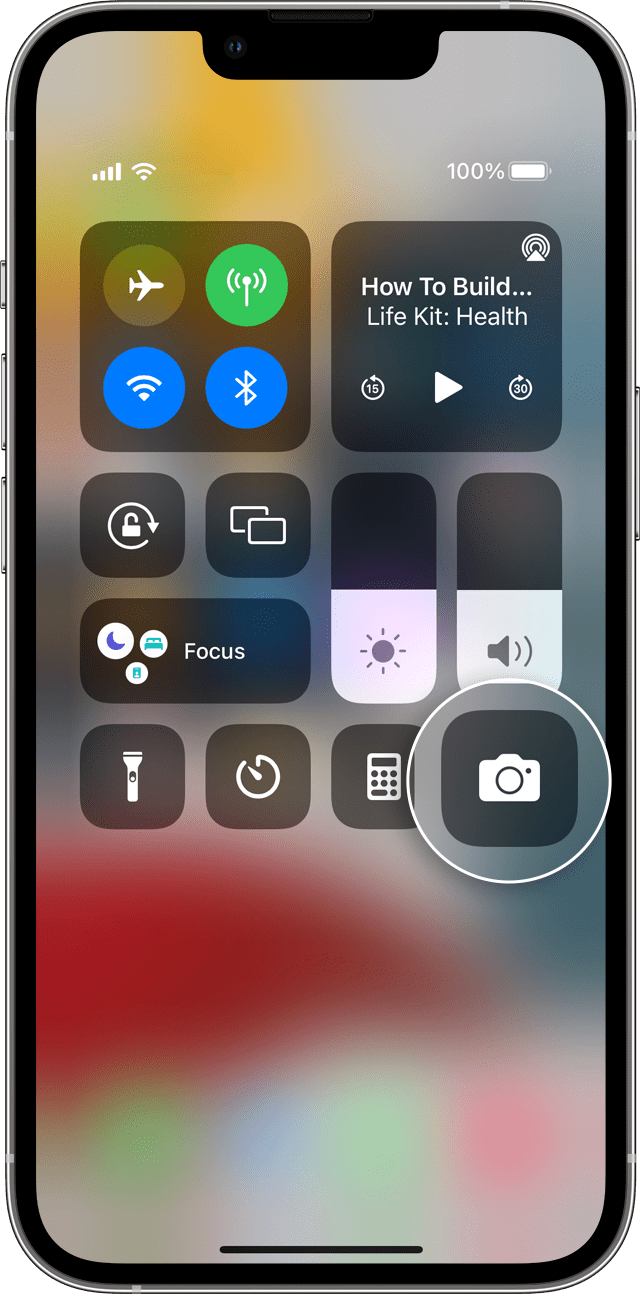
Control Center
Open Control Center, then tap the Camera button .
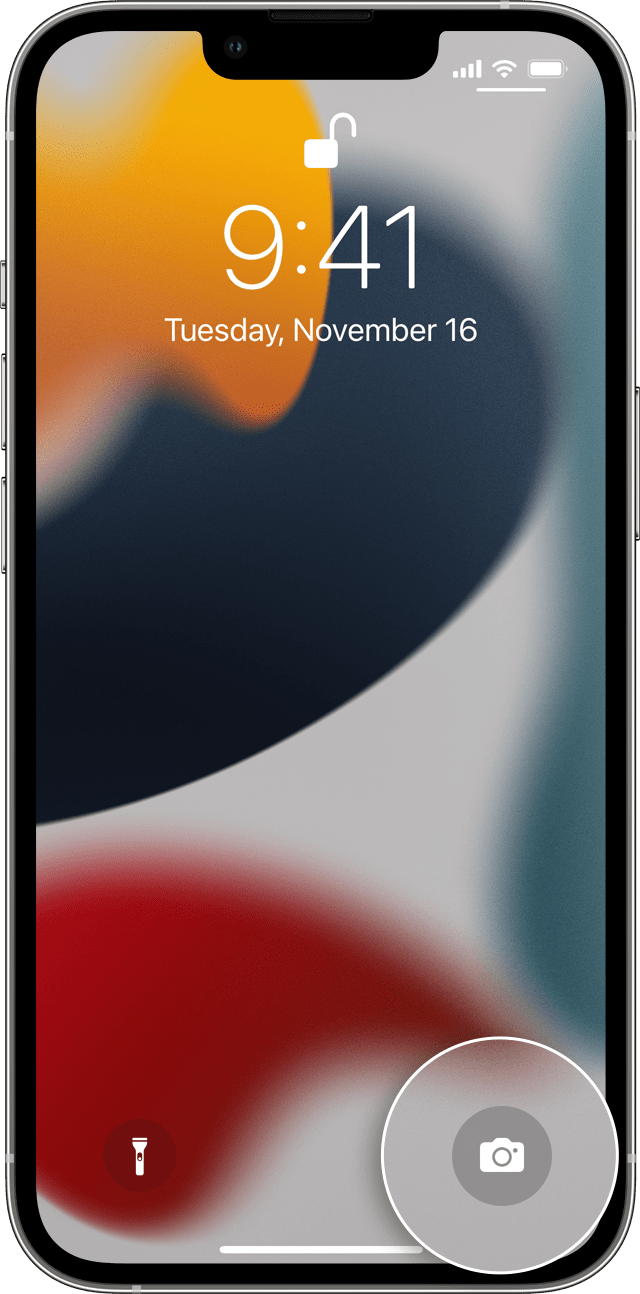
Lock screen
Swipe to the left to access the Camera, or touch and hold the Camera button .
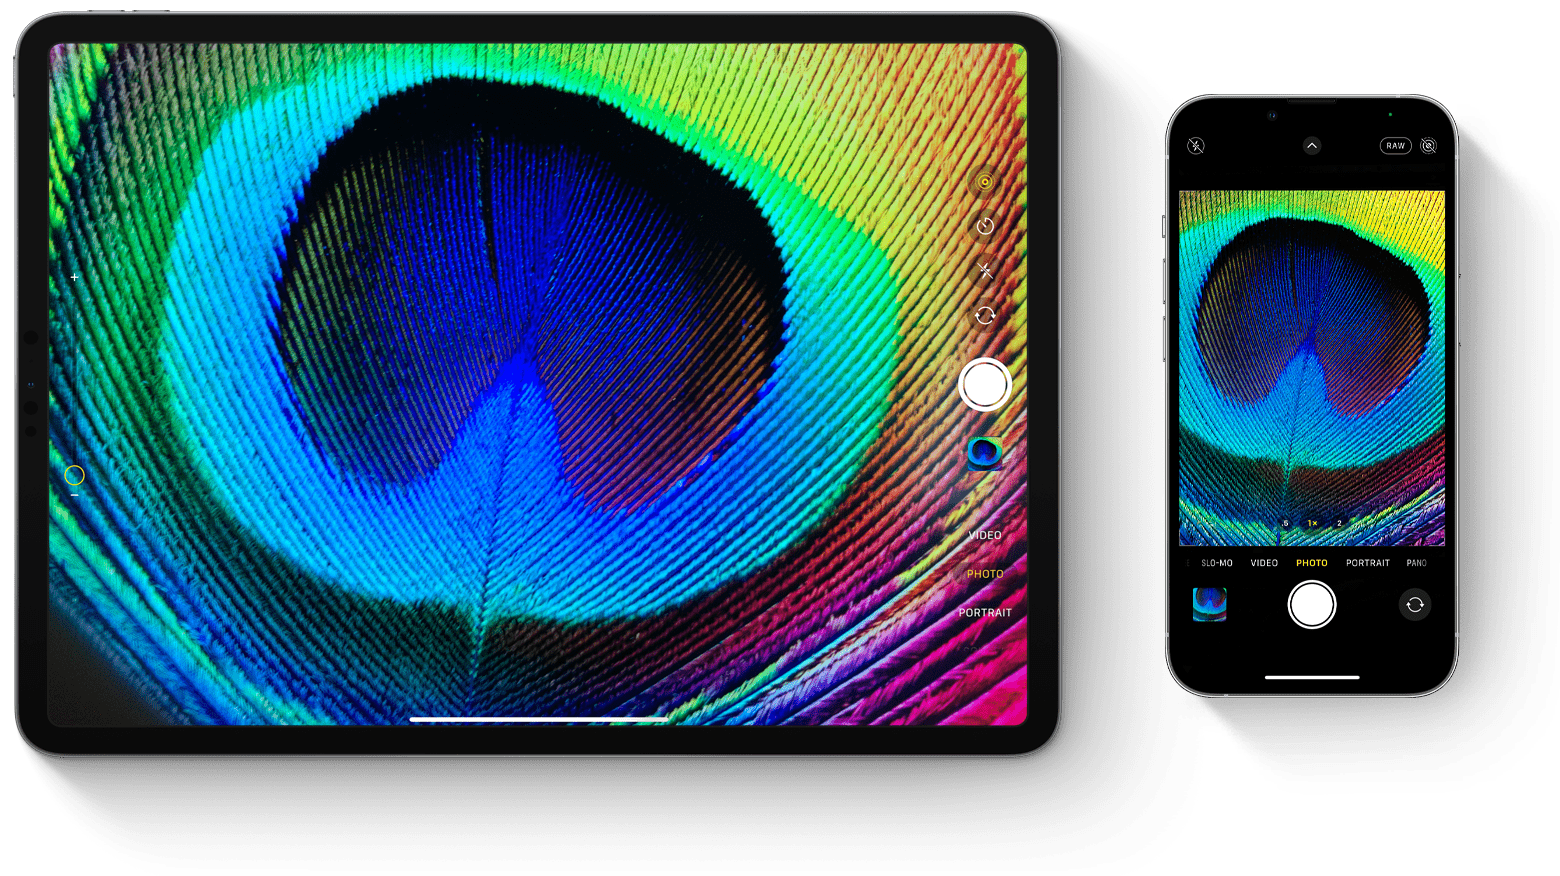
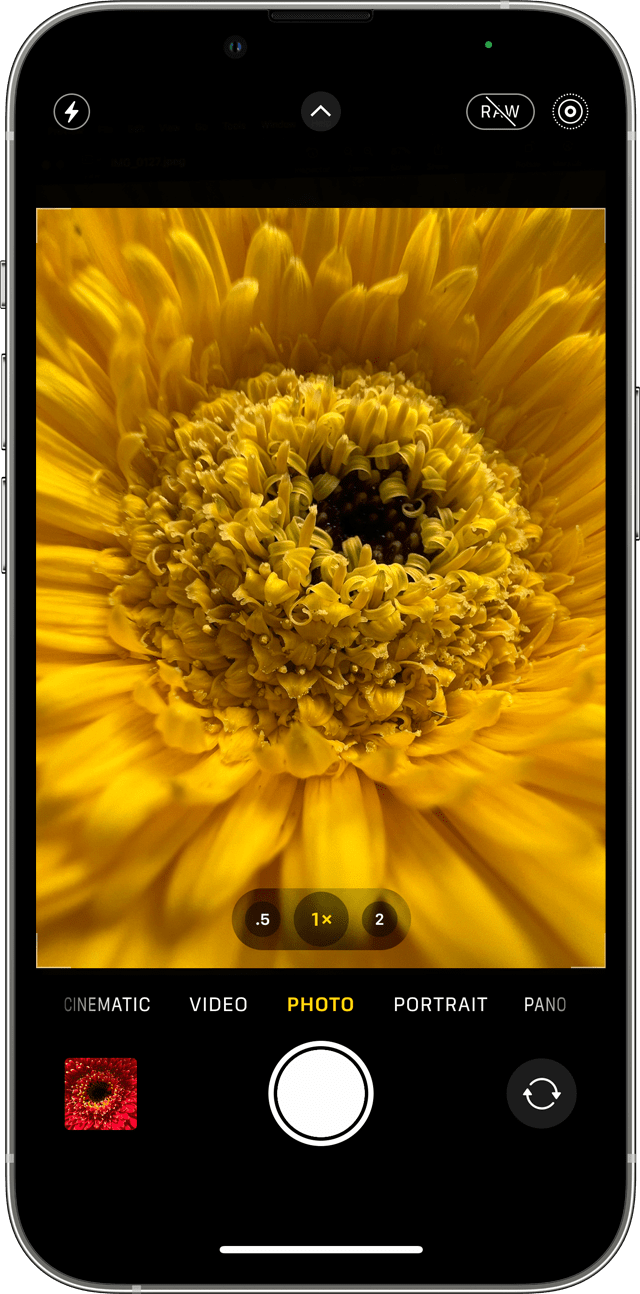
Take a photo or video
Take high-quality photos with the advanced technologies built into your device. Just find your subject, open the Camera app, then tap the shutter button.
Then unleash your creativity with Camera features like Live Photos, Portrait mode, camera filters, and more. You can even capture photos with time-lapse, slo-mo, pano, and more. Learn more about the camera features on your iPhone.
Flash: The LED flash on your device gives your photo extra light when you need it. Tap the Flash button to turn it on or off.
Live Photos: You can capture life as it happens — in movement and sound. Live Photos is on by default. Tap the Live Photos button to turn it off.
Timer: Set your device somewhere sturdy, frame your shot, then tap the timer button . Choose a 3 or 10 second countdown, tap the Shutter button, then step into the frame.
Front-facing camera: To take a selfie with your front-facing camera, tap the front-facing camera button , find a good angle, then tap the shutter button. With iPhone 6s and later, you can use the Home Screen as a flash for your selfies.
Burst: Trying to capture a picture but your subject matter won’t stay still? Try burst mode. Just tap and hold the shutter button. Burst mode takes multiple photos at once so that you have a range of photos to choose from. On iPhone 11 and later, slide the shutter button to the left and hold it to take a burst of photos, then release it to stop.
On your iPhone 7 Plus, iPhone 8 Plus, or iPhone X and later, tap 1x for a higher-quality zoom from farther away. If you want to zoom more than 2x or finely control the image, touch and hold 1x or 2x to get a slider that lets you zoom all the way to 10x. On iPhone 11 and later, iPad Pro 12.9-inch (4th generation), and iPad Pro 11-inch (2nd generation), zoom out to .5x with the Ultra Wide camera.
Edit your photo or video
After you take your photo or video, open it in the Photos app and tap Edit. Then you can adjust the crop, angle, light, add a filter, and more. Choose an adjustment, like Brightness or Saturation, and slide to change the strength and intensity. If you don’t like how your changes look, tap Cancel and revert back to the original.
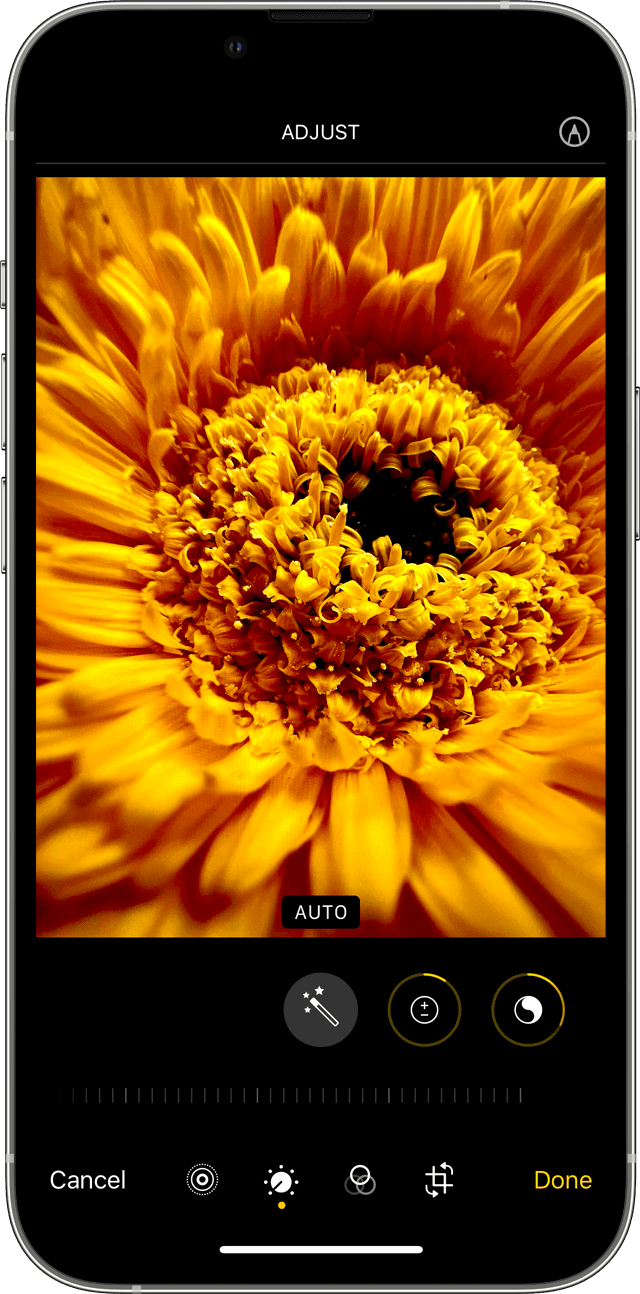
Adjust light and color
Improve the exposure, saturation, highlights, warmth, tint, and more of your photos and videos. Then use the slider to make precise adjustments with each setting.
Apply filters
Tap one of the photo filters to give your photo a different color effect, such as Vivid or Dramatic. Or try classic black and white looks like Mono and Silvertone.
Crop and straighten
You can drag the corners of the grid tool to set your own crop, then move the wheel to tilt or straighten your photo or video. You can also rotate or flip your photo or video, and adjust the vertical and horizontal perspective.
Источник
Take screenshots or screen recordings on Mac
You can take pictures (called screenshots) or recordings of the screen on your Mac using Screenshot or keyboard shortcuts. Screenshot provides a panel of tools that let you easily take screenshots and screen recordings, with options to control what you capture — for example, you can set a timer delay or include the pointer or clicks.
Take pictures or screen recordings using Screenshot
On your Mac, press Shift-Command-5 (or use Launchpad) to open Screenshot and display the tools.

Click a tool to use to select what you want to capture or record (or use the Touch Bar).
For a portion of the screen, drag the frame to reposition it or drag its edges to adjust the size of the area you want to capture or record.
Capture the entire screen

Capture a window

Capture a portion of the screen

Record the entire screen

Record a portion of the screen

Click Options if you want.
The available options vary based on whether you’re taking a screenshot or a screen recording. For example, you can choose to set a timed delay or show the mouse pointer or clicks, and specify where to save the file.
The Show Floating Thumbnail option helps you work more easily with a completed shot or recording — it floats in the bottom-right corner of the screen for a few seconds so you have time to drag it into a document, mark it up or share it before it’s saved to the location you specified.
Start the screenshot or screen recording:
For the entire screen or a portion of it: Click Capture.
For a window: Move the pointer to the window, then click the window.
For recordings: Click Record. To stop recording, click the Stop Recording button  in the menu bar.
When the Show Floating Thumbnail option is set, you can do any of the following while the thumbnail is briefly displayed in the bottom-right corner of the screen:
Swipe right to immediately save the file and make it disappear.
Drag the thumbnail into a document, an email, a note or a Finder window.
Click the thumbnail to open a window where you can mark up the screenshot or trim the recording, or share it.
Depending on where you chose to save the screenshot or recording, an app may open.
Take pictures using keyboard shortcuts
You can use various keyboard shortcuts on your Mac to take pictures of the screen. The files are saved to the desktop.
Tip: To copy a screenshot so you can paste it somewhere — like in an email or to another device — press and hold the Control key while you press the other keys. For example, to copy the whole screen, press Shift-Command-Control-3.
Capture the entire screen
Capture a portion of the screen
Press Shift-Command-4, then move the crosshair pointer to where you want to start the screenshot. Press the mouse or trackpad button, drag over the area you want to capture, then release the mouse or trackpad button.
Capture a window or the menu bar
Press Shift-Command-4, then press the Space bar. Move the camera pointer over the window or the menu bar to highlight it, then click.
Capture a menu and menu items
Open the menu, press Shift-Command-4, then drag the pointer over the menu items you want to capture.
Press Shift-Command 5.
Capture the Touch Bar
You can customise these keyboard shortcuts in the Shortcuts pane of Keyboard preferences. On your Mac, choose Apple menu

> System Preferences, click Keyboard  , then click Shortcuts.
Screenshots are saved as .png files and screen recordings are saved as .mov files. Filenames begin with “Screenshot” or “Screen Recording” and include the date and time.
You may not be able to take pictures of windows in some apps, such as DVD Player.
Источник


