- Take a screenshot on your iPhone
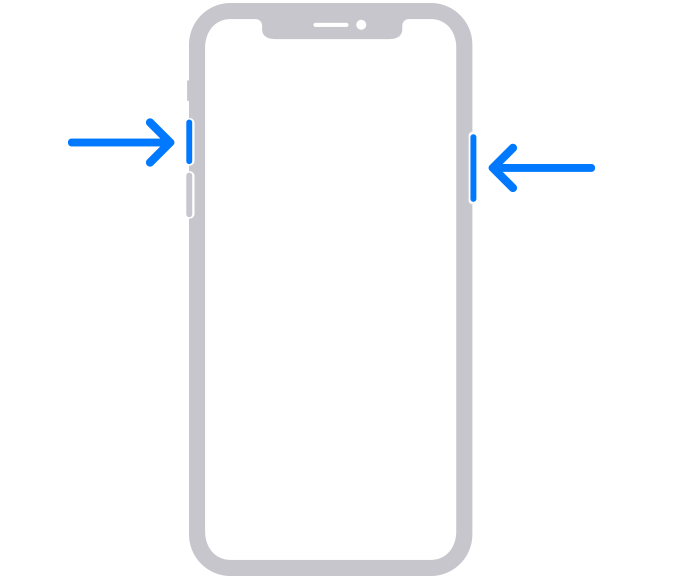
- How to take a screenshot on iPhone 13 and other models with Face ID
- How to take a screenshot on iPhone models with Touch ID and side button
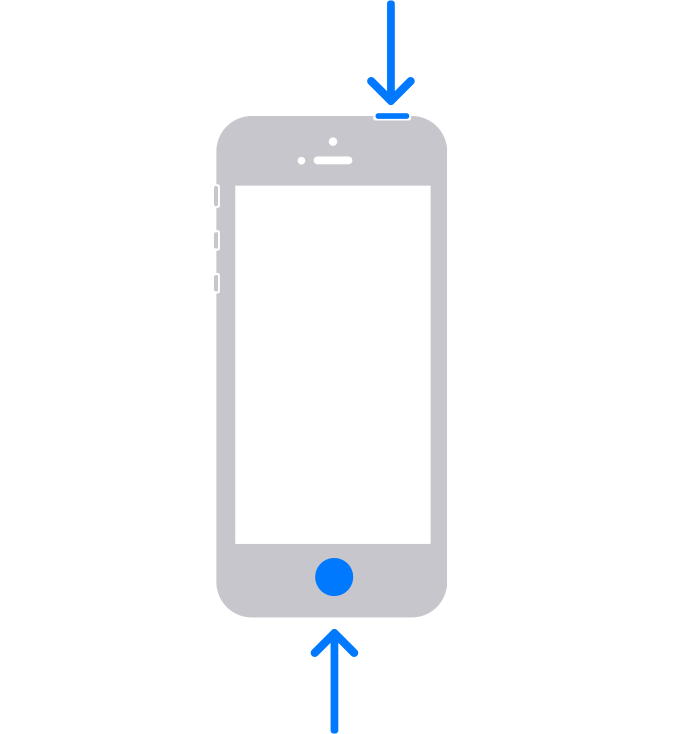
- How to take a screenshot on iPhone models with Touch ID and top button
- Where to find screenshots
- Take and edit photos on your iPhone, iPad, and iPod touch
- Open your Camera app
- Home screen
- Control Center
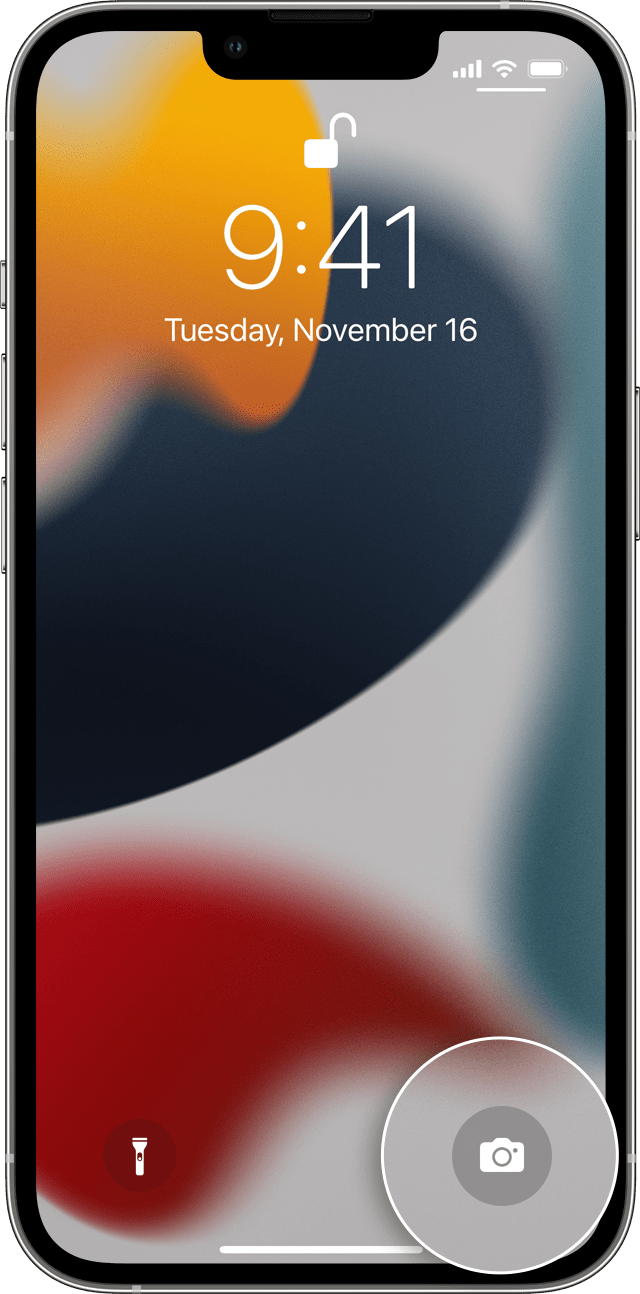
- Lock screen
- Take a photo or video
- Edit your photo or video
- Adjust light and color
- Apply filters
- Crop and straighten
- iPhone vs. Mirrorless: Can You Really Take Pro Photos with Your Phone?
- Share this:
- We’re debunking the myth that professional photos aren’t possible with your smartphone camera. Let’s explore how an iPhone stacks up to a mirrorless camera.
- iPhone vs Mirrorless
- Can You Tell the Difference?
- A Few Tips for Better Photos on Your Smartphone
- 1. Expose the Photo In-Camera
- 2. Reduce the Sharpness in Post
- 3. Play to Your Smartphone’s Strengths
- Ten tips for taking great photos with your iPhone
- 1. Use the iPhone camera shortcut
- 2. Experiment with third-party apps
- 3. Target your shooting mode around your end result
- 4. Follow the rule of thirds
- 5. Turn off your flash
- 6. Use Burst mode for action shots
- 7. Turn on HDR Auto
- 8. Hold down a spot on your viewfinder to lock focus
- 9. Slide the exposure meter to brighten (or darken) images
- 10. Snap photos with the volume button
- What are your favorite iPhone photography tips?
- WhatsApp testing cryptocurrency payments through Novi
- Apple VR headset to feature 3D sensing cameras for hand tracking, says Kuo
- Apple TV+ has renewed sci-fi show ‘Invasion’ for a second season
- Dive deep with these waterproof iPhone cases for underwater photography
Take a screenshot on your iPhone
Quickly save what’s on your screen.
How to take a screenshot on iPhone 13 and other models with Face ID
- Press the side button and the volume up button at the same time.

- Quickly release both buttons.
- After you take a screenshot, a thumbnail temporarily appears in the lower-left corner of your screen. Tap the thumbnail to open it or swipe left to dismiss it.

How to take a screenshot on iPhone models with Touch ID and side button
- Press the side button and the Home button at the same time.
- Quickly release both buttons.
- After you take a screenshot, a thumbnail temporarily appears in the lower-left corner of your screen. Tap the thumbnail to open it or swipe left to dismiss it.
How to take a screenshot on iPhone models with Touch ID and top button
- Press the top button and the Home button at the same time.
- Quickly release both buttons.
- After you take a screenshot, a thumbnail temporarily appears in the lower-left corner of your screen. Tap the thumbnail to open it or swipe left to dismiss it.
Where to find screenshots
Open Photos, then go to Albums > Screenshots.
Источник
Take and edit photos on your iPhone, iPad, and iPod touch
Learn how to take and edit photos on your iPhone, iPad, and iPod touch.
Open your Camera app
There are a few ways to open your Camera app.
Home screen
From your Home screen, tap the Camera app.

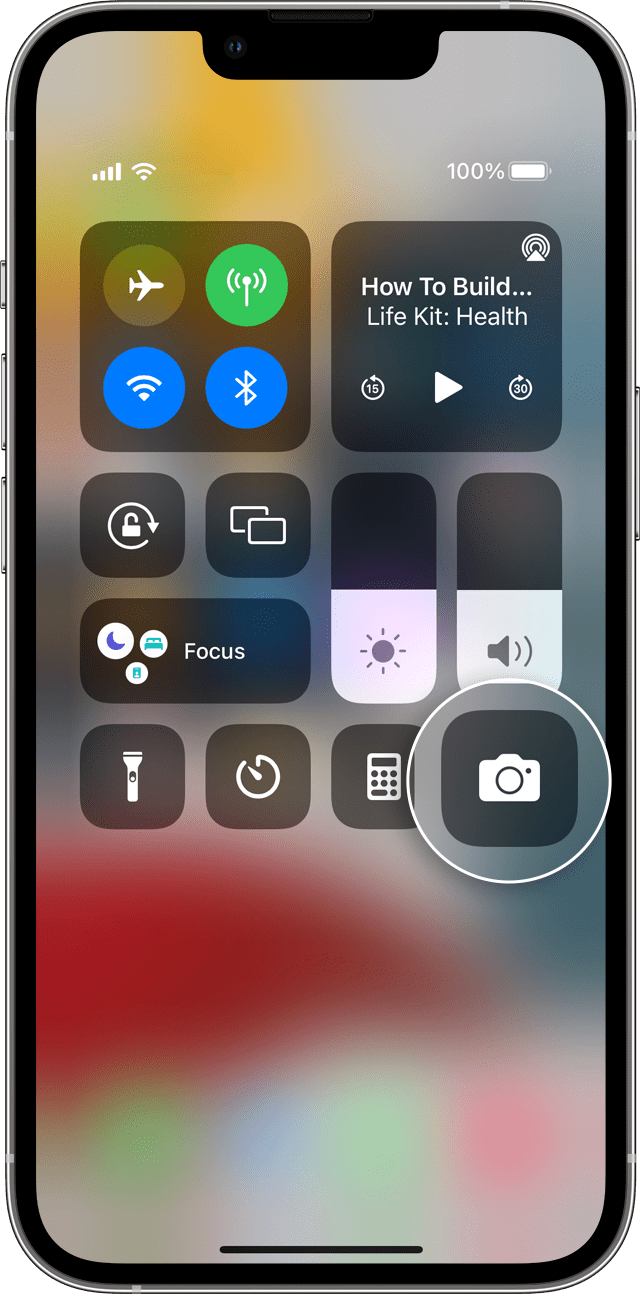
Control Center
Open Control Center, then tap the Camera button .
Lock screen
Swipe to the left to access the Camera, or touch and hold the Camera button .
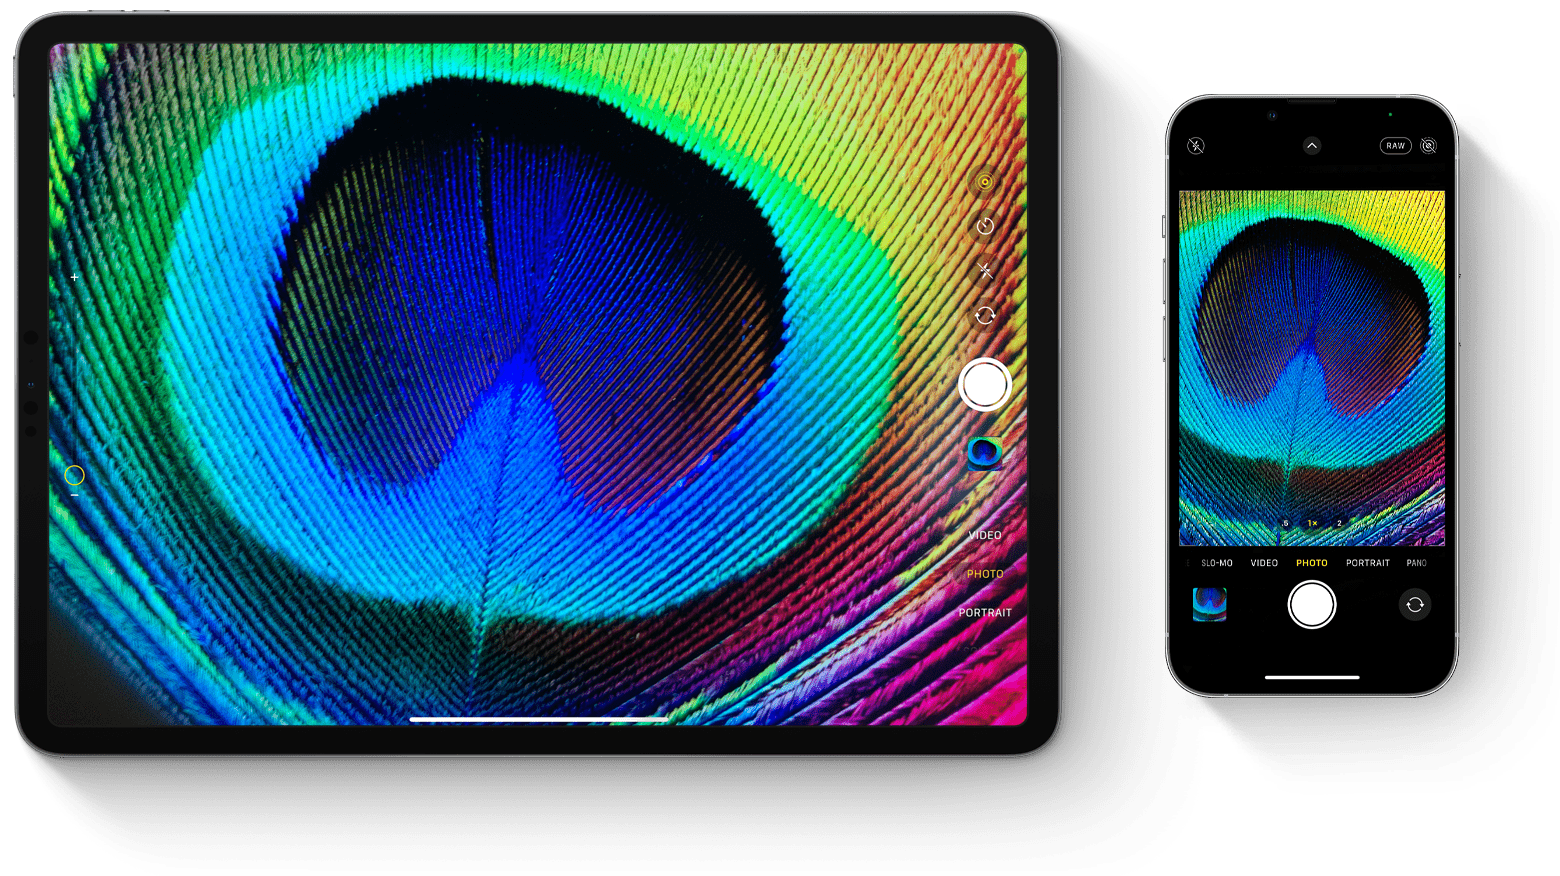
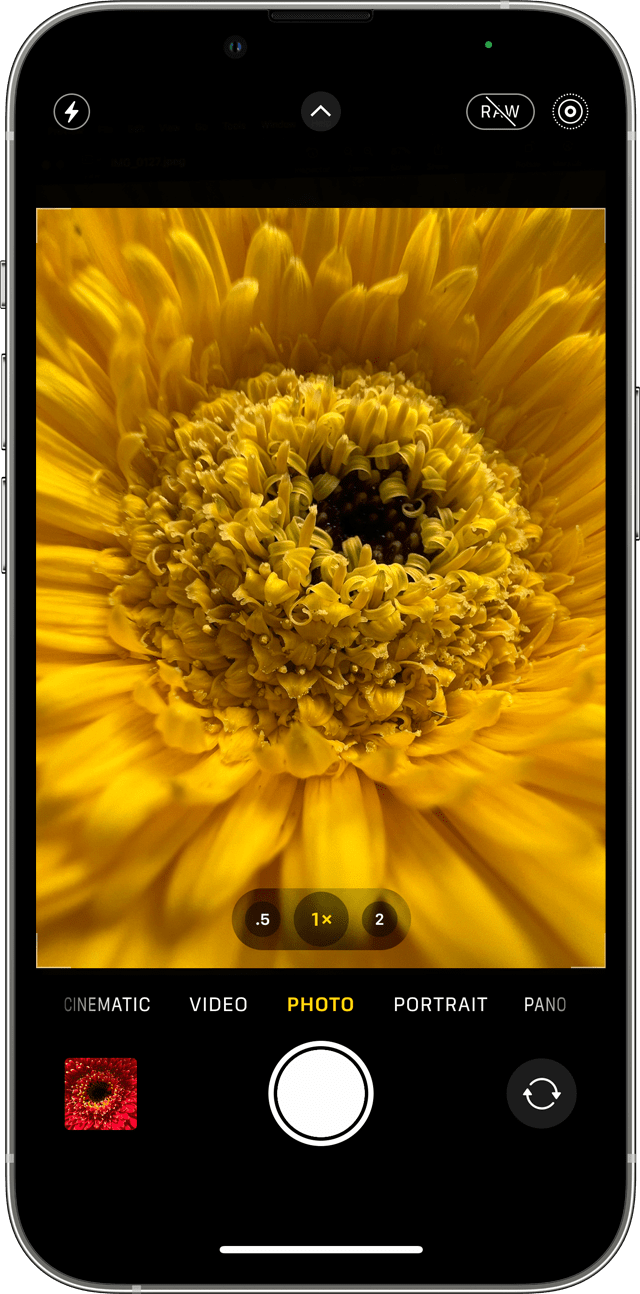
Take a photo or video
Take high-quality photos with the advanced technologies built into your device. Just find your subject, open the Camera app, then tap the shutter button.
Then unleash your creativity with Camera features like Live Photos, Portrait mode, camera filters, and more. You can even capture photos with time-lapse, slo-mo, pano, and more. Learn more about the camera features on your iPhone.
Flash: The LED flash on your device gives your photo extra light when you need it. Tap the Flash button to turn it on or off.
Live Photos: You can capture life as it happens — in movement and sound. Live Photos is on by default. Tap the Live Photos button to turn it off.
Timer: Set your device somewhere sturdy, frame your shot, then tap the timer button . Choose a 3 or 10 second countdown, tap the Shutter button, then step into the frame.
Front-facing camera: To take a selfie with your front-facing camera, tap the front-facing camera button , find a good angle, then tap the shutter button. With iPhone 6s and later, you can use the Home Screen as a flash for your selfies.
Burst: Trying to capture a picture but your subject matter won’t stay still? Try burst mode. Just tap and hold the shutter button. Burst mode takes multiple photos at once so that you have a range of photos to choose from. On iPhone 11 and later, slide the shutter button to the left and hold it to take a burst of photos, then release it to stop.
On your iPhone 7 Plus, iPhone 8 Plus, or iPhone X and later, tap 1x for a higher-quality zoom from farther away. If you want to zoom more than 2x or finely control the image, touch and hold 1x or 2x to get a slider that lets you zoom all the way to 10x. On iPhone 11 and later, iPad Pro 12.9-inch (4th generation), and iPad Pro 11-inch (2nd generation), zoom out to .5x with the Ultra Wide camera.
Edit your photo or video
After you take your photo or video, open it in the Photos app and tap Edit. Then you can adjust the crop, angle, light, add a filter, and more. Choose an adjustment, like Brightness or Saturation, and slide to change the strength and intensity. If you don’t like how your changes look, tap Cancel and revert back to the original.
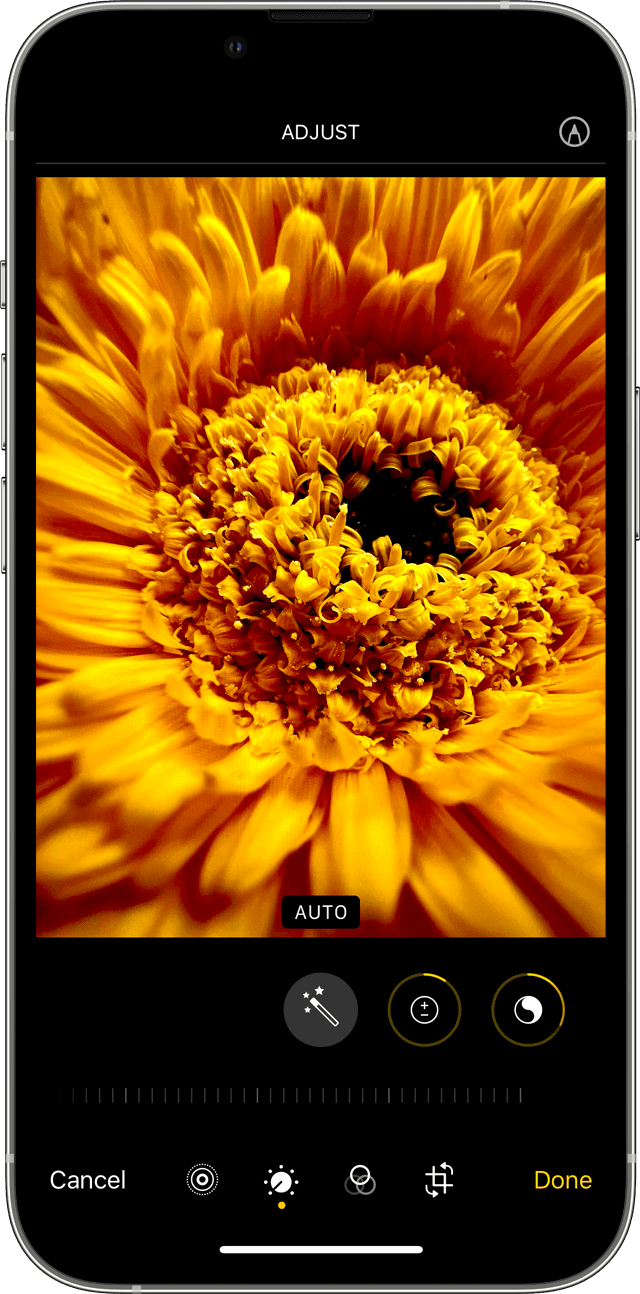
Adjust light and color
Improve the exposure, saturation, highlights, warmth, tint, and more of your photos and videos. Then use the slider to make precise adjustments with each setting.
Apply filters
Tap one of the photo filters to give your photo a different color effect, such as Vivid or Dramatic. Or try classic black and white looks like Mono and Silvertone.
Crop and straighten
You can drag the corners of the grid tool to set your own crop, then move the wheel to tilt or straighten your photo or video. You can also rotate or flip your photo or video, and adjust the vertical and horizontal perspective.
Источник
iPhone vs. Mirrorless: Can You Really Take Pro Photos with Your Phone?
Share this:
We’re debunking the myth that professional photos aren’t possible with your smartphone camera. Let’s explore how an iPhone stacks up to a mirrorless camera.
One of the worst feelings to experience as a photographer is stumbling upon an amazing photo opportunity, but you don’t have your camera on you. Professional photographers and ambitious photo hobbyists alike might squander these moments because they forget that they (almost) always have a camera on hand — their phones!
Many of us wrongly assume that photos taken on a professional grade camera automatically look better than ones snapped on your iPhone. But, with the rapid advancements in smartphone camera technology, the results can be surprising. To see how an iPhone stacks up to a mirrorless camera, I compared the two in some real photo shoots.
iPhone vs Mirrorless
When looking at the two cameras side-by-side, there are a few specifications to consider. First, let’s look at the sensors of smartphones vs mirrorless cameras. I used an iPhone 7 for this shoot which has a 12 megapixel sensor, compared to my EOS R that boasts an impressive 30.3 megapixel CMOS sensor. Objectively speaking, the EOS R sensor can collect more than double the amount of information. For lenses I was using around the same focal length. On the iPhone 7 there is a 28mm wide lens with a f/1.8 aperture, and on the EOS R I was using a Canon L series 16-35mm with a f/2.8 aperture.
Between the image sensors and the lenses used, you’re obviously going to get a sharper, bigger file from the mirrorless camera. But, these factors don’t mean the image from one source will automatically be better than the other.
This isn’t the only mirrorless camera we’ve done! Check out our film vs digital video to see how mirrorless compares to old school photography.
Can You Tell the Difference?
I want to conduct a little experiment. Below, I’ve attached two similar photos side by side, one taken on my iPhone 7, and the other on my Canon EOSR. Before you scroll down to the next section of this article, try to guess which one is which. I’ll wait!


Locked your guesses in?
All of the A photos were taken on my iPhone, and Bs on my mirrorless camera. There’s no way of me knowing if you got them right or not, but I did conduct this experiment with my brother and he guessed 1/3 correctly. It’s important to note that he is by no means a photographer, and his rule of thumb is the sharper the photo, the higher the quality.
I, as an *artiste* and photographer, can appreciate the beauty created by Canon glass (or any lens for that matter), with the shallow depth of field and soft color profile. However, the phenomenon of a sharp image perceived as higher quality seems to be quite a common opinion. That means it’s relatively easy to take a “professional-looking” photo using basic tools, like an iPhone.
For photographers, it’s easy to get carried away by the professionally shot photos we see online — the ones we’re constantly comparing our own work to. Though expensive gear can add a certain quality to your shots, sometimes it’s necessary to take a step back and use the tools that you’ve got, instead of letting gear get in the way of capturing beautiful photos. With practice and dedication to the tools you have, you might even find that you don’t really need that gear upgrade after all.
A Few Tips for Better Photos on Your Smartphone
1. Expose the Photo In-Camera
One of the advantages of shooting photos on a DSLR or mirrorless camera is the ability to shoot RAW photos. When you shoot in RAW, the camera captures a flat profile with a lot of information about the image, so that when you go to edit it in post, you can manipulate the photo with a lot more flexibility. In comparison, your smartphone takes photos in JPGs, which doesn’t capture nearly as much information. When you’re taking photos on your smartphone, it’s important to try and expose your images as best as possible in camera so that you need the least amount of edits afterwards, to keep it looking natural.
One trick for iPhone users is to click on the screen to focus on an object. There should be a little slider on the right side of the focus square that pops up. If you click and drag on that slider up and down, you’ll adjust the exposure of the image. This way, if you adjust your exposure before taking the photo, you’ll have a much better base image to work with!
2. Reduce the Sharpness in Post
I’m not a huge fan of the overly sharpened look, so I like to go into some editing software and reduce that down so it’s not as pronounced when I finalize the photo and post it on Instagram. Obviously, this is a matter of taste. You may love how detailed and sharp they appear, so keep it if you want. However, if you’re trying to not make it as apparent that your photo was taken on a phone, reducing the sharpness is an easy fix.
3. Play to Your Smartphone’s Strengths
Knowing the advantages and disadvantages of your smartphone’s photos can help you play to its strengths and avoid highlighting negatives as much as possible.
- For example, most smartphone cameras create this digital blur effect when you focus on an object in the foreground to recreate depth of field, similar to a camera lens. Using this technique, you can capture really beautiful images that emulate the real thing!
 A simple image with a professional touch.
- Symmetry is literally your best friend. There’s something about a well composed photo that, no matter what it’s shot on, looks professional. On most smartphone camera apps, you have the option to use the built-in rule of thirds grid to help you compose your photos properly. Use it to your advantage!
This may sound a little harsh but, aside from the quality of your smartphone, it’s not the camera’s fault if you’re taking mediocre photos.
I’m a firm believer in outgrowing your gear. Once you get to the point where you feel like there’s no possible way you can take the photos that you want to take with your smartphone anymore, and you’re serious about photography, it may be time to upgrade. For the most part, it’s so awesome to have a compact little camera on us at all times. Go out and use it to your advantage!
Learn more about smartphone photography and videography here:
Источник
Ten tips for taking great photos with your iPhone

The iPhone is a fantastic device for snapping pictures: It has excellent hardware, smart software, and it’s easy enough for your grandmother to use. It has limitations, as any camera does, but you can work around most of them by being smart about your snapping. Here are ten of my favorite tips to help you along the way.
1. Use the iPhone camera shortcut
There are lots of great third-party camera apps out there, but if you want a quick shot of your tiny cousins being cute or a rare appearance of the family cat, you need speed on your side — speed that you may not get if you have to unlock your device, find your app, tap on the icon, and wait for it to load.
Swipe up on the iPhone camera shortcut from the Lock screen, however, and you can quickly take that picture with no significant wait time. You can also do something similar while in an app or on your Home screen by swiping up from the bottom of the screen to launch Control Center, then tapping on the Camera button.
2. Experiment with third-party apps
If you’re not in a rush to snap a quick shot, I suggest downloading some of the third-party manual camera apps available. Apple’s opened a bunch of controls up to developers, including shutter speed, ISO, white balance, and exposure, which means that you can often snap a photo with much more clarity than you would be able to from the default camera application.

Bonus tip: Though you can’t assign the camera shortcut buttons to third-party apps, you can put those apps in your Dock, so that they’re easily accessible from any part of your Home screen.
3. Target your shooting mode around your end result
Apple’s default camera app offers a variety of different modes for taking pictures, including panorama, square, and photo. It may seem like common-sense instruction, but I find that it really helps to shoot in the mode you plan to publish for — for instance, when I’m taking pictures I want to post to Instagram, I shoot in square mode rather than shooting in photo mode and cropping the image afterward. It helps you better frame your picture, rather than trying to invent new framing after-the-fact.
4. Follow the rule of thirds
Your iPhone has a grid option available, which can aid you in lining up photographs so that they follow the rule of thirds. You can turn this option on by visiting Settings > Photos & Camera and enabling the Grid switch.
I prefer to keep it on at all times, so that it’s there as an aid and a reminder, but you can switch it off at any time by returning to the Photos & Camera preference screen.
5. Turn off your flash
Recent generations of the iPhone flash are much improved upon their predecessors, but at the end of the day, the flash is still just an LED light: It’s just not that powerful, and even with the TrueTone technology it can occasionally emit a strange hue onto your photographs.
Instead, try shooting in natural lighting sources, or if you’re shooting at night, use the Camera app’s exposure slider to boost light in the photo. If you don’t mind carrying around a little bit of extra gear, I also recommend Photojojo’s Pocket Spotlight, which emits considerably more light than your iPhone’s tiny flash.
6. Use Burst mode for action shots
Chasing around a bunch of kids? Going on a bumpy ride? Attempting sports photography? Whatever the case, burst mode (available for the iPhone 5s and up) might be just the option you’re looking for to capture the best images. Apple included burst mode originally for snapping clear pictures of moving subjects, but I find it works well when your camera is moving, too — by snapping images in quick succession, you’re more likely to get a clear shot and you have more options to choose from.
To shoot in Burst mode, just tap and hold down the shutter button (or volume up button) when you want to begin. While holding down the shutter button, you’ll see a counter appear at the bottom of the screen, letting you know how many shots you’ve snapped. To stop shooting, just lift up your finger and the burst will be saved to your Camera Roll.
7. Turn on HDR Auto
Your iPhone comes with a software feature called High Dynamic Range, or HDR: This lets you snap photos that may have high contrast light sources (say, a bright sunset against a darkening mountain) and still capture a nice image without distorting either the light or the dark area of the picture. Your iPhone does this by snapping several pictures in quick succession at different exposures, then merging them together to create a unified image.
You can manually turn HDR on or off from the Camera app, but I prefer iOS 8’s HDR Auto (available for the iPhone 5s and up) — it uses information from your iPhone’s sensor as you point your device at a subject to determine when an image might need HDR correction, and only then does it turn on HDR mode. (You’ll know HDR is enabled by the little yellow «HDR» box that appears at the bottom of the screen.) This can save a little bit of extra storage space on your device, and prevents you from shooting HDR unnecessarily.
8. Hold down a spot on your viewfinder to lock focus
If you’re trying to shoot macro photography or want to prevent your iPhone’s camera from attempting to grab a different subject in the frame, it can be incredibly useful to lock your focus point on your current subject.
You can do this by tapping and holding on the subject in question until you see the yellow AE/AF Lock alert. This means that the automatic exposure metering and automatic focus metering have been locked on your subject; to remove the lock, just tap anywhere else on the frame.
9. Slide the exposure meter to brighten (or darken) images
If an image is too blown out or underexposed for your liking, you can fix it before snapping the picture by adjusting the yellow exposure slider next to the focus square.
Just tap once on the focus square and exposure slider, then use the sun icon to increase your exposure by sliding upward, or decrease exposure by sliding downward.
10. Snap photos with the volume button
Because the iPhone is so thin, tapping the digital shutter button can cause camera shake and blur the photo you’re trying to take. Instead, you can use the volume up button when in the Camera app to snap a photo — and avoid camera shake entirely.
What are your favorite iPhone photography tips?
If you have suggestions, questions, or thoughts on iPhone photography, I want to hear them! Let ’em loose in the comments.
**Updated September 2020: Updated for iOS 14. Serenity Caldwell contributed to an earlier version of this article.
![]()
WhatsApp testing cryptocurrency payments through Novi
WhatsApp is now testing cryptocurrency payments through Novi, which will users send and receive money through their messages.
![]()
Apple VR headset to feature 3D sensing cameras for hand tracking, says Kuo
A new report says Apple’s rumored AR/VR headset will have 3D sensors that can track hand movements.
![]()
Apple TV+ has renewed sci-fi show ‘Invasion’ for a second season
Apple TV+ has announced that a second season of hit sci-fi show Invasion has been signed for a second season days before the first season comes to a close.
![]()
Dive deep with these waterproof iPhone cases for underwater photography
How do you take amazing underwater photographs with your iPhone? With an amazing waterproof case, for starters!
Источник


