- Test on an Android device or emulator
- Run on a real Android device
- Enable your device for development
- Run your app on the device
- Run your app on a virtual Android device using an emulator
- Enable virtualization support
- Emulator for native development with Android Studio
- Emulator for cross-platform development with Visual Studio
- Install Android emulator with Visual Studio
- Tek Eye
- Why Use Android Virtual Devices?
- Use AVDs to Test Apps on Different Hardware Profiles
- Configuring an AVD
- Hardware Profile Settings
- Notes on AVD Settings
- Note on HAXM
- Launching AVDs
- See Also
- Do you have a question or comment about this article?
Test on an Android device or emulator
There are several ways to test and debug your Android application using a real device or emulator on your Windows machine. We have outlined a few recommendations in this guide.
Run on a real Android device
To run your app on a real Android device, you will first need to enable your Android device for development. Developer options on Android have been hidden by default since version 4.2 and enabling them can vary based on the Android version.
Enable your device for development
For a device running a recent version of Android 9.0+:
- Connect your device to your Windows development machine with a USB cable. You may receive a notification to install a USB driver.
- Open the Settings screen on your Android device.
- Select About phone.
- Scroll to the bottom and tap Build number seven times, until You are now a developer! is visible.
- Return to the previous screen, select System.
- Select Advanced, scroll to the bottom, and tap Developer options.
- In the Developer options window, scroll down to find and enable USB debugging.
For a device running an older version of Android, see Set Up Device for Development.
Run your app on the device
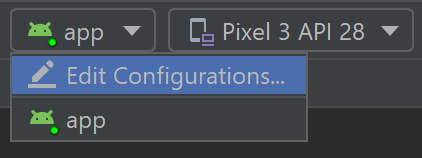
In the Android Studio toolbar, select your app from the run configurations drop-down menu.
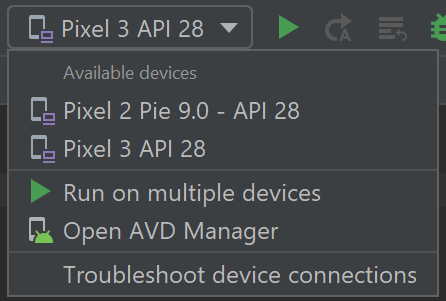
From the target device drop-down menu, select the device that you want to run your app on.
Select Run в–·. This will launch the app on your connected device.
Run your app on a virtual Android device using an emulator
The first thing to know about running an Android emulator on your Windows machine is that regardless of your IDE (Android Studio, Visual Studio, etc), emulator performance is vastly improved by enabling virtualization support.
Enable virtualization support
Before creating a virtual device with the Android emulator, it is recommended that you enable virtualization by turning on the Hyper-V and Windows Hypervisor Platform (WHPX) features. This will allow your computer’s processor to significantly improve the execution speed of the emulator.
To run Hyper-V and Windows Hypervisor Platform, your computer must:
- Have 4GB of memory available
- Have a 64-bit Intel processor or AMD Ryzen CPU with Second Level Address Translation (SLAT)
- Be running Windows 10 build 1803+ (Check your build #)
- Have updated graphics drivers (Device Manager > Display adapters > Update driver)
If your machine doesn’t fit this criteria, you may be able to run Intel HAXM or AMD Hypervisor. For more info, see the article: Hardware acceleration for emulator performance or the Android Studio Emulator documentation.
Verify that your computer hardware and software is compatible with Hyper-V by opening a command prompt and entering the command: systeminfo

In the Windows search box (lower left), enter «windows features». Select Turn Windows features on or off from the search results.
Once the Windows Features list appears, scroll to find Hyper-V (includes both Management Tools and Platform) and Windows Hypervisor Platform, ensure that the box is checked to enable both, then select OK.
Restart your computer when prompted.
Emulator for native development with Android Studio
When building and testing a native Android app, we recommend using Android Studio. Once your app is ready for testing, you can build and run your app by:
In the Android Studio toolbar, select your app from the run configurations drop-down menu.
From the target device drop-down menu, select the device that you want to run your app on.
Select Run в–·. This will launch the Android Emulator.
Once your app is installed on the emulator device, you can use Apply Changes to deploy certain code and resource changes without building a new APK. See the Android developer guide for more information.
Emulator for cross-platform development with Visual Studio
There are many Android emulator options available for Windows PCs. We recommend using the Google Android emulator, as it offers access to the latest Android OS images and Google Play services.
Install Android emulator with Visual Studio
If you don’t already have it installed, download Visual Studio 2019. Use the Visual Studio Installer to Modify your workloads and ensure that you have the Mobile development with .NET workload.
Create a new project. Once you’ve set up the Android Emulator, you can use the Android Device Manager to create, duplicate, customize, and launch a variety of Android virtual devices. Launch the Android Device Manager from the Tools menu with: Tools > Android > Android Device Manager.
Once the Android Device Manager opens, select + New to create a new device.
You will need to give the device a name, choose the base device type from a drop-down menu, choose a processor, and OS version, along with several other variables for the virtual device. For more information, Android Device Manager Main Screen.
In the Visual Studio toolbar, choose between Debug (attaches to the application process running inside the emulator after your app starts) or Release mode (disables the debugger). Then choose a virtual device from the device drop-down menu and select the Play button в–· to run your application in the emulator.
Источник
Tek Eye
What is an Android Virtual Device (AVD)? An AVD is an emulation of a real Android machine on a PC. It enables testing of Android applications (Apps) on a code development computer.
Why Use Android Virtual Devices?
Android has been around for a few years with devices manufactured to cover various market segments, from mobile and tablet through to watches and TV. There are low cost devices and high specification, high value devices and a wide range of hardware options. For all these reasons there is a large range of Android devices running various operating system (OS) versions. A successful App will run on many of these devices. However, an App developer may not physically own a good range of devices. Testing is done on a small selection of real devices supported by AVDs.
Use AVDs to Test Apps on Different Hardware Profiles
The Android Software Development Kit (SDK) comes with the device emulation tool. Allowing different combinations of AVD hardware and OS versions to be configured. Testing on different AVD combinations reduces issues related to hardware differences in real devices, as used by Android Play customers. Boosting confidence that the App will run reliably when released.
Other reasons for using AVDs for testing:
- Multiple AVD configurations to test an App at different screen sizes.
- Different (emulated) hardware configurations can be used, for example a device with a keyboard or without.
- A compiled App is automatically installed and started when the Run button is pressed in Android Studio.
- Testing on AVDs reduces the amount of physical device testing.
- AVDs can be used alongside a physical device.
- You don’t need to handicap you physical device to induce error conditions, e.g. testing on a device with no SD card, just set up an AVD with no SD card.
- An AVD can simulate network events without the costs involved in using a physical device, e.g. simulate phone calls or send an SMS between two AVDs.
- Simulate GPS data from an AVD from different physical locations without moving from your desk.
- When App users report bugs you can try and mimic their hardware configurations using AVDs.
Note: Real Android devices plugged into development machines usually provide better performance for testing Apps than AVDs.
Configuring an AVD
Set up an AVD for App testing using the AVD Manager program. In Android Studio to run AVD Manager use the toolbar icon or select Android in the Tools menu. (There is a version of AVD Manager.exe that can be run outside of Studio, in the Android SDK install directory. To locate it in Windows type AVD at the Start screen to find it.)
To create an AVD select the Create Virtual Device button. The Virtual Device Configuration wizard loads.
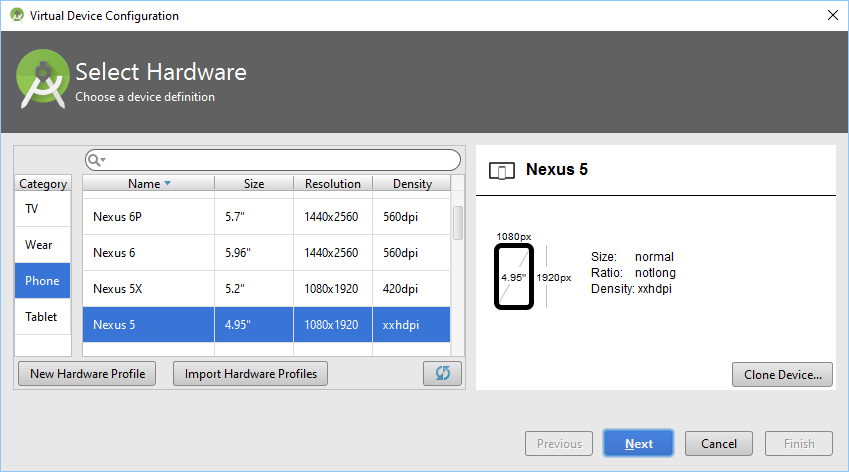
Choose a common predefined device or generate a new device profile for testing specific hardware configurations. Use the remaining wizard screens to configure the AVD.
Hardware Profile Settings
This table lists the AVD supported properties that can be configured for emulated hardware and AVD start up configuration.
| Property | Values | Description |
|---|---|---|
| Device Name | String | Name of the device profile |
| Device Type | Phone/Tablet, Wear or TV | Device category |
| Screen Size | Inches | Length of screen diagonal |
| Resolution | X and Y Pixels | Number of width and height pixels |
| Memory | Set RAM in bytes, KB, MB, GB or TB | Amount of physical RAM emulated |
| Hardware Input | Physical Back/Home/Menu buttons and Keyboard | Emulate buttons and keyboard |
| Orientation | Portrait and/or Landscape | Supported orientation states |
| Cameras | Front and/or Back | Supported cameras (emulated or PC cam) |
| Sensors | Accelerometer, Gyroscope, GPS, Proximity | Supported sensors |
| Skin and frame | Select appearance | Skin the emulated device |
| System | Select Android OS version | Android API to emulate |
| Scale | Auto or select dp units to pixels | Customise screen density |
| Performance | Auto, GPU for graphics, software emulation | GPU Emulation |
| Multi-Core | 1 to 4 | Select number of cores |
| Network Speed | Full, HSDPA, UMTS, EDGE, GPRS, HSCSD, GSM | Emulate the network speed |
| Network Latency | UMTS, EDGE, GPRS | Emulate the network latency |
| VM Heap | Java heap in bytes, KB, MB, GB or TB | Java Virtual Machine heap |
| Internal Storage | Non-removal space in bytes, KB, MB, GB or TB | Emulated internal memory |
| SD card | Size in bytes, KB, MB, GB or TB or existing file | Emulated removable SD card |
| Keyboard | Enable/Disable | Allow keyboard input |
Notes on AVD Settings
- CPU/ABI refers to the target CPU type and the Application Binary Interface (ARM/x86/x86_64). x86 targets perform better than ARM, especially with the Intel Hardware Acceleration Manager (HAXM) installed (by default) on the development computer.
- When naming a new emulated Android device make it descriptive, for example if emulating a device with a version 4.4 operating system and medium resolution screen (HVGA) a name such as And-v4.4-HVGA is better than Android-Device as it is easier to pick out in the list of configured AVDs.
- For the emulated Secure Digital (SD) card the bigger the specified size the bigger the file created on the host computer. Alternatively select an existing SD card image, allowing SD card data sharing amongst different AVDs. On a Windows machine the sdcard.img files will be found in the sub-folders of the avd directory, under the .android directory in the logged on user’s profile. (Use the Show on Disk drop down menu option next to the AVD listed in the AVD Manager.)
- Use snapshots if you want the runtime state of the emulated device to persist between sessions. It also reduces the start up time of an AVD for subsequent runs. Though shutdown is longer as the snapshot is written to disk, and host GPU cannot be used to improve AVD graphics performance.
- Use the Wipe Data drop down menu option in the AVD Manager to clear data in the AVD. When the AVD is started the user data file is reset, any user data generated from previous sessions of the selected AVD is lost.
Note on HAXM
The Intel Hardware Accelerated Execution Manager (HAXM) software is installed by default with Android Studio (unless deselected), alternatively see the Intel HAXM home page. HAXM is a hardware assisted virtualization engine (hypervisor). To benefit from HAXM the following is required:
- Check the bios documentation for your PC to see if the motherboard and processor of your development machine supports Intel VT (Virtualization Technology).
- Intel VT must be turned on in the BIOS (see your PCs documentation on how to do that).
- If HAXM has not been installed by Studio download it via the Android SDK using SDK Manager (under Extras) or from Intel. The version of HAXM installed by Studio is out of date. Uninstall it via control panel and install the latest version.
Launching AVDs
Once the AVD has been defined it will be listed in the AVD Manager window. The AVD is ready to be loaded using the launch (i.e. run or play) button. Once loaded it can be used like any other Android device and driven from the mouse (or keyboard) of the development computer.
See Also
Additional details on AVDs and emulation is available in the Android developer documention. The emulator key mapping is a useful reference.
Author: Daniel S. Fowler Published: 2012-01-08 Updated: 2015-04-11


Do you have a question or comment about this article?
(Alternatively, use the email address at the bottom of the web page.)
↓markdown↓ CMS is fast and simple. Build websites quickly and publish easily. For beginner to expert.
Free Android Projects and Samples:
Источник


