- Add Android App Links
- Add intent filters
- Handle incoming links
- Kotlin
- Kotlin
- Associate your app with your website
- Test your App Links
- How to make links in a TextView clickable HyperLink on Android Kotlin/Java
- Let’s build an Android TextView link click application
- Download Complete Code TextView clickable
- Q: How to create a hyperlink in the Android TextView programmatically?
- How to Create a Hyperlink Using Android TextView
- Android TextView Hyperlink Tutorial
- Creating a String Resource for the Hyperlink in HTML Markup
- Creating an Activity Layout File with a TextView
- Enabling the TextView Hyperlink in the Activity or Fragment Class
- Java Example
- Kotlin Example
- How to Change the Hyperlink Text Color in a TextView
- How to Create a Clickable Link to a Website Using a Button in Android
- How to Create a Clickable Link to Another Activity in a TextView
Add Android App Links
Android App Links are HTTP URLs that bring users directly to specific content in your Android app. Android App Links can drive more traffic to your app, help you discover which app content is used most, and make it easier for users to share and find content in an installed app.
To add support for Android App Links:
- Create intent filters in your manifest.
- Add code to your app’s activities to handle incoming links.
- Associate your app and your website with Digital Asset Links.
The App Links Assistant in Android Studio 2.3 and higher simplifies the process in a step-by-step wizard, as described below.
For more information about how app links work and the benefits they offer, read Handling Android App Links.
Add intent filters
The App Links Assistant in Android Studio can help you create intent filters in your manifest and map existing URLs from your website to activities in your app. The App Links Assistant also adds template Java code in each corresponding activity to handle the intent.
To add intent filters and URL handling, follow these steps:
- Select Tools > App Links Assistant.
- Click Open URL Mapping Editor and then click Add at the bottom of the URL Mapping list to add a new URL mapping.
- Add details for the new URL mapping:

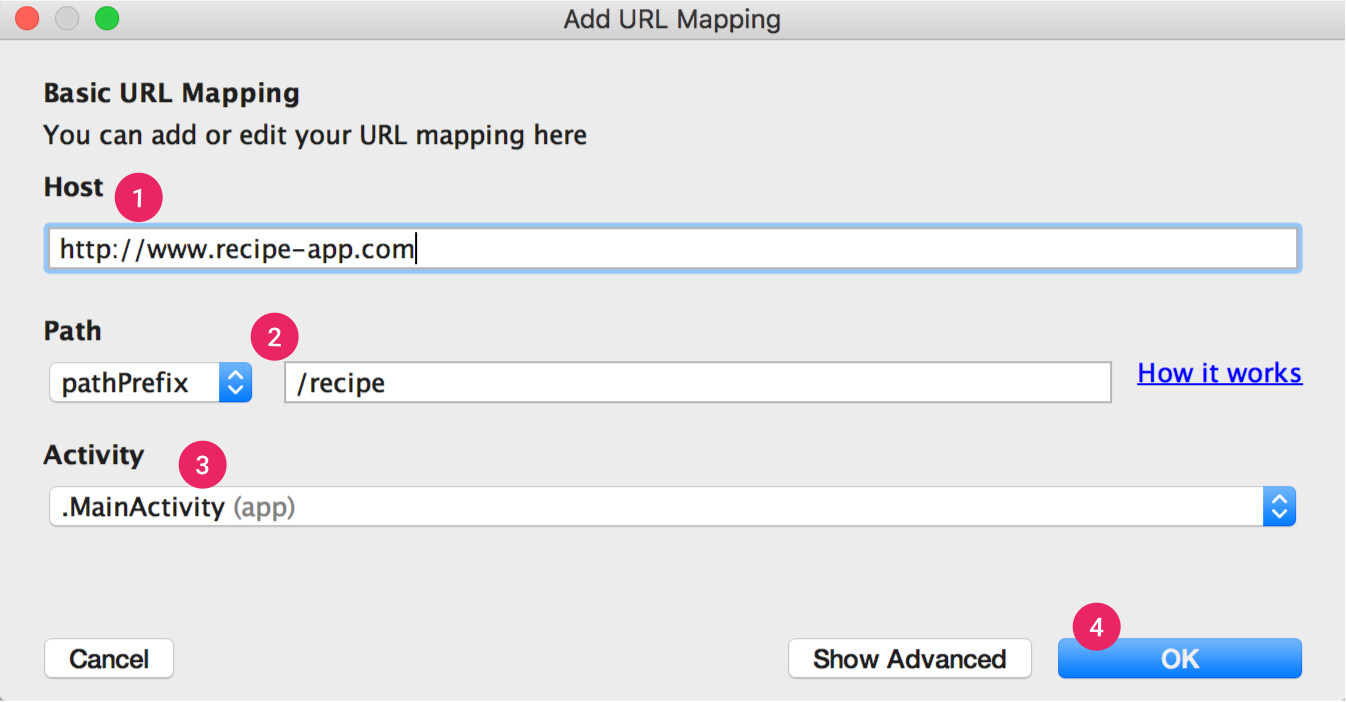
Figure 1. Add basic details about your site’s link structure to map URLs to activities in your app.
- Enter your website’s URL in the Host field.
- Add a path, pathPrefix, or pathPattern for the URLs you want to map. For example, if you have a recipe-sharing app, with all the recipes available in the same activity, and your corresponding website’s recipes are all in the same /recipe directory, use pathPrefix and enter /recipe. This way, the URL http://www.recipe-app.com/recipe/grilled-potato-salad maps to the activity you select in the following step.
- Select the Activity the URLs should take users to.
- Click OK.
Note: To support more links without updating your app, you should define a URL mapping that supports URLs that you’ll add in the future. Also, remember to include a URL for your app home screen so it’s included in search results.
Handle incoming links
Once you’ve verified that your URL mapping is working correctly, add logic to handle the intent you created.
- Click Select Activity from the App Links Assistant.
- Select an activity from the list and click Insert Code.
The App Links Assistant adds code to your activity’s Java file, similar to the following ( Please note: Currently the App Links Assistant does not support Kotlin so you will need to add this code manually):
Kotlin
However, this code isn’t complete on its own. You must now take an action based on the URI in appLinkData , such as display the corresponding content. For example, for the recipe-sharing app, your code might look like the following sample:
Kotlin
Associate your app with your website
After setting up URL support for your app, the App Links Assistant generates a Digital Asset Links file you can use to associate your website with your app.
As an alternative to using the Digital Asset Links file, you can associate your site and app in Search Console.
To associate your app and your website using the App Links Assistant, click Open Digital Asset Links File Generator from the App Links Assistant and follow these steps:
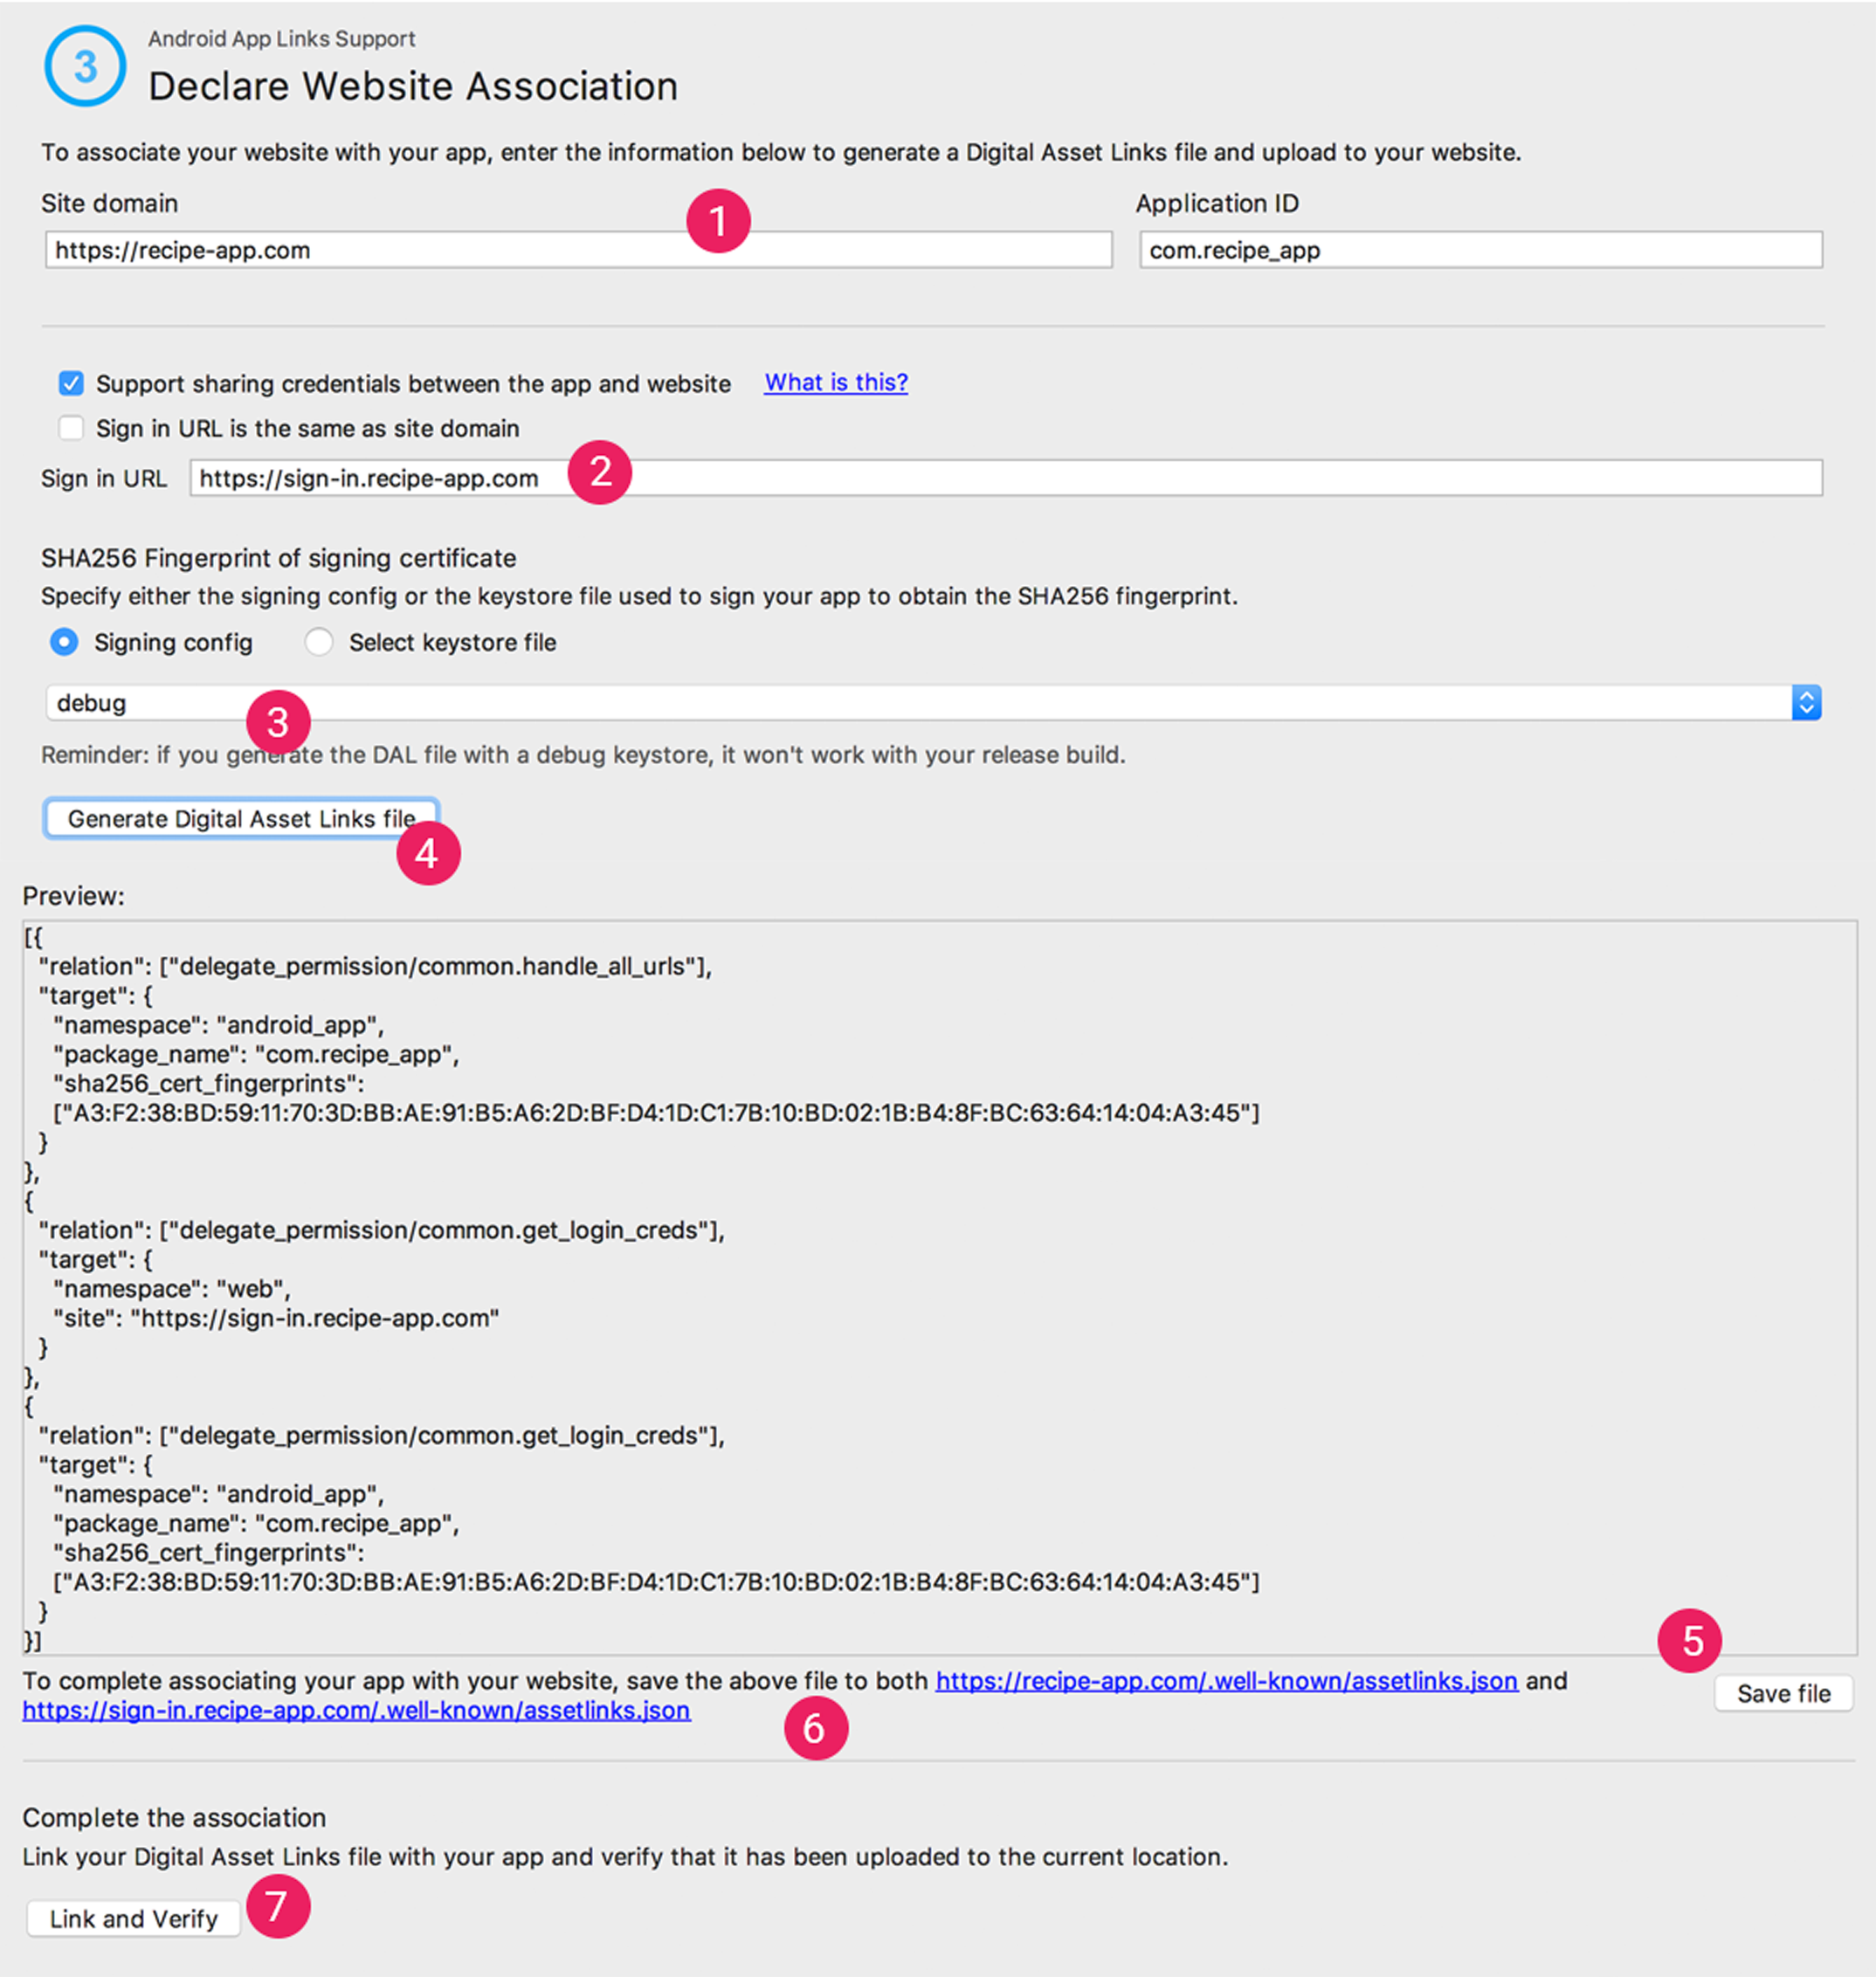
Figure 2. Enter details about your site and app to generate a Digital Asset Links file.
- Enter your Site domain and your Application ID.
- To include support in your Digital Asset Links file for Smart Lock for Passwords, select Support sharing credentials between the app and the website and enter your site’s login URL. This adds the following string to your Digital Asset Links file declaring that your app and website share sign-in credentials: delegate_permission/common.get_login_creds . Learn more about supporting Smart Lock for Passwords in your app.
- Specify the signing config or select a keystore file. Make sure you select the right config or keystore file for either the release build or debug build of your app. If you want to set up your production build, use the release config. If you want to test your build, use the debug config.
- Click Generate Digital Asset Links file.
- Once Android Studio generates the file, click Save file to download it.
- Upload the assetlinks.json file to your site, with read-access for everyone, at https:// /.well-known/assetlinks.json .
Important: The system verifies the Digital Asset Links file via the encrypted HTTPS protocol. Make sure that the assetlinks.json file is accessible over an HTTPS connection, regardless of whether your app’s intent filter includes https .
Learn more about associating your website with your app through the Digital Asset Links file in Declare Website Associations.
Test your App Links
To verify that your links open the correct activity, follow these steps:
- Click Test App Links in the App Links Assistant.
- Enter the URL you want to test in the URL field, for example, http://recipe-app.com/recipe/grilled-potato-salad.

Figure 3. The App Links Assistant displays a success message and opens your app to the specified content when the URL you’re testing successfully maps to an activity in your app.
To test Android App Links through the App Links Assistant, you must have a device connected or a virtual device available running Android 6.0 (API level 23) or higher. For more information, see how to connect a device or create an AVD.
Content and code samples on this page are subject to the licenses described in the Content License. Java is a registered trademark of Oracle and/or its affiliates.
Источник
How to make links in a TextView clickable HyperLink on Android Kotlin/Java
To make a TextView clickable(hypertext link) in Android you can do it in value Strings file or calling setMovementMethod(). There are multiple scenarios and conditions.
Let’s see some situations which we have found on stack overflow:
A. android:autoLink=»web» works if you have full links in your HTML. The following will be highlighted in blue and clickable:
B. view.setMovementMethod(LinkMovementMethod.getInstance()); will work with the following (will be highlighted and clickable):
- Some text
- Some text
- Some text
Note:- that the third (A-3) option has a hyperlink, but the description of the link (the part between the tags) itself is not a link. android:autoLink=»web» does NOT work with such links.
android:autoLink=»web» if set in XML will override view.setMovementMethod(LinkMovementMethod.getInstance()); (i.e.; links of the third kind will be highlighted, but not clickable).
Summary:
If using a view.setMovementMethod(LinkMovementMethod.getInstance()); in your code and then make sure you don’t have android:autoLink=»web» in your XML layout if you want all links to be clickable.
Let’s build an Android TextView link click application
Step 1. Create an android project in the android studio (Follow this tutorial: Android First Program in Android Studio).
Step 2. Open the strings.xml file.

Step 3. Add this text in the strings.xml file.
Step 4. Add the following code in activity_mail.xml
Using a LinearLayout and 2 TextView fields for both examples.
Step 5. Add the below code in MainActivity.kt
Step 6. Now Run the application, in an emulator or on your Android device.
Output screenshot Android TextView link underline example:

Download Complete Code TextView clickable
Q: How to create a hyperlink in the Android TextView programmatically?
Answer: You can do it with this java code.
From API level >= 24 onwards Html.fromHtml(String source) is deprecated instead use fromHtml(String, int) ,
Or in the layout XML file, inside your TextView widget attributes
Do comment if you knew another way to do it or have any problem in this tutorial.
Note: This example (Project) is developed in Android Studio 3.3.2. Tested on Android 9 ( Android-P), compile SDK version API 28: Android 9.0 (Pie)
MinSdkVersion=25″
TargetSdkVersion=28″Coding in Kotlin

Degree in Computer Science and Engineer: App Developer and has multiple Programming languages experience. Enthusiasm for technology & like learning technical.
Источник
How to Create a Hyperlink Using Android TextView
The TextView is a widget in Android that allows you to display text to the user. It is also possible to use the Android TextView widget to create a hyperlink which can load a web page in a mobile web browser when clicked.
To create a clickable hyperlink in your Android app using the TextView widget follow the steps below.
- Create a new String resource in the strings.xml resource file representing the text to be placed inside the TextView
- In your String resource use HTML markup to insert the hyperlink using an anchor tag
- Add a TextView in the layout of your Activity or Fragment and use the android:text attribute on the TextView to reference the String resource containing the hyperlink
- In your Activity or Fragment class use the setMovementMethod(…) on the TextView to enable the hyperlink
In the article below I will include Java and Kotlin code samples that show how to create a hyperlink using the Android TextView following the steps listed above.
I have also included some additional instructions along with code samples written in Kotlin for using links in Android apps in different ways such as:
- How to Change the Hyperlink Text Color in a TextView
- How to Create a Clickable Link to a Website Using a Button in Android
- How to Create a Clickable Link to Another Activity in a TextView
Android TextView Hyperlink Tutorial
Below is a screenshot of an Android app we will be building in this tutorial for creating a hyperlink using the Android TextView widget. When the hyperlink is selected the app will open a mobile web browser and navigate the user to the website https://learntodroid.com

In this tutorial will cover the following steps for creating a hyperlink using the Android TextView widget.
- Creating a String Resource for the Hyperlink in HTML Markup
- Creating an Activity Layout File with a TextView
- Enabling the TextView Hyperlink in the Activity or Fragment Class
I will include code excerpts embedded into this tutorial. For step 3, I have included code samples for both Kotlin and Java.
I have created a video tutorial embedded below on how to create a hyperlink inside a TextView in an Android app. The code written in this video tutorial is also available on GitHub.
Creating a String Resource for the Hyperlink in HTML Markup
The first part of this tutorial for creating a hyperlink using the Android TextView widget will require you to add a new String Resource into the strings.xml file that will represent the text that will be used by the TextView for the hyperlink.
You will need to use HTML markup when writing your hyperlink in your resource file. This means you will need to use an anchor tag and use the href attribute on the anchor tag to capture the URI. Inside the anchor tag you will also need to add some text that will be displayed as a hyperlink to the user in the app.
You can also add a description to the link above or next to the link by adding some text outside of the anchor text in the String Resource. In my example I have also added a new line between my description of the link and the clickable link.
See the code sample of the strings.xml resource file below containing the hyperlink String resource.
Creating an Activity Layout File with a TextView
The next step in this tutorial will involve setting up the layout file for your Activity or Fragment that will contain the hyperlink TextView.
When you are creating the TextView in the layout file you will need to take care of a few things.
- Give the TextView an id using the “android:id” attribute so that you can reference it in the next part of the tutorial in your Activity or Fragment class
- Use the “android:text” attribute to reference the String resource you have created above for your hyperlink
- If you the text shown in the TextView is going to spill over one row consider centering the TextView by setting the “android:textAlignment” attribute to the value of “center”
See the code sample of the activity_main.xml layout resource file below containing a TextView to be shown inside a ConstraintLayout.
Enabling the TextView Hyperlink in the Activity or Fragment Class
The final step of this tutorial involves enabling the hyperlink to be clickable in your Activity or Fragment class by using the setMovementMethod(…) on the TextView.
The setMovementMethod(…) takes a MovementMethod as a parameter. In this tutorial we will be making use of the LinkMovementMethod allow the hyperlink to be clickable and to handle the launching of the web browser and navigation to the link in the browser when selected.
Java Example
See the code sample of the MainActivity.java Activity class file below showing the enabling of the hyperlink using setMovementMethod(…)
Kotlin Example
See the code sample of the MainActivity.kt Activity class file below showing the enabling of the hyperlink using setMovementMethod(…)
How to Change the Hyperlink Text Color in a TextView
By default the hyperlinks shown in your Android TextView widget will be displayed in a dark pink text color with an underline.
You can change the default color of the text of the hyperlink using the setLinkTextColor(…) method on the TextView.
See the code sample of the MainActivity.kt Activity class file below setting the color of the hyperlink in the TextView to blue using setLinkTextColor(…)
See a screenshot showing the hyperlink inside the TextView in blue using the code from the excerpt above.

How to Create a Clickable Link to a Website Using a Button in Android
You can also use a Button widget in Android to load a web page in the mobile browser when clicked.
To do this you will need to make use of an Intent and use the startActivity(…) method to launch an Intent when the Button is clicked.
See the code sample of the MainActivity.kt Activity class file below showing how to use a Button to launch a web browser on the device at a given URI when clicked.
How to Create a Clickable Link to Another Activity in a TextView
I have written another blog post on this website about how to switch between Activities in Android using an Intent. To learn more about this including an example using a Button to switch between Activities using an Intent check out the article below.
If you want to use a TextView instead of a Button to create a link to another Activity you can take the code samples from that lesson and replace the Button with a TextView. You will need to style the text shown in the TextView to look like a hyperlink by setting the text color to blue and adding an underline. There you will need to add an OnClickListener to create the Intent when the TextView is selected.
See the code excerpt from the IntentNavigationActivity.kt Activity class file below which shows setting the text color of the TextView to blue and adding an on click listener to switch to the MainActivity using an Intent when the TextView is clicked.
See the code sample of the activity_intent_navigation.xml layout resource file below containing a TextView to be shown inside a ConstraintLayout.
See the code sample of the strings.xml resource file below containing String Resource for the activity link which is underlined using HTML markup.
You will ensure need to use you have included references to all of the Activities you will be using and navigating between in your manifest file. This is done using the activity tag inside the application tag of the Android Manifest file.
 Loading…
Источник


