- Android TextView Animation – Animate Text Change in TextView
- Textview animations in android
- View Animation Effects in Android
- Color Animation
- Shadow Animation
- Slide Down
- Slide Up
- Slide In
- Slide Out
- Rotate Animation
- Rotate Anti Clockwise
- Fade In Animation
- Fade Out Animation
- Blink Animation
- Move Animation
- Zoom Out Animation
- Zoom In Animation
- Bounce Animation
- Animation Complete Code
- Animation Activity
- Animation Layout
- About
- Animation in Android — Android Tutorial
- What is Animation?
- Basic Animation using XML
- Animate Drawable Graphics
- Animation between Activities
- Conclusion
Android TextView Animation – Animate Text Change in TextView
Hi and welcome to another tutorial from Codingdemos, today you will learn about Android TextView animation and how you can animate text changes inside TextView.

By the end of this tutorial, you will have an app that looks like this. (Large preview)
You will be using a 3rd party library called FadingTextView to help you make this smooth TextView animation.
In this tutorial we will be using the following:
- – Android studio version 3.0.1
– Android emulator Nexus 5X with API 26
– Minimum SDK API 16
1- Open up Android Studio and open any project that you have in your computer.
Create new Android Studio project or open existing project. (Large preview)
2- Open up build.gradle (module:app) and add the library in the dependencies.
3- Next you need to open up build.gradle (Project) and add Jcenter because this library is available through it.
4- Now sync your project by clicking on Sync Now.

5- Open up colors.xml file to change the colors of the main app.
6- Build and run the app to see the new colors.
7- Open strings.xml file and add a string array.
You will be using this string array later with FadingTextView to show text animation.
8- Open up activity_main.xml file and add FadingTextView.
Here you are using app:texts to reference the string array which you have created earlier so that it appears inside FadingTextView, then you use app:timeout which represent the amount of time in milliseconds that each text is visible.
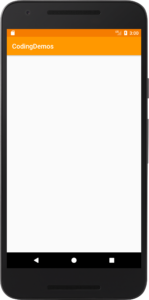
9- Build and run the app to see the output.
10- Let’s customize the layout to include other TextViews as well like this.
11- Build and run the app to see the result.

FadingTextView with other TextViews. (Large preview)
12- Now let’s customize the appearance of FadingTextView by increasing text size, changing the text color, make it bold as well as add some margin from top and bottom.
13- Build and run the app to see the result.
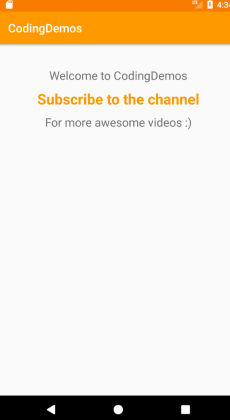
Now you can see Android text animation effect. (Large preview)
14- Here is the full code for activity_main.xml file.
15- I hope you find this tutorial helpful and if you have any question please post them in the comment below.
Источник
Textview animations in android
View Animation Effects in Android
January 19, 2017 by Srinivas
Android provides property animation framework using which you can animate properties of any object. In property animation, value of a property is gradually changed from provided start value to end value in specified time duration.
You can find more information about property animation in android animation post.
In this post, I am going to show how to create different animation effects using android property animation framework and TextView as target object.
Color Animation
Animating text color can be done using ObjectAnimator’s ofArgb() method. You need to pass list of colors to be animated through in addition to object and property. In the same way, view’s back ground can be animated. Below code snippet shows how to animate text color and back ground color together using AnimatorSet.
Shadow Animation
Shadow animation can be achieved by animating elevation property of target view.
Slide Down
Slide down animation can be achieved by animating ScaleY from value 0 to 1.
Slide Up
Slide up animation can be achieved by animating ScaleY from value 1 to 0.
Slide In
Slide in animation can be achieved by animating ScaleX from value 1 to 0.
Slide Out
Slide Out animation can be achieved by animating ScaleX from value 0 to 1.
Rotate Animation
Rotate animation can be achieved using RotateAnimation class. RotateAnimation’s constructor takes from degree, to degree, x axis and y axis for rotation of target object. You can specify x axis and y axis type also. Axis type RELATIVE_TO_SELF allows you to specify coordinate values as percentage of width and height of target object, setting the both axis values 0.5 makes target object rotate at center point.To use RotateAnimation, you need to set interpolator and set it to target object by calling startAnimation() method.
Rotate Anti Clockwise
To rotate object anti clockwise, you need to set from degree as 360 and to degree as 0.
Fade In Animation
Fade animation can be achieved by animating alpha property.
Fade Out Animation
Fade out animation can be created by animating alpha property from 1 to 0.
Blink Animation
Using alpha property you can create blink animation by setting the duration to few milliseconds and repeating the animation.
Move Animation
Position of an object can be animated using TranslateAnimation. TranslateAnimation’s constructor takes delta x and delta y values.
Zoom Out Animation
Zoom animation can be created by using scaleAnimation class. scaleAnimation’s constructor takes from and to scale x and scale y values and pivot x and y values. By setting pivot x and pivot y to center of object and changing scalex and scaley from high values to low values, zoom out animation of target object can be achieved.
Zoom In Animation
By setting pivot x and pivot y to center of object and changing scalex and scaley from low values to high values, zoom in animation of target object can be achieved.
Bounce Animation
Animation Complete Code
Animation Activity
Animation Layout
About
Android app development tutorials and web app development tutorials with programming examples and code samples.
Источник
Animation in Android — Android Tutorial
A picture is worth more than 1000 words. If you are using some icons or pictures or animations in your Android application then your users will interact with your application in a better way and things become easier to understand when you are using some pictorial representation rather than some textual representation. Nowadays, every big application is using animations to represent the content in a more understandable way. And when the Material Design concept came in existence, then these Animations also came into existence. For example, the moving car icon in the Uber app or the login screen of the Zomato app are some cool examples of animations in Android application. Here is a basic example of animation user in the play button:

No doubt, we can use the feature of the play button without using animation also, but if you use animation then it looks more interactive i.e. by using animation, we are not abruptly changing the UI of the application.
So, in this blog, we will learn how we can implement Animations in Android. So, let’s get started.
What is Animation?
If we look at the definition of Animation from Wikipedia, then it says something like this:
Animation is a method in which pictures are manipulated to appear as moving images.
So, we can think of animations as moving images. For example, if you want to do some UI change in your application and if you change the UI directly then it will look very ugly. Look at the below image taken from the Android Developer Website:
![]()
Here, if you are clicking on the Clock item, then you are opening a new Activity but if you open the activity directly then a sudden change in UI will be imposed and this may lead to bad user experience. So, by using animation, you can change the UI by having some cool layout transition animation.
For a better understanding of Animation, I have divided the whole blog into three categories:
- Basic Animation
- Animate Drawable Graphics
- Animation between Activities
So, let’s learn these, one by one.
Basic Animation using XML
The best part about animation that I like is the fact that you can use animation just by writing some XML code. Yeah and this is the need because in Animation, you are dealing with the UI part and in order to have Animation, XML codes can be used.
In order to have a thorough knowledge of Animation, you should know some of the important XML attributes that can be used in your application to have a perfect Animation. Some of these attributes are:
- android:duration: It is used to specify the duration of animation i.e. how long a particular Animation will continue.
- android:interpolator: It is used to define the rate of change of Animation i.e. how fast a particular UI will change to another UI.
- android:startOffset: When you are having a number of animations one after the other, then you have to specify some time to a particular animation and that animation will wait for that duration and after that, it will start.
- android:repeatMode: This is used to repeat a particular animation.
- android:repeatCount: This is used to specify the repeat count of a particular animation. You can set the repeat count of an animation to be infinite, if you want infinite repetition.
Now, we are done with the introduction part. Let’s implement some basic animations in our project. Follow the best steps:
Step 1: Open Android Studio and create a new project with Empty Activity template.
Step 2: After creating the project, the very first thing that you have to do is making an anim resource directory where you can store all your animation files. So, go to res directory and right click on it, then click on New > Android Resource Directory and after that choose resource type as anim and then click on OK.
Step 3: Now, you have to create some Animation files in the anim folder that you have created in the previous step. So, right click on res/anim and select New > Animation Resource File and then enter the file name and click on OK. Here, we will see how to use the Fade In animation. So, my file name is fade_in.xml.
Step 4: Our next step is to add the animation that we want to perform in the file that we have added in the previous step. Add the below code for Fade In animation in your fade_in.xml file:
Step 5: Add the UI for the MainActivity. Here we will add the desired UI of the MainActivity. Here, I am adding one TextView (to apply animation on) and one Button(to start the animation). So, the code for the activity_main.xml file looks like:
Step 6: After adding the UI, our last step is to connect the animation when the Button is clicked. So, the code of MainActivty.kt file looks like:
loadAnimation() method is used to load the desired animation i.e. in our case, it is fade_in.xml file.
startAnimation() method is used to start an animation on a particular component.If you want to perform some operations before, after or during the Animation, then you can implement the AnimationListener in your call and then override the below function for the same:
- onAnimationStart(): Will be called when the Animation will start.
- onAnimationEnd(): Will be called when the Animation will end.
- onAnimationRepeat(): Will be called when you repeat an Animation.
All you need to do is implement the AnimationListener and then set the animation listener. Our final code after implementing the AnimationListener will be:
Run your application on mobile device and see the Animation.
In the next part of this section, we will look upon some basic animations XML file. You can use these animations in the same manner as used in the above example. Add the below files in your anim folder.
Animation for Fade Out
Animation for ClockWise rotation
Animation for Blink
Animation for Zoom In
Animation for Zoom out
Animation for MoveTo move one component form one position to other
Animation for Bounce
Animate Drawable Graphics
Apart from the basic Animation, these days, animations are used in Drawable resources i.e. Animations are being used in the Vector assets or Image Assets. Below is an example of the animation used in Drawable resources:
Here, the animation is applied to the Play Button icon.There are two ways of achieving this:
- Use AnimationDrawable
- Use AnimatedVectorDrawable
One of the basic ways of animation is to play or put one image after the other. So, in this case, we are having a series of images that are coming one after the other. For example, if you are having five images i.e. Image1, Image2, Image3, Image4, and Image5 then play one image after the other.
To achieve this feature, you can use the AnimationDrawable class API. Here, the XML file for this is stored in the res/drawable directory and the XML file consists of a which contains a series of that will be played or put one after the other.
Below is an example of the XML file which is added in res/drawable:
Here, android:oneshot is used to tell if the list is to be repeated or not. If the value is true then after the animation of the last element, the whole animation will be stopped. But if the value is set to false, then the animation will continue again and again.
android:drawable is used to identify the element that is to be animated i.e. these are elements that will be showed when we start the animation. The rocket_thrust1 will be showed and after that reocket_thrust2 will be showed and finally, rocket_thrust3 will be shown. All the animation will be showed in a duration that is written in the android:duration i.e. 200. By doing so, you will get a visualization of animation.
Below is the code for our MainActivity.kt file to apply the above animation on an ImageView. Here, we are using AnimationDrawable:
You can apply animation to your VectorDrawable by using the AnimatedVectorDrawable. So, basically add some Vector Assets in your project and use animationon it.
To achieve this, you have to add three XML files in your project:
- A vector drawable in the res/drawable directory. You can create a vector drawable by right-clicking on res/drawable and then New > Drawable resource file and enter the desired name
Other way of creating vector assets in your res/drawable directory. Just right click on the res directory and click on New > Vector assets and then follow the steps.
- An animated vector drawable that is used to animate the attributes of the vector drawable i.e.,, etc. The main aim of this file is to apply certain animation to a certain component. For example, if you are having an attribute A in your vector drawable file and your want some Animation anim to be applied on the attribute A, then you define these things in your animated vector drawable present in the res/drawable directory.
At last, you have to add the Object Animator in your res/animator directory. Here, you actually define the animation to be applied on any component. To create an Animator directory go to res and right click on it. After that click on New and Android Resource Directory and select the resource type as animator and click on OK. After that go to res/animator and add the resource file of the name of your choice. Following is an example of the post:
Animation between Activities
When we are making an Android Application, then we deal with various Activities and one Activity is started after the other with the help of some triggers. But if you directly open an activity from another activity then there will be a sudden change in UI and this may result in bad user experience. So, we should apply some kind of Animation that can be used to have a fluent transition from one activity to the other. You can achieve this by enabling Activity Transitions in your application. You can apply animation to your transition in the application:
Enter Transition: An enter transition is used to define the animation that is used when a view of the activity is entering a screen.
Exit Transition: An exit transition is used to define the animation that is used when a view of the activity is exiting the screen.
Following are the entry and exit transition supported by Android:
- explode: It is used to move the view in and out in the screen from the center of the screen.
- slide: It is used to slide the view between edges in the screen of the application.
- fade: It is used to change the opacity of the view while entering into the screen.
Following is an example of Screen Transition used in Android Application:
![]()
Here, when you click on the Android icon, then a new Activity will be opened by using Activity Transition.
Now, let’s start the coding part.
The Activity transition API is available for the API level 21 or higher. So, our first step should be to check for the version of API being used:
After checking for the Android Version, our next step is to add the entry and exit transition for the activity using windowActivityTransitions
Our last step is to start the Activity by enabling transition:
Phew! Such a long blog. But I am sure, you learned a lot from this blog.
Conclusion
In this blog, we learned about Animations in Android. We learned how we can add some basic Animation form in our Android Application. Adding animation to our application results in more user interaction and making the application more attractive. So, having some kind of animation in our application is good to have practice.
You can understand the details of Motion in Android by referring to the Material Design website.
Also, there are a lot of libraries that can be used to implement some cool animations. You can find the top animation libraries here.
Источник


