- Use your mobile phone number as your Apple ID
- Here’s how it works
- What you need
- Account security
- Messages from Apple
- Change your Apple ID to a different mobile phone number
- From your Apple ID account page
- On your iPhone, iPad, or iPod touch
- If you move to a different country or region
- Add or remove your phone number in Messages or FaceTime
- Set up your phone number
- Remove your phone number
- Turn your phone number on or off for your Mac
- Turn your phone number on or off for your iPad or iPod touch
- If you can’t see or select your number in Messages or FaceTime
- Block phone numbers, contacts, and emails on your iPhone, iPad, or iPod touch
- Block a phone number, contact, or email
- Phone
- FaceTime
- Messages
- Manage your blocked phone numbers, contacts, and emails
- Phone
- FaceTime
- Messages
- Filter messages from unknown senders
- Report spam or junk in the Messages app
Use your mobile phone number as your Apple ID
When you create a new Apple ID in some countries or regions, you can use your mobile phone number as your Apple ID username.
Here’s how it works
Any time you set up an iPhone, iPad, or iPod touch, you have the option to sign in with your existing Apple ID or create a new account. If you create a new Apple ID on an iPhone in iOS 11 or later, you can use your mobile phone number as your username in China mainland and India. If you live in China mainland, use your (+86) mobile phone number. If you live in India, use your (+91) number. Depending on your carrier, you might also be able to create a new account with a phone number on some Android devices, smart TVs, and streaming devices. Just choose Create Your Apple ID from the Apple ID sign in screen and follow the instructions to create your new account.
Once your account is created, you can use it to sign in to any Apple device or service. Whenever you sign in to a new device, app, or service, you’ll enter your mobile phone number—including the country code—and your password. Be sure to use the same Apple ID everywhere you sign in so that your Apple devices and services work together seamlessly.
If you already have an Apple ID that’s an email address, you might not be able to change it to a mobile phone number. However, you can associate your account with different phone numbers or email addresses on your Apple ID account page.

What you need
Here’s what you need to use your mobile phone number as your Apple ID to sign in:
- iPhone, iPad, or iPod touch with iOS 11 or later
- Mac with macOS High Sierra or later
- Apple Watch with watchOS 4 or later
- Apple TV with tvOS 11 or later
- Apple.com, iCloud.com, and other Apple web properties*
- Apple services on third-party devices
*Depending on how you created your Apple ID, you might be prompted to change your username from a phone number to an email address. You might also need to provide additional information.
Account security
Depending on where you created your account and how much personal information is associated with it, account security requirements might vary. When using an Apple device, it’s best to use two-factor authentication. In some cases, you might be prompted to review or upgrade your security when signing in on an Apple device or an Apple website.
Messages from Apple
Since there isn’t an email address associated with a phone number-based Apple ID, communications from Apple come to you through Messages on your iPhone, iPad, or iPod touch, and your Apple ID account page.
To make sure that you receive important account-related messages on your iPhone, iPad, or iPod touch, sign in to iCloud, iMessage, and FaceTime with your phone number Apple ID. If you sign in to iCloud on an iPhone, iPad, or iPod touch without a SIM card, you can’t use FaceTime and iMessage. You can always see your messages from Apple on your Apple ID account page.
Change your Apple ID to a different mobile phone number
Depending on the country or region that you live in and how you created your Apple ID, you might be able to change your Apple ID to a different mobile phone number from your Apple ID account page or on your iPhone, iPad, or iPod touch.
In China mainland, your new Apple ID must be another (+86) mobile phone number. In India, your new Apple ID must be another (+91) mobile phone number.
From your Apple ID account page
- Sign out of every Apple service and device that uses your Apple ID.
- Go to appleid.apple.com and sign in.
- In the Account section, click Edit.
- Under your Apple ID, click Change Apple ID.
- After you enter the mobile phone number that you want to use as your Apple ID, a verification code is sent to you at that number. Enter the verification code from the text into the fields provided.
- Sign back in to all Apple services with your new Apple ID.
On your iPhone, iPad, or iPod touch
- Sign out of every Apple service and device that uses your Apple ID, except the one you’re using to change your Apple ID.
- Go to Settings > [your name] > Name, Phone Numbers, Email.
- Next to Reachable At, tap Edit > Delete.
- Tap Continue and follow the instructions.
- After you enter the mobile phone number that you want to use as your Apple ID, a verification code is sent to you at that number. Enter the verification code from the text into the fields provided.
- Sign back in to all Apple services with your new Apple ID.
If your new mobile phone number is already connected to your Apple ID as an iMessage phone number, shared phone number, or trusted phone number, then you don’t need to verify it.
Didn’t get a code? If you use iOS 11.3 or later on your iPhone, you might not need to enter a verification code. In some cases, your trusted phone number can be automatically verified in the background on your iPhone. It’s one less thing to do, and your account is still protected with two-factor authentication.
If you move to a different country or region
You can change your username to a new mobile phone number. Make sure that the mobile phone number can be verified by SMS. First, change your Apple ID country or region. Then follow the steps to change your Apple ID to a new mobile phone number.
Источник
Add or remove your phone number in Messages or FaceTime
You can use the phone number of your iPhone with Messages and FaceTime on your Mac, iPad, or iPod touch.
Set up or remove your phone number
Turn your number on or off for Mac
Turn your number on or off for iPad or iPod touch
Set up your phone number
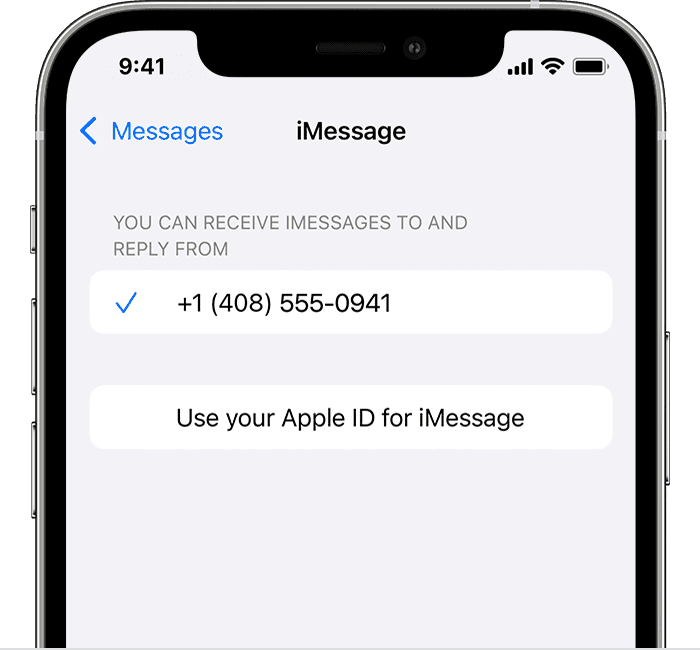
- Go to Settings > Messages and make sure that iMessage is on. You might need to wait a moment for it to activate.
- Tap Send & Receive. If you see “Use your Apple ID for iMessage,” tap it and sign in with the same Apple ID that you use on your Mac, iPad, and iPod touch.

- In the «You can receive iMessages to and Reply From» section, make sure that your phone number and Apple ID are selected.
- Go to Settings > FaceTime and make sure that your phone number and Apple ID are selected in the «You can be reached by FaceTime at» section.
On your other devices, you can now turn on the phone number that you just set up:
If you use this feature and share your Apple ID with someone, you can’t prevent them from seeing your conversations. Instead of using the same Apple ID as someone else, set up Family Sharing.
Remove your phone number
If you don’t want calls or messages for your iPhone on your iPad, iPod touch, or Mac, you can remove your phone number. There are two ways to do this:
- On your iPhone, go to Settings > Messages > Send & Receive. Select your Apple ID at the bottom of the screen and tap Sign Out. Then go to Settings > FaceTime, select your Apple ID and tap Sign Out.
- If the phone number that you want to remove belongs to an iPhone that you can’t access, change your Apple ID password. This removes all phone numbers from your iPad, iPod touch, and Mac. Calls or messages for the removed numbers won’t appear on those devices anymore.
Turn your phone number on or off for your Mac
After you set up your phone number, you can turn it on or off for Messages and FaceTime on your Mac.
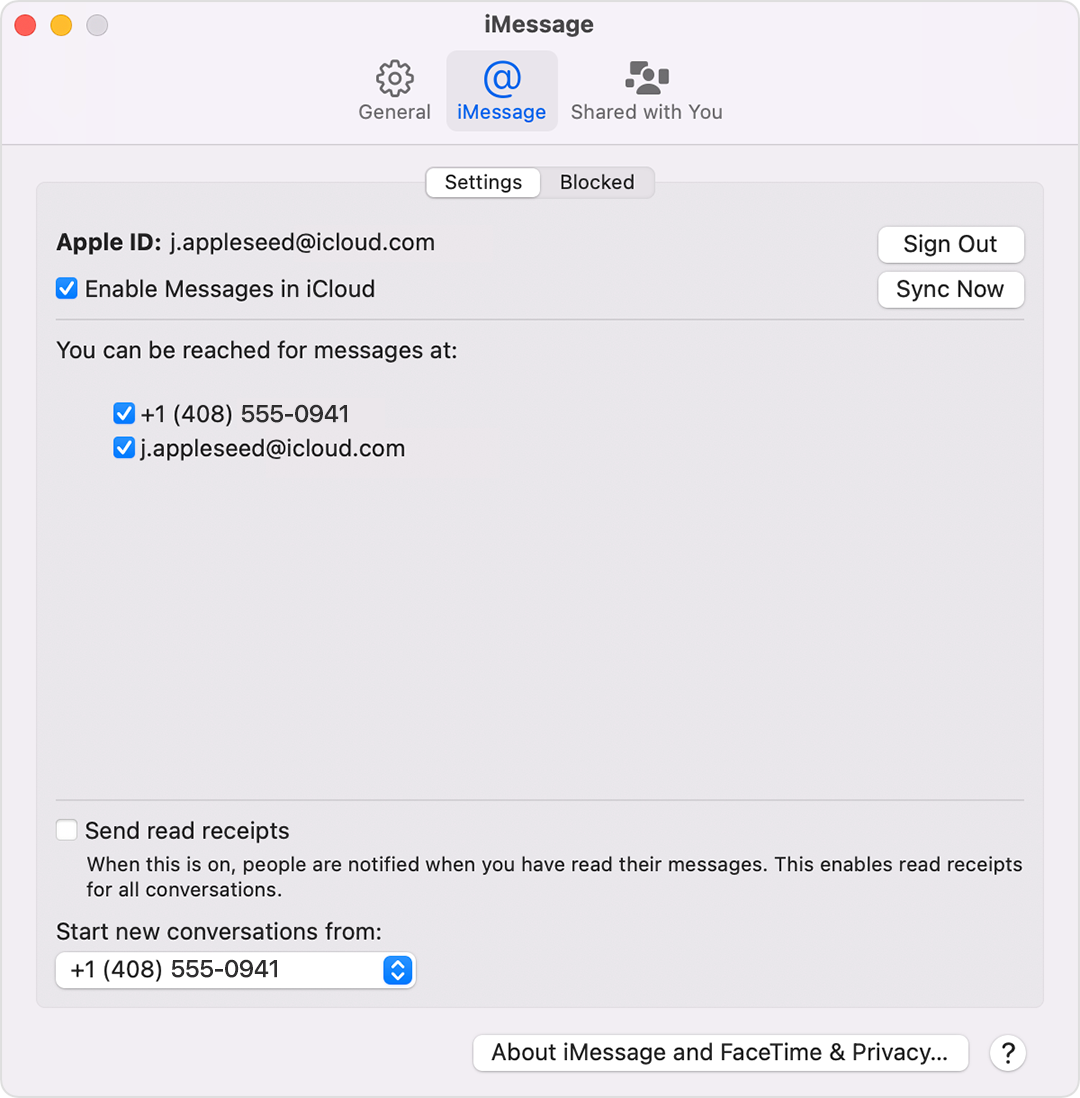
- Open Messages or FaceTime. If asked, sign in with the Apple ID that you’re using with Messages and FaceTime on your iPhone.
- For Messages, choose Messages > Preferences, then click iMessage. For FaceTime, choose FaceTime > Preferences, then click Settings.
- Turn your phone number on or off:
- To turn on your phone number, select it and your Apple ID in the list. If you don’t see your phone number, get help with your settings or contact Apple Support. If you see a number that isn’t yours, change your Apple ID password.
- To turn off your phone number, deselect it in the list.
- If you want recipients to see your phone number and not your Apple ID, select your phone number from the “Start new conversations from” or ”Start new calls from” pop-up menu.
Turn your phone number on or off for your iPad or iPod touch
After you set up your phone number, you can turn it on or off for Messages and FaceTime on your iPad or iPod touch.
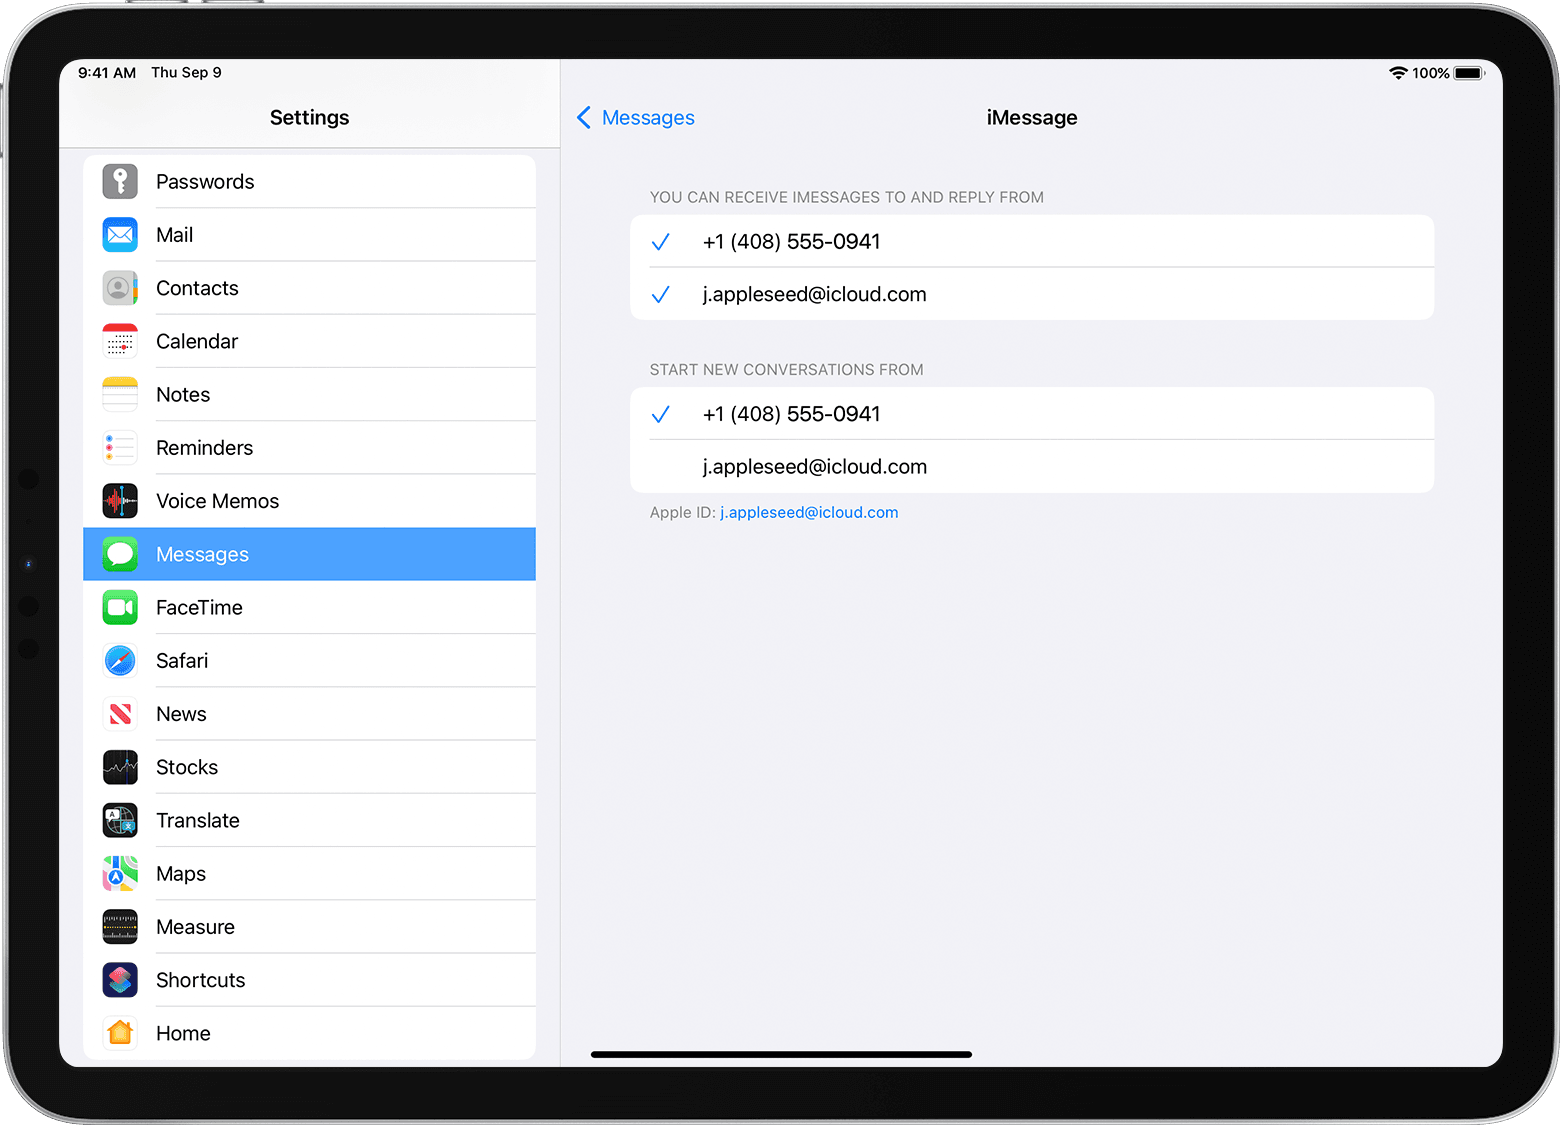
- For Messages, go to Settings > Messages and make sure that iMessage is on. If asked, sign in with the Apple ID you’re using with Messages and FaceTime on your iPhone. Then tap Send & Receive.
- For FaceTime, go to Settings > FaceTime. If asked, sign in with the Apple ID that you’re using with Messages and FaceTime on your iPhone.
- Turn your phone number on or off:
- To turn on your phone number, select it and your Apple ID in the “You can be reached” section. If you don’t see your phone number, get help with your settings or contact Apple Support. If you see a number that isn’t yours, change your Apple ID password.
- To turn off your phone number, uncheck it.
If you can’t see or select your number in Messages or FaceTime
- Make sure that you’re using the latest software for your Mac or iOS device.
- Make sure that you correctly followed the iPhone steps to set up your phone number. You should be using the same Apple ID on all of your devices.
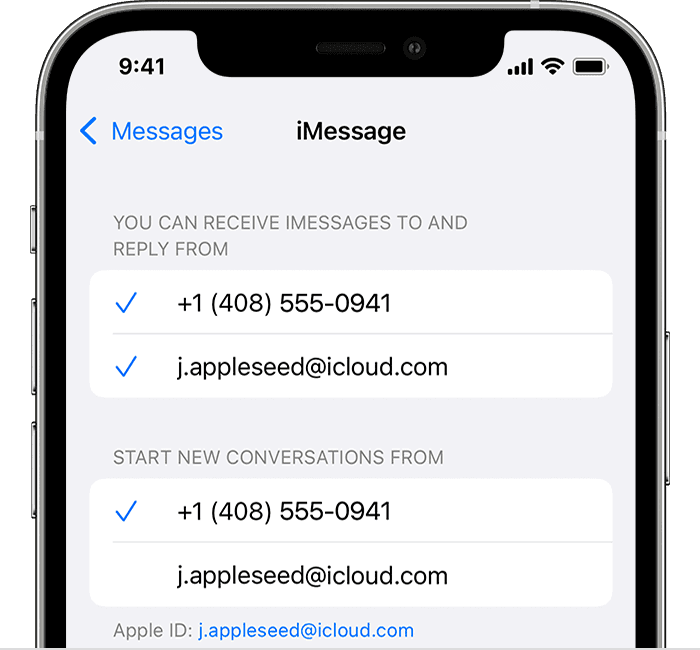
- In the “You can be reached” section of Messages and FaceTime settings, make sure that there are checkmarks beside your phone number and Apple ID:
If your phone number is unchecked and you can’t select it, or you have some other issue, follow these steps:
- On your Mac:
- In Messages, choose Messages > Preferences, then click iMessage. Click Sign Out.
- In FaceTime, choose FaceTime > Preferences, then click Sign Out.
- On your iPhone, iPad, and iPod touch:
- Go to Settings > Messages > Send & Receive. Tap your Apple ID, then tap Sign Out.
- Go to Settings > FaceTime. Tap your Apple ID, then tap Sign Out.
- On your iPhone:
- Go back to Settings > Messages and make sure that iMessage is turned on.
- Tap Send & Receive, then choose “Use your Apple ID for iMessage” and sign in with your Apple ID.
- Using the same Apple ID, sign back in to Messages and FaceTime on your other devices.
If you still need help, change your Apple ID password and repeat the setup steps. If that doesn’t work, contact Apple Support.
Источник
Block phone numbers, contacts, and emails on your iPhone, iPad, or iPod touch
You can block phone numbers, contacts, and emails on your device. You can also filter iMessages from unknown senders and report iMessages that look like spam or junk.
Block a phone number, contact, or email
There are a few ways that you can block phone numbers, contacts, and emails.
Phone
From the Phone app, tap Recents, then tap the Info button next to the phone number or contact that you want to block. Scroll down, then tap Block this Caller.
FaceTime
From the FaceTime app, tap the Info button next to the phone number, contact, or email address that you want to block. Scroll down, then tap Block this Caller.
![]()
Messages
From the Messages app, open the conversation, tap the contact at the top of the conversation. Tap the info button, scroll down, then tap Block this Caller.
From the Mail app, open the email that has the contact that you want to block, then tap the contact at the top. Tap Block this Contact.
When you block a phone number or contact, they can still leave a voicemail, but you won’t get a notification. Messages that are sent or received won’t be delivered. Also, the contact won’t get a notification that the call or message was blocked. When you block an email address from Mail, it goes to the trash folder. Email blocking works across all your Apple devices.
Manage your blocked phone numbers, contacts, and emails
To see the phone numbers, contacts, and email addresses that you’ve blocked from Phone, FaceTime, Messages, or Mail:
Phone
Go to Settings > Phone and tap Blocked Contacts to see the list.
FaceTime
Go to Settings > FaceTime. Under Calls, tap Blocked Contacts.
![]()
Messages
Go to Settings > Messages. Under SMS/MMS, tap Blocked Contacts.
Go to Settings > Mail. Under Threading, tap Blocked.
Filter messages from unknown senders
You can filter messages from people who aren’t saved in your Contacts.
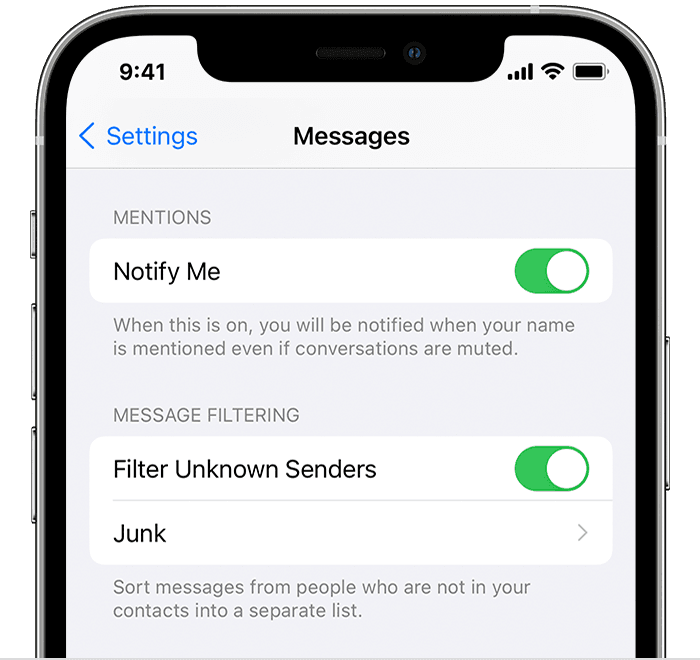
To filter messages, go to Settings > Messages, scroll down and turn on Filter Unknown Senders.
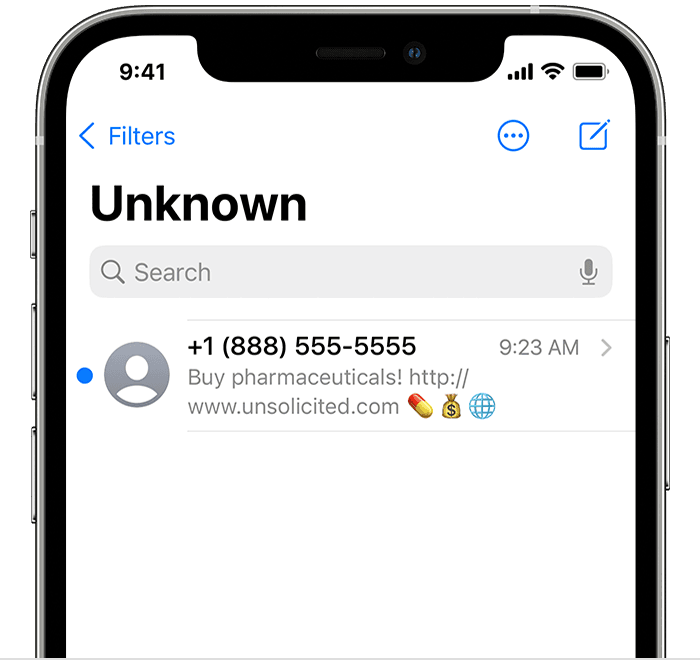
In Messages, tap Filters, then tap Unknown Senders. You won’t get notifications for these messages.
Report spam or junk in the Messages app
You can report iMessages that look like spam or junk from the Messages app. If you get an iMessage from someone who’s not saved in your Contacts, you’ll see a Report Junk link under the message.
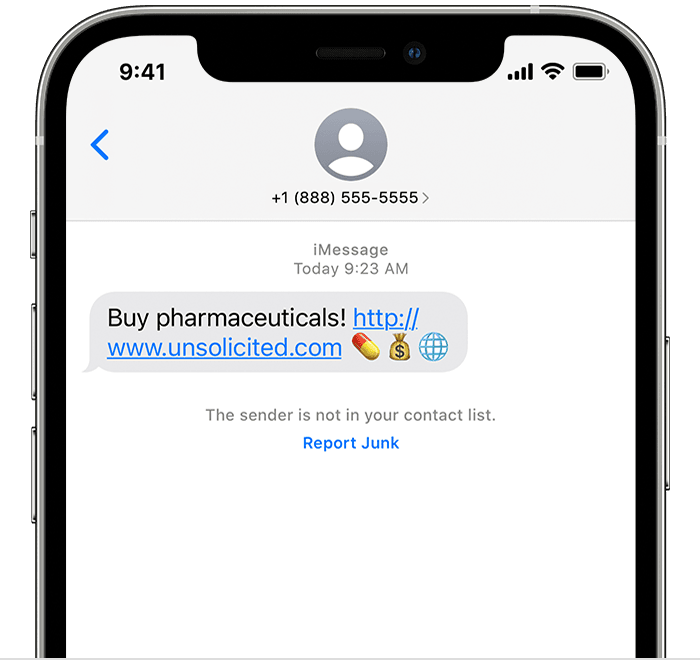
Tap Report Junk, then tap Delete and Report Junk. Messages will forward the sender’s information and the message to Apple, as well as delete the message from your device. You can’t undo deleting a message.
Reporting junk doesn’t block the sender from being able to send another message. If you don’t want to receive these messages, you need to block the contact.
To report SMS and MMS messages, contact your carrier.
Источник


