- iPhone vs. Mirrorless: Can You Really Take Pro Photos with Your Phone?
- Share this:
- We’re debunking the myth that professional photos aren’t possible with your smartphone camera. Let’s explore how an iPhone stacks up to a mirrorless camera.
- iPhone vs Mirrorless
- Can You Tell the Difference?
- A Few Tips for Better Photos on Your Smartphone
- 1. Expose the Photo In-Camera
- 2. Reduce the Sharpness in Post
- 3. Play to Your Smartphone’s Strengths
- Apple highlights best photos shot on iPhone around the world
- Shot on iPhone Challenge — The Winners
- 10 iPhone Photography Tips To Quickly Improve Your Photos
- 1. Keep Your Photos Simple
- 2. Shoot From A Low Angle
- 3. Show Depth In Your Photos
- 4. Capture Close-Up Detail
- 5. Take Silhouette Photos
- 6. Include Shadows In Your Composition
- 7. Photograph Reflections
- » alt=»iPhone Photography Tips» width=»560″ height=»auto» data-src=»https://images.iphonephotographyschool.com/23854/1120/iPhone-Photography-Tips.jpg» srcset=»» data-srcset=»https://images.iphonephotographyschool.com/23854/546/iPhone-Photography-Tips.jpg 640w, https://images.iphonephotographyschool.com/23854/616/iPhone-Photography-Tips.jpg 720w, https://images.iphonephotographyschool.com/23854/560/iPhone-Photography-Tips.jpg 769w, https://images.iphonephotographyschool.com/23854/640/iPhone-Photography-Tips.jpg 750w, https://images.iphonephotographyschool.com/23854/708/iPhone-Photography-Tips.jpg 828w, https://images.iphonephotographyschool.com/23854/960/iPhone-Photography-Tips.jpg 1125w, https://images.iphonephotographyschool.com/23854/970/iPhone-Photography-Tips.jpg 1136w, https://images.iphonephotographyschool.com/23854/996/iPhone-Photography-Tips.jpg 1334w, https://images.iphonephotographyschool.com/23854/1062/iPhone-Photography-Tips.jpg 1242w, https://images.iphonephotographyschool.com/23854/1120/iPhone-Photography-Tips.jpg 1538w, https://images.iphonephotographyschool.com/23854/1120/iPhone-Photography-Tips.jpg 1792w, https://images.iphonephotographyschool.com/23854/1494/iPhone-Photography-Tips.jpg 2208w, https://images.iphonephotographyschool.com/23854/1680/iPhone-Photography-Tips.jpg 2436w» sizes=»(min-width: 768px) 768px, 100vw»/>
- » alt=»iPhone Photography Tips» width=»560″ height=»auto» data-src=»https://images.iphonephotographyschool.com/23880/1120/iPhone-Photography-Tips.jpg» srcset=»» data-srcset=»https://images.iphonephotographyschool.com/23880/546/iPhone-Photography-Tips.jpg 640w, https://images.iphonephotographyschool.com/23880/616/iPhone-Photography-Tips.jpg 720w, https://images.iphonephotographyschool.com/23880/560/iPhone-Photography-Tips.jpg 769w, https://images.iphonephotographyschool.com/23880/640/iPhone-Photography-Tips.jpg 750w, https://images.iphonephotographyschool.com/23880/708/iPhone-Photography-Tips.jpg 828w, https://images.iphonephotographyschool.com/23880/960/iPhone-Photography-Tips.jpg 1125w, https://images.iphonephotographyschool.com/23880/970/iPhone-Photography-Tips.jpg 1136w, https://images.iphonephotographyschool.com/23880/996/iPhone-Photography-Tips.jpg 1334w, https://images.iphonephotographyschool.com/23880/1062/iPhone-Photography-Tips.jpg 1242w, https://images.iphonephotographyschool.com/23880/1120/iPhone-Photography-Tips.jpg 1538w, https://images.iphonephotographyschool.com/23880/1120/iPhone-Photography-Tips.jpg 1792w, https://images.iphonephotographyschool.com/23880/1494/iPhone-Photography-Tips.jpg 2208w, https://images.iphonephotographyschool.com/23880/1680/iPhone-Photography-Tips.jpg 2436w» sizes=»(min-width: 768px) 768px, 100vw»/>
- 8. Use Symmetry
- 9. Use Diagonal Alignment
- 10. Edit Your Photos With VSCO Filters
iPhone vs. Mirrorless: Can You Really Take Pro Photos with Your Phone?
Share this:
We’re debunking the myth that professional photos aren’t possible with your smartphone camera. Let’s explore how an iPhone stacks up to a mirrorless camera.
One of the worst feelings to experience as a photographer is stumbling upon an amazing photo opportunity, but you don’t have your camera on you. Professional photographers and ambitious photo hobbyists alike might squander these moments because they forget that they (almost) always have a camera on hand — their phones!
Many of us wrongly assume that photos taken on a professional grade camera automatically look better than ones snapped on your iPhone. But, with the rapid advancements in smartphone camera technology, the results can be surprising. To see how an iPhone stacks up to a mirrorless camera, I compared the two in some real photo shoots.
iPhone vs Mirrorless
When looking at the two cameras side-by-side, there are a few specifications to consider. First, let’s look at the sensors of smartphones vs mirrorless cameras. I used an iPhone 7 for this shoot which has a 12 megapixel sensor, compared to my EOS R that boasts an impressive 30.3 megapixel CMOS sensor. Objectively speaking, the EOS R sensor can collect more than double the amount of information. For lenses I was using around the same focal length. On the iPhone 7 there is a 28mm wide lens with a f/1.8 aperture, and on the EOS R I was using a Canon L series 16-35mm with a f/2.8 aperture.
Between the image sensors and the lenses used, you’re obviously going to get a sharper, bigger file from the mirrorless camera. But, these factors don’t mean the image from one source will automatically be better than the other.
This isn’t the only mirrorless camera we’ve done! Check out our film vs digital video to see how mirrorless compares to old school photography.
Can You Tell the Difference?
I want to conduct a little experiment. Below, I’ve attached two similar photos side by side, one taken on my iPhone 7, and the other on my Canon EOSR. Before you scroll down to the next section of this article, try to guess which one is which. I’ll wait!


Locked your guesses in?
All of the A photos were taken on my iPhone, and Bs on my mirrorless camera. There’s no way of me knowing if you got them right or not, but I did conduct this experiment with my brother and he guessed 1/3 correctly. It’s important to note that he is by no means a photographer, and his rule of thumb is the sharper the photo, the higher the quality.
I, as an *artiste* and photographer, can appreciate the beauty created by Canon glass (or any lens for that matter), with the shallow depth of field and soft color profile. However, the phenomenon of a sharp image perceived as higher quality seems to be quite a common opinion. That means it’s relatively easy to take a “professional-looking” photo using basic tools, like an iPhone.
For photographers, it’s easy to get carried away by the professionally shot photos we see online — the ones we’re constantly comparing our own work to. Though expensive gear can add a certain quality to your shots, sometimes it’s necessary to take a step back and use the tools that you’ve got, instead of letting gear get in the way of capturing beautiful photos. With practice and dedication to the tools you have, you might even find that you don’t really need that gear upgrade after all.
A Few Tips for Better Photos on Your Smartphone
1. Expose the Photo In-Camera
One of the advantages of shooting photos on a DSLR or mirrorless camera is the ability to shoot RAW photos. When you shoot in RAW, the camera captures a flat profile with a lot of information about the image, so that when you go to edit it in post, you can manipulate the photo with a lot more flexibility. In comparison, your smartphone takes photos in JPGs, which doesn’t capture nearly as much information. When you’re taking photos on your smartphone, it’s important to try and expose your images as best as possible in camera so that you need the least amount of edits afterwards, to keep it looking natural.
One trick for iPhone users is to click on the screen to focus on an object. There should be a little slider on the right side of the focus square that pops up. If you click and drag on that slider up and down, you’ll adjust the exposure of the image. This way, if you adjust your exposure before taking the photo, you’ll have a much better base image to work with!
2. Reduce the Sharpness in Post
I’m not a huge fan of the overly sharpened look, so I like to go into some editing software and reduce that down so it’s not as pronounced when I finalize the photo and post it on Instagram. Obviously, this is a matter of taste. You may love how detailed and sharp they appear, so keep it if you want. However, if you’re trying to not make it as apparent that your photo was taken on a phone, reducing the sharpness is an easy fix.
3. Play to Your Smartphone’s Strengths
Knowing the advantages and disadvantages of your smartphone’s photos can help you play to its strengths and avoid highlighting negatives as much as possible.
- For example, most smartphone cameras create this digital blur effect when you focus on an object in the foreground to recreate depth of field, similar to a camera lens. Using this technique, you can capture really beautiful images that emulate the real thing!
 A simple image with a professional touch.
- Symmetry is literally your best friend. There’s something about a well composed photo that, no matter what it’s shot on, looks professional. On most smartphone camera apps, you have the option to use the built-in rule of thirds grid to help you compose your photos properly. Use it to your advantage!
This may sound a little harsh but, aside from the quality of your smartphone, it’s not the camera’s fault if you’re taking mediocre photos.
I’m a firm believer in outgrowing your gear. Once you get to the point where you feel like there’s no possible way you can take the photos that you want to take with your smartphone anymore, and you’re serious about photography, it may be time to upgrade. For the most part, it’s so awesome to have a compact little camera on us at all times. Go out and use it to your advantage!
Learn more about smartphone photography and videography here:
Источник
Apple highlights best photos shot on iPhone around the world
Shot on iPhone Challenge — The Winners

Alex Jiang (US), iPhone X S Max
Chen Man says: “This is a photo filled with lovely color and sense of story in the composition. Zooming in, you can see details of each family and their unique touch. The basketball hoop is placed right in the middle of the photo, adding more stories behind the image.”
Annet de Graaf says: “The narrative in architecture. There is actually life behind the surface of an average apartment building in an unknown city. Vivid colors and a perfect composition with the basketball board right in the middle! Great eye.”

Blake Marvin (US), iPhone X S Max
Austin Mann says: “This image took a lot of patience and great timing … with the iPhone’s zero shutter lag and Smart HDR, we’re able to see both the raccoon’s eyes and the deep shadows inside the log … something that would have previously been nearly impossible with natural light.”
Phil Schiller says: “The stolen glance between this raccoon/thief and photographer is priceless, we can imagine that it is saying ‘if you back away slowly no one has to get hurt.’ A nice use of black and white, the focus on the raccoon and the inside of the hollow log provides an organic movement frozen in time.”

Darren Soh (Singapore), iPhone X S Max
Phil Schiller says: “A reflection that looks like a painting, two worlds have collided. You are compelled to think about where and how this photo was taken, the bird flying in the corner provides the single sign of life in an otherwise surreal composition.”
Chen Man says: “Distortion and reflection at a strange angle — this photo creates a fantastic feeling.”
Nikita Yarosh (Belarus), iPhone 7
Austin Mann says: “I love how accessible this image is: You don’t have to travel to Iceland to capture something beautiful, it’s right under your nose. The way the lines intersect, the vibrant color, the sense of old and new … this is just a great image.”
Luísa Dörr says: “I like the simplicity of this image, the composition, light, details, everything looks good. Then you see one small line that looks wrong and makes me think what happened, where is this place, who was there. For me a good image is not only one that is strong or beautiful, but makes you think about it — and keep thinking.”

Dina Alfasi (Israel), iPhone X
Sebastien Marineau-Mes says: “Love how the heart shaped water puddle frames the subject, capturing a glimpse of the world as the subject hurriedly walks past.”
Brooks Kraft says: “A unique perspective and a new take on the popular subject of shooting reflections. I like that the subject is evident, but you are not really sure how the photo was taken. The puddle is the shape of a heart, with nice symmetry of the subject. The depth of field that iPhone has in regular mode made this image possible, a DSLR would have had a difficult time keeping everything in focus.”

Elizabeth Scarrott (US), iPhone 8 Plus
Brooks Kraft says: “A portrait that captures the wonderment of childhood in a beautiful setting. Great composition that shows both the personality of the child and the experience in the surroundings.”
Pete Souza says: “Nice portrait and use of background to provide context. The placement of the child’s face is in an optimal place — lining her up so the background directly behind her is clean and not distracting. The setting is a familiar — I’ve probably stood in this exact spot. But the picture is not like any I’ve seen from this location.”

Andrew Griswold (US), iPhone X S
Jon McCormack says: “This image is very well thought through and executed. The background pattern holds the image together and the repeated smaller versions of that pattern in the water droplets create a lot of visual interest. The creative use of depth of field here is excellent.”
Sebastien Marineau-Mes says: “Very unique composition and color palette, playing to the strengths of iPhone X S . What I find most interesting is the background pattern, uniquely magnified and distorted in every one of the water droplets. I’m drawn to studying and trying to elucidate what that pattern is.”

Bernard Antolin (US), iPhone X S Max
Kaiann Drance says: “Looks like a simple scene but a good choice of using black and white to elevate it with a different mood. Helps to bring out the dramatic contrast in the clouds and the surrounding landscape.”

Lie Adi Darmawan (US), iPhone X S
Luísa Dörr says: “I feel like this landscape was treated like an old portrait. The texture of the mountains evokes an old wrinkled face. Portraits and landscapes are the oldest way of creative representation by humans. There’s something about it that belongs to the realms of the subconscious mind, and this is mainly what appeals me of this picture; the part that I’m not able to explain.”
Robert Glaser (Germany), iPhone 7
Kaiann Drance says: “Gorgeous dynamic range. There’s detail throughout the photo in the meadow, trees, and clouds. Beautiful deep sky and pleasing color overall.”
Источник
10 iPhone Photography Tips To Quickly Improve Your Photos
Posted by Emil Pakarklis Comments 96
What’s the key to incredible iPhone photography? Some people work for years to master professional photography techniques. But all you really need are a few simple iPhone photography tips. In this tutorial, you’ll discover how to take good pictures using 10 quick and easy techniques. Read on to start taking better iPhone photos right now!
1. Keep Your Photos Simple
Do you want to know how to take good photos with your iPhone? Start by keeping your pictures simple.
» alt=»iPhone Photography Tips» width=»560″ height=»auto» data-src=»https://images.iphonephotographyschool.com/23884/1120/iPhone-Photography-Tips.jpg» srcset=»» data-srcset=»https://images.iphonephotographyschool.com/23884/546/iPhone-Photography-Tips.jpg 640w, https://images.iphonephotographyschool.com/23884/616/iPhone-Photography-Tips.jpg 720w, https://images.iphonephotographyschool.com/23884/560/iPhone-Photography-Tips.jpg 769w, https://images.iphonephotographyschool.com/23884/640/iPhone-Photography-Tips.jpg 750w, https://images.iphonephotographyschool.com/23884/708/iPhone-Photography-Tips.jpg 828w, https://images.iphonephotographyschool.com/23884/960/iPhone-Photography-Tips.jpg 1125w, https://images.iphonephotographyschool.com/23884/970/iPhone-Photography-Tips.jpg 1136w, https://images.iphonephotographyschool.com/23884/996/iPhone-Photography-Tips.jpg 1334w, https://images.iphonephotographyschool.com/23884/1062/iPhone-Photography-Tips.jpg 1242w, https://images.iphonephotographyschool.com/23884/1120/iPhone-Photography-Tips.jpg 1538w, https://images.iphonephotographyschool.com/23884/1120/iPhone-Photography-Tips.jpg 1792w, https://images.iphonephotographyschool.com/23884/1494/iPhone-Photography-Tips.jpg 2208w, https://images.iphonephotographyschool.com/23884/1680/iPhone-Photography-Tips.jpg 2436w» sizes=»(min-width: 768px) 768px, 100vw»/>
New photographers often overcomplicate their photos. But too many details distract the viewer. A busy scene makes it hard to create a beautiful composition.
One interesting subject is all you need to take great pictures. It’s easier to create a strong composition when your picture only has one subject.
» alt=»iPhone Photography Tips» width=»560″ height=»auto» data-src=»https://images.iphonephotographyschool.com/23865/1120/iPhone-Photography-Tips.jpg» srcset=»» data-srcset=»https://images.iphonephotographyschool.com/23865/546/iPhone-Photography-Tips.jpg 640w, https://images.iphonephotographyschool.com/23865/616/iPhone-Photography-Tips.jpg 720w, https://images.iphonephotographyschool.com/23865/560/iPhone-Photography-Tips.jpg 769w, https://images.iphonephotographyschool.com/23865/640/iPhone-Photography-Tips.jpg 750w, https://images.iphonephotographyschool.com/23865/708/iPhone-Photography-Tips.jpg 828w, https://images.iphonephotographyschool.com/23865/960/iPhone-Photography-Tips.jpg 1125w, https://images.iphonephotographyschool.com/23865/970/iPhone-Photography-Tips.jpg 1136w, https://images.iphonephotographyschool.com/23865/996/iPhone-Photography-Tips.jpg 1334w, https://images.iphonephotographyschool.com/23865/1062/iPhone-Photography-Tips.jpg 1242w, https://images.iphonephotographyschool.com/23865/1120/iPhone-Photography-Tips.jpg 1538w, https://images.iphonephotographyschool.com/23865/1120/iPhone-Photography-Tips.jpg 1792w, https://images.iphonephotographyschool.com/23865/1494/iPhone-Photography-Tips.jpg 2208w, https://images.iphonephotographyschool.com/23865/1680/iPhone-Photography-Tips.jpg 2436w» sizes=»(min-width: 768px) 768px, 100vw»/>
Don’t worry if most of your photo is empty space. In photography, we call this negative space. It’s a great way to make your subject stand out.
» alt=»iPhone Photography Tips» width=»560″ height=»auto» data-src=»https://images.iphonephotographyschool.com/23847/1120/iPhone-Photography-Tips.jpg» srcset=»» data-srcset=»https://images.iphonephotographyschool.com/23847/546/iPhone-Photography-Tips.jpg 640w, https://images.iphonephotographyschool.com/23847/616/iPhone-Photography-Tips.jpg 720w, https://images.iphonephotographyschool.com/23847/560/iPhone-Photography-Tips.jpg 769w, https://images.iphonephotographyschool.com/23847/640/iPhone-Photography-Tips.jpg 750w, https://images.iphonephotographyschool.com/23847/708/iPhone-Photography-Tips.jpg 828w, https://images.iphonephotographyschool.com/23847/960/iPhone-Photography-Tips.jpg 1125w, https://images.iphonephotographyschool.com/23847/970/iPhone-Photography-Tips.jpg 1136w, https://images.iphonephotographyschool.com/23847/996/iPhone-Photography-Tips.jpg 1334w, https://images.iphonephotographyschool.com/23847/1062/iPhone-Photography-Tips.jpg 1242w, https://images.iphonephotographyschool.com/23847/1120/iPhone-Photography-Tips.jpg 1538w, https://images.iphonephotographyschool.com/23847/1120/iPhone-Photography-Tips.jpg 1792w, https://images.iphonephotographyschool.com/23847/1494/iPhone-Photography-Tips.jpg 2208w, https://images.iphonephotographyschool.com/23847/1680/iPhone-Photography-Tips.jpg 2436w» sizes=»(min-width: 768px) 768px, 100vw»/>
Before you take the shot, check the scene for any distracting elements. Move closer, or change your viewpoint, to remove unwanted objects from your photo.
» alt=»iPhone Photography Tips» width=»560″ height=»auto» data-src=»https://images.iphonephotographyschool.com/23862/1120/iPhone-Photography-Tips.jpg» srcset=»» data-srcset=»https://images.iphonephotographyschool.com/23862/546/iPhone-Photography-Tips.jpg 640w, https://images.iphonephotographyschool.com/23862/616/iPhone-Photography-Tips.jpg 720w, https://images.iphonephotographyschool.com/23862/560/iPhone-Photography-Tips.jpg 769w, https://images.iphonephotographyschool.com/23862/640/iPhone-Photography-Tips.jpg 750w, https://images.iphonephotographyschool.com/23862/708/iPhone-Photography-Tips.jpg 828w, https://images.iphonephotographyschool.com/23862/960/iPhone-Photography-Tips.jpg 1125w, https://images.iphonephotographyschool.com/23862/970/iPhone-Photography-Tips.jpg 1136w, https://images.iphonephotographyschool.com/23862/996/iPhone-Photography-Tips.jpg 1334w, https://images.iphonephotographyschool.com/23862/1062/iPhone-Photography-Tips.jpg 1242w, https://images.iphonephotographyschool.com/23862/1120/iPhone-Photography-Tips.jpg 1538w, https://images.iphonephotographyschool.com/23862/1120/iPhone-Photography-Tips.jpg 1792w, https://images.iphonephotographyschool.com/23862/1494/iPhone-Photography-Tips.jpg 2208w, https://images.iphonephotographyschool.com/23862/1680/iPhone-Photography-Tips.jpg 2436w» sizes=»(min-width: 768px) 768px, 100vw»/>
Minimalist compositions are ideal for sharing on Instagram. Your photos are more likely to stand out on the small screen of a phone if you keep it simple.
» alt=»iPhone Photography Tips» width=»560″ height=»auto» data-src=»https://images.iphonephotographyschool.com/23881/1120/iPhone-Photography-Tips.jpg» srcset=»» data-srcset=»https://images.iphonephotographyschool.com/23881/546/iPhone-Photography-Tips.jpg 640w, https://images.iphonephotographyschool.com/23881/616/iPhone-Photography-Tips.jpg 720w, https://images.iphonephotographyschool.com/23881/560/iPhone-Photography-Tips.jpg 769w, https://images.iphonephotographyschool.com/23881/640/iPhone-Photography-Tips.jpg 750w, https://images.iphonephotographyschool.com/23881/708/iPhone-Photography-Tips.jpg 828w, https://images.iphonephotographyschool.com/23881/960/iPhone-Photography-Tips.jpg 1125w, https://images.iphonephotographyschool.com/23881/970/iPhone-Photography-Tips.jpg 1136w, https://images.iphonephotographyschool.com/23881/996/iPhone-Photography-Tips.jpg 1334w, https://images.iphonephotographyschool.com/23881/1062/iPhone-Photography-Tips.jpg 1242w, https://images.iphonephotographyschool.com/23881/1120/iPhone-Photography-Tips.jpg 1538w, https://images.iphonephotographyschool.com/23881/1120/iPhone-Photography-Tips.jpg 1792w, https://images.iphonephotographyschool.com/23881/1494/iPhone-Photography-Tips.jpg 2208w, https://images.iphonephotographyschool.com/23881/1680/iPhone-Photography-Tips.jpg 2436w» sizes=»(min-width: 768px) 768px, 100vw»/>
Always aim to create clean and simple compositions. This is one of the easiest, yet most powerful iPhone photography tips you can learn.
2. Shoot From A Low Angle
Most people take iPhone photos from chest height. This is usually the most convenient way of taking a picture.
But there are usually more creative options for taking great photos. Learning how to take a good photo involves thinking outside the box!
» alt=»iPhone Photography Tips» width=»560″ height=»auto» data-src=»https://images.iphonephotographyschool.com/23849/1120/iPhone-Photography-Tips.jpg» srcset=»» data-srcset=»https://images.iphonephotographyschool.com/23849/546/iPhone-Photography-Tips.jpg 640w, https://images.iphonephotographyschool.com/23849/616/iPhone-Photography-Tips.jpg 720w, https://images.iphonephotographyschool.com/23849/560/iPhone-Photography-Tips.jpg 769w, https://images.iphonephotographyschool.com/23849/640/iPhone-Photography-Tips.jpg 750w, https://images.iphonephotographyschool.com/23849/708/iPhone-Photography-Tips.jpg 828w, https://images.iphonephotographyschool.com/23849/960/iPhone-Photography-Tips.jpg 1125w, https://images.iphonephotographyschool.com/23849/970/iPhone-Photography-Tips.jpg 1136w, https://images.iphonephotographyschool.com/23849/996/iPhone-Photography-Tips.jpg 1334w, https://images.iphonephotographyschool.com/23849/1062/iPhone-Photography-Tips.jpg 1242w, https://images.iphonephotographyschool.com/23849/1120/iPhone-Photography-Tips.jpg 1538w, https://images.iphonephotographyschool.com/23849/1120/iPhone-Photography-Tips.jpg 1792w, https://images.iphonephotographyschool.com/23849/1494/iPhone-Photography-Tips.jpg 2208w, https://images.iphonephotographyschool.com/23849/1680/iPhone-Photography-Tips.jpg 2436w» sizes=»(min-width: 768px) 768px, 100vw»/>
An easy way to improve your photos is to shoot from a different perspective. Often the best way to do that is to shoot from a lower angle.
» alt=»iPhone Photography Tips» width=»560″ height=»auto» data-src=»https://images.iphonephotographyschool.com/23888/1120/iPhone-Photography-Tips.jpg» srcset=»» data-srcset=»https://images.iphonephotographyschool.com/23888/546/iPhone-Photography-Tips.jpg 640w, https://images.iphonephotographyschool.com/23888/616/iPhone-Photography-Tips.jpg 720w, https://images.iphonephotographyschool.com/23888/560/iPhone-Photography-Tips.jpg 769w, https://images.iphonephotographyschool.com/23888/640/iPhone-Photography-Tips.jpg 750w, https://images.iphonephotographyschool.com/23888/708/iPhone-Photography-Tips.jpg 828w, https://images.iphonephotographyschool.com/23888/960/iPhone-Photography-Tips.jpg 1125w, https://images.iphonephotographyschool.com/23888/970/iPhone-Photography-Tips.jpg 1136w, https://images.iphonephotographyschool.com/23888/996/iPhone-Photography-Tips.jpg 1334w, https://images.iphonephotographyschool.com/23888/1062/iPhone-Photography-Tips.jpg 1242w, https://images.iphonephotographyschool.com/23888/1120/iPhone-Photography-Tips.jpg 1538w, https://images.iphonephotographyschool.com/23888/1120/iPhone-Photography-Tips.jpg 1792w, https://images.iphonephotographyschool.com/23888/1494/iPhone-Photography-Tips.jpg 2208w, https://images.iphonephotographyschool.com/23888/1680/iPhone-Photography-Tips.jpg 2436w» sizes=»(min-width: 768px) 768px, 100vw»/>
There are three great reasons to take pictures from a low angle. First, your photo will be more intriguing. It shows the world from a new perspective.
» alt=»iPhone Photography Tips» width=»560″ height=»auto» data-src=»https://images.iphonephotographyschool.com/23860/1120/iPhone-Photography-Tips.jpg» srcset=»» data-srcset=»https://images.iphonephotographyschool.com/23860/546/iPhone-Photography-Tips.jpg 640w, https://images.iphonephotographyschool.com/23860/616/iPhone-Photography-Tips.jpg 720w, https://images.iphonephotographyschool.com/23860/560/iPhone-Photography-Tips.jpg 769w, https://images.iphonephotographyschool.com/23860/640/iPhone-Photography-Tips.jpg 750w, https://images.iphonephotographyschool.com/23860/708/iPhone-Photography-Tips.jpg 828w, https://images.iphonephotographyschool.com/23860/960/iPhone-Photography-Tips.jpg 1125w, https://images.iphonephotographyschool.com/23860/970/iPhone-Photography-Tips.jpg 1136w, https://images.iphonephotographyschool.com/23860/996/iPhone-Photography-Tips.jpg 1334w, https://images.iphonephotographyschool.com/23860/1062/iPhone-Photography-Tips.jpg 1242w, https://images.iphonephotographyschool.com/23860/1120/iPhone-Photography-Tips.jpg 1538w, https://images.iphonephotographyschool.com/23860/1120/iPhone-Photography-Tips.jpg 1792w, https://images.iphonephotographyschool.com/23860/1494/iPhone-Photography-Tips.jpg 2208w, https://images.iphonephotographyschool.com/23860/1680/iPhone-Photography-Tips.jpg 2436w» sizes=»(min-width: 768px) 768px, 100vw»/>
Second, shooting from a lower angle shows your subject with nothing but sky in the background. This is perfect for removing unwanted distractions. It makes your subject stand out against the plain background.
A third benefit of shooting from low down is that you can show interesting details in the foreground.
» alt=»iPhone Photography Tips» width=»560″ height=»auto» data-src=»https://images.iphonephotographyschool.com/23864/1120/iPhone-Photography-Tips.jpg» srcset=»» data-srcset=»https://images.iphonephotographyschool.com/23864/546/iPhone-Photography-Tips.jpg 640w, https://images.iphonephotographyschool.com/23864/616/iPhone-Photography-Tips.jpg 720w, https://images.iphonephotographyschool.com/23864/560/iPhone-Photography-Tips.jpg 769w, https://images.iphonephotographyschool.com/23864/640/iPhone-Photography-Tips.jpg 750w, https://images.iphonephotographyschool.com/23864/708/iPhone-Photography-Tips.jpg 828w, https://images.iphonephotographyschool.com/23864/960/iPhone-Photography-Tips.jpg 1125w, https://images.iphonephotographyschool.com/23864/970/iPhone-Photography-Tips.jpg 1136w, https://images.iphonephotographyschool.com/23864/996/iPhone-Photography-Tips.jpg 1334w, https://images.iphonephotographyschool.com/23864/1062/iPhone-Photography-Tips.jpg 1242w, https://images.iphonephotographyschool.com/23864/1120/iPhone-Photography-Tips.jpg 1538w, https://images.iphonephotographyschool.com/23864/1120/iPhone-Photography-Tips.jpg 1792w, https://images.iphonephotographyschool.com/23864/1494/iPhone-Photography-Tips.jpg 2208w, https://images.iphonephotographyschool.com/23864/1680/iPhone-Photography-Tips.jpg 2436w» sizes=»(min-width: 768px) 768px, 100vw»/>
Are you shooting landscape photos? Try shooting from low down to include flowers in the foreground. Or capture ripples and reflections in water.
» alt=»iPhone Photography Tips» width=»560″ height=»auto» data-src=»https://images.iphonephotographyschool.com/23897/1120/iPhone-Photography-Tips.jpg» srcset=»» data-srcset=»https://images.iphonephotographyschool.com/23897/546/iPhone-Photography-Tips.jpg 640w, https://images.iphonephotographyschool.com/23897/616/iPhone-Photography-Tips.jpg 720w, https://images.iphonephotographyschool.com/23897/560/iPhone-Photography-Tips.jpg 769w, https://images.iphonephotographyschool.com/23897/640/iPhone-Photography-Tips.jpg 750w, https://images.iphonephotographyschool.com/23897/708/iPhone-Photography-Tips.jpg 828w, https://images.iphonephotographyschool.com/23897/960/iPhone-Photography-Tips.jpg 1125w, https://images.iphonephotographyschool.com/23897/970/iPhone-Photography-Tips.jpg 1136w, https://images.iphonephotographyschool.com/23897/996/iPhone-Photography-Tips.jpg 1334w, https://images.iphonephotographyschool.com/23897/1062/iPhone-Photography-Tips.jpg 1242w, https://images.iphonephotographyschool.com/23897/1120/iPhone-Photography-Tips.jpg 1538w, https://images.iphonephotographyschool.com/23897/1120/iPhone-Photography-Tips.jpg 1792w, https://images.iphonephotographyschool.com/23897/1494/iPhone-Photography-Tips.jpg 2208w, https://images.iphonephotographyschool.com/23897/1680/iPhone-Photography-Tips.jpg 2436w» sizes=»(min-width: 768px) 768px, 100vw»/>
For the ultimate low angle shot, try kneeling or even lying on the ground!
3. Show Depth In Your Photos
Most photos look better when they convey a sense of depth. Creating depth helps draw the viewer’s eye into the scene. This is especially important in landscape photography.
» alt=»iPhone Photography Tips» width=»560″ height=»auto» data-src=»https://images.iphonephotographyschool.com/23901/1120/iPhone-Photography-Tips.jpg» srcset=»» data-srcset=»https://images.iphonephotographyschool.com/23901/546/iPhone-Photography-Tips.jpg 640w, https://images.iphonephotographyschool.com/23901/616/iPhone-Photography-Tips.jpg 720w, https://images.iphonephotographyschool.com/23901/560/iPhone-Photography-Tips.jpg 769w, https://images.iphonephotographyschool.com/23901/640/iPhone-Photography-Tips.jpg 750w, https://images.iphonephotographyschool.com/23901/708/iPhone-Photography-Tips.jpg 828w, https://images.iphonephotographyschool.com/23901/960/iPhone-Photography-Tips.jpg 1125w, https://images.iphonephotographyschool.com/23901/970/iPhone-Photography-Tips.jpg 1136w, https://images.iphonephotographyschool.com/23901/996/iPhone-Photography-Tips.jpg 1334w, https://images.iphonephotographyschool.com/23901/1062/iPhone-Photography-Tips.jpg 1242w, https://images.iphonephotographyschool.com/23901/1120/iPhone-Photography-Tips.jpg 1538w, https://images.iphonephotographyschool.com/23901/1120/iPhone-Photography-Tips.jpg 1792w, https://images.iphonephotographyschool.com/23901/1494/iPhone-Photography-Tips.jpg 2208w, https://images.iphonephotographyschool.com/23901/1680/iPhone-Photography-Tips.jpg 2436w» sizes=»(min-width: 768px) 768px, 100vw»/>
There are several techniques to create depth in your photos. One of the most powerful methods is to use leading lines in your composition.
» alt=»iPhone Photography Tips» width=»560″ height=»auto» data-src=»https://images.iphonephotographyschool.com/23899/1120/iPhone-Photography-Tips.jpg» srcset=»» data-srcset=»https://images.iphonephotographyschool.com/23899/546/iPhone-Photography-Tips.jpg 640w, https://images.iphonephotographyschool.com/23899/616/iPhone-Photography-Tips.jpg 720w, https://images.iphonephotographyschool.com/23899/560/iPhone-Photography-Tips.jpg 769w, https://images.iphonephotographyschool.com/23899/640/iPhone-Photography-Tips.jpg 750w, https://images.iphonephotographyschool.com/23899/708/iPhone-Photography-Tips.jpg 828w, https://images.iphonephotographyschool.com/23899/960/iPhone-Photography-Tips.jpg 1125w, https://images.iphonephotographyschool.com/23899/970/iPhone-Photography-Tips.jpg 1136w, https://images.iphonephotographyschool.com/23899/996/iPhone-Photography-Tips.jpg 1334w, https://images.iphonephotographyschool.com/23899/1062/iPhone-Photography-Tips.jpg 1242w, https://images.iphonephotographyschool.com/23899/1120/iPhone-Photography-Tips.jpg 1538w, https://images.iphonephotographyschool.com/23899/1120/iPhone-Photography-Tips.jpg 1792w, https://images.iphonephotographyschool.com/23899/1494/iPhone-Photography-Tips.jpg 2208w, https://images.iphonephotographyschool.com/23899/1680/iPhone-Photography-Tips.jpg 2436w» sizes=»(min-width: 768px) 768px, 100vw»/>
Roads, paths, railway tracks, rivers and fences make excellent leading lines. At the beach, use the water’s edge or ripples in the sand.
Compose your photo so the line leads from the foreground into the distance. This draws the viewer through the scene, making your photo more engaging.
» alt=»iPhone Photography Tips» width=»560″ height=»auto» data-src=»https://images.iphonephotographyschool.com/23874/1120/iPhone-Photography-Tips.jpg» srcset=»» data-srcset=»https://images.iphonephotographyschool.com/23874/546/iPhone-Photography-Tips.jpg 640w, https://images.iphonephotographyschool.com/23874/616/iPhone-Photography-Tips.jpg 720w, https://images.iphonephotographyschool.com/23874/560/iPhone-Photography-Tips.jpg 769w, https://images.iphonephotographyschool.com/23874/640/iPhone-Photography-Tips.jpg 750w, https://images.iphonephotographyschool.com/23874/708/iPhone-Photography-Tips.jpg 828w, https://images.iphonephotographyschool.com/23874/960/iPhone-Photography-Tips.jpg 1125w, https://images.iphonephotographyschool.com/23874/970/iPhone-Photography-Tips.jpg 1136w, https://images.iphonephotographyschool.com/23874/996/iPhone-Photography-Tips.jpg 1334w, https://images.iphonephotographyschool.com/23874/1062/iPhone-Photography-Tips.jpg 1242w, https://images.iphonephotographyschool.com/23874/1120/iPhone-Photography-Tips.jpg 1538w, https://images.iphonephotographyschool.com/23874/1120/iPhone-Photography-Tips.jpg 1792w, https://images.iphonephotographyschool.com/23874/1494/iPhone-Photography-Tips.jpg 2208w, https://images.iphonephotographyschool.com/23874/1680/iPhone-Photography-Tips.jpg 2436w» sizes=»(min-width: 768px) 768px, 100vw»/>
Another way to create depth is to include something in the foreground. Look for rocks, flowers, leaves or other interesting objects.
» alt=»iPhone Photography Tips» width=»560″ height=»auto» data-src=»https://images.iphonephotographyschool.com/23872/1120/iPhone-Photography-Tips.jpg» srcset=»» data-srcset=»https://images.iphonephotographyschool.com/23872/546/iPhone-Photography-Tips.jpg 640w, https://images.iphonephotographyschool.com/23872/616/iPhone-Photography-Tips.jpg 720w, https://images.iphonephotographyschool.com/23872/560/iPhone-Photography-Tips.jpg 769w, https://images.iphonephotographyschool.com/23872/640/iPhone-Photography-Tips.jpg 750w, https://images.iphonephotographyschool.com/23872/708/iPhone-Photography-Tips.jpg 828w, https://images.iphonephotographyschool.com/23872/960/iPhone-Photography-Tips.jpg 1125w, https://images.iphonephotographyschool.com/23872/970/iPhone-Photography-Tips.jpg 1136w, https://images.iphonephotographyschool.com/23872/996/iPhone-Photography-Tips.jpg 1334w, https://images.iphonephotographyschool.com/23872/1062/iPhone-Photography-Tips.jpg 1242w, https://images.iphonephotographyschool.com/23872/1120/iPhone-Photography-Tips.jpg 1538w, https://images.iphonephotographyschool.com/23872/1120/iPhone-Photography-Tips.jpg 1792w, https://images.iphonephotographyschool.com/23872/1494/iPhone-Photography-Tips.jpg 2208w, https://images.iphonephotographyschool.com/23872/1680/iPhone-Photography-Tips.jpg 2436w» sizes=»(min-width: 768px) 768px, 100vw»/>
If you’re struggling to include foreground objects in your photo, shoot from a lower angle.
Try to include subjects in the foreground, middleground and background. This simple iPhone photography tip will immediately make your images more three-dimensional.
» alt=»iPhone Photography Tips» width=»560″ height=»auto» data-src=»https://images.iphonephotographyschool.com/23869/1120/iPhone-Photography-Tips.jpg» srcset=»» data-srcset=»https://images.iphonephotographyschool.com/23869/546/iPhone-Photography-Tips.jpg 640w, https://images.iphonephotographyschool.com/23869/616/iPhone-Photography-Tips.jpg 720w, https://images.iphonephotographyschool.com/23869/560/iPhone-Photography-Tips.jpg 769w, https://images.iphonephotographyschool.com/23869/640/iPhone-Photography-Tips.jpg 750w, https://images.iphonephotographyschool.com/23869/708/iPhone-Photography-Tips.jpg 828w, https://images.iphonephotographyschool.com/23869/960/iPhone-Photography-Tips.jpg 1125w, https://images.iphonephotographyschool.com/23869/970/iPhone-Photography-Tips.jpg 1136w, https://images.iphonephotographyschool.com/23869/996/iPhone-Photography-Tips.jpg 1334w, https://images.iphonephotographyschool.com/23869/1062/iPhone-Photography-Tips.jpg 1242w, https://images.iphonephotographyschool.com/23869/1120/iPhone-Photography-Tips.jpg 1538w, https://images.iphonephotographyschool.com/23869/1120/iPhone-Photography-Tips.jpg 1792w, https://images.iphonephotographyschool.com/23869/1494/iPhone-Photography-Tips.jpg 2208w, https://images.iphonephotographyschool.com/23869/1680/iPhone-Photography-Tips.jpg 2436w» sizes=»(min-width: 768px) 768px, 100vw»/>
A third way to create a sense of depth is to use something in the foreground to frame the scene. You could use archways, window frames or overhanging tree branches.
» alt=»iPhone Photography Tips» width=»560″ height=»auto» data-src=»https://images.iphonephotographyschool.com/23868/1120/iPhone-Photography-Tips.jpg» srcset=»» data-srcset=»https://images.iphonephotographyschool.com/23868/546/iPhone-Photography-Tips.jpg 640w, https://images.iphonephotographyschool.com/23868/616/iPhone-Photography-Tips.jpg 720w, https://images.iphonephotographyschool.com/23868/560/iPhone-Photography-Tips.jpg 769w, https://images.iphonephotographyschool.com/23868/640/iPhone-Photography-Tips.jpg 750w, https://images.iphonephotographyschool.com/23868/708/iPhone-Photography-Tips.jpg 828w, https://images.iphonephotographyschool.com/23868/960/iPhone-Photography-Tips.jpg 1125w, https://images.iphonephotographyschool.com/23868/970/iPhone-Photography-Tips.jpg 1136w, https://images.iphonephotographyschool.com/23868/996/iPhone-Photography-Tips.jpg 1334w, https://images.iphonephotographyschool.com/23868/1062/iPhone-Photography-Tips.jpg 1242w, https://images.iphonephotographyschool.com/23868/1120/iPhone-Photography-Tips.jpg 1538w, https://images.iphonephotographyschool.com/23868/1120/iPhone-Photography-Tips.jpg 1792w, https://images.iphonephotographyschool.com/23868/1494/iPhone-Photography-Tips.jpg 2208w, https://images.iphonephotographyschool.com/23868/1680/iPhone-Photography-Tips.jpg 2436w» sizes=»(min-width: 768px) 768px, 100vw»/>
Shooting through a frame draws the viewer’s eye through the frame to the scene beyond. This is a great way to create a stronger feeling of depth in your photo.
Never under-estimate the power of composition in photography. If you’re wondering how to take good photos with iPhone, this is one of the key skills to master.
4. Capture Close-Up Detail
One of the biggest photography mistakes is not getting close enough to the subject. This is particularly important when photographing objects with intricate details.
» alt=»iPhone Photography Tips» width=»560″ height=»auto» data-src=»https://images.iphonephotographyschool.com/23882/1120/iPhone-Photography-Tips.jpg» srcset=»» data-srcset=»https://images.iphonephotographyschool.com/23882/546/iPhone-Photography-Tips.jpg 640w, https://images.iphonephotographyschool.com/23882/616/iPhone-Photography-Tips.jpg 720w, https://images.iphonephotographyschool.com/23882/560/iPhone-Photography-Tips.jpg 769w, https://images.iphonephotographyschool.com/23882/640/iPhone-Photography-Tips.jpg 750w, https://images.iphonephotographyschool.com/23882/708/iPhone-Photography-Tips.jpg 828w, https://images.iphonephotographyschool.com/23882/960/iPhone-Photography-Tips.jpg 1125w, https://images.iphonephotographyschool.com/23882/970/iPhone-Photography-Tips.jpg 1136w, https://images.iphonephotographyschool.com/23882/996/iPhone-Photography-Tips.jpg 1334w, https://images.iphonephotographyschool.com/23882/1062/iPhone-Photography-Tips.jpg 1242w, https://images.iphonephotographyschool.com/23882/1120/iPhone-Photography-Tips.jpg 1538w, https://images.iphonephotographyschool.com/23882/1120/iPhone-Photography-Tips.jpg 1792w, https://images.iphonephotographyschool.com/23882/1494/iPhone-Photography-Tips.jpg 2208w, https://images.iphonephotographyschool.com/23882/1680/iPhone-Photography-Tips.jpg 2436w» sizes=»(min-width: 768px) 768px, 100vw»/>
If you shoot from too far away, you won’t capture the amazing details of your subject. Close-up patterns, textures and colors will bring your photos to life.
» alt=»iPhone Photography Tips» width=»560″ height=»auto» data-src=»https://images.iphonephotographyschool.com/23894/1120/iPhone-Photography-Tips.jpg» srcset=»» data-srcset=»https://images.iphonephotographyschool.com/23894/546/iPhone-Photography-Tips.jpg 640w, https://images.iphonephotographyschool.com/23894/616/iPhone-Photography-Tips.jpg 720w, https://images.iphonephotographyschool.com/23894/560/iPhone-Photography-Tips.jpg 769w, https://images.iphonephotographyschool.com/23894/640/iPhone-Photography-Tips.jpg 750w, https://images.iphonephotographyschool.com/23894/708/iPhone-Photography-Tips.jpg 828w, https://images.iphonephotographyschool.com/23894/960/iPhone-Photography-Tips.jpg 1125w, https://images.iphonephotographyschool.com/23894/970/iPhone-Photography-Tips.jpg 1136w, https://images.iphonephotographyschool.com/23894/996/iPhone-Photography-Tips.jpg 1334w, https://images.iphonephotographyschool.com/23894/1062/iPhone-Photography-Tips.jpg 1242w, https://images.iphonephotographyschool.com/23894/1120/iPhone-Photography-Tips.jpg 1538w, https://images.iphonephotographyschool.com/23894/1120/iPhone-Photography-Tips.jpg 1792w, https://images.iphonephotographyschool.com/23894/1494/iPhone-Photography-Tips.jpg 2208w, https://images.iphonephotographyschool.com/23894/1680/iPhone-Photography-Tips.jpg 2436w» sizes=»(min-width: 768px) 768px, 100vw»/>
Flowers, leaves, water droplets and other textured subjects look more exciting up close.
» alt=»iPhone Photography Tips» width=»560″ height=»auto» data-src=»https://images.iphonephotographyschool.com/23886/1120/iPhone-Photography-Tips.jpg» srcset=»» data-srcset=»https://images.iphonephotographyschool.com/23886/546/iPhone-Photography-Tips.jpg 640w, https://images.iphonephotographyschool.com/23886/616/iPhone-Photography-Tips.jpg 720w, https://images.iphonephotographyschool.com/23886/560/iPhone-Photography-Tips.jpg 769w, https://images.iphonephotographyschool.com/23886/640/iPhone-Photography-Tips.jpg 750w, https://images.iphonephotographyschool.com/23886/708/iPhone-Photography-Tips.jpg 828w, https://images.iphonephotographyschool.com/23886/960/iPhone-Photography-Tips.jpg 1125w, https://images.iphonephotographyschool.com/23886/970/iPhone-Photography-Tips.jpg 1136w, https://images.iphonephotographyschool.com/23886/996/iPhone-Photography-Tips.jpg 1334w, https://images.iphonephotographyschool.com/23886/1062/iPhone-Photography-Tips.jpg 1242w, https://images.iphonephotographyschool.com/23886/1120/iPhone-Photography-Tips.jpg 1538w, https://images.iphonephotographyschool.com/23886/1120/iPhone-Photography-Tips.jpg 1792w, https://images.iphonephotographyschool.com/23886/1494/iPhone-Photography-Tips.jpg 2208w, https://images.iphonephotographyschool.com/23886/1680/iPhone-Photography-Tips.jpg 2436w» sizes=»(min-width: 768px) 768px, 100vw»/>
Moving in close is also a good technique to use in portrait photography. Getting close lets you capture your subject’s facial features and emotions. This gives your portrait photos far more impact.
» alt=»iPhone Photography Tips» width=»560″ height=»auto» data-src=»https://images.iphonephotographyschool.com/23878/1120/iPhone-Photography-Tips.jpg» srcset=»» data-srcset=»https://images.iphonephotographyschool.com/23878/546/iPhone-Photography-Tips.jpg 640w, https://images.iphonephotographyschool.com/23878/616/iPhone-Photography-Tips.jpg 720w, https://images.iphonephotographyschool.com/23878/560/iPhone-Photography-Tips.jpg 769w, https://images.iphonephotographyschool.com/23878/640/iPhone-Photography-Tips.jpg 750w, https://images.iphonephotographyschool.com/23878/708/iPhone-Photography-Tips.jpg 828w, https://images.iphonephotographyschool.com/23878/960/iPhone-Photography-Tips.jpg 1125w, https://images.iphonephotographyschool.com/23878/970/iPhone-Photography-Tips.jpg 1136w, https://images.iphonephotographyschool.com/23878/996/iPhone-Photography-Tips.jpg 1334w, https://images.iphonephotographyschool.com/23878/1062/iPhone-Photography-Tips.jpg 1242w, https://images.iphonephotographyschool.com/23878/1120/iPhone-Photography-Tips.jpg 1538w, https://images.iphonephotographyschool.com/23878/1120/iPhone-Photography-Tips.jpg 1792w, https://images.iphonephotographyschool.com/23878/1494/iPhone-Photography-Tips.jpg 2208w, https://images.iphonephotographyschool.com/23878/1680/iPhone-Photography-Tips.jpg 2436w» sizes=»(min-width: 768px) 768px, 100vw»/>
Shooting up close works when photographing both people and pets. Get down to the level of your subject and don’t be afraid to get in close.
» alt=»iPhone Photography Tips» width=»560″ height=»auto» data-src=»https://images.iphonephotographyschool.com/23885/1120/iPhone-Photography-Tips.jpg» srcset=»» data-srcset=»https://images.iphonephotographyschool.com/23885/546/iPhone-Photography-Tips.jpg 640w, https://images.iphonephotographyschool.com/23885/616/iPhone-Photography-Tips.jpg 720w, https://images.iphonephotographyschool.com/23885/560/iPhone-Photography-Tips.jpg 769w, https://images.iphonephotographyschool.com/23885/640/iPhone-Photography-Tips.jpg 750w, https://images.iphonephotographyschool.com/23885/708/iPhone-Photography-Tips.jpg 828w, https://images.iphonephotographyschool.com/23885/960/iPhone-Photography-Tips.jpg 1125w, https://images.iphonephotographyschool.com/23885/970/iPhone-Photography-Tips.jpg 1136w, https://images.iphonephotographyschool.com/23885/996/iPhone-Photography-Tips.jpg 1334w, https://images.iphonephotographyschool.com/23885/1062/iPhone-Photography-Tips.jpg 1242w, https://images.iphonephotographyschool.com/23885/1120/iPhone-Photography-Tips.jpg 1538w, https://images.iphonephotographyschool.com/23885/1120/iPhone-Photography-Tips.jpg 1792w, https://images.iphonephotographyschool.com/23885/1494/iPhone-Photography-Tips.jpg 2208w, https://images.iphonephotographyschool.com/23885/1680/iPhone-Photography-Tips.jpg 2436w» sizes=»(min-width: 768px) 768px, 100vw»/>
Keep in mind that your iPhone won’t be able to focus if the lens is too close to your subject. To capture extreme close-ups of tiny detail, you’ll need an add-on macro lens.
» alt=»iPhone Photography Tips» width=»560″ height=»auto» data-src=»https://images.iphonephotographyschool.com/23902/1120/iPhone-Photography-Tips.jpg» srcset=»» data-srcset=»https://images.iphonephotographyschool.com/23902/546/iPhone-Photography-Tips.jpg 640w, https://images.iphonephotographyschool.com/23902/616/iPhone-Photography-Tips.jpg 720w, https://images.iphonephotographyschool.com/23902/560/iPhone-Photography-Tips.jpg 769w, https://images.iphonephotographyschool.com/23902/640/iPhone-Photography-Tips.jpg 750w, https://images.iphonephotographyschool.com/23902/708/iPhone-Photography-Tips.jpg 828w, https://images.iphonephotographyschool.com/23902/960/iPhone-Photography-Tips.jpg 1125w, https://images.iphonephotographyschool.com/23902/970/iPhone-Photography-Tips.jpg 1136w, https://images.iphonephotographyschool.com/23902/996/iPhone-Photography-Tips.jpg 1334w, https://images.iphonephotographyschool.com/23902/1062/iPhone-Photography-Tips.jpg 1242w, https://images.iphonephotographyschool.com/23902/1120/iPhone-Photography-Tips.jpg 1538w, https://images.iphonephotographyschool.com/23902/1120/iPhone-Photography-Tips.jpg 1792w, https://images.iphonephotographyschool.com/23902/1494/iPhone-Photography-Tips.jpg 2208w, https://images.iphonephotographyschool.com/23902/1680/iPhone-Photography-Tips.jpg 2436w» sizes=»(min-width: 768px) 768px, 100vw»/>
Macro lenses allow your camera to focus very close to the subject. There are many different macro lenses on the market.
Olloclip and Moment are two popular lenses to check out. The Hitcase macro lens also produces great results.
Of course, for genres like landscape photography, you’ll be photographing distant scenes. But you can still include close-up detail in the foreground. This is a great way to add extra visual interest and a stronger sense of depth.
» alt=»iPhone Photography Tips» width=»560″ height=»auto» data-src=»https://images.iphonephotographyschool.com/23887/1120/iPhone-Photography-Tips.jpg» srcset=»» data-srcset=»https://images.iphonephotographyschool.com/23887/546/iPhone-Photography-Tips.jpg 640w, https://images.iphonephotographyschool.com/23887/616/iPhone-Photography-Tips.jpg 720w, https://images.iphonephotographyschool.com/23887/560/iPhone-Photography-Tips.jpg 769w, https://images.iphonephotographyschool.com/23887/640/iPhone-Photography-Tips.jpg 750w, https://images.iphonephotographyschool.com/23887/708/iPhone-Photography-Tips.jpg 828w, https://images.iphonephotographyschool.com/23887/960/iPhone-Photography-Tips.jpg 1125w, https://images.iphonephotographyschool.com/23887/970/iPhone-Photography-Tips.jpg 1136w, https://images.iphonephotographyschool.com/23887/996/iPhone-Photography-Tips.jpg 1334w, https://images.iphonephotographyschool.com/23887/1062/iPhone-Photography-Tips.jpg 1242w, https://images.iphonephotographyschool.com/23887/1120/iPhone-Photography-Tips.jpg 1538w, https://images.iphonephotographyschool.com/23887/1120/iPhone-Photography-Tips.jpg 1792w, https://images.iphonephotographyschool.com/23887/1494/iPhone-Photography-Tips.jpg 2208w, https://images.iphonephotographyschool.com/23887/1680/iPhone-Photography-Tips.jpg 2436w» sizes=»(min-width: 768px) 768px, 100vw»/>
Don’t be afraid to get up close to foreground objects when you’re shooting scenery. It might make all the difference to your photo!
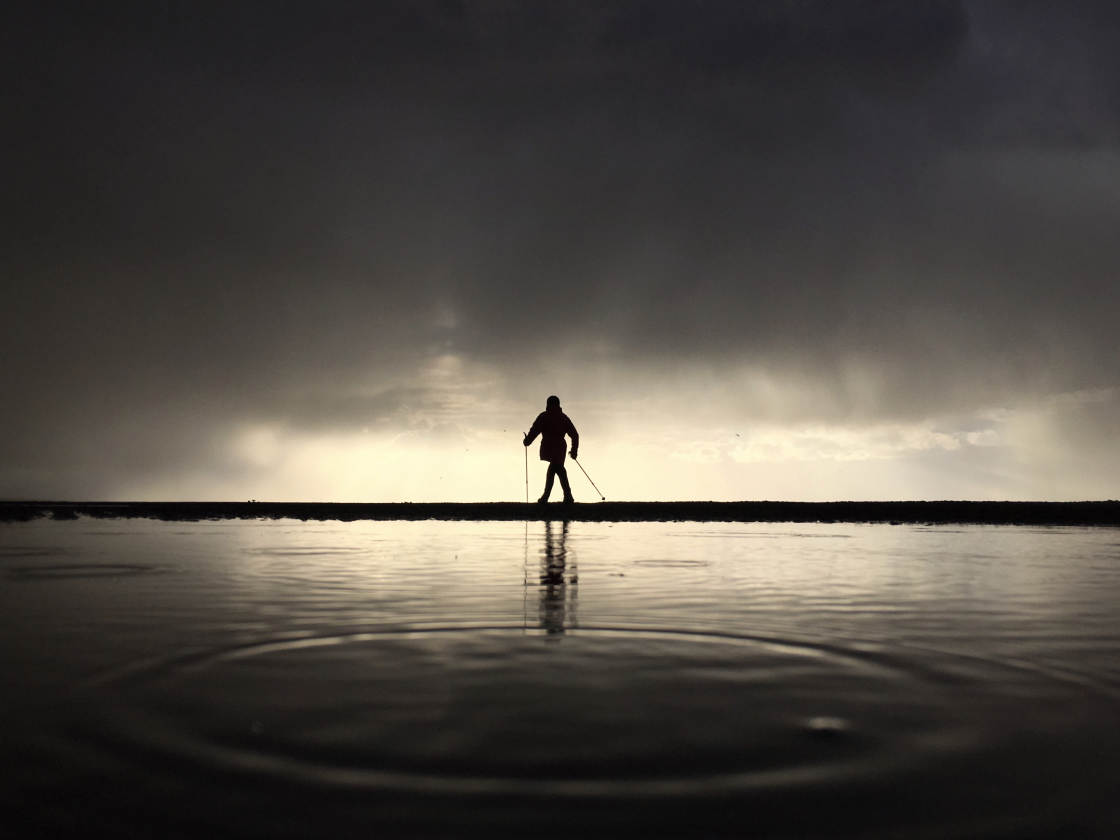
5. Take Silhouette Photos
One of the best iPhone photo tips is to shoot silhouettes. A silhouette is the dark shape of an object taken against bright light.
» alt=»iPhone Photography Tips» width=»560″ height=»auto» data-src=»https://images.iphonephotographyschool.com/23898/1120/iPhone-Photography-Tips.jpg» srcset=»» data-srcset=»https://images.iphonephotographyschool.com/23898/546/iPhone-Photography-Tips.jpg 640w, https://images.iphonephotographyschool.com/23898/616/iPhone-Photography-Tips.jpg 720w, https://images.iphonephotographyschool.com/23898/560/iPhone-Photography-Tips.jpg 769w, https://images.iphonephotographyschool.com/23898/640/iPhone-Photography-Tips.jpg 750w, https://images.iphonephotographyschool.com/23898/708/iPhone-Photography-Tips.jpg 828w, https://images.iphonephotographyschool.com/23898/960/iPhone-Photography-Tips.jpg 1125w, https://images.iphonephotographyschool.com/23898/970/iPhone-Photography-Tips.jpg 1136w, https://images.iphonephotographyschool.com/23898/996/iPhone-Photography-Tips.jpg 1334w, https://images.iphonephotographyschool.com/23898/1062/iPhone-Photography-Tips.jpg 1242w, https://images.iphonephotographyschool.com/23898/1120/iPhone-Photography-Tips.jpg 1538w, https://images.iphonephotographyschool.com/23898/1120/iPhone-Photography-Tips.jpg 1792w, https://images.iphonephotographyschool.com/23898/1494/iPhone-Photography-Tips.jpg 2208w, https://images.iphonephotographyschool.com/23898/1680/iPhone-Photography-Tips.jpg 2436w» sizes=»(min-width: 768px) 768px, 100vw»/>
Silhouettes create stunning photos that catch the viewer’s attention. And they’re actually very easy to achieve.
So how do you shoot an incredible silhouette photo with your iPhone? All you need is an interesting subject. Then shoot towards the light.
» alt=»iPhone Photography Tips» width=»560″ height=»auto» data-src=»https://images.iphonephotographyschool.com/23861/1120/iPhone-Photography-Tips.jpg» srcset=»» data-srcset=»https://images.iphonephotographyschool.com/23861/546/iPhone-Photography-Tips.jpg 640w, https://images.iphonephotographyschool.com/23861/616/iPhone-Photography-Tips.jpg 720w, https://images.iphonephotographyschool.com/23861/560/iPhone-Photography-Tips.jpg 769w, https://images.iphonephotographyschool.com/23861/640/iPhone-Photography-Tips.jpg 750w, https://images.iphonephotographyschool.com/23861/708/iPhone-Photography-Tips.jpg 828w, https://images.iphonephotographyschool.com/23861/960/iPhone-Photography-Tips.jpg 1125w, https://images.iphonephotographyschool.com/23861/970/iPhone-Photography-Tips.jpg 1136w, https://images.iphonephotographyschool.com/23861/996/iPhone-Photography-Tips.jpg 1334w, https://images.iphonephotographyschool.com/23861/1062/iPhone-Photography-Tips.jpg 1242w, https://images.iphonephotographyschool.com/23861/1120/iPhone-Photography-Tips.jpg 1538w, https://images.iphonephotographyschool.com/23861/1120/iPhone-Photography-Tips.jpg 1792w, https://images.iphonephotographyschool.com/23861/1494/iPhone-Photography-Tips.jpg 2208w, https://images.iphonephotographyschool.com/23861/1680/iPhone-Photography-Tips.jpg 2436w» sizes=»(min-width: 768px) 768px, 100vw»/>
For great results, ensure your silhouette appears nice and dark. In the Camera app, tap to set the iPhone focus. Then swipe down to darken the exposure. You can always darken the silhouettes further with an editing app.
» alt=»iPhone Photography Tips» width=»560″ height=»auto» data-src=»https://images.iphonephotographyschool.com/23866/1120/iPhone-Photography-Tips.jpg» srcset=»» data-srcset=»https://images.iphonephotographyschool.com/23866/546/iPhone-Photography-Tips.jpg 640w, https://images.iphonephotographyschool.com/23866/616/iPhone-Photography-Tips.jpg 720w, https://images.iphonephotographyschool.com/23866/560/iPhone-Photography-Tips.jpg 769w, https://images.iphonephotographyschool.com/23866/640/iPhone-Photography-Tips.jpg 750w, https://images.iphonephotographyschool.com/23866/708/iPhone-Photography-Tips.jpg 828w, https://images.iphonephotographyschool.com/23866/960/iPhone-Photography-Tips.jpg 1125w, https://images.iphonephotographyschool.com/23866/970/iPhone-Photography-Tips.jpg 1136w, https://images.iphonephotographyschool.com/23866/996/iPhone-Photography-Tips.jpg 1334w, https://images.iphonephotographyschool.com/23866/1062/iPhone-Photography-Tips.jpg 1242w, https://images.iphonephotographyschool.com/23866/1120/iPhone-Photography-Tips.jpg 1538w, https://images.iphonephotographyschool.com/23866/1120/iPhone-Photography-Tips.jpg 1792w, https://images.iphonephotographyschool.com/23866/1494/iPhone-Photography-Tips.jpg 2208w, https://images.iphonephotographyschool.com/23866/1680/iPhone-Photography-Tips.jpg 2436w» sizes=»(min-width: 768px) 768px, 100vw»/>
Silhouette photography works best during the golden hours of sunrise and sunset. With the sun low above the horizon, it’s easy to position the light behind your subject. And you’ll get a beautiful colored sky as your background.
» alt=»iPhone Photography Tips» width=»560″ height=»auto» data-src=»https://images.iphonephotographyschool.com/23850/1120/iPhone-Photography-Tips.jpg» srcset=»» data-srcset=»https://images.iphonephotographyschool.com/23850/546/iPhone-Photography-Tips.jpg 640w, https://images.iphonephotographyschool.com/23850/616/iPhone-Photography-Tips.jpg 720w, https://images.iphonephotographyschool.com/23850/560/iPhone-Photography-Tips.jpg 769w, https://images.iphonephotographyschool.com/23850/640/iPhone-Photography-Tips.jpg 750w, https://images.iphonephotographyschool.com/23850/708/iPhone-Photography-Tips.jpg 828w, https://images.iphonephotographyschool.com/23850/960/iPhone-Photography-Tips.jpg 1125w, https://images.iphonephotographyschool.com/23850/970/iPhone-Photography-Tips.jpg 1136w, https://images.iphonephotographyschool.com/23850/996/iPhone-Photography-Tips.jpg 1334w, https://images.iphonephotographyschool.com/23850/1062/iPhone-Photography-Tips.jpg 1242w, https://images.iphonephotographyschool.com/23850/1120/iPhone-Photography-Tips.jpg 1538w, https://images.iphonephotographyschool.com/23850/1120/iPhone-Photography-Tips.jpg 1792w, https://images.iphonephotographyschool.com/23850/1494/iPhone-Photography-Tips.jpg 2208w, https://images.iphonephotographyschool.com/23850/1680/iPhone-Photography-Tips.jpg 2436w» sizes=»(min-width: 768px) 768px, 100vw»/>
Sunrise and sunset are perfect for taking silhouette photos. But you can create them wherever there’s a light source behind the subject.
If you’re shooting indoors, place your subject in front of a window or lamp. In the photo below, I created a silhouette by using the reflected light from the floor tiles.
» alt=»iPhone Photography Tips» width=»560″ height=»auto» data-src=»https://images.iphonephotographyschool.com/23873/1120/iPhone-Photography-Tips.jpg» srcset=»» data-srcset=»https://images.iphonephotographyschool.com/23873/546/iPhone-Photography-Tips.jpg 640w, https://images.iphonephotographyschool.com/23873/616/iPhone-Photography-Tips.jpg 720w, https://images.iphonephotographyschool.com/23873/560/iPhone-Photography-Tips.jpg 769w, https://images.iphonephotographyschool.com/23873/640/iPhone-Photography-Tips.jpg 750w, https://images.iphonephotographyschool.com/23873/708/iPhone-Photography-Tips.jpg 828w, https://images.iphonephotographyschool.com/23873/960/iPhone-Photography-Tips.jpg 1125w, https://images.iphonephotographyschool.com/23873/970/iPhone-Photography-Tips.jpg 1136w, https://images.iphonephotographyschool.com/23873/996/iPhone-Photography-Tips.jpg 1334w, https://images.iphonephotographyschool.com/23873/1062/iPhone-Photography-Tips.jpg 1242w, https://images.iphonephotographyschool.com/23873/1120/iPhone-Photography-Tips.jpg 1538w, https://images.iphonephotographyschool.com/23873/1120/iPhone-Photography-Tips.jpg 1792w, https://images.iphonephotographyschool.com/23873/1494/iPhone-Photography-Tips.jpg 2208w, https://images.iphonephotographyschool.com/23873/1680/iPhone-Photography-Tips.jpg 2436w» sizes=»(min-width: 768px) 768px, 100vw»/>
Silhouettes create dramatic and eye-catching images. So this might be one of the best iPhone photography tips that you learn today.
6. Include Shadows In Your Composition
Shadows provide another way to improve your photography with iPhone. Photographing shadows adds a sense of mystery and intrigue to your images.
» alt=»iPhone Photography Tips» width=»560″ height=»auto» data-src=»https://images.iphonephotographyschool.com/23893/1120/iPhone-Photography-Tips.jpg» srcset=»» data-srcset=»https://images.iphonephotographyschool.com/23893/546/iPhone-Photography-Tips.jpg 640w, https://images.iphonephotographyschool.com/23893/616/iPhone-Photography-Tips.jpg 720w, https://images.iphonephotographyschool.com/23893/560/iPhone-Photography-Tips.jpg 769w, https://images.iphonephotographyschool.com/23893/640/iPhone-Photography-Tips.jpg 750w, https://images.iphonephotographyschool.com/23893/708/iPhone-Photography-Tips.jpg 828w, https://images.iphonephotographyschool.com/23893/960/iPhone-Photography-Tips.jpg 1125w, https://images.iphonephotographyschool.com/23893/970/iPhone-Photography-Tips.jpg 1136w, https://images.iphonephotographyschool.com/23893/996/iPhone-Photography-Tips.jpg 1334w, https://images.iphonephotographyschool.com/23893/1062/iPhone-Photography-Tips.jpg 1242w, https://images.iphonephotographyschool.com/23893/1120/iPhone-Photography-Tips.jpg 1538w, https://images.iphonephotographyschool.com/23893/1120/iPhone-Photography-Tips.jpg 1792w, https://images.iphonephotographyschool.com/23893/1494/iPhone-Photography-Tips.jpg 2208w, https://images.iphonephotographyschool.com/23893/1680/iPhone-Photography-Tips.jpg 2436w» sizes=»(min-width: 768px) 768px, 100vw»/>
Shadows are often more interesting than the subjects themselves. They create fantastic visual interest in the foreground of the scene. And they can even act as leading lines, like the shadows of the trees in the photo below.
» alt=»iPhone Photography Tips» width=»560″ height=»auto» data-src=»https://images.iphonephotographyschool.com/23863/1120/iPhone-Photography-Tips.jpg» srcset=»» data-srcset=»https://images.iphonephotographyschool.com/23863/546/iPhone-Photography-Tips.jpg 640w, https://images.iphonephotographyschool.com/23863/616/iPhone-Photography-Tips.jpg 720w, https://images.iphonephotographyschool.com/23863/560/iPhone-Photography-Tips.jpg 769w, https://images.iphonephotographyschool.com/23863/640/iPhone-Photography-Tips.jpg 750w, https://images.iphonephotographyschool.com/23863/708/iPhone-Photography-Tips.jpg 828w, https://images.iphonephotographyschool.com/23863/960/iPhone-Photography-Tips.jpg 1125w, https://images.iphonephotographyschool.com/23863/970/iPhone-Photography-Tips.jpg 1136w, https://images.iphonephotographyschool.com/23863/996/iPhone-Photography-Tips.jpg 1334w, https://images.iphonephotographyschool.com/23863/1062/iPhone-Photography-Tips.jpg 1242w, https://images.iphonephotographyschool.com/23863/1120/iPhone-Photography-Tips.jpg 1538w, https://images.iphonephotographyschool.com/23863/1120/iPhone-Photography-Tips.jpg 1792w, https://images.iphonephotographyschool.com/23863/1494/iPhone-Photography-Tips.jpg 2208w, https://images.iphonephotographyschool.com/23863/1680/iPhone-Photography-Tips.jpg 2436w» sizes=»(min-width: 768px) 768px, 100vw»/>
The longest shadows appear when the sun is low in the sky. So shoot during golden hour to capture long shadows in your iPhone photos.
» alt=»iPhone Photography Tips» width=»560″ height=»auto» data-src=»https://images.iphonephotographyschool.com/23896/1120/iPhone-Photography-Tips.jpg» srcset=»» data-srcset=»https://images.iphonephotographyschool.com/23896/546/iPhone-Photography-Tips.jpg 640w, https://images.iphonephotographyschool.com/23896/616/iPhone-Photography-Tips.jpg 720w, https://images.iphonephotographyschool.com/23896/560/iPhone-Photography-Tips.jpg 769w, https://images.iphonephotographyschool.com/23896/640/iPhone-Photography-Tips.jpg 750w, https://images.iphonephotographyschool.com/23896/708/iPhone-Photography-Tips.jpg 828w, https://images.iphonephotographyschool.com/23896/960/iPhone-Photography-Tips.jpg 1125w, https://images.iphonephotographyschool.com/23896/970/iPhone-Photography-Tips.jpg 1136w, https://images.iphonephotographyschool.com/23896/996/iPhone-Photography-Tips.jpg 1334w, https://images.iphonephotographyschool.com/23896/1062/iPhone-Photography-Tips.jpg 1242w, https://images.iphonephotographyschool.com/23896/1120/iPhone-Photography-Tips.jpg 1538w, https://images.iphonephotographyschool.com/23896/1120/iPhone-Photography-Tips.jpg 1792w, https://images.iphonephotographyschool.com/23896/1494/iPhone-Photography-Tips.jpg 2208w, https://images.iphonephotographyschool.com/23896/1680/iPhone-Photography-Tips.jpg 2436w» sizes=»(min-width: 768px) 768px, 100vw»/>
Ensure the shadows appear dark enough by adjusting exposure when shooting. In the camera app, tap to set focus, then swipe down so that the shadows appear nice and dark. If necessary, you can darken shadows in post-processing.
» alt=»iPhone Photography Tips» width=»560″ height=»auto» data-src=»https://images.iphonephotographyschool.com/23895/1120/iPhone-Photography-Tips.jpg» srcset=»» data-srcset=»https://images.iphonephotographyschool.com/23895/546/iPhone-Photography-Tips.jpg 640w, https://images.iphonephotographyschool.com/23895/616/iPhone-Photography-Tips.jpg 720w, https://images.iphonephotographyschool.com/23895/560/iPhone-Photography-Tips.jpg 769w, https://images.iphonephotographyschool.com/23895/640/iPhone-Photography-Tips.jpg 750w, https://images.iphonephotographyschool.com/23895/708/iPhone-Photography-Tips.jpg 828w, https://images.iphonephotographyschool.com/23895/960/iPhone-Photography-Tips.jpg 1125w, https://images.iphonephotographyschool.com/23895/970/iPhone-Photography-Tips.jpg 1136w, https://images.iphonephotographyschool.com/23895/996/iPhone-Photography-Tips.jpg 1334w, https://images.iphonephotographyschool.com/23895/1062/iPhone-Photography-Tips.jpg 1242w, https://images.iphonephotographyschool.com/23895/1120/iPhone-Photography-Tips.jpg 1538w, https://images.iphonephotographyschool.com/23895/1120/iPhone-Photography-Tips.jpg 1792w, https://images.iphonephotographyschool.com/23895/1494/iPhone-Photography-Tips.jpg 2208w, https://images.iphonephotographyschool.com/23895/1680/iPhone-Photography-Tips.jpg 2436w» sizes=»(min-width: 768px) 768px, 100vw»/>
You can use shadows to create stunning abstract images. So keep your eyes peeled for interesting shadow patterns.
» alt=»iPhone Photography Tips» width=»560″ height=»auto» data-src=»https://images.iphonephotographyschool.com/23855/1120/iPhone-Photography-Tips.jpg» srcset=»» data-srcset=»https://images.iphonephotographyschool.com/23855/546/iPhone-Photography-Tips.jpg 640w, https://images.iphonephotographyschool.com/23855/616/iPhone-Photography-Tips.jpg 720w, https://images.iphonephotographyschool.com/23855/560/iPhone-Photography-Tips.jpg 769w, https://images.iphonephotographyschool.com/23855/640/iPhone-Photography-Tips.jpg 750w, https://images.iphonephotographyschool.com/23855/708/iPhone-Photography-Tips.jpg 828w, https://images.iphonephotographyschool.com/23855/960/iPhone-Photography-Tips.jpg 1125w, https://images.iphonephotographyschool.com/23855/970/iPhone-Photography-Tips.jpg 1136w, https://images.iphonephotographyschool.com/23855/996/iPhone-Photography-Tips.jpg 1334w, https://images.iphonephotographyschool.com/23855/1062/iPhone-Photography-Tips.jpg 1242w, https://images.iphonephotographyschool.com/23855/1120/iPhone-Photography-Tips.jpg 1538w, https://images.iphonephotographyschool.com/23855/1120/iPhone-Photography-Tips.jpg 1792w, https://images.iphonephotographyschool.com/23855/1494/iPhone-Photography-Tips.jpg 2208w, https://images.iphonephotographyschool.com/23855/1680/iPhone-Photography-Tips.jpg 2436w» sizes=»(min-width: 768px) 768px, 100vw»/>
When photographing shadows, think about what you want to include in your shot.
You could include both the subject and its shadow in the frame. Or photograph only the shadows for a more unique and abstract image.
» alt=»iPhone Photography Tips» width=»560″ height=»auto» data-src=»https://images.iphonephotographyschool.com/23856/1120/iPhone-Photography-Tips.jpg» srcset=»» data-srcset=»https://images.iphonephotographyschool.com/23856/546/iPhone-Photography-Tips.jpg 640w, https://images.iphonephotographyschool.com/23856/616/iPhone-Photography-Tips.jpg 720w, https://images.iphonephotographyschool.com/23856/560/iPhone-Photography-Tips.jpg 769w, https://images.iphonephotographyschool.com/23856/640/iPhone-Photography-Tips.jpg 750w, https://images.iphonephotographyschool.com/23856/708/iPhone-Photography-Tips.jpg 828w, https://images.iphonephotographyschool.com/23856/960/iPhone-Photography-Tips.jpg 1125w, https://images.iphonephotographyschool.com/23856/970/iPhone-Photography-Tips.jpg 1136w, https://images.iphonephotographyschool.com/23856/996/iPhone-Photography-Tips.jpg 1334w, https://images.iphonephotographyschool.com/23856/1062/iPhone-Photography-Tips.jpg 1242w, https://images.iphonephotographyschool.com/23856/1120/iPhone-Photography-Tips.jpg 1538w, https://images.iphonephotographyschool.com/23856/1120/iPhone-Photography-Tips.jpg 1792w, https://images.iphonephotographyschool.com/23856/1494/iPhone-Photography-Tips.jpg 2208w, https://images.iphonephotographyschool.com/23856/1680/iPhone-Photography-Tips.jpg 2436w» sizes=»(min-width: 768px) 768px, 100vw»/>
7. Photograph Reflections
Reflections make wonderful iPhone photography subjects. You can find reflections on many different surfaces including glass, metal and ice. But water is the best surface for reflection photography.
» alt=»iPhone Photography Tips» width=»560″ height=»auto» data-src=»https://images.iphonephotographyschool.com/23871/1120/iPhone-Photography-Tips.jpg» srcset=»» data-srcset=»https://images.iphonephotographyschool.com/23871/546/iPhone-Photography-Tips.jpg 640w, https://images.iphonephotographyschool.com/23871/616/iPhone-Photography-Tips.jpg 720w, https://images.iphonephotographyschool.com/23871/560/iPhone-Photography-Tips.jpg 769w, https://images.iphonephotographyschool.com/23871/640/iPhone-Photography-Tips.jpg 750w, https://images.iphonephotographyschool.com/23871/708/iPhone-Photography-Tips.jpg 828w, https://images.iphonephotographyschool.com/23871/960/iPhone-Photography-Tips.jpg 1125w, https://images.iphonephotographyschool.com/23871/970/iPhone-Photography-Tips.jpg 1136w, https://images.iphonephotographyschool.com/23871/996/iPhone-Photography-Tips.jpg 1334w, https://images.iphonephotographyschool.com/23871/1062/iPhone-Photography-Tips.jpg 1242w, https://images.iphonephotographyschool.com/23871/1120/iPhone-Photography-Tips.jpg 1538w, https://images.iphonephotographyschool.com/23871/1120/iPhone-Photography-Tips.jpg 1792w, https://images.iphonephotographyschool.com/23871/1494/iPhone-Photography-Tips.jpg 2208w, https://images.iphonephotographyschool.com/23871/1680/iPhone-Photography-Tips.jpg 2436w» sizes=»(min-width: 768px) 768px, 100vw»/>
Ripples and waves on the water’s surface add an extra dimension to your reflection photos. They produce distortions in reflections which create a beautiful painterly effect.
» alt=»iPhone Photography Tips» width=»560″ height=»auto» data-src=»https://images.iphonephotographyschool.com/23854/1120/iPhone-Photography-Tips.jpg» srcset=»» data-srcset=»https://images.iphonephotographyschool.com/23854/546/iPhone-Photography-Tips.jpg 640w, https://images.iphonephotographyschool.com/23854/616/iPhone-Photography-Tips.jpg 720w, https://images.iphonephotographyschool.com/23854/560/iPhone-Photography-Tips.jpg 769w, https://images.iphonephotographyschool.com/23854/640/iPhone-Photography-Tips.jpg 750w, https://images.iphonephotographyschool.com/23854/708/iPhone-Photography-Tips.jpg 828w, https://images.iphonephotographyschool.com/23854/960/iPhone-Photography-Tips.jpg 1125w, https://images.iphonephotographyschool.com/23854/970/iPhone-Photography-Tips.jpg 1136w, https://images.iphonephotographyschool.com/23854/996/iPhone-Photography-Tips.jpg 1334w, https://images.iphonephotographyschool.com/23854/1062/iPhone-Photography-Tips.jpg 1242w, https://images.iphonephotographyschool.com/23854/1120/iPhone-Photography-Tips.jpg 1538w, https://images.iphonephotographyschool.com/23854/1120/iPhone-Photography-Tips.jpg 1792w, https://images.iphonephotographyschool.com/23854/1494/iPhone-Photography-Tips.jpg 2208w, https://images.iphonephotographyschool.com/23854/1680/iPhone-Photography-Tips.jpg 2436w» sizes=»(min-width: 768px) 768px, 100vw»/>
If there aren’t any waves, create them yourself by moving your hand through the water.
» alt=»iPhone Photography Tips» width=»560″ height=»auto» data-src=»https://images.iphonephotographyschool.com/23848/1120/iPhone-Photography-Tips.jpg» srcset=»» data-srcset=»https://images.iphonephotographyschool.com/23848/546/iPhone-Photography-Tips.jpg 640w, https://images.iphonephotographyschool.com/23848/616/iPhone-Photography-Tips.jpg 720w, https://images.iphonephotographyschool.com/23848/560/iPhone-Photography-Tips.jpg 769w, https://images.iphonephotographyschool.com/23848/640/iPhone-Photography-Tips.jpg 750w, https://images.iphonephotographyschool.com/23848/708/iPhone-Photography-Tips.jpg 828w, https://images.iphonephotographyschool.com/23848/960/iPhone-Photography-Tips.jpg 1125w, https://images.iphonephotographyschool.com/23848/970/iPhone-Photography-Tips.jpg 1136w, https://images.iphonephotographyschool.com/23848/996/iPhone-Photography-Tips.jpg 1334w, https://images.iphonephotographyschool.com/23848/1062/iPhone-Photography-Tips.jpg 1242w, https://images.iphonephotographyschool.com/23848/1120/iPhone-Photography-Tips.jpg 1538w, https://images.iphonephotographyschool.com/23848/1120/iPhone-Photography-Tips.jpg 1792w, https://images.iphonephotographyschool.com/23848/1494/iPhone-Photography-Tips.jpg 2208w, https://images.iphonephotographyschool.com/23848/1680/iPhone-Photography-Tips.jpg 2436w» sizes=»(min-width: 768px) 768px, 100vw»/>
In most cases, it looks best if you include both the subject and its reflection. Creating a symmetrical composition will have a very strong visual impact.
But in some cases, photographing only the reflection creates a beautiful abstract image. The photo below captures the reflection of a tree in shallow water.
» alt=»iPhone Photography Tips» width=»560″ height=»auto» data-src=»https://images.iphonephotographyschool.com/23880/1120/iPhone-Photography-Tips.jpg» srcset=»» data-srcset=»https://images.iphonephotographyschool.com/23880/546/iPhone-Photography-Tips.jpg 640w, https://images.iphonephotographyschool.com/23880/616/iPhone-Photography-Tips.jpg 720w, https://images.iphonephotographyschool.com/23880/560/iPhone-Photography-Tips.jpg 769w, https://images.iphonephotographyschool.com/23880/640/iPhone-Photography-Tips.jpg 750w, https://images.iphonephotographyschool.com/23880/708/iPhone-Photography-Tips.jpg 828w, https://images.iphonephotographyschool.com/23880/960/iPhone-Photography-Tips.jpg 1125w, https://images.iphonephotographyschool.com/23880/970/iPhone-Photography-Tips.jpg 1136w, https://images.iphonephotographyschool.com/23880/996/iPhone-Photography-Tips.jpg 1334w, https://images.iphonephotographyschool.com/23880/1062/iPhone-Photography-Tips.jpg 1242w, https://images.iphonephotographyschool.com/23880/1120/iPhone-Photography-Tips.jpg 1538w, https://images.iphonephotographyschool.com/23880/1120/iPhone-Photography-Tips.jpg 1792w, https://images.iphonephotographyschool.com/23880/1494/iPhone-Photography-Tips.jpg 2208w, https://images.iphonephotographyschool.com/23880/1680/iPhone-Photography-Tips.jpg 2436w» sizes=»(min-width: 768px) 768px, 100vw»/>
Once you start paying attention, you’ll notice reflections everywhere. And they’ll look stunning in your photos!
8. Use Symmetry
Using symmetry is a fun way to create a striking image. Challenge yourself to find symmetrical scenes wherever you go. Then compose your shot so that both halves of the photo are identical (or almost identical).
» alt=»iPhone Photography Tips» width=»560″ height=»auto» data-src=»https://images.iphonephotographyschool.com/23870/1120/iPhone-Photography-Tips.jpg» srcset=»» data-srcset=»https://images.iphonephotographyschool.com/23870/546/iPhone-Photography-Tips.jpg 640w, https://images.iphonephotographyschool.com/23870/616/iPhone-Photography-Tips.jpg 720w, https://images.iphonephotographyschool.com/23870/560/iPhone-Photography-Tips.jpg 769w, https://images.iphonephotographyschool.com/23870/640/iPhone-Photography-Tips.jpg 750w, https://images.iphonephotographyschool.com/23870/708/iPhone-Photography-Tips.jpg 828w, https://images.iphonephotographyschool.com/23870/960/iPhone-Photography-Tips.jpg 1125w, https://images.iphonephotographyschool.com/23870/970/iPhone-Photography-Tips.jpg 1136w, https://images.iphonephotographyschool.com/23870/996/iPhone-Photography-Tips.jpg 1334w, https://images.iphonephotographyschool.com/23870/1062/iPhone-Photography-Tips.jpg 1242w, https://images.iphonephotographyschool.com/23870/1120/iPhone-Photography-Tips.jpg 1538w, https://images.iphonephotographyschool.com/23870/1120/iPhone-Photography-Tips.jpg 1792w, https://images.iphonephotographyschool.com/23870/1494/iPhone-Photography-Tips.jpg 2208w, https://images.iphonephotographyschool.com/23870/1680/iPhone-Photography-Tips.jpg 2436w» sizes=»(min-width: 768px) 768px, 100vw»/>
Reflections provide an easy way to create perfectly symmetrical images. Position the line of symmetry across the center of the frame to create the symmetry.
» alt=»iPhone Photography Tips» width=»560″ height=»auto» data-src=»https://images.iphonephotographyschool.com/23889/1120/iPhone-Photography-Tips.jpg» srcset=»» data-srcset=»https://images.iphonephotographyschool.com/23889/546/iPhone-Photography-Tips.jpg 640w, https://images.iphonephotographyschool.com/23889/616/iPhone-Photography-Tips.jpg 720w, https://images.iphonephotographyschool.com/23889/560/iPhone-Photography-Tips.jpg 769w, https://images.iphonephotographyschool.com/23889/640/iPhone-Photography-Tips.jpg 750w, https://images.iphonephotographyschool.com/23889/708/iPhone-Photography-Tips.jpg 828w, https://images.iphonephotographyschool.com/23889/960/iPhone-Photography-Tips.jpg 1125w, https://images.iphonephotographyschool.com/23889/970/iPhone-Photography-Tips.jpg 1136w, https://images.iphonephotographyschool.com/23889/996/iPhone-Photography-Tips.jpg 1334w, https://images.iphonephotographyschool.com/23889/1062/iPhone-Photography-Tips.jpg 1242w, https://images.iphonephotographyschool.com/23889/1120/iPhone-Photography-Tips.jpg 1538w, https://images.iphonephotographyschool.com/23889/1120/iPhone-Photography-Tips.jpg 1792w, https://images.iphonephotographyschool.com/23889/1494/iPhone-Photography-Tips.jpg 2208w, https://images.iphonephotographyschool.com/23889/1680/iPhone-Photography-Tips.jpg 2436w» sizes=»(min-width: 768px) 768px, 100vw»/>
But reflections are only one way to create symmetrical compositions. Architecture and other man-made objects are often designed to be symmetrical.
» alt=»iPhone Photography Tips» width=»560″ height=»auto» data-src=»https://images.iphonephotographyschool.com/23890/1120/iPhone-Photography-Tips.jpg» srcset=»» data-srcset=»https://images.iphonephotographyschool.com/23890/546/iPhone-Photography-Tips.jpg 640w, https://images.iphonephotographyschool.com/23890/616/iPhone-Photography-Tips.jpg 720w, https://images.iphonephotographyschool.com/23890/560/iPhone-Photography-Tips.jpg 769w, https://images.iphonephotographyschool.com/23890/640/iPhone-Photography-Tips.jpg 750w, https://images.iphonephotographyschool.com/23890/708/iPhone-Photography-Tips.jpg 828w, https://images.iphonephotographyschool.com/23890/960/iPhone-Photography-Tips.jpg 1125w, https://images.iphonephotographyschool.com/23890/970/iPhone-Photography-Tips.jpg 1136w, https://images.iphonephotographyschool.com/23890/996/iPhone-Photography-Tips.jpg 1334w, https://images.iphonephotographyschool.com/23890/1062/iPhone-Photography-Tips.jpg 1242w, https://images.iphonephotographyschool.com/23890/1120/iPhone-Photography-Tips.jpg 1538w, https://images.iphonephotographyschool.com/23890/1120/iPhone-Photography-Tips.jpg 1792w, https://images.iphonephotographyschool.com/23890/1494/iPhone-Photography-Tips.jpg 2208w, https://images.iphonephotographyschool.com/23890/1680/iPhone-Photography-Tips.jpg 2436w» sizes=»(min-width: 768px) 768px, 100vw»/>
Composition guidelines such as the rule of thirds don’t encourage central subject placement. But sometimes it’s okay to break the rules!
9. Use Diagonal Alignment
Are you serious about learning how to take better pictures with iPhone? If so, you need to develop an eye for balanced compositions.
One of the best iPhone photography tips for creating visual harmony is to use diagonal balance in your photos.
» alt=»iPhone Photography Tips» width=»560″ height=»auto» data-src=»https://images.iphonephotographyschool.com/23859/1120/iPhone-Photography-Tips.jpg» srcset=»» data-srcset=»https://images.iphonephotographyschool.com/23859/546/iPhone-Photography-Tips.jpg 640w, https://images.iphonephotographyschool.com/23859/616/iPhone-Photography-Tips.jpg 720w, https://images.iphonephotographyschool.com/23859/560/iPhone-Photography-Tips.jpg 769w, https://images.iphonephotographyschool.com/23859/640/iPhone-Photography-Tips.jpg 750w, https://images.iphonephotographyschool.com/23859/708/iPhone-Photography-Tips.jpg 828w, https://images.iphonephotographyschool.com/23859/960/iPhone-Photography-Tips.jpg 1125w, https://images.iphonephotographyschool.com/23859/970/iPhone-Photography-Tips.jpg 1136w, https://images.iphonephotographyschool.com/23859/996/iPhone-Photography-Tips.jpg 1334w, https://images.iphonephotographyschool.com/23859/1062/iPhone-Photography-Tips.jpg 1242w, https://images.iphonephotographyschool.com/23859/1120/iPhone-Photography-Tips.jpg 1538w, https://images.iphonephotographyschool.com/23859/1120/iPhone-Photography-Tips.jpg 1792w, https://images.iphonephotographyschool.com/23859/1494/iPhone-Photography-Tips.jpg 2208w, https://images.iphonephotographyschool.com/23859/1680/iPhone-Photography-Tips.jpg 2436w» sizes=»(min-width: 768px) 768px, 100vw»/>
If you have two or three main subjects in your scene, try positioning them in diagonal alignment.
This is an easy way to create a more balanced composition. And it encourages the viewer’s gaze to flow through the scene.
If everything is on one side of the frame, your photo can look unbalanced. Diagonal balance will make a real difference to the impact of your photo.
» alt=»iPhone Photography Tips» width=»560″ height=»auto» data-src=»https://images.iphonephotographyschool.com/23858/1120/iPhone-Photography-Tips.jpg» srcset=»» data-srcset=»https://images.iphonephotographyschool.com/23858/546/iPhone-Photography-Tips.jpg 640w, https://images.iphonephotographyschool.com/23858/616/iPhone-Photography-Tips.jpg 720w, https://images.iphonephotographyschool.com/23858/560/iPhone-Photography-Tips.jpg 769w, https://images.iphonephotographyschool.com/23858/640/iPhone-Photography-Tips.jpg 750w, https://images.iphonephotographyschool.com/23858/708/iPhone-Photography-Tips.jpg 828w, https://images.iphonephotographyschool.com/23858/960/iPhone-Photography-Tips.jpg 1125w, https://images.iphonephotographyschool.com/23858/970/iPhone-Photography-Tips.jpg 1136w, https://images.iphonephotographyschool.com/23858/996/iPhone-Photography-Tips.jpg 1334w, https://images.iphonephotographyschool.com/23858/1062/iPhone-Photography-Tips.jpg 1242w, https://images.iphonephotographyschool.com/23858/1120/iPhone-Photography-Tips.jpg 1538w, https://images.iphonephotographyschool.com/23858/1120/iPhone-Photography-Tips.jpg 1792w, https://images.iphonephotographyschool.com/23858/1494/iPhone-Photography-Tips.jpg 2208w, https://images.iphonephotographyschool.com/23858/1680/iPhone-Photography-Tips.jpg 2436w» sizes=»(min-width: 768px) 768px, 100vw»/>
With certain kinds of photography, you can control subject placement.
With still life and portraits, you can move your subjects. Take a few moments to position the main elements in a diagonal composition.
» alt=»iPhone Photography Tips» width=»560″ height=»auto» data-src=»https://images.iphonephotographyschool.com/23857/1120/iPhone-Photography-Tips.jpg» srcset=»» data-srcset=»https://images.iphonephotographyschool.com/23857/546/iPhone-Photography-Tips.jpg 640w, https://images.iphonephotographyschool.com/23857/616/iPhone-Photography-Tips.jpg 720w, https://images.iphonephotographyschool.com/23857/560/iPhone-Photography-Tips.jpg 769w, https://images.iphonephotographyschool.com/23857/640/iPhone-Photography-Tips.jpg 750w, https://images.iphonephotographyschool.com/23857/708/iPhone-Photography-Tips.jpg 828w, https://images.iphonephotographyschool.com/23857/960/iPhone-Photography-Tips.jpg 1125w, https://images.iphonephotographyschool.com/23857/970/iPhone-Photography-Tips.jpg 1136w, https://images.iphonephotographyschool.com/23857/996/iPhone-Photography-Tips.jpg 1334w, https://images.iphonephotographyschool.com/23857/1062/iPhone-Photography-Tips.jpg 1242w, https://images.iphonephotographyschool.com/23857/1120/iPhone-Photography-Tips.jpg 1538w, https://images.iphonephotographyschool.com/23857/1120/iPhone-Photography-Tips.jpg 1792w, https://images.iphonephotographyschool.com/23857/1494/iPhone-Photography-Tips.jpg 2208w, https://images.iphonephotographyschool.com/23857/1680/iPhone-Photography-Tips.jpg 2436w» sizes=»(min-width: 768px) 768px, 100vw»/>
In other situations, you won’t have any control over the position of your subjects. For example, in landscape photography the objects are usually static and too big to move.
In environments like this, you’ll need to move yourself around the scene. Find a perspective where the main subjects appear in diagonal alignment.
» alt=»iPhone Photography Tips» width=»560″ height=»auto» data-src=»https://images.iphonephotographyschool.com/23891/1120/iPhone-Photography-Tips.jpg» srcset=»» data-srcset=»https://images.iphonephotographyschool.com/23891/546/iPhone-Photography-Tips.jpg 640w, https://images.iphonephotographyschool.com/23891/616/iPhone-Photography-Tips.jpg 720w, https://images.iphonephotographyschool.com/23891/560/iPhone-Photography-Tips.jpg 769w, https://images.iphonephotographyschool.com/23891/640/iPhone-Photography-Tips.jpg 750w, https://images.iphonephotographyschool.com/23891/708/iPhone-Photography-Tips.jpg 828w, https://images.iphonephotographyschool.com/23891/960/iPhone-Photography-Tips.jpg 1125w, https://images.iphonephotographyschool.com/23891/970/iPhone-Photography-Tips.jpg 1136w, https://images.iphonephotographyschool.com/23891/996/iPhone-Photography-Tips.jpg 1334w, https://images.iphonephotographyschool.com/23891/1062/iPhone-Photography-Tips.jpg 1242w, https://images.iphonephotographyschool.com/23891/1120/iPhone-Photography-Tips.jpg 1538w, https://images.iphonephotographyschool.com/23891/1120/iPhone-Photography-Tips.jpg 1792w, https://images.iphonephotographyschool.com/23891/1494/iPhone-Photography-Tips.jpg 2208w, https://images.iphonephotographyschool.com/23891/1680/iPhone-Photography-Tips.jpg 2436w» sizes=»(min-width: 768px) 768px, 100vw»/>
In the photo above, the ferns create diagonal balance with the cliffs in the distance. In the photo below, the two boats are in diagonal alignment.
» alt=»iPhone Photography Tips» width=»560″ height=»auto» data-src=»https://images.iphonephotographyschool.com/23879/1120/iPhone-Photography-Tips.jpg» srcset=»» data-srcset=»https://images.iphonephotographyschool.com/23879/546/iPhone-Photography-Tips.jpg 640w, https://images.iphonephotographyschool.com/23879/616/iPhone-Photography-Tips.jpg 720w, https://images.iphonephotographyschool.com/23879/560/iPhone-Photography-Tips.jpg 769w, https://images.iphonephotographyschool.com/23879/640/iPhone-Photography-Tips.jpg 750w, https://images.iphonephotographyschool.com/23879/708/iPhone-Photography-Tips.jpg 828w, https://images.iphonephotographyschool.com/23879/960/iPhone-Photography-Tips.jpg 1125w, https://images.iphonephotographyschool.com/23879/970/iPhone-Photography-Tips.jpg 1136w, https://images.iphonephotographyschool.com/23879/996/iPhone-Photography-Tips.jpg 1334w, https://images.iphonephotographyschool.com/23879/1062/iPhone-Photography-Tips.jpg 1242w, https://images.iphonephotographyschool.com/23879/1120/iPhone-Photography-Tips.jpg 1538w, https://images.iphonephotographyschool.com/23879/1120/iPhone-Photography-Tips.jpg 1792w, https://images.iphonephotographyschool.com/23879/1494/iPhone-Photography-Tips.jpg 2208w, https://images.iphonephotographyschool.com/23879/1680/iPhone-Photography-Tips.jpg 2436w» sizes=»(min-width: 768px) 768px, 100vw»/>
You can even use leading lines to create diagonal balance in your photos. In the photo below, the line of the water’s edge leads diagonally towards the hill at the top right.
» alt=»iPhone Photography Tips» width=»560″ height=»auto» data-src=»https://images.iphonephotographyschool.com/23883/1120/iPhone-Photography-Tips.jpg» srcset=»» data-srcset=»https://images.iphonephotographyschool.com/23883/546/iPhone-Photography-Tips.jpg 640w, https://images.iphonephotographyschool.com/23883/616/iPhone-Photography-Tips.jpg 720w, https://images.iphonephotographyschool.com/23883/560/iPhone-Photography-Tips.jpg 769w, https://images.iphonephotographyschool.com/23883/640/iPhone-Photography-Tips.jpg 750w, https://images.iphonephotographyschool.com/23883/708/iPhone-Photography-Tips.jpg 828w, https://images.iphonephotographyschool.com/23883/960/iPhone-Photography-Tips.jpg 1125w, https://images.iphonephotographyschool.com/23883/970/iPhone-Photography-Tips.jpg 1136w, https://images.iphonephotographyschool.com/23883/996/iPhone-Photography-Tips.jpg 1334w, https://images.iphonephotographyschool.com/23883/1062/iPhone-Photography-Tips.jpg 1242w, https://images.iphonephotographyschool.com/23883/1120/iPhone-Photography-Tips.jpg 1538w, https://images.iphonephotographyschool.com/23883/1120/iPhone-Photography-Tips.jpg 1792w, https://images.iphonephotographyschool.com/23883/1494/iPhone-Photography-Tips.jpg 2208w, https://images.iphonephotographyschool.com/23883/1680/iPhone-Photography-Tips.jpg 2436w» sizes=»(min-width: 768px) 768px, 100vw»/>
Train your eye to notice diagonal alignment of subjects. Then compose your shot to create a balanced composition. This will make your photos more engaging and interesting to look at.
10. Edit Your Photos With VSCO Filters
Do you want to know how to turn a good picture into an amazing one?
It’s simple. You just need to do some basic iPhone photo editing.
But you don’t need high-end editing skills or expensive photoshop apps to add beauty or drama to your iPhone photos.
» alt=»iPhone Photography Tips» width=»560″ height=»auto» data-src=»https://images.iphonephotographyschool.com/23900/1120/iPhone-Photography-Tips.jpg» srcset=»» data-srcset=»https://images.iphonephotographyschool.com/23900/546/iPhone-Photography-Tips.jpg 640w, https://images.iphonephotographyschool.com/23900/616/iPhone-Photography-Tips.jpg 720w, https://images.iphonephotographyschool.com/23900/560/iPhone-Photography-Tips.jpg 769w, https://images.iphonephotographyschool.com/23900/640/iPhone-Photography-Tips.jpg 750w, https://images.iphonephotographyschool.com/23900/708/iPhone-Photography-Tips.jpg 828w, https://images.iphonephotographyschool.com/23900/960/iPhone-Photography-Tips.jpg 1125w, https://images.iphonephotographyschool.com/23900/970/iPhone-Photography-Tips.jpg 1136w, https://images.iphonephotographyschool.com/23900/996/iPhone-Photography-Tips.jpg 1334w, https://images.iphonephotographyschool.com/23900/1062/iPhone-Photography-Tips.jpg 1242w, https://images.iphonephotographyschool.com/23900/1120/iPhone-Photography-Tips.jpg 1538w, https://images.iphonephotographyschool.com/23900/1120/iPhone-Photography-Tips.jpg 1792w, https://images.iphonephotographyschool.com/23900/1494/iPhone-Photography-Tips.jpg 2208w, https://images.iphonephotographyschool.com/23900/1680/iPhone-Photography-Tips.jpg 2436w» sizes=»(min-width: 768px) 768px, 100vw»/>
The easiest way to apply powerful yet subtle effects to your photos is to use VSCO filters. VSCO is the best filter app for applying beautiful, understated filters to your images.
Open the VSCO app, tap the plus icon (+) at the top right of the screen, and import the photo you want to edit:
» alt=»iPhone Photography Tips» width=»320″ height=»auto» data-src=»https://images.iphonephotographyschool.com/23892/1120/iPhone-Photography-Tips.jpg» srcset=»» data-srcset=»https://images.iphonephotographyschool.com/23892/546/iPhone-Photography-Tips.jpg 640w, https://images.iphonephotographyschool.com/23892/616/iPhone-Photography-Tips.jpg 720w, https://images.iphonephotographyschool.com/23892/320/iPhone-Photography-Tips.jpg 769w, https://images.iphonephotographyschool.com/23892/640/iPhone-Photography-Tips.jpg 750w, https://images.iphonephotographyschool.com/23892/640/iPhone-Photography-Tips.jpg 828w, https://images.iphonephotographyschool.com/23892/960/iPhone-Photography-Tips.jpg 1125w, https://images.iphonephotographyschool.com/23892/640/iPhone-Photography-Tips.jpg 1136w, https://images.iphonephotographyschool.com/23892/640/iPhone-Photography-Tips.jpg 1334w, https://images.iphonephotographyschool.com/23892/960/iPhone-Photography-Tips.jpg 1242w, https://images.iphonephotographyschool.com/23892/640/iPhone-Photography-Tips.jpg 1538w, https://images.iphonephotographyschool.com/23892/640/iPhone-Photography-Tips.jpg 1792w, https://images.iphonephotographyschool.com/23892/960/iPhone-Photography-Tips.jpg 2208w, https://images.iphonephotographyschool.com/23892/960/iPhone-Photography-Tips.jpg 2436w» sizes=»(min-width: 768px) 768px, 100vw»/>
Now tap the Edit icon (two sliders) at the bottom of the screen. Select a filter of your choice:
» alt=»iPhone Photography Tips» width=»560″ height=»auto» data-src=»https://images.iphonephotographyschool.com/23853/1120/iPhone-Photography-Tips.jpg» srcset=»» data-srcset=»https://images.iphonephotographyschool.com/23853/546/iPhone-Photography-Tips.jpg 640w, https://images.iphonephotographyschool.com/23853/616/iPhone-Photography-Tips.jpg 720w, https://images.iphonephotographyschool.com/23853/560/iPhone-Photography-Tips.jpg 769w, https://images.iphonephotographyschool.com/23853/640/iPhone-Photography-Tips.jpg 750w, https://images.iphonephotographyschool.com/23853/708/iPhone-Photography-Tips.jpg 828w, https://images.iphonephotographyschool.com/23853/960/iPhone-Photography-Tips.jpg 1125w, https://images.iphonephotographyschool.com/23853/970/iPhone-Photography-Tips.jpg 1136w, https://images.iphonephotographyschool.com/23853/996/iPhone-Photography-Tips.jpg 1334w, https://images.iphonephotographyschool.com/23853/1062/iPhone-Photography-Tips.jpg 1242w, https://images.iphonephotographyschool.com/23853/1120/iPhone-Photography-Tips.jpg 1538w, https://images.iphonephotographyschool.com/23853/1120/iPhone-Photography-Tips.jpg 1792w, https://images.iphonephotographyschool.com/23853/1494/iPhone-Photography-Tips.jpg 2208w, https://images.iphonephotographyschool.com/23853/1680/iPhone-Photography-Tips.jpg 2436w» sizes=»(min-width: 768px) 768px, 100vw»/>
To reduce the intensity of the filter, tap the filter name, then drag the slider. Tap the checkmark at the bottom right when you’re happy with the effect:
» alt=»iPhone Photography Tips» width=»560″ height=»auto» data-src=»https://images.iphonephotographyschool.com/23852/1120/iPhone-Photography-Tips.jpg» srcset=»» data-srcset=»https://images.iphonephotographyschool.com/23852/546/iPhone-Photography-Tips.jpg 640w, https://images.iphonephotographyschool.com/23852/616/iPhone-Photography-Tips.jpg 720w, https://images.iphonephotographyschool.com/23852/560/iPhone-Photography-Tips.jpg 769w, https://images.iphonephotographyschool.com/23852/640/iPhone-Photography-Tips.jpg 750w, https://images.iphonephotographyschool.com/23852/708/iPhone-Photography-Tips.jpg 828w, https://images.iphonephotographyschool.com/23852/960/iPhone-Photography-Tips.jpg 1125w, https://images.iphonephotographyschool.com/23852/970/iPhone-Photography-Tips.jpg 1136w, https://images.iphonephotographyschool.com/23852/996/iPhone-Photography-Tips.jpg 1334w, https://images.iphonephotographyschool.com/23852/1062/iPhone-Photography-Tips.jpg 1242w, https://images.iphonephotographyschool.com/23852/1120/iPhone-Photography-Tips.jpg 1538w, https://images.iphonephotographyschool.com/23852/1120/iPhone-Photography-Tips.jpg 1792w, https://images.iphonephotographyschool.com/23852/1494/iPhone-Photography-Tips.jpg 2208w, https://images.iphonephotographyschool.com/23852/1680/iPhone-Photography-Tips.jpg 2436w» sizes=»(min-width: 768px) 768px, 100vw»/>
To save your edited image, tap Save at the top right. On the next screen, tap the three dots icon at the bottom right, select Save To Camera Roll, then select Actual Size:
» alt=»iPhone Photography Tips» width=»560″ height=»auto» data-src=»https://images.iphonephotographyschool.com/23851/1120/iPhone-Photography-Tips.jpg» srcset=»» data-srcset=»https://images.iphonephotographyschool.com/23851/546/iPhone-Photography-Tips.jpg 640w, https://images.iphonephotographyschool.com/23851/616/iPhone-Photography-Tips.jpg 720w, https://images.iphonephotographyschool.com/23851/560/iPhone-Photography-Tips.jpg 769w, https://images.iphonephotographyschool.com/23851/640/iPhone-Photography-Tips.jpg 750w, https://images.iphonephotographyschool.com/23851/708/iPhone-Photography-Tips.jpg 828w, https://images.iphonephotographyschool.com/23851/960/iPhone-Photography-Tips.jpg 1125w, https://images.iphonephotographyschool.com/23851/970/iPhone-Photography-Tips.jpg 1136w, https://images.iphonephotographyschool.com/23851/996/iPhone-Photography-Tips.jpg 1334w, https://images.iphonephotographyschool.com/23851/1062/iPhone-Photography-Tips.jpg 1242w, https://images.iphonephotographyschool.com/23851/1120/iPhone-Photography-Tips.jpg 1538w, https://images.iphonephotographyschool.com/23851/1120/iPhone-Photography-Tips.jpg 1792w, https://images.iphonephotographyschool.com/23851/1494/iPhone-Photography-Tips.jpg 2208w, https://images.iphonephotographyschool.com/23851/1680/iPhone-Photography-Tips.jpg 2436w» sizes=»(min-width: 768px) 768px, 100vw»/>
VSCO presets allow you to apply beautiful filters that enhance your photo in seconds. The filters are quite subtle, so it’s very difficult for you to over-edit your photos.
» alt=»iPhone Photography Tips» width=»560″ height=»auto» data-src=»https://images.iphonephotographyschool.com/23876/1120/iPhone-Photography-Tips.jpg» srcset=»» data-srcset=»https://images.iphonephotographyschool.com/23876/546/iPhone-Photography-Tips.jpg 640w, https://images.iphonephotographyschool.com/23876/616/iPhone-Photography-Tips.jpg 720w, https://images.iphonephotographyschool.com/23876/560/iPhone-Photography-Tips.jpg 769w, https://images.iphonephotographyschool.com/23876/640/iPhone-Photography-Tips.jpg 750w, https://images.iphonephotographyschool.com/23876/708/iPhone-Photography-Tips.jpg 828w, https://images.iphonephotographyschool.com/23876/960/iPhone-Photography-Tips.jpg 1125w, https://images.iphonephotographyschool.com/23876/970/iPhone-Photography-Tips.jpg 1136w, https://images.iphonephotographyschool.com/23876/996/iPhone-Photography-Tips.jpg 1334w, https://images.iphonephotographyschool.com/23876/1062/iPhone-Photography-Tips.jpg 1242w, https://images.iphonephotographyschool.com/23876/1120/iPhone-Photography-Tips.jpg 1538w, https://images.iphonephotographyschool.com/23876/1120/iPhone-Photography-Tips.jpg 1792w, https://images.iphonephotographyschool.com/23876/1494/iPhone-Photography-Tips.jpg 2208w, https://images.iphonephotographyschool.com/23876/1680/iPhone-Photography-Tips.jpg 2436w» sizes=»(min-width: 768px) 768px, 100vw»/>
There are plenty of filters to choose from in VSCO. You can create classic black and white images, crisp clean edits, or faded vintage photos.
» alt=»iPhone Photography Tips» width=»560″ height=»auto» data-src=»https://images.iphonephotographyschool.com/23875/1120/iPhone-Photography-Tips.jpg» srcset=»» data-srcset=»https://images.iphonephotographyschool.com/23875/546/iPhone-Photography-Tips.jpg 640w, https://images.iphonephotographyschool.com/23875/616/iPhone-Photography-Tips.jpg 720w, https://images.iphonephotographyschool.com/23875/560/iPhone-Photography-Tips.jpg 769w, https://images.iphonephotographyschool.com/23875/640/iPhone-Photography-Tips.jpg 750w, https://images.iphonephotographyschool.com/23875/708/iPhone-Photography-Tips.jpg 828w, https://images.iphonephotographyschool.com/23875/960/iPhone-Photography-Tips.jpg 1125w, https://images.iphonephotographyschool.com/23875/970/iPhone-Photography-Tips.jpg 1136w, https://images.iphonephotographyschool.com/23875/996/iPhone-Photography-Tips.jpg 1334w, https://images.iphonephotographyschool.com/23875/1062/iPhone-Photography-Tips.jpg 1242w, https://images.iphonephotographyschool.com/23875/1120/iPhone-Photography-Tips.jpg 1538w, https://images.iphonephotographyschool.com/23875/1120/iPhone-Photography-Tips.jpg 1792w, https://images.iphonephotographyschool.com/23875/1494/iPhone-Photography-Tips.jpg 2208w, https://images.iphonephotographyschool.com/23875/1680/iPhone-Photography-Tips.jpg 2436w» sizes=»(min-width: 768px) 768px, 100vw»/>
The app does offer more advanced VSCO photo editing tools. But you don’t need any technical knowledge to create amazing edits with VSCO presets. And the VSCO app is even free to download!
» alt=»iPhone Photography Tips» width=»560″ height=»auto» data-src=»https://images.iphonephotographyschool.com/23877/1120/iPhone-Photography-Tips.jpg» srcset=»» data-srcset=»https://images.iphonephotographyschool.com/23877/546/iPhone-Photography-Tips.jpg 640w, https://images.iphonephotographyschool.com/23877/616/iPhone-Photography-Tips.jpg 720w, https://images.iphonephotographyschool.com/23877/560/iPhone-Photography-Tips.jpg 769w, https://images.iphonephotographyschool.com/23877/640/iPhone-Photography-Tips.jpg 750w, https://images.iphonephotographyschool.com/23877/708/iPhone-Photography-Tips.jpg 828w, https://images.iphonephotographyschool.com/23877/960/iPhone-Photography-Tips.jpg 1125w, https://images.iphonephotographyschool.com/23877/970/iPhone-Photography-Tips.jpg 1136w, https://images.iphonephotographyschool.com/23877/996/iPhone-Photography-Tips.jpg 1334w, https://images.iphonephotographyschool.com/23877/1062/iPhone-Photography-Tips.jpg 1242w, https://images.iphonephotographyschool.com/23877/1120/iPhone-Photography-Tips.jpg 1538w, https://images.iphonephotographyschool.com/23877/1120/iPhone-Photography-Tips.jpg 1792w, https://images.iphonephotographyschool.com/23877/1494/iPhone-Photography-Tips.jpg 2208w, https://images.iphonephotographyschool.com/23877/1680/iPhone-Photography-Tips.jpg 2436w» sizes=»(min-width: 768px) 768px, 100vw»/>
Now, iPhone Photography School has an exciting job vacancy! Our hiring team needs someone who can help grow the company by recruiting talented people. Click here to find out more about this Recruiter job.
Источник


