- Dynamic Feature Module Integration Android
- Dynamic Feature Module Integration Android
- Get Started
- Before you begin
- App prerequisites
- Set up your app in your AdMob account
- Configure your app
- Initialize the Google Mobile Ads SDK
- Example MainActivity (excerpt)
- Kotlin
- Select an ad format
- Banner
- Interstitial
- Native
- Rewarded
- Additional resources
Dynamic Feature Module Integration Android


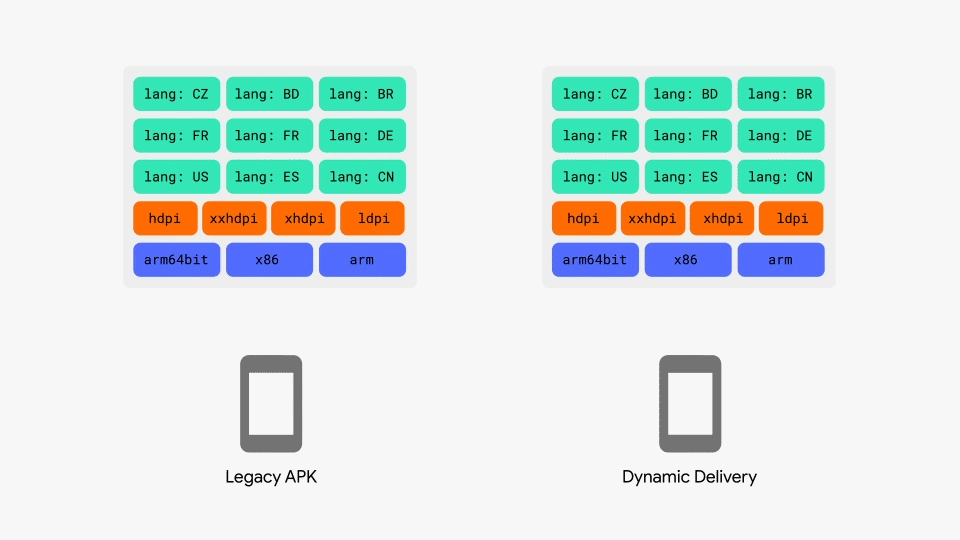
The size of the application has always been an extreme pain for the developers. Sometimes the large libraries make the app size even larger.
To cope up with that Google released On-Demand Delivery Module. Through this feature, you can download and install important components later on as a feature module.
For example, consider an app that has a chat feature that only a few users use. It may make sense to add that feature as a downloadable feature rather than including it all for the first time installation of the app which will make your app size lighter for the first time install.
So, let’s go through each step to let you configure the on-demand feature module. You can configure through Android Studio in simple easy steps.
STEP 1: Click on File > New > New Module from Menu.
STEP 2: Select Dynamic Feature Module and Click Next.
STEP 3: Enter your Module name and enter Package name as com.example.project.featurename. and Click Next.
STEP 4: Inside Module Download Options, enter your Module Title and leave the rest of the configured options as default as was set by Android Studio and Click Finish.
STEP 5: Once you finish, the Android Studio will do its work and Gradle will sync.
STEP 6: Once Gradle will finish its syncing, you will see your feature module on the left panel below your app module as a new project with its own Manifest, Java, and res folder.
STEP 7: Implement Google Play Core dependencies inside your app module using api. You can use “api” for Google Dependencies to use it inside your feature module. “api” acts as a common dependency to be used in both modules.
STEP 8: Now, inside your app manifest, add this line if you don’t have an application class.
OR, If you have an existing Application class, then extend that class with SplitCompatApplication and override attachBaseContext() method and add the line I have added in the sample file.
STEP 9: Now download the feature module using the following sample below.
NOTE: If your feature module size is greater than 10MB, then a user confirmation dialog will show up to let the user know what they are downloading.

In the above example, once the feature module is downloaded and installed, you can call the feature module activity using Intent.
STEP 10: Now inside your feature module java folder, create an activity as you do in a normal app module and call it using the above Intent calls. Inside that activity override attachBaseContext()
That’s it… You are done with the on-demand feature module android implementation.
Now, the testing part of it.
a) Test using an internal test track
Upload your app to the internal test track and install it on a device with a user account that has access to the internal test track. When using an internal test track, the following conditions must be met:
- The user account is part of the Internal Test Track.
- The user account is the primary account and it’s selected in the Play Store.
- The user account has downloaded the app from the Play Store (the app is listed in the user’s Google Play library).
- The user account does not currently have a review for the app.
After the account on the device has downloaded the app at least once from the internal test track and is part of the testers list, you can deploy new versions of the app locally to that device (for example, using Android Studio).
b) Test using an internal sharing app
Alternatively, for rapid iteration, you can use internal app sharing to test your integration. This method lets you quickly test changes by skipping some of the verification that happens with other test tracks.
- You may face multiple Gradle errors, while you are configuring your feature module dependencies. You may find answers to a few of them on Stack Overflow easily. For ease, I am adding my feature module build.gradle file.
The above file will help you if you have multiple flavors in your app.
2. The feature module can access all your app module files, but not vice-versa. Since your feature module will be downloaded later that’s why the app module doesn’t have the information on how to handle them and then will lead to a crash.

3. This feature will only work in a bundled app.
4. Caution: You have to set shrinkResources flag to false in-order to proceed with DFM, which is really a pain.
Источник
Dynamic Feature Module Integration Android
The size of the application has always been an extreme pain for the developers. Sometimes the large libraries make the app size even larger.
To cope up with that Google released On-Demand Delivery Module. Through this feature, you can download and install important components later on as a feature module.
For example, consider an app that has a chat feature that only a few users use. It may make sense to add that feature as a downloadable feature rather than including it all for the first time installation of the app which will make your app size lighter for the first time install.
So, let’s go through each step to let you configure the on-demand feature module. You can configure through Android Studio in simple easy steps.
STEP 1: Click on File > New > New Module from Menu.
STEP 2: Select Dynamic Feature Module and Click Next.
STEP 3: Enter your Module name and enter Package name as com.example.project.featurename. and Click Next.
STEP 4: Inside Module Download Options, enter your Module Title and leave the rest of the configured options as default as was set by Android Studio and Click Finish.
STEP 5: Once you finish, the Android Studio will do its work and Gradle will sync.
STEP 6: Once Gradle will finish its syncing, you will see your feature module on the left panel below your app module as a new project with its own Manifest, Java, and res folder.
STEP 7: Implement Google Play Core dependencies inside your app module using api. You can use “api” for Google Dependencies to use it inside your feature module. “api” acts as a common dependency to be used in both modules.
STEP 8: Now, inside your app manifest, add this line if you don’t have an application class.
OR, If you have an existing Application class, then extend that class with SplitCompatApplication and override attachBaseContext() method and add the line I have added in the sample file.
STEP 9: Now download the feature module using the following sample below.
NOTE: If your feature module size is greater than 10MB, then a user confirmation dialog will show up to let the user know what they are downloading.
In the above example, once the feature module is downloaded and installed, you can call the feature module activity using Intent.
STEP 10: Now inside your feature module java folder, create an activity as you do in a normal app module and call it using the above Intent calls. Inside that activity override attachBaseContext()
That’s it… You are done with the on-demand feature module android implementation.
Now, the testing part of it.
a) Test using an internal test track
Upload your app to the internal test track and install it on a device with a user account that has access to the internal test track. When using an internal test track, the following conditions must be met:
- The user account is part of the Internal Test Track.
- The user account is the primary account and it’s selected in the Play Store.
- The user account has downloaded the app from the Play Store (the app is listed in the user’s Google Play library).
- The user account does not currently have a review for the app.
After the account on the device has downloaded the app at least once from the internal test track and is part of the testers list, you can deploy new versions of the app locally to that device (for example, using Android Studio).
b) Test using an internal sharing app
Alternatively, for rapid iteration, you can use internal app sharing to test your integration. This method lets you quickly test changes by skipping some of the verification that happens with other test tracks.
- You may face multiple Gradle errors, while you are configuring your feature module dependencies. You may find answers to a few of them on Stack Overflow easily. For ease, I am adding my feature module build.gradle file.
The above file will help you if you have multiple flavors in your app.
2. The feature module can access all your app module files, but not vice-versa. Since your feature module will be downloaded later that’s why the app module doesn’t have the information on how to handle them and then will lead to a crash.
3. This feature will only work in a bundled app.
4. Caution: You have to set shrinkResources flag to false in-order to proceed with DFM, which is really a pain.
Источник
Get Started
Integrating the Google Mobile Ads SDK into an app is the first step toward displaying ads and earning revenue. Once you’ve integrated the SDK, you can choose an ad format (such as native or rewarded video) and follow the steps to implement it.
Before you begin
To prepare your app, complete the steps in the following sections.
App prerequisites
- Use Android Studio 3.2 or higher
Make sure that your app’s build file uses the following values:
- A minSdkVersion of 16 or higher
- A compileSdkVersion of 28 or higher
Set up your app in your AdMob account
Register your app as an AdMob app by completing the following steps:
Register your app with AdMob. This step creates an AdMob app with a unique AdMob App ID that is needed later in this guide.
Configure your app
In your project-level build.gradle file, include Google’s Maven repository and Maven central repository in both your buildscript and allprojects sections:
Add the dependencies for the Google Mobile Ads SDK to your module’s app-level Gradle file, normally app/build.gradle :
Add your AdMob app ID (identified in the AdMob UI) to your app’s AndroidManifest.xml file. To do so, add a tag with android:name=»com.google.android.gms.ads.APPLICATION_ID» . You can find your app ID in the AdMob UI. For android:value , insert your own AdMob app ID, surrounded by quotation marks.
In a real app, use your actual AdMob app ID, not the one listed above. If you’re just looking to experiment with the SDK in a Hello World app, you can use the sample app ID shown above.
Note also that failure to add the tag as shown above results in a crash with the message:
(Optional) Declare AD_ID permission for previous versions to work with Android S.
If your app uses the Google Mobile Ads SDK version 20.4.0 or higher, you can skip this step since the SDK automatically declares the com.google.android.gms.permission.AD_ID permission and is able to access the Advertising ID whenever it’s available.
For apps that use the Google Mobile Ads SDK version 20.3.0 or lower and are targeting Android S, you must add the com.google.android.gms.permission.AD_ID permission in the AndroidManifest.xml file in order to target Android S:
To learn more about the com.google.android.gms.permission.AD_ID permission declaration, including how to disable it, please refer to this Play Console article.
Initialize the Google Mobile Ads SDK
Before loading ads, have your app initialize the Google Mobile Ads SDK by calling MobileAds.initialize() which initializes the SDK and calls back a completion listener once initialization is complete (or after a 30-second timeout). This needs to be done only once, ideally at app launch.
Ads may be preloaded by the Google Mobile Ads SDK or mediation partner SDKs upon calling MobileAds.initialize() . If you need to obtain consent from users in the European Economic Area (EEA), set any request-specific flags (such as tagForChildDirectedTreatment or tag_for_under_age_of_consent ), or otherwise take action before loading ads, ensure you do so before initializing the Google Mobile Ads SDK.
Here’s an example of how to call the initialize() method in an Activity:
Example MainActivity (excerpt)
Kotlin
If you’re using mediation, wait until the completion handler is called before loading ads, as this will ensure that all mediation adapters are initialized.
Select an ad format
The Google Mobile Ads SDK is now imported and you’re ready to implement an ad. AdMob offers a number of different ad formats, so you can choose the one that best fits your app’s user experience.
Banner
Rectangular ads that appear at the top or bottom of the device screen. Banner ads stay on screen while users are interacting with the app, and can refresh automatically after a certain period of time. If you’re new to mobile advertising, they’re a great place to start.
Interstitial

Full-screen ads that cover the interface of an app until closed by the user. They’re best used at natural pauses in the flow of an app’s execution, such as between levels of a game or just after a task is completed.
Native

Customizable ads that match the look and feel of your app. You decide how and where they’re placed, so the layout is more consistent with your app’s design.
Rewarded

Ads that reward users for watching short videos and interacting with playable ads and surveys. Used for monetizing free-to-play apps.
Additional resources
The Google Mobile Ads repository on GitHub demonstrates how to use the different ad formats that this API offers.
Except as otherwise noted, the content of this page is licensed under the Creative Commons Attribution 4.0 License, and code samples are licensed under the Apache 2.0 License. For details, see the Google Developers Site Policies. Java is a registered trademark of Oracle and/or its affiliates.
Источник


