- 15 most useful apps for Android
- Adobe apps
- AirDroid
- CamScanner
- IFTTT
- Google Assistant / Google Search
- Google Drive suite
- Google Translate
- LastPass Password Manager
- Microsoft Apps
- Solid Explorer
- Tasker
- TickTick
- WiFi Analyzer
- YouTube
- A guide to Android app development for complete beginners in 5 easy steps
- Step 1: Downloading the tools you need for Android app development
- Step 2: Start a new project
- Java vs Kotlin for Android app development
- Minimum SDK
- Step 3: Familiarize yourself with the files
- Introducing layout files
- The other files and folders
- Step 4: Test your app
- Step 5: Make a thing!
15 most useful apps for Android
![]()
Read more:
Adobe apps
Price: Free / Up to $52.99 per month
Adobe has some of the most useful apps out there. Their apps generally range from photo editing to utility and include apps like Adobe Acrobat (PDF reader), Adobe Lightroom and Photo Express (photo editing), Illustrator Draw (drawing), Scan (document scanner), Premiere Clip (video editing), and many, many others. Many of these apps fill niches that other third party apps simply don’t. In addition, they are all good enough to hold spots on our lists for all of those things. All of them are free to download. Some of them may require an Adobe Creative Cloud subscription to get all of the features, though.
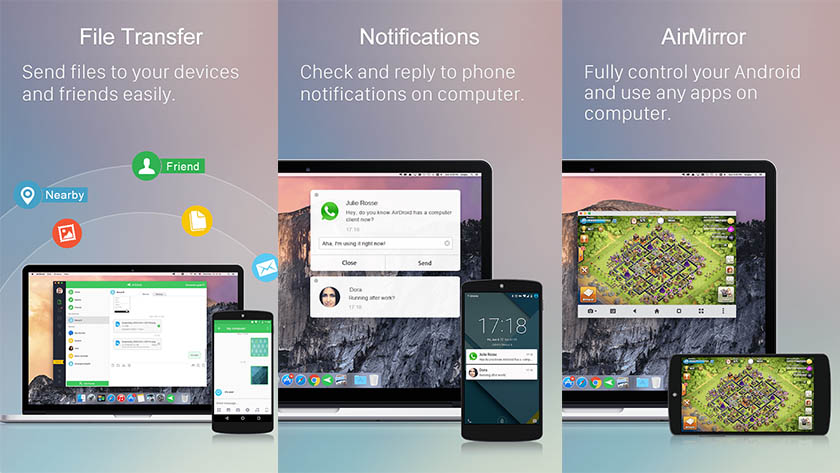
AirDroid
Price: Free / $1.99 per month / $19.99 per year
AirDroid is one useful app. It lets you connect your PC to your Android device and vice versa. You can share files, get notifications, quick reply to a few messaging apps, and more. AirMirror and AirDroid: Remote Support are two plugins that add to the functionality in various ways. This is among the best ways to connect all of your devices together. It also works on Android, iOS, Mac, and Windows. There is a subscription for all of the features. However, you can try the free version first to see if you like it. Pushbullet is a good competitor to AirDroid as well.
CamScanner
Price: Free / $4.99-$6.99 per month / Varies
CamScanner is probably the best document scanner app on mobile. You use the app to scan documents into your phone and convert them to PDF format. You then send that document through email, save it to your device, and you can even fax it for a nominal fee. This is one of the few apps on the Play Store that can do all of those things and definitely the best of those. It seems to hit all the check boxes you’d want in an app like this. You can use most of the features for free or you can pay for a subscription if you intend on using it very heavily. In either case, this is probably the best app in its category. It’s especially useful during tax season and for business people.
IFTTT
Price: Free
IFTTT is easily one of the most useful apps ever. It’s an app that creates commands to carry out a set of basic tasks automatically. What’s great about the app is the sheer number of services, products, and other apps that have IFTTT supports. You can have it turn on your smart lights in your home, save images from Instagram and upload them to Dropbox, and there is even some Google Assistant and Amazon Alexa stuff available. It doesn’t take very long to learn and can automate a lot of otherwise mundane tasks on your phone. The list of things this app is capable of is so long that it’s absurd. It’s definitely useful, trust us. Plus, it’s free!
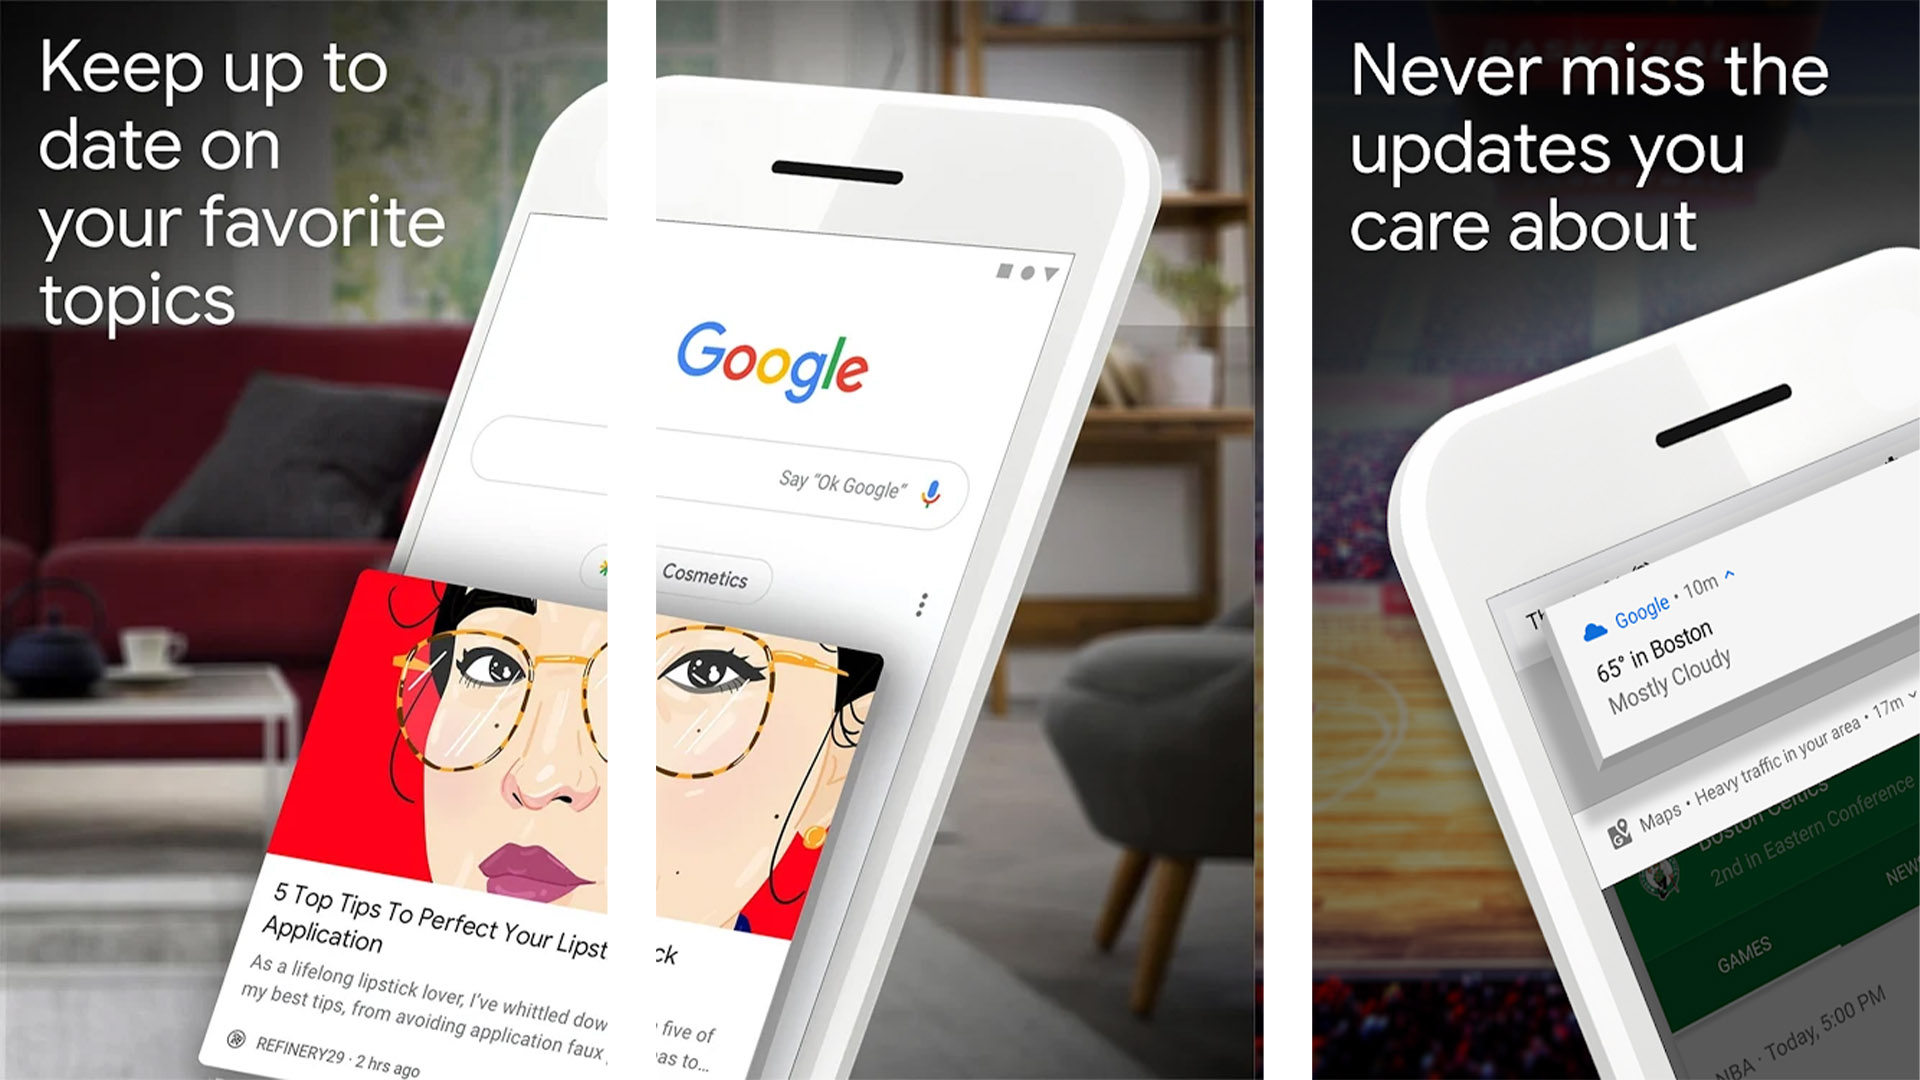
Google Assistant / Google Search
Price: Free
Google’s app is definitely one of the most useful apps ever. It contains two basic things: Google Assistant and Google Feed. Google Assistant answers basically any question, sets up reminders, turns smart lights on and off, and even pulls up songs or videos for you. Google Feed is, well, a feed with tons of stuff, including weather, news, and news. It slowly curates new stuff based on your search history and interests. You can also tune it to your likes specifically as well. The two together with Google Search in one app is a potent combination that few other developers can even compete with. This single app houses Google Assistant, Google Search, and Google Feed. All of them are useful.
See more:
Google Drive suite
Price: Free / $1.99-$299.99 per month
Google Drive and its suite of apps are the most popular productivity apps on Android. The full collection includes Google Drive, Google Docs, Google Sheets, Google Slides, Google Keep, and Google Photos. Between these apps, you have a full-fledged office suite complete with a note taking app, cloud storage, and a place to back up all of your photos and videos for free. Google Drive comes with 15GB of storage for free. You can increase the cloud storage space with a monthly subscription. The whole package are some of the most useful apps we’ve seen.

Google Translate
Price: Free
Google Translate is the go-to translation app available on any platform. It has received a number of updates over the years, including the ability to use your camera to point at something and have it translated in real-time. There is also a neural network powering the platform that helps make translation even more accurate. It has a slew of additional features as well, including the ability to translate a two way conversation in real-time. Microsoft Translate and a few other translate apps are getting better, but Google Translate is still king of the roost.
![]()
LastPass Password Manager
Price: Free / $2-$4 per month
LastPass is a password manager app. There are many of these in Google Play and most of them work fairly well. However, we like LastPass because it stays current with Android updates and also has a second authenticator app for additional security. The app generates passwords, saves your passwords to various sites, and helps you login quickly when you need to. It adds a layer of security to your life. The subscription costs are also quite reasonable. There are other really good password manager apps as well. However, we like that LastPass is always among the first to integrate new Android features quickly so it gets the spot for now.
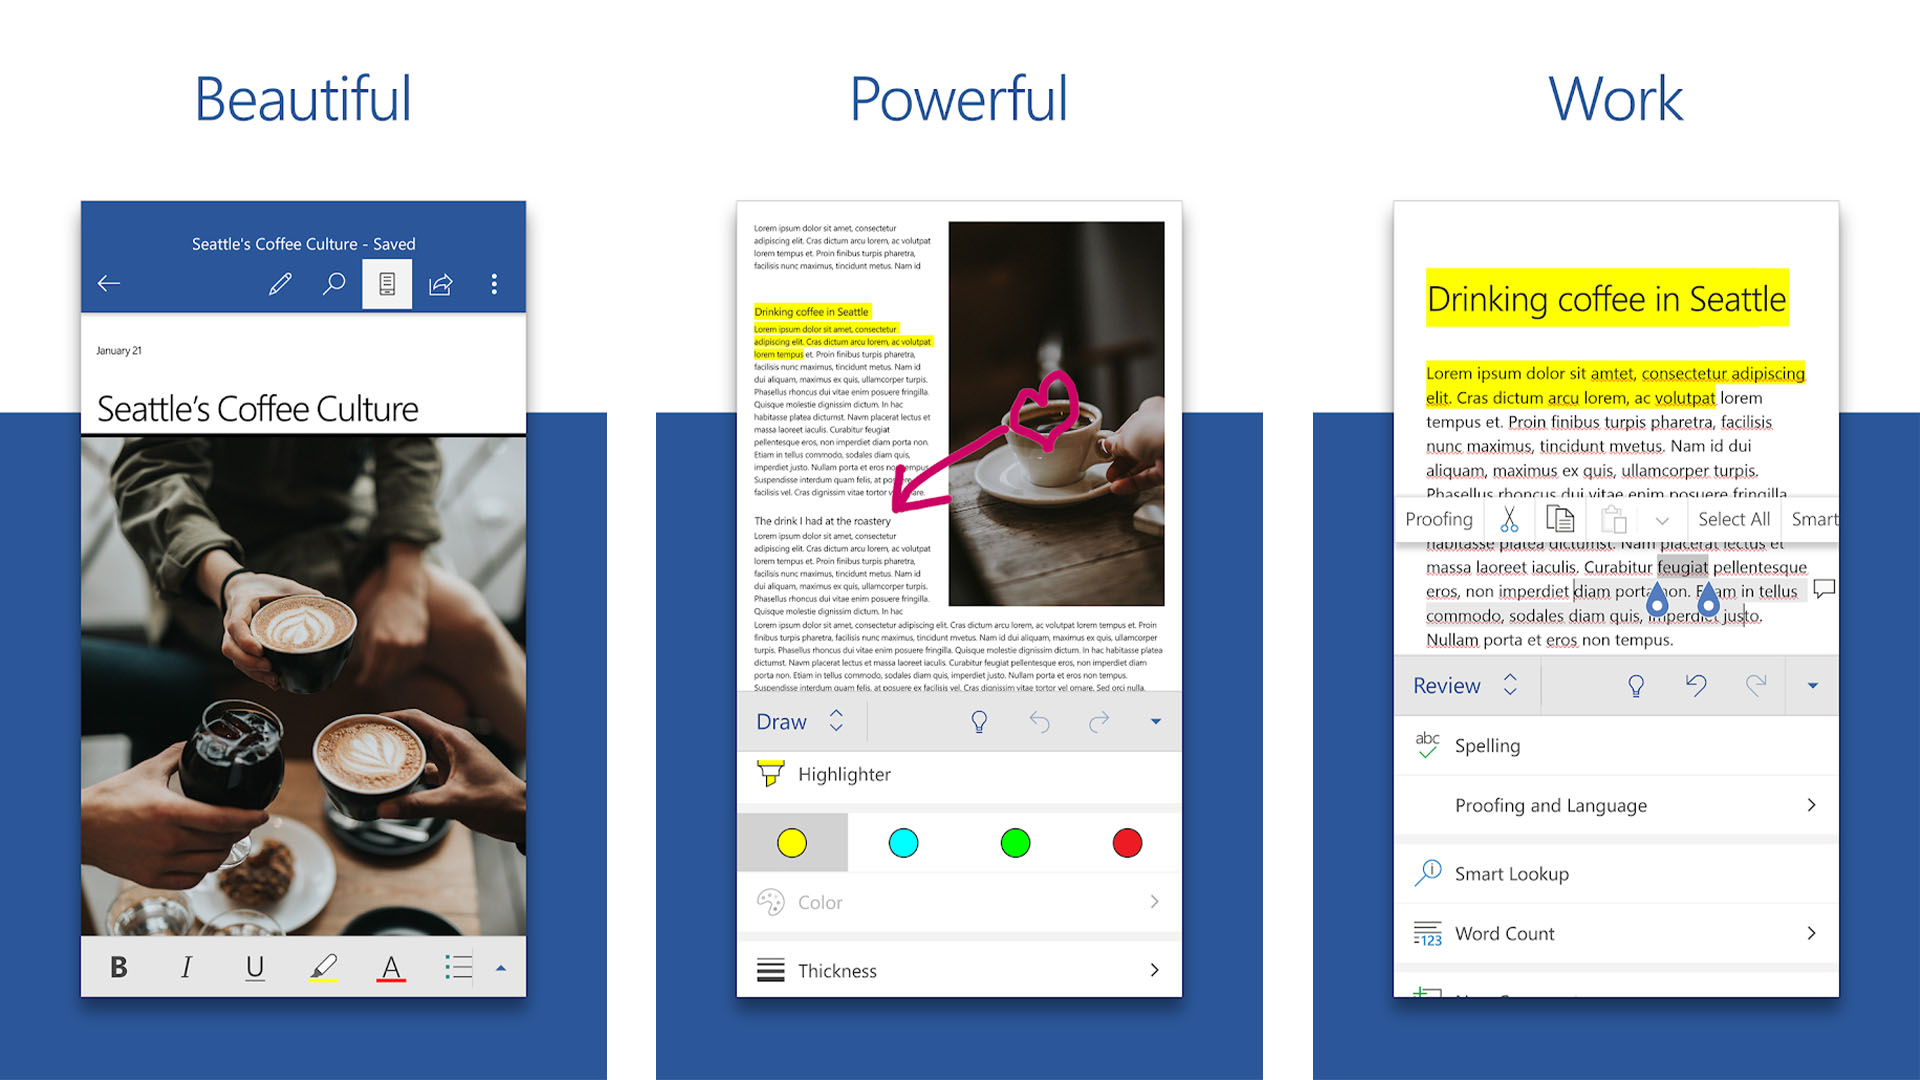
Microsoft Apps
Price: Free / Varies
Microsoft has been killing it on mobile the last couple of years. The company definitely has some of the most useful apps out there. Some of the better ones include Microsoft OneDrive (cloud storage), the Microsoft Office suite (word documents, spreadsheets, presentations), Microsoft Launcher, Microsoft Authenticator (security), Office Lens (document scanner), Remote Desktop, Xbox and Mixer (gaming), Your Phone Companion (phone-to-PC), and several more. Additionally, they have some up and comers like a to do list app that is slowly getting better. They are also working on direct Android screen mirroring on Windows 10 and some other useful things. Cortana exists on this list too, but it’s just average as far as virtual assistants go for right now.
Price: Free / $5.99 per month
Reddit is a very useful app and website. It has a virtual ton of subreddits that cover all sorts of topics. You can find advice, tutorials, and information about basically anything. There are a lot of trashy people and topics on Reddit. However, a little tact and some patience and you can avoid most of the nonsense. Anyone with an interest should check out the subreddits for that interest. You may find some really cool stuff you didn’t previously know about. There are also a ton of third party Reddit apps. Many prefer the third party ones over the official app, but the official app works too.

More useful apps here:
Solid Explorer
Price: Free trial / $1.99
Solid Explorer is a file manager and browser that does a great job. It’s built around Material Design and that makes the app very easy to use. On top of the usual file browsing, you’ll also have the option to access your cloud storage services if you use them. On top of that, you’ll be able to access FTP, SFTP, WebDav, and SMB/CIFS clients. There is even root access if you need that. It’s a powerful app that is also simple to use. You’ll have to pay for it after the 14-day trial, but everyone needs a file manager and this one is a good one.
Tasker
Price: $2.99
Tasker is one of the most powerful apps. Tasker allows you to create automated activities that do a variety of things. It’s difficult to express what this app can do because it can do virtually anything. The app comes with 200 built-in actions that you can use or you can build your own. There are also a ton of apps with Tasker support along with plugins to expand functionality. There is a large learning curve. This is definitely not the easiest app to use. However, it works great once you figure it out. This is kind of like a power user version of IFTTT. Tasker is also free with Google Play Pass if you have it.
TickTick
Price: Free / $27.99 per year
TickTick is among the best to do list apps and also one of the most useful apps. You put tasks in and the app reminds you to do them. In addition, you can set it up for things like grocery lists and other stuff. The app also features collaboration. You can share tasks between the members of your household or job if needed. It also comes with a calendar, widgets, and note taking features. The free version comes with more than enough for casual use. The paid version is really only needed for extreme business use cases.

WiFi Analyzer
Price: Free
WiFi Analyzer is an open-source WiFi analyzer. It lets you see your WiFi connection as well as other connections in the general area. There are a number of reasons why you’d need something like this. You can see if your WiFi is sharing a channel with other WiFi networks (which can affect connectivity and speed). You can also identify nearby WiFi networks, graph signal strength, and other activities. This can help diagnose WiFi problems in the event you have issues. This is especially useful for those who stream live TV or use live stream gaming services like Google Stadia.
YouTube
Price: Free / $12.99 per month
YouTube is probably the most useful app on mobile. Sure, most use it for music videos or product reviews. However, there is a healthy and huge underbelly of tutorials, lessons, lectures, explainers, and other videos. I once learned how to change the headlight bulbs on my 2005 Chevy Equinox with a YouTube video. There aren’t a ton of things that it doesn’t have. The app is free if you don’t mind advertising. You can pay $9.99 per month to remove ads, enable background play, and get a complimentary subscription to Google Play Music. It’s a pretty good deal.

Thank you for reading! Try these out too:
If we missed any of the most useful apps for Android, tell us about them in the comments! You can also click here to check out our latest Android app and game lists!
Источник
A guide to Android app development for complete beginners in 5 easy steps

Learning Android app development may seem like a daunting task, but it can open up a world of possibilities. You could create the next “hit app” that changes the way we work or interact with each other. Maybe you’ll develop a tool that you can use yourself to improve your workflow. Or perhaps you’ll just gain a new skill that lands you a great job!
Whatever the case, learning Android app development might not be as tough as you think, as long as you understand what all the different moving parts are for, and have a roadmap to guide you through. This post is that road map!
Step 1: Downloading the tools you need for Android app development
First, you need to create your development environment so that your desktop is ready to support your Android development goals. For that, you will need Android Studio and the Android SDK. Thankfully, these both come packaged together in a single download that you can find here.
Android Studio is an IDE. That stands for “integrated development environment,” which is essentially an interface where you can enter your code (primarily Java or Kotlin) and access all the different tools necessary for development. Android Studio allows you to access libraries and APIs from the Android SDK, thereby giving you access to native functions of the operating system. You’ll also be able to build your app into an APK using Gradle, test it via a “virtual device” (emulator), and debug your code while it runs.

With all that said, keep in mind that there are other options available for your Android app development. For example, Unity is a very powerful tool for cross-platform game development that also supports Android. Likewise, Visual Studio with Xamarin is an excellent combination for creating cross-platform apps in C#.
Android Studio is the best place for most people to start (with Android game development being an exception), particularly as it provides all these additional tools and resources in a single place.
Fortunately, set up is very simple and you only need to follow along with the instructions on the screen.
If you need help getting set up, check out our Android Studio tutorial for beginners. And our guide on how to install the Android SDK.
Step 2: Start a new project
Once you have Android Studio on your machine, the next step is to start a new project. This is a straightforward process, but you’ll need to make a few decisions that will impact on your Android app development going forward.
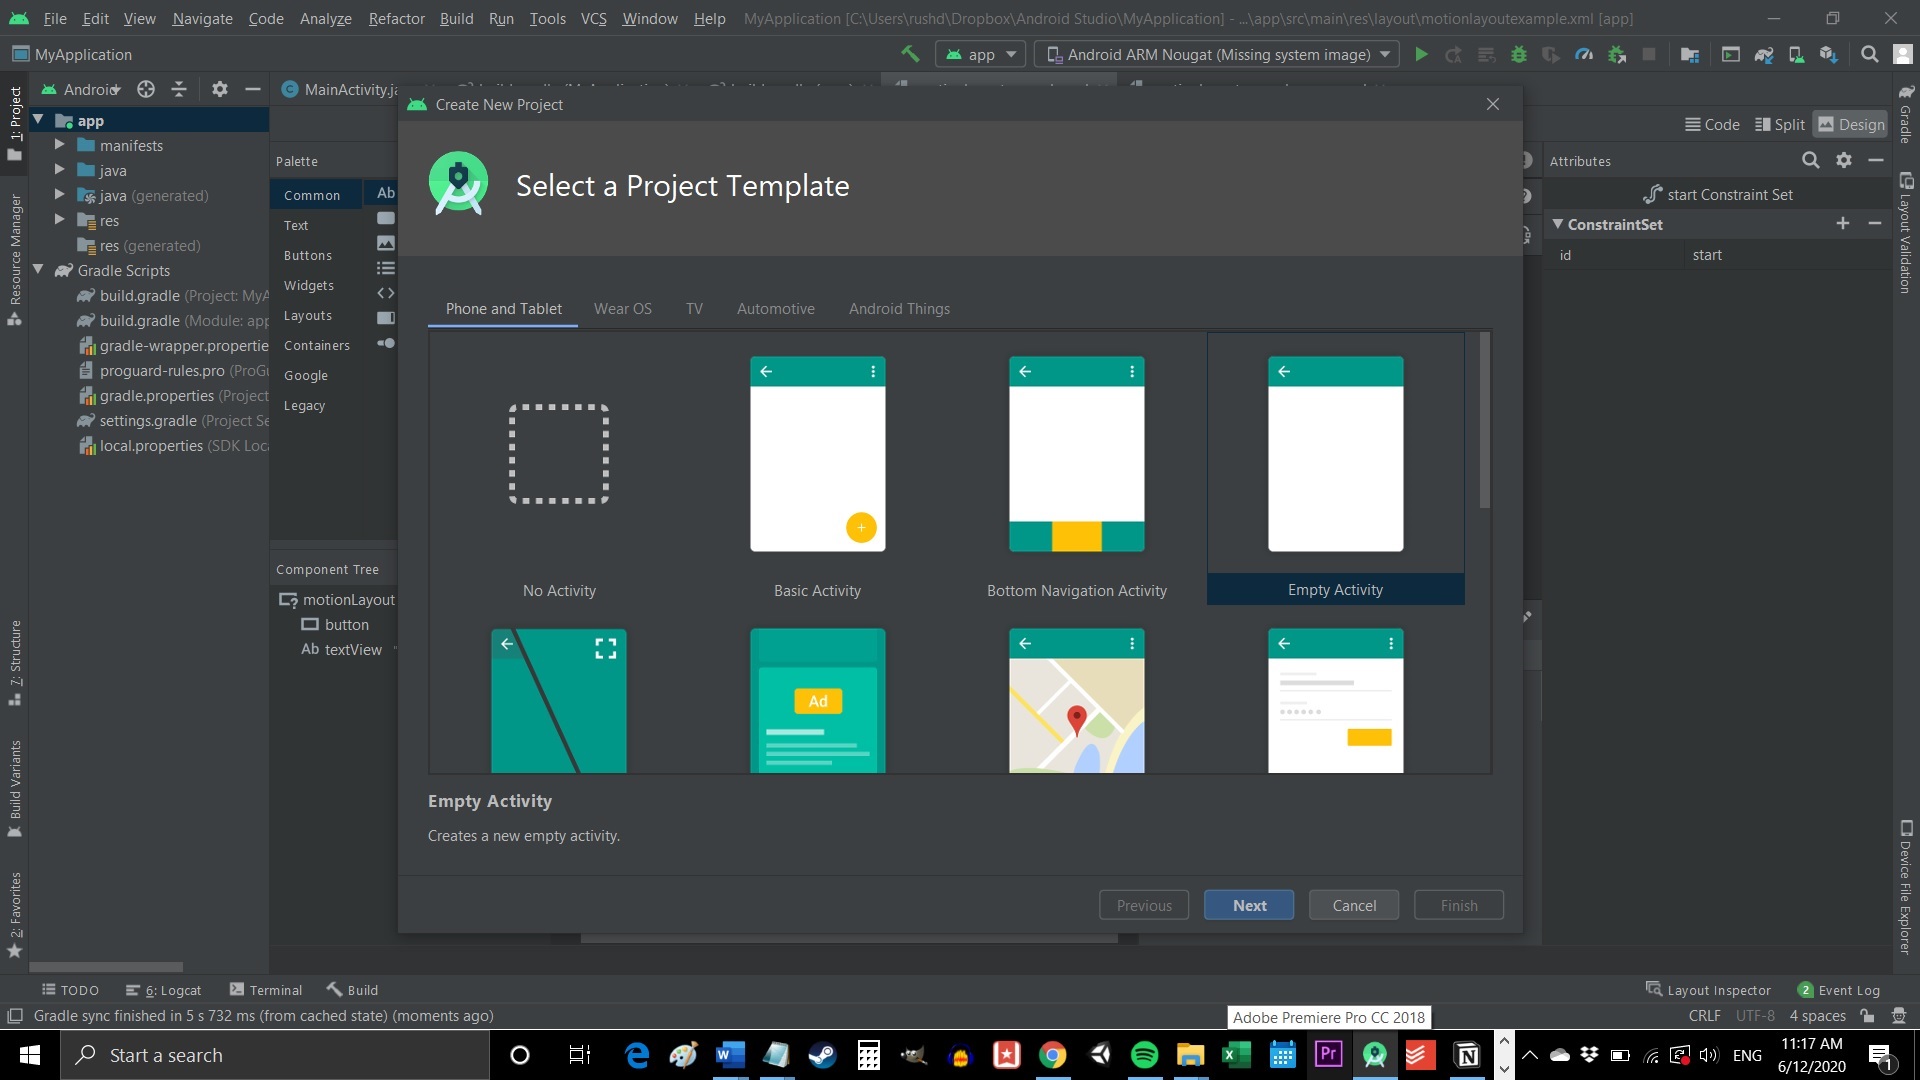
Go to File > New > New Project. You will now be asked to select a “Project Template.” This defines the code and UI elements that will be included in your new app when it loads.
The word “Activity” refers to a “screen” in your app. Thus, a project with “No Activity” will be completely empty, apart from the basic file structure. A “Basic Activity” on the other hand will create a starting screen for your app and will add a button in the bottom and a hamburger menu at the top. These are common elements in many Android apps, so this can save you some time.
That said, it can also risk making things more complicated when you’re first getting to grips with development. For that reason, we’re going to choose the “Empty Activity.” This will create an activity and some files for us, but it won’t add a lot of additional code.

Choose a name and “package name” for your new app. The name is what your audience will see when the app is installed on their device. The package name is an internal reference used by Android to differentiate it from other apps. This should be composed using your top level domain (e.g. .com), domain name, and app name.
For example: com.androidauthority.sampleapp.
If you don’t have a domain or a company, just use “com” followed by something that appeals to you!
You’ll also need to decide where you want the files to be saved and what language you’re going to code in: Java or Kotlin.
Java vs Kotlin for Android app development
One of the biggest decisions you’ll need to make as an Android developer is whether you’re going to learn Kotlin or Java. Both languages are officially supported by Google and Android Studio, but they have some distinct differences.
Java has been supported by Google the longest and is what developers have been using to craft Android apps for years. Java is also one of the most in-demand programming languages in the world, which makes it a great choice for those who want to begin a career in development. As the oldest Android programming language, there is also slightly more support for Java vs Kotlin, although it’s not by much.

Kotlin, on the other hand, has become Google’s preferred choice for Android development. This is the default when starting a new app, and it is likely to become more common going forward. Kotlin is also significantly easier to get to grips with if you’re a complete beginner.
For these reasons, Kotlin is probably the language of choice for Android developers that are learning for fun, or that have no aspirations to develop for other platforms. However, Java makes more sense if you’re interested in becoming a professional developer.
You can learn more about the two options here by reading our guide to Kotlin vs Java for Android.
Minimum SDK
Finally, you also need to consider your Minimum SDK. This is the lowest version of Android that you want your app to support.
The lower you make this number, the broader your potential audience will be. Keep in mind that there is a relatively low adoption rate for the latest versions of Android, so sticking with the latest update will prevent a lot of users from trying your creation.
However, you will only be able to access the latest features of Android if you target a more recent version. If you like the sound of supporting chat bubbles, then you’ll want to stick with the most recent version.
Step 3: Familiarize yourself with the files
I remember the first time I tried Android app development. I loaded up Android Studio and was immediately baffled by what I saw. There are just so many different files, multiple types of code, folders, and more! This was worlds away from the single blank file I was used to working with in Python or even QBasic (anyone remember QBasic??).
This can be rather daunting, but here’s what you need to know.
![]()
The file that is open is MainActivity.java or MainActivity.kt. This is the main logic file for the activity that is going to define how your app behaves. Look on the left, and you’ll see that this file is found in: MyApplication > app > src > main > java > com > companyname > myapplication.
The folders used are important for Android app development, as they help Android Studio and Gradle to find everything and build it correctly (more on Gradle in a moment). Suffice to say, you can’t just rename these as you please!
You’ll notice that there is already some code on the main page. This is what we call “boilerplate code,” meaning that it is code that is almost identical across different app projects and that is needed to make basic functions work. Boilerplate code is what you’ll find yourself typing out over and over again! One of the benefits of Kotlin is that it requires less boilerplate, meaning that you’ll have less code on your screen if that is what you chose.
Introducing layout files
The role of this code is to tell Android where the associated layout file is. A layout file is slightly different from a Kotlin/Java file. This defines the way that an activity looks, and lets you add things like buttons, text, and browser windows.
You’ll find this file in: MyApplication > app > src > res > layout.
It will be called activity_main.xml. Note that files stored in the resources folder can’t use capitals; they need to use the underscore symbol to distinguish different words. Double click on this file and it will open in the main window where you edit your code. Notice that you can switch between the open files using tabs along the top.
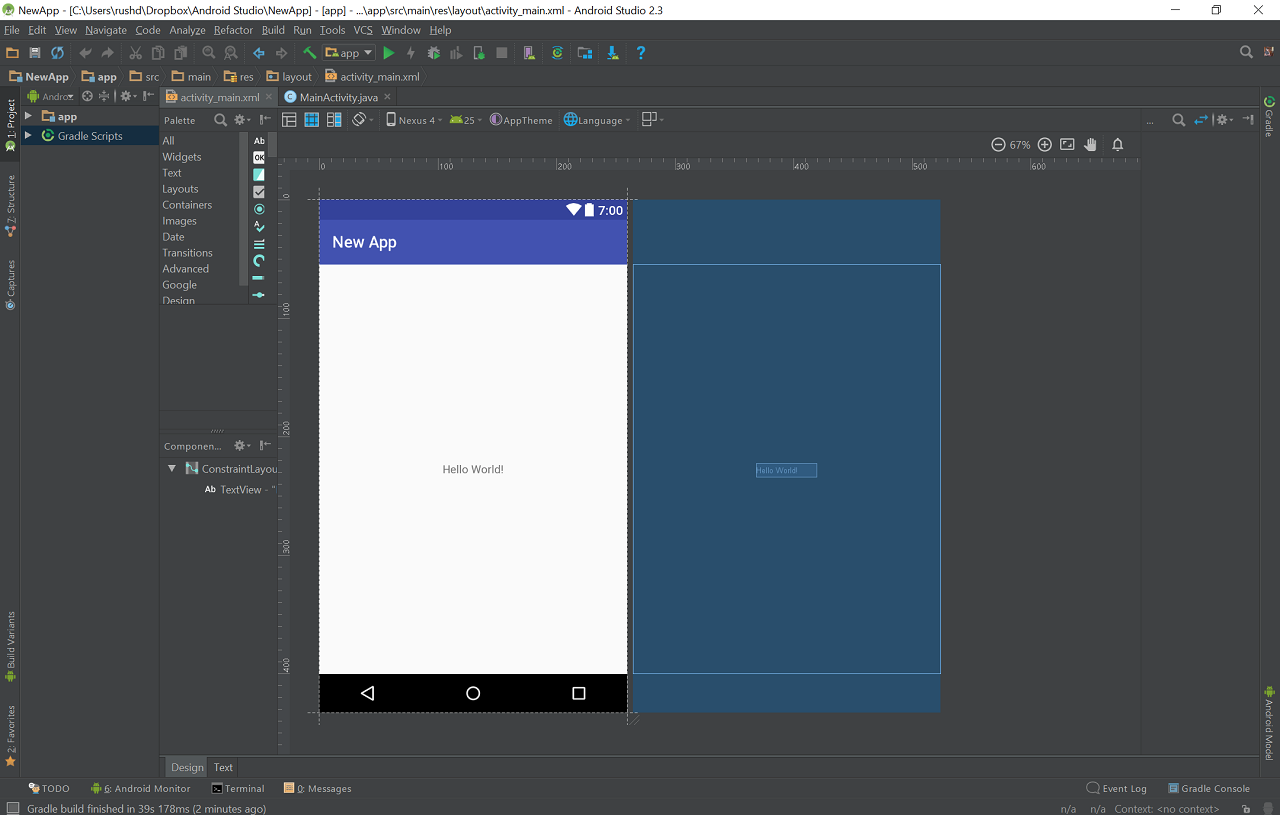
You can view this file via the “Code” view, the “Design” view, or a split view that shows these windows side-by-side. There are buttons to switch mode in the top right.
In the design view, you can actually drag and drop different widgets onto the screen. The code view shows you a load of XML script. When you add new widgets via the Design view, this script will update. Likewise, you can tweak properties of the widgets (called “views”) in here and see them reflected in real-time via the Code view.
In the vast majority of apps, you’ll need to create a new Java/Kotlin file and a corresponding XML file, each time you want a new activity. And for those that were wondering: yes, that means you have to learn either Kotlin or Java and XML. This is a bit of a headache, but it actually simplifies the process in the long run.
The other files and folders
There are lots more files and folders here though, so what do they all do?
In truth, you don’t need to know what everything here is. But some things that are useful to know about:
The Android Manifest: This is an XML file in the res folder that defines important features of your app. That includes the orientation of the app, the activities that you want to be included in it, the version, etc.
Drawable: This folder is found in res. This is where you will put things like images that you want to reference later.
Values: This resource folder is a useful place to store values that will be used globally across your app. For example, this can include color codes (making it easy for you to change the look of your entire app) or strings (words). You’ll define these values in individual XML files, such as colors.xml.
Gradle: Gradle is the tool that takes all your files and bundles them into a workable APK for testing. It is also useful for generating previews etc. You won’t need to worry about the files in here often, but if you want to add a “dependency,” this is where you will do it. Dependencies are external libraries that let you access additional functionality from within your own code.
Of course, we also have a detailed introduction to Gradle for new Android developers.
Step 4: Test your app
The first thing that you are supposed to do when familiarizing yourself with any new programming language, is to create an app that says “Hello World.” Thankfully, this is very easy in this case seeing as that’s what the code that’s already here does! If you look at the XML, it includes a small label that just says: Hello World!
If you look at the controls along the top, you’ll see there’s a little green play arrow. On the left of this is a drop-down menu, with a phone name in it. When you installed Android Studio, this should also have installed an Android system image along with the Virtual Device Manager. In other words, you should already have an Android emulator set up and ready to go! By clicking on this green arrow, you’ll be able to launch that and test your app! Notice that this will also let you use the emulated phone as though it were a real device.
You can change the settings for your virtual device – such as screen size, Android version, space etc. – by going to Tools > AVD Manager. You can also download new system images here. Make sure that your virtual device meets or exceeds the minimum SDK you set at the start.
Alternatively, you can try plugging a physical device into your computer and using this to test your new app. You’ll need to turn on Developer Options though, and enable USB Debugging.
Step 5: Make a thing!
The best way to learn Android app development is by doing! That means you should have a stab at editing the code in front of you, to see if you can make it do something new.
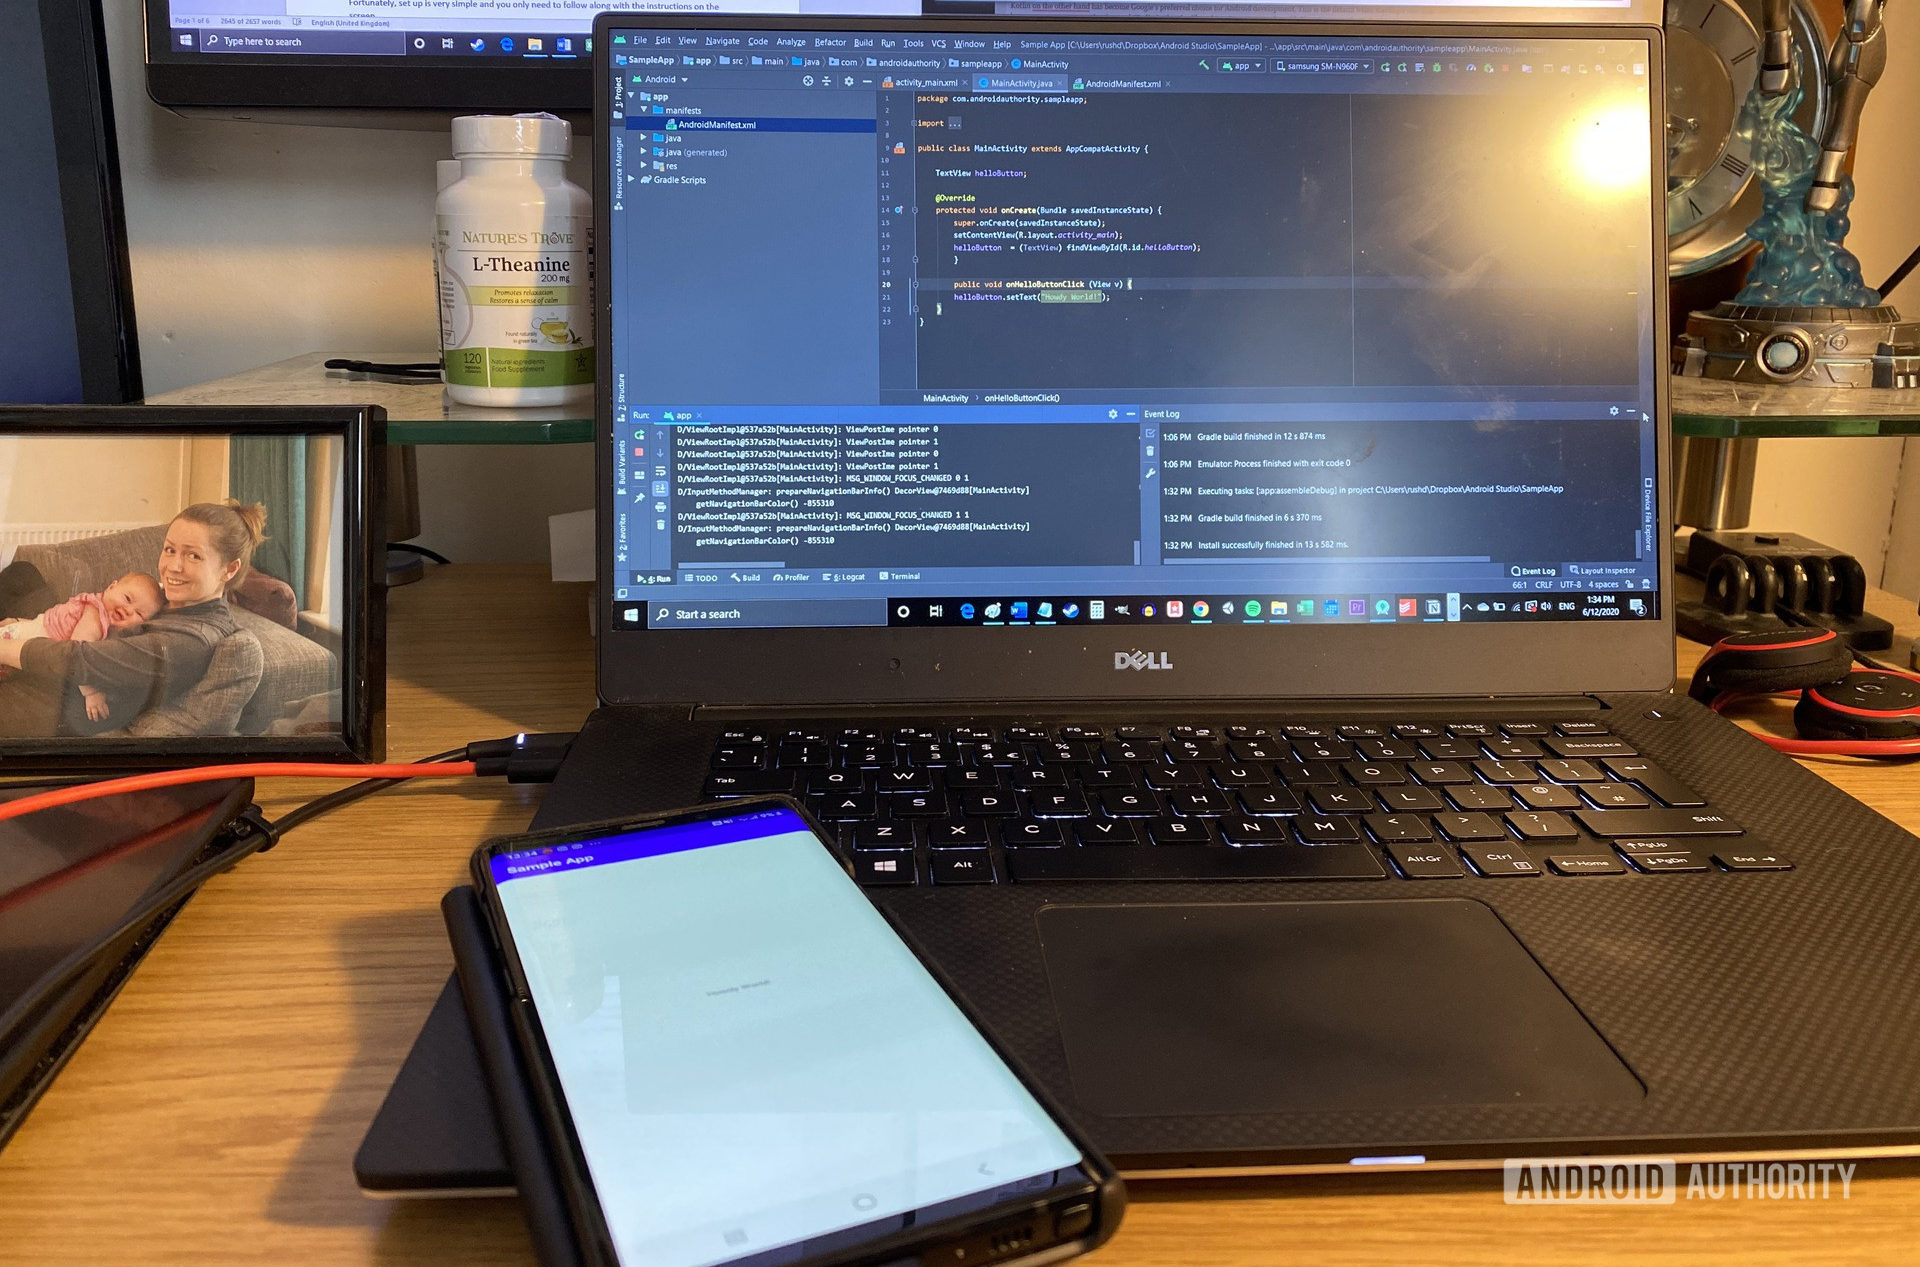
Changing the message that displays is as simple as going into your XML and changing the line that says “Hello World!” into “Howdy World!”
But what if you want to add some kind of interactive element to your creation? In that case, you might decide to let the user click the button to change the text.
First, you’ll need to place this line inside the TextView tag in your activity_main.xml:
This will give the text label the name “helloButton” and will state that the method “onHelloButtonClick” will reference this view. We’re going to add that to our code in a moment.
Now you can add the following code to your MainActivity. If you see any text appear red as you are typing it, that means you need to “import” that code from the Android SDK. Click on the red text then press Alt + Enter and Android Studio will do this for you automatically. In short, this tells Android that you are referencing a library that is a part of the Android SDK.
(The following example is written in Java.)
In this code example, we first create an “object” in the code called “helloButton.” Inside our “onCreate” method (everything within the curly brackets) we then tell Android that this object represents the button in our layout file. The code you place here is what will run first when you launch an app.
Next, we create the method that runs when someone clicks on the button. Once that happens, we can then change the text on the said button. Notice that once again, Kotlin requires significantly fewer lines to achieve the same thing!
Run the app and you should now see that when you click the button, the text changes!
This is a very simple app, but it demonstrates the basics of how Android app development works. Generally, you will be creating new on-screen elements in the layout file, then defining how they behave in the associated Java or Kotlin file.

As you get more advanced, you’ll need to start manipulating and storing data. To do this, you’ll use variables that contain numbers and strings (words).
We have an in-depth Java tutorial that will help you get started.
Once you’ve read through that, you’ll have a basic idea of how Java works, and all that is left is to learn how you can apply these skills to Android app development. To that end, a great strategy is to pick a project and then work on that.
And wouldn’t you know it: we have a ton of great projects to try out! Like an easy first project for Android app development noobs (math game).
The key is not to try and learn “all of Android app development” but to set your sights on a realistic first project. You’ll keep learning as you add new features and want to do new things, and having a goal will keep your learning fun and structured. Before you know it, you’ll be a pro!
Источник


