- Урок 2. Использование Material Theme в android приложениях
- Новая материальная тема обеспечивает:
- Материальная тема задается:
- Настройте цветовую палитру
- Настройте строку состояния
- Отдельные view темы
- Theme material android studio
- Android Material Styles and Themes
- Material Themes
- Using Material Themes
- Theme.Material Output
- Theme.Material.Light Output
- Material Themes Custom Colors
- Material Dialog Themes
- Material Styles for Text
- Widget Materials Themes
- Material Themes Compatibility
- Using App Compact Material Themes
- About
- Styles and Themes
- Themes versus Styles
- Create and apply a style
- Extend and customize a style
- Apply a style as a theme
- Style hierarchy
- TextAppearance
- Customize the default theme
- Add version-specific styles
- Customize widget styles
- Additional resources
- Blog posts
Урок 2. Использование Material Theme в android приложениях
Новая материальная тема обеспечивает:
- Системные виджеты, которые позволяют вам установить их цветовую палитру
- Анимацию сенсорного отклика для системных виджетов
- Анимации переходов между activity
Вы можете настроить вид материальной темы согласно вашему фирменному стилю с помощью цветовой палитры. Вы можете окрасить строку меню и строку состояния, используя свойства темы, как показано на рисунке 3.
Системные виджеты имеют новый дизайн и анимацию сенсорного отклика. Вы можете настроить цветовую палитру, анимацию сенсорного отклика и переходы между activity в вашем приложении.
Материальная тема задается:
- @android:style/Theme.Material (темная версия)
- @android:style/Theme.Material.Light (светлая версия)
- @android:style/Theme.Material.Light.DarkActionBar
Чтобы увидеть список материальных стилей, которые вы можете использовать, смотрите R.style.
 Рисунок 1. Темная материальная тема
  Рисунок 2. Светлая материальная тема
Примечание: материальная тема доступна только в версиях Android 5.0 (уровень API 21) и выше. Вспомогательные библиотеки v7 предоставляют темы с материальными стилями для некоторых виджетов и поддерживают настройку цветовой палитры. Для получения дополнительной информации, смотрите Поддержка совместимости.
Настройте цветовую палитру
Чтобы настроить основные цвета, соответствуя вашему бренду, установите ваши цвета используя атрибуты темы, когда вы наследуетесь от материальной темы:
Настройте строку состояния
Материальная тема позволяет вам легко настроить строку состояния, таким образом, вы можете установить цвет, который соответствует вашему бренду и обеспечивает достаточно контраста, чтобы были видны белые значки состояния. Чтобы выбрать цвет строки состояния используйте android:statusBarColor, когда вы наследуетесь от материальной темы. По умолчанию android:statusBarColor наследует значение android:colorPrimaryDark.
Вы так же можете сделать строку состояния самостоятельно. Например, если вы хотите наложить прозрачную строку состояния поверх фотографии, с тонким темным градиентом, чтобы белые значки состояния были видны. Для этого установите атрибут android:statusBarColor в @android:color/transparent и скорректируйте флаги окна как нужно. Вы можете так же использовать метод Window.setStatusBarColor() для анимаций или исчезновения.
Примечание: Строка состояния почти всегда должна иметь четкое разграничение от основной панелью инструментов, за исключением случаев, когда вы показываете от края к краю большое количество изображений или мультимедиа контента позади этих панелей и когда вы используете градиент, чтобы гарантировать что значки будут видны.
Когда вы настраиваете панель навигации и строку состояния, сделайте их прозрачными либо изменяйте только строку состояния. Во всех других случаях панель навигации должна оставаться черной.
Отдельные view темы
Элементы в XML layout могут устанавливать атрибут android:theme, который ссылается на ресурс темы. Этот атрибут изменяет тему для элемента и любых дочерних элементов, которые испльзуются для изменения цветовых палитр темы в определенной части интерфейса.
Источник
Theme material android studio
Android Material Styles and Themes
September 04, 2017
Android platform provides material styles and themes which follow material design guidelines. Material themes were introduced in Android 5.0 (API level 21).
Since material themes are available from API level 21 onwards, apps which use material themes should take care of backward compatibility so that apps using material themes will work on devices running older versions of android.
In this post, I’ll show how to use material styles and themes in your app and provide backward compatibility for material styles.
Material Themes
Android platform provides two material themes, one is dark and second one is light
There are several variants of the above material themes, listed below.
- Theme.Material.NoActionBar
- Theme.Material.NoActionBar.Fullscreen
- Theme.Material.NoActionBar.Overscan
- Theme.Material.NoActionBar.TranslucentDecor
- Theme.Material.Light.DarkActionBar
- Theme.Material.Light.NoActionBar.Fullscreen
- Theme.Material.Light.NoActionBar.Overscan
- Theme.Material.Light.NoActionBar.TranslucentDecor
Using Material Themes
You can apply material theme to an application or activity by setting theme attribute of application and activity elements in android manifest file. To apply themes to individual views, you can use theme attribute of the views. For more information about themes and styles, you can read Android styles and themes tutorial.
Theme.Material Output
Below is the screen shot of a layout with common UI components and Theme.Material.

Theme.Material.Light Output
Below is the screen shot of a layout with common UI components and Theme.Material.Light.

Material Themes Custom Colors
You can change the theme color for text color, status bar, action bar, navigation bar, window background and UI controls using textColorPrimary, colorPrimaryDark, colorPrimary, navigationBarColor, windowBackground and colorAccent properties respectively.

Material Dialog Themes
Material themes include themes for dialog and overlays. Below is screen shot of dialog window with ThemeOverlay_Material_Dark.

Below are the material dialog and overlay themes and variants of these themes are also available.
- Theme_Material_Dialog
- Theme_Material_Dialog_Presentation
- Theme_Material_Light_Dialog
- ThemeOverlay_Material_Dialog
- ThemeOverlay_Material_Light
- ThemeOverlay_Material_Dark
- ThemeOverlay_Material
If you want to change default dialog theme of the material theme applied to application, you can use alertDialogTheme and dialogTheme attribute as shown below.
Material Styles for Text
Below are some of the material text styles and screen shot shows applying the styles to TextView with textAppearance attribute.
- TextAppearance.Material.Body1
- TextAppearance.Material.Body2
- TextAppearance.Material.Inverse
- TextAppearance.Material.Small
- TextAppearance.Material.Medium
- TextAppearance.Material.Large
- TextAppearance.Material.Headline
- TextAppearance.Material.Title
- TextAppearance.Material.Display1
- TextAppearance.Material.Display2

Widget Materials Themes
As shown in the above screen shots, default material themes are applied to UI controls when application or activity themes is set to one of the material themes. You can change the color of the widgets as explained above.
If you want particular widgets on a screen to have a different look, you can use theme attribute to apply different themes to it or change specific styling attribute to get required look and feel.
Below screen shot shows two buttons using different styles, Widget.Material.Light.Button and Widget.Material.Button.Borderless.Colored.

Material Themes Compatibility
Since material themes were introduced in Android 5.0, you need to take care of compatibility issue so that application, which is using material themes, run on prior Android versions.
One way to take care of compatibility is to define separate styles for different versions of android and keep them in corresponding res/values folder. This approach is the right choice if you want material design for your app only when it runs on android 5.0 and later versions and non-material themes when it runs on versions prior to Android 5.0. For example, two versions of style file with the same custom theme name is defined and placed in res/values and res/values-21 folders. You can apply the custom theme to application in manifest. Android will pick the style based on its version on the device.
Custom style inheriting material theme that needs to be placed res/values-21 folder.
Custom style inheriting holo theme that needs to be saved in res/values folder.
Using App Compact Material Themes
If you want material themes in all the versions of android, you can use app compact material themes from support library. App compact material themes are material themes which are part of support library and can provide material design for apps running on older android versions.
To use app compact material themes, make sure that app compact library, for example com.android.support:appcompat-v7:26.0.1, is added to your project.
Some of the material themes in support library are Theme.AppCompat.Light, Theme.AppCompat, and Theme.AppCompat.DayNight.
To know app compact styles and themes see app compact styles.
About
Android app development tutorials and web app development tutorials with programming examples and code samples.
Источник
Styles and Themes
Styles and themes on Android allow you to separate the details of your app design from the UI structure and behavior, similar to stylesheets in web design.
A style is a collection of attributes that specify the appearance for a single View . A style can specify attributes such as font color, font size, background color, and much more.
A theme is a collection of attributes that’s applied to an entire app, activity, or view hierarchy—not just an individual view. When you apply a theme, every view in the app or activity applies each of the theme’s attributes that it supports. Themes can also apply styles to non-view elements, such as the status bar and window background.
Styles and themes are declared in a style resource file in res/values/ , usually named styles.xml .

Figure 1. Two themes applied to the same activity: Theme.AppCompat (left) and Theme.AppCompat.Light (right)
Themes versus Styles
Themes and styles have many similarities, but they are used for different purposes. Themes and styles have the same basic structure—a key-value pair which maps attributes to resources.
A specifies attributes for a particular type of view. For example, one style might specify a button’s attributes. Every attribute you specify in a style is an attribute you could set in the layout file. By extracting all the attributes to a style, it’s easy to use and maintain them across multiple widgets.
A defines a collection of named resources which can be referenced by styles, layouts, widgets, and so on. Themes assign semantic names, like colorPrimary , to Android resources.
Styles and themes are meant to work together. For example, you might have a style that specifies that one part of a button should be colorPrimary , and another part should be colorSecondary . The actual definitions of those colors is provided in the theme. When the device goes into night mode, your app can switch from its «light» theme to its «dark» theme, changing the values for all those resource names. You don’t need to change the styles, since the styles are using the semantic names and not specific color definitions.
For more information about how themes and styles work together, see the blog post Android Styling: Themes vs Styles.
Create and apply a style
To create a new style or theme, open your project’s res/values/styles.xml file. For each style you want to create, follow these steps:
You can apply the style to a view as follows:
Each attribute specified in the style is applied to that view if the view accepts it. The view simply ignores any attributes that it does not accept.
Note: Only the element to which you add the style attribute receives those style attributes—any child views do not apply the styles. If you want child views to inherit styles, instead apply the style with the android:theme attribute.
However, instead of applying a style to individual views, you’ll usually apply styles as a theme for your entire app, activity, or collection of views.
Extend and customize a style
When creating your own styles, you should always extend an existing style from the framework or support library so that you maintain compatibility with platform UI styles. To extend a style, specify the style you want to extend with the parent attribute. You can then override the inherited style attributes and add new ones.
For example, you can inherit the Android platform’s default text appearance and modify it as follows:
However, you should always inherit your core app styles from the Android Support Library. The styles in the support library provide compatibility with Android 4.0 (API level 14) and higher by optimizing each style for the UI attributes available in each version. The support library styles often have a name similar to the style from the platform, but with AppCompat included.
To inherit styles from a library or your own project, declare the parent style name without the @android:style/ part shown above. For example, the following example inherits text appearance styles from the support library:
You can also inherit styles (except those from the platform) by extending a style’s name with a dot notation, instead of using the parent attribute. That is, prefix the name of your style with the name of the style you want to inherit, separated by a period. You should usually do this only when extending your own styles, not styles from other libraries. For example, the following style inherits all styles from the GreenText style above and then increases the text size:
You can continue inheriting styles like this as many times as you’d like by chaining on more names.
Note: If you use the dot notation to extend a style, and you also include the parent attribute, then the parent styles override any styles inheritted through the dot notation.
To find which attributes you can declare with an tag, refer to the «XML attributes» table in the various class references. All views support XML attributes from the base View class, and many views add their own special attributes. For example, the TextView XML attributes includes the android:inputType attribute that you can apply to a text view that receives input, such as an EditText widget.
Apply a style as a theme
You can create a theme the same way you create styles. The difference is how you apply it: instead of applying a style with the style attribute on a view, you apply a theme with the android:theme attribute on either the tag or an tag in the AndroidManifest.xml file.
For example, here’s how to apply the Android Support Library’s material design «dark» theme to the whole app:
And here’s how to apply the «light» theme to just one activity:
Now every view in the app or activity applies the styles defined in the given theme. If a view supports only some of the attributes declared in the style, then it applies only those attributes and ignores the ones it does not support.
Beginning with Android 5.0 (API level 21) and Android Support Library v22.1, you can also specify the android:theme attribute to a view in your layout file. This modifies the theme for that view and any child views, which is useful for altering theme color palettes in a specific portion of your interface.
The previous examples show how to apply a theme such as Theme.AppCompat that’s supplied by the Android Support Library. But you’ll usually want to customize the theme to fit your app’s brand. The best way to do so is to extend these styles from the support library and override some of the attributes, as described in the next section.
Style hierarchy
Android provides a variety of ways to set attributes throughout your Android app. For example, you can set attributes directly in a layout, you can apply a style to a view, you can apply a theme to a layout, and you can even set attributes programmatically.
When choosing how to style your app, be mindful of Android’s style hierarchy. In general, you should use themes and styles as much as possible for consistency. If you’ve specified the same attributes in multiple places, the list below determines which attributes are ultimately applied. The list is ordered from highest precedence to lowest:
- Applying character- or paragraph-level styling via text spans to TextView -derived classes
- Applying attributes programmatically
- Applying individual attributes directly to a View
- Applying a style to a View
- Default styling
- Applying a theme to a collection of Views, an activity, or your entire app
- Applying certain View-specific styling, such as setting a TextAppearance on a TextView
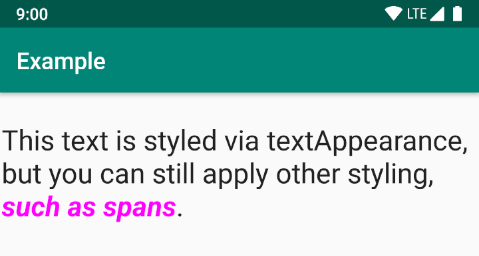
Figure 2. Styling from a span overrides styling from a textAppearance .
If you’re trying to style your app and not seeing the results you expect, it’s likely that other styling is overriding your changes. For example, if you apply a theme to your app, along with a style to an individual View , the style attributes would override any matching theme attributes for that View . Note, however, that any theme attributes that aren’t overridden by the style are still used.
TextAppearance
One limitation with styles is that you can apply only one style to a View . In a TextView , however, you can also specify a TextAppearance attribute which functions similarly to a style, as shown in the following example:
TextAppearance allows you to define text-specific styling while leaving a View ’s style available for other uses. Note, however, that if you define any text attributes directly on the View or in a style, those values would override the TextAppearance values.
TextAppearance supports a subset of styling attributes that TextView offers. For the full attribute list, see TextAppearance .
Some common TextView attributes not included are lineHeight[Multiplier|Extra] , lines , breakStrategy , and hyphenationFrequency . TextAppearance works at the character level and not the paragraph level, so attributes that affect the entire layout are not supported.
Customize the default theme
When you create a project with Android Studio, it applies a material design theme to your app by default, as defined in your project’s styles.xml file. This AppTheme style extends a theme from the support library and includes overrides for color attributes that are used by key UI elements, such as the app bar and the floating action button (if used). So you can quickly customize your app’s color design by updating the provided colors.
For example, your styles.xml file should look similar to this:
Notice that the style values are actually references to other color resources, defined in the project’s res/values/colors.xml file. So that’s the file you should edit to change the colors. But before you start changing these colors, preview your colors with the Material Color Tool. This tool helps you pick colors from the material palette and preview how they’ll look in an app.
Once you know your colors, update the values in res/values/colors.xml :
And then you can override whatever other styles you want. For example, you can change the activity background color as follows:
For a list of attributes you can use in your theme, see the table of attributes at R.styleable.Theme . And when adding styles for the views in your layout, you can also find attributes by looking at the «XML attributes» table in the view class references. For example, all views support XML attributes from the base View class.
Most attributes are applied to specific types of views, and some apply to all views. However, some theme attributes listed at R.styleable.Theme apply to the activity window, not the views in the layout. For example, windowBackground changes the window background and windowEnterTransition defines a transition animation to use when the activity starts (for details, see Start an Activity with an Animation).
The Android Support Library also provides other attributes you can use to customize your theme extended from Theme.AppCompat (such as the colorPrimary attribute shown above). These are best viewed in the library’s attrs.xml file
Note: Attribute names from the support library do not use the android: prefix. That’s used only for attributes from the Android framework.
There are also different themes available from the support library that you might want to extend instead of the ones shown above. The best place to see the available themes is the library’s themes.xml file.
Add version-specific styles
If a new version of Android adds theme attributes that you want to use, you can add them to your theme while still being compatible with old versions. All you need is another styles.xml file saved in a values directory that includes the resource version qualifier. For example:
Because the styles in the values/styles.xml file are available for all versions, your themes in values-v21/styles.xml can inherit them. As such, you can avoid duplicating styles by beginning with a «base» theme and then extending it in your version-specific styles.
For example, to declare window transitions for Android 5.0 (API level 21) and higher, you need to use some new attributes. So your base theme in res/values/styles.xml could look like this:
Now you can apply AppTheme in your manifest file and the system selects the styles available for each system version.
For more information about using alternative resources for different devices, read Providing Resources.
Customize widget styles
Every widget in the framework and support library has a default style. For example, when you style your app using a theme from the support library, an instance of Button is styled using the Widget.AppCompat.Button style. If you’d like to apply a different widget style to a button, then you can do so with the style attribute in your layout file. For example, the following applies the library’s borderless button style:
And if you want to apply this style to all buttons, you can declare it in your theme’s buttonStyle as follows:
You can also extend widget styles, just like extending any other style, and then apply your custom widget style in your layout or in your theme.
Additional resources
To learn more about themes and styles, see the following additional resources:
Blog posts
Content and code samples on this page are subject to the licenses described in the Content License. Java is a registered trademark of Oracle and/or its affiliates.
Источник


