- Реальный игрушечный мир: чудеса Tilt-Shift на iPhone и iPad
- Tilt Shift. Эффект миниатюры на iPhone
- Tilt-Shift Miniature Faking
- TiltShift for iPhone/iPod touch
- TiltShift 4+
- Michael Krause
- Для iPad
- Снимки экрана
- Описание
- TiltShift 4+
- Michael Krause
- Designed for iPad
- Screenshots
- Description
- How To Create Amazing Tilt-Shift Photos With Your iPhone
- What Is A Tilt-Shift Photo?
- What Makes A Good Tilt-Shift Subject?
- Which Tilt-Shift App Do You Need?
- How To Use The TiltShiftGen2 App
Реальный игрушечный мир: чудеса Tilt-Shift на iPhone и iPad
Многим любителям фотографии, занимающимся фото- и видеосъемкой, а также мастерам программы Photoshop, известно, что означает термин «Tilt-Shift». Это способ фокусировки, сосредоточенный непосредственно на одном объекте, при котором все остальное пространство визуально размывается. Эффект от данного действия таков, что вы превращаете объекты, значительные по своим размерам, в совсем крошечные. Большой мир, окружающий нас, становится совершенно игрушечным и безобидным.
Добиться такого эффекта можно, если оснастить iPhone специальной линзой, посредством которой вы будете создавать снимки, овеянные иллюзией, воспользоваться «фотошопом» во время постобработки или установить специальное мобильное приложение. Третий способ вполне как раз подойдет любителям фотосъемок с мобильных устройств, оснащенных операционной системой iOS. В действительности смартфоны iPhone с легкостью создают такие сложные структуры.
Приложение TiltShift Photos, предназначенное для «айфонографов», выпустила компания JP. С помощью него можно без труда добиться удивительного эффекта тилт-шифт. Сразу хочется обрадовать «ябломанов» – поддерживается вся линейка мобильных устройств Apple, включая iPhone 5 и iPad. С помощью новинки можно получать фотографии, в которых будет создана иллюзия игрушечного мира.
На данный момент из всех существующих приложений подобного рода именно TiltShift Photos позволяет за считанные секунды достичь желаемого эффекта. Если говорить об остальном многообразии программного обеспечения, реализующего функцию Tilt-Shift, то замороченный внешний вид и излишняя «туговатость» вряд ли придется вам по вкусу. Утилита имеет дружелюбный интерфейс и несколько специальных эффектов для обработки снимков, которые могут из неопытного пользователя сделать профессионального «тилтшифтера».
Что касается доступности программы для обычных пользователей, то это удивительное приложение можно получить совершенно бесплатно. Скачать TiltShift Photos можно из App Store по ссылке далее.
Скачать TiltShift Photos для iPhone, iPod touch и iPad [iTunes]
Источник
Tilt Shift. Эффект миниатюры на iPhone
Доброго времени суток, уважаемые читатели блога Маковод! Давно что-то я не делился с вами интересными новостями и обзорами. Так уж получилось, что у меня на то были причины: зависящие и не зависящие от меня. Надеюсь, что все позади и я, теперь уже один из четырех авторов этого отличного блога, буду чаще с вами общаться.
Но хватит лирики! Тем более, сегодня будет очень интересный, на мой взгляд, материал: вас ожидает рассказ об одной очень интересной технике профессиональной фотографии и о том, как реализовать её при помощи подручных средств 🙂
Tilt-Shift Miniature Faking
Техника фотографирования, о которой я порывался рассказать абзац назад называется Tilt-shift miniature faking, что в вольном русском переводе называется имитация фотосъемки миниатюрных объектов.
Откуда пошел этот термин? Иногда взрослые и богатые дядьки увлекаются созданием миниатюр — это по-своему, очень интересное и увлекательное занятие: маленькие домики и стадионы, маленькие улицы и люди размером с ноготь, миниатюрные машинки и самое наикрутейшее — миниатюрная и полностью рабочая железная дорога. Другие богатые дядьки покупают себе крутые фотоаппараты, умеющие красиво делать макросъемку. А когда первые и вторые дядьки встречаются вместе — получаются удивительные и невероятно красивые фотографии. Например вот такие (все картинки кликабельны):


Отличные фотографии, не правда ли? 😉
Допустим, вам понравилось, но у вас не ни макета, ни крутого фотоаппарата. Можно ли как-нибуть обойтись подручными средствами? Не буду мучать вас — конечно же можно. Поэтому я и упомянул про технику имитации фотографирования миниатюр в начале статьи.
Для этого берется обычная фотография и обрабатывается таким образом, чтобы у смотрящего на неё человека создавалось впечатление, что фото было снято при помощи макросъемки. Меняя фокус в центре фотографии, создатель изображения имитирует глубину резкости. Поэтому объекты, снятые в натуральную величину кажутся меньше, чем есть на самом деле. Кроме этого, обычно выбирают фотографии, которые сняты под большим углом — в этом случае кажется, что фотограф находился над миниатюрой.
Кстати, обычно лучше имитировать съемку миниатюр для горизонтально расположенных объектов, чем для вертикально расположенных. Хотите примеры? Пожалуйста!


Ладно, скажете вы, а каким боком это относится к владельцем Яблофона? А самым непосредственным: потому что в роли фотоаппарата у нас выступит какая-никакая камера iPhone, а в роли пост-обработки — приложение TiltShift от компании Imimux.
TiltShift for iPhone/iPod touch
 Принцип работы прост:
- выбирите фото, над которым будут происходить манипуляции;
- расположите линейную или элептическую область на фотографии — в этом месте не грех прибегнуть к помощи мультитача и расположить области так, как вам понравится;
- «на-лету» регулируйте настройки размытия для пущей убедительности;
- сохраняйте результат и… пробуйте еще раз — потому что с первого раза вряд ли получится такая же фотография, как в начале статьи, для этого надо немного потренироваться 😉
Вот, собственно, все! Теперь можно выложить эти чумовые фотки к себе в блог, показать знакомым и любимым, в общем, попросту хвастаться радоваться 🙂 Кроме этого, программа умеет работать как в портретном, так и в ландшафтном режимах (в смысле, телефон можно повернуть и комфортно работать в горизонтальном положении), а так же обрабатывать фотографии с большим разрешением без потери качества. Все мною сказанное в равной степени подходит и для iPod Touch (кстати, теперь моя очередь что-то про него написать).
Кстати, настало время открыть небольшой секрет. Фотографии в начале статьи, на которые я привел в качестве примера, тоже были обработаны. Правда не при помощи программы, а визуального графического редактора (Photoshop, Gimp итд).
Ах да, программа платная и стоит 2 доллара США. А напоследок позволю себе добавить несколько полезных ссылок:
- Ссылка на TiltShift в App Store
- 41 штука удивительных фотографий, сделанных при помощи этой техники
- Еще фотографии, правда на этот раз из ЖЖ
- Первый и второй тьюториал (обучалка, в смысле), как воссоздать этот эффект в Фотошопе, нагугленый мной по первым ссылкам.
Источник
TiltShift 4+
Michael Krause
Для iPad
Снимки экрана
![]()
![]()
![]()
![]()
![]()
Описание
Transform a scene into a miniature world. This application simulates a tilt-shift lens that tricks your mind into viewing a photo as a miniature scene like a model railroad for example.
Focus on a linear or elliptical region in the image with visual guides and interactively adjust the amount of blur for maximum effect. Increase color saturation, contrast or brightness to increase the toy model look.
Create a nice bokeh effect with the lens blur filter in night scene photos.
Blooming strength and threshold are adjustable.
You can even choose a shaped aperture (hexagon, heart, dollar sign, etc.) if you like.
The size and orientation of the focus can be adjusted
by the multi-touch gestures pinch in, pinch out
and rotation of two fingers around a common center.
Practice with dozens of images that are included or use the camera and photo roll.
The resulting image can be saved in high resolution.
Both portrait and landscape mode are supported.
Please have a look at a video review by Vu Bui, a photographer and cinematographer from Southern California.
This review demonstrates nicely how TiltShift can be used.
A clickable link to the review is on the TiltShift support site.
Источник
TiltShift 4+
Michael Krause
Designed for iPad
Screenshots
![]()
![]()
![]()
![]()
![]()
Description
Transform a scene into a miniature world. This application simulates a tilt-shift lens that tricks your mind into viewing a photo as a miniature scene like a model railroad for example.
Focus on a linear or elliptical region in the image with visual guides and interactively adjust the amount of blur for maximum effect. Increase color saturation, contrast or brightness to increase the toy model look.
Create a nice bokeh effect with the lens blur filter in night scene photos.
Blooming strength and threshold are adjustable.
You can even choose a shaped aperture (hexagon, heart, dollar sign, etc.) if you like.
The size and orientation of the focus can be adjusted
by the multi-touch gestures pinch in, pinch out
and rotation of two fingers around a common center.
Practice with dozens of images that are included or use the camera and photo roll.
The resulting image can be saved in high resolution.
Both portrait and landscape mode are supported.
Please have a look at a video review by Vu Bui, a photographer and cinematographer from Southern California.
This review demonstrates nicely how TiltShift can be used.
A clickable link to the review is on the TiltShift support site.
Источник
How To Create Amazing Tilt-Shift Photos With Your iPhone
Posted by Rob Dunsford Comments 11
Have you ever seen those fake miniature photos where the life-size subjects look like tiny scale-models? Have you wondered how they’re made? Well, in this tutorial you’ll discover exactly how to create this amazing “tilt-shift” effect using one of the best tilt-shift apps for iPhone.

What Is A Tilt-Shift Photo?
In simple terms a tilt-shift photo is one where only a strip of the photo is in sharp focus. The rest of the photo (the foreground and background) appears blurred.
» alt=»Tilt Shift iPhone Photos 17″ width=»560″ height=»424″ srcset=»» sizes=»(min-width: 768px) 768px, 100vw» data-src=»https://images.iphonephotographyschool.com/3713/1120/Tilt-Shift-iPhone-Photos-17.jpg» data-srcset=»https://images.iphonephotographyschool.com/3713/546/Tilt-Shift-iPhone-Photos-17.jpg 640w, https://images.iphonephotographyschool.com/3713/616/Tilt-Shift-iPhone-Photos-17.jpg 720w, https://images.iphonephotographyschool.com/3713/560/Tilt-Shift-iPhone-Photos-17.jpg 769w, https://images.iphonephotographyschool.com/3713/640/Tilt-Shift-iPhone-Photos-17.jpg 750w, https://images.iphonephotographyschool.com/3713/708/Tilt-Shift-iPhone-Photos-17.jpg 828w, https://images.iphonephotographyschool.com/3713/960/Tilt-Shift-iPhone-Photos-17.jpg 1125w, https://images.iphonephotographyschool.com/3713/970/Tilt-Shift-iPhone-Photos-17.jpg 1136w, https://images.iphonephotographyschool.com/3713/996/Tilt-Shift-iPhone-Photos-17.jpg 1334w, https://images.iphonephotographyschool.com/3713/1062/Tilt-Shift-iPhone-Photos-17.jpg 1242w, https://images.iphonephotographyschool.com/3713/1120/Tilt-Shift-iPhone-Photos-17.jpg 1538w, https://images.iphonephotographyschool.com/3713/1120/Tilt-Shift-iPhone-Photos-17.jpg 1792w, https://images.iphonephotographyschool.com/3713/1494/Tilt-Shift-iPhone-Photos-17.jpg 2208w, https://images.iphonephotographyschool.com/3713/1680/Tilt-Shift-iPhone-Photos-17.jpg 2436w»/>
This shallow depth of field (where only a small part of the photo is in focus) is the type of effect you would get when taking close-up photos.
When you take a photo from a distance, e.g. a photo of a landscape or cityscape, you don’t get a shallow depth of field – instead, everything from foreground to background will normally be in focus.
» alt=»Tilt Shift iPhone Photos 13″ width=»560″ height=»419″ srcset=»» sizes=»(min-width: 768px) 768px, 100vw» data-src=»https://images.iphonephotographyschool.com/5951/1120/Tilt-Shift-iPhone-Photos-13.jpg» data-srcset=»https://images.iphonephotographyschool.com/5951/546/Tilt-Shift-iPhone-Photos-13.jpg 640w, https://images.iphonephotographyschool.com/5951/616/Tilt-Shift-iPhone-Photos-13.jpg 720w, https://images.iphonephotographyschool.com/5951/560/Tilt-Shift-iPhone-Photos-13.jpg 769w, https://images.iphonephotographyschool.com/5951/640/Tilt-Shift-iPhone-Photos-13.jpg 750w, https://images.iphonephotographyschool.com/5951/708/Tilt-Shift-iPhone-Photos-13.jpg 828w, https://images.iphonephotographyschool.com/5951/960/Tilt-Shift-iPhone-Photos-13.jpg 1125w, https://images.iphonephotographyschool.com/5951/970/Tilt-Shift-iPhone-Photos-13.jpg 1136w, https://images.iphonephotographyschool.com/5951/996/Tilt-Shift-iPhone-Photos-13.jpg 1334w, https://images.iphonephotographyschool.com/5951/1062/Tilt-Shift-iPhone-Photos-13.jpg 1242w, https://images.iphonephotographyschool.com/5951/1120/Tilt-Shift-iPhone-Photos-13.jpg 1538w, https://images.iphonephotographyschool.com/5951/1120/Tilt-Shift-iPhone-Photos-13.jpg 1792w, https://images.iphonephotographyschool.com/5951/1494/Tilt-Shift-iPhone-Photos-13.jpg 2208w, https://images.iphonephotographyschool.com/5951/1680/Tilt-Shift-iPhone-Photos-13.jpg 2436w»/>
So when you see this shallow depth of field effect in a photo that’s been taken from a distance, it tricks the brain into thinking that it’s a close-up photo, and therefore that the subject of the photo is a tiny scale model or toy.
A true tilt-shift photo is achieved when the lens is tilted at a different angle to the camera’s sensor. This can be achieved with special tilt-shift lenses that you can buy for DSLR cameras.
» alt=»Tilt Shift iPhone Photos 8″ width=»560″ height=»420″ srcset=»» sizes=»(min-width: 768px) 768px, 100vw» data-src=»https://images.iphonephotographyschool.com/7035/1120/Tilt-Shift-iPhone-Photos-8.jpg» data-srcset=»https://images.iphonephotographyschool.com/7035/546/Tilt-Shift-iPhone-Photos-8.jpg 640w, https://images.iphonephotographyschool.com/7035/616/Tilt-Shift-iPhone-Photos-8.jpg 720w, https://images.iphonephotographyschool.com/7035/560/Tilt-Shift-iPhone-Photos-8.jpg 769w, https://images.iphonephotographyschool.com/7035/640/Tilt-Shift-iPhone-Photos-8.jpg 750w, https://images.iphonephotographyschool.com/7035/708/Tilt-Shift-iPhone-Photos-8.jpg 828w, https://images.iphonephotographyschool.com/7035/960/Tilt-Shift-iPhone-Photos-8.jpg 1125w, https://images.iphonephotographyschool.com/7035/970/Tilt-Shift-iPhone-Photos-8.jpg 1136w, https://images.iphonephotographyschool.com/7035/996/Tilt-Shift-iPhone-Photos-8.jpg 1334w, https://images.iphonephotographyschool.com/7035/1062/Tilt-Shift-iPhone-Photos-8.jpg 1242w, https://images.iphonephotographyschool.com/7035/1120/Tilt-Shift-iPhone-Photos-8.jpg 1538w, https://images.iphonephotographyschool.com/7035/1120/Tilt-Shift-iPhone-Photos-8.jpg 1792w, https://images.iphonephotographyschool.com/7035/1494/Tilt-Shift-iPhone-Photos-8.jpg 2208w, https://images.iphonephotographyschool.com/7035/1680/Tilt-Shift-iPhone-Photos-8.jpg 2436w»/>
However, it’s not physically possible to tilt the lens on cameras which have a conventional, fixed lens such as the iPhone. Therefore we have to rely on apps to apply blur to certain parts of the photo to give the impression of true tilt-shift.
What Makes A Good Tilt-Shift Subject?
Before we start looking at apps for creating tilt-shift photos, it’s important to know that not all subjects are suitable for tilt-shift photography.
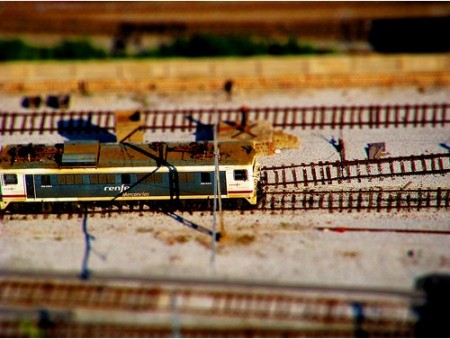
Anything that you might expect to see as a small toy or scale-model will make a great tilt-shift subject. For example, a car, a boat, a train, a building or even an entire city.
» alt=»Tilt Shift iPhone Photos 33″ width=»560″ height=»560″ srcset=»» sizes=»(min-width: 768px) 768px, 100vw» data-src=»https://images.iphonephotographyschool.com/7058/1120/Tilt-Shift-iPhone-Photos-33.jpg» data-srcset=»https://images.iphonephotographyschool.com/7058/546/Tilt-Shift-iPhone-Photos-33.jpg 640w, https://images.iphonephotographyschool.com/7058/616/Tilt-Shift-iPhone-Photos-33.jpg 720w, https://images.iphonephotographyschool.com/7058/560/Tilt-Shift-iPhone-Photos-33.jpg 769w, https://images.iphonephotographyschool.com/7058/640/Tilt-Shift-iPhone-Photos-33.jpg 750w, https://images.iphonephotographyschool.com/7058/708/Tilt-Shift-iPhone-Photos-33.jpg 828w, https://images.iphonephotographyschool.com/7058/960/Tilt-Shift-iPhone-Photos-33.jpg 1125w, https://images.iphonephotographyschool.com/7058/970/Tilt-Shift-iPhone-Photos-33.jpg 1136w, https://images.iphonephotographyschool.com/7058/996/Tilt-Shift-iPhone-Photos-33.jpg 1334w, https://images.iphonephotographyschool.com/7058/1062/Tilt-Shift-iPhone-Photos-33.jpg 1242w, https://images.iphonephotographyschool.com/7058/1120/Tilt-Shift-iPhone-Photos-33.jpg 1538w, https://images.iphonephotographyschool.com/7058/1120/Tilt-Shift-iPhone-Photos-33.jpg 1792w, https://images.iphonephotographyschool.com/7058/1494/Tilt-Shift-iPhone-Photos-33.jpg 2208w, https://images.iphonephotographyschool.com/7058/1680/Tilt-Shift-iPhone-Photos-33.jpg 2436w»/>
Also, simple scenes which lack busy detail can make good backgrounds for your subject. For example, a paved area, street, park, pond, car park, sports field or tennis court.
People don’t tend to make such good tilt-shift subjects because the detail in their clothes, hands and face reminds us they’re not toys or models, and the tilt-shift illusion breaks down. If you include people in your tilt-shift photos, make sure they’re very small in relation to the scene.
» alt=»Tilt Shift iPhone Photos 14″ width=»560″ height=»560″ srcset=»» sizes=»(min-width: 768px) 768px, 100vw» data-src=»https://images.iphonephotographyschool.com/7065/1120/Tilt-Shift-iPhone-Photos-14.jpg» data-srcset=»https://images.iphonephotographyschool.com/7065/546/Tilt-Shift-iPhone-Photos-14.jpg 640w, https://images.iphonephotographyschool.com/7065/616/Tilt-Shift-iPhone-Photos-14.jpg 720w, https://images.iphonephotographyschool.com/7065/560/Tilt-Shift-iPhone-Photos-14.jpg 769w, https://images.iphonephotographyschool.com/7065/640/Tilt-Shift-iPhone-Photos-14.jpg 750w, https://images.iphonephotographyschool.com/7065/708/Tilt-Shift-iPhone-Photos-14.jpg 828w, https://images.iphonephotographyschool.com/7065/960/Tilt-Shift-iPhone-Photos-14.jpg 1125w, https://images.iphonephotographyschool.com/7065/970/Tilt-Shift-iPhone-Photos-14.jpg 1136w, https://images.iphonephotographyschool.com/7065/996/Tilt-Shift-iPhone-Photos-14.jpg 1334w, https://images.iphonephotographyschool.com/7065/1062/Tilt-Shift-iPhone-Photos-14.jpg 1242w, https://images.iphonephotographyschool.com/7065/1120/Tilt-Shift-iPhone-Photos-14.jpg 1538w, https://images.iphonephotographyschool.com/7065/1120/Tilt-Shift-iPhone-Photos-14.jpg 1792w, https://images.iphonephotographyschool.com/7065/1494/Tilt-Shift-iPhone-Photos-14.jpg 2208w, https://images.iphonephotographyschool.com/7065/1680/Tilt-Shift-iPhone-Photos-14.jpg 2436w»/>
There are also some shooting techniques that will make your tilt-shift photos much more successful. Almost without exception, a good tilt-shift photo requires you to shoot down at your subject from a height.
Try shooting down on your scene from a bridge, balcony, upstairs window or any other high vantage point. This exaggerates the illusion that your subject is a tiny model.
» alt=»Tilt Shift iPhone Photos 7″ width=»560″ height=»420″ srcset=»» sizes=»(min-width: 768px) 768px, 100vw» data-src=»https://images.iphonephotographyschool.com/7073/1120/Tilt-Shift-iPhone-Photos-7.jpg» data-srcset=»https://images.iphonephotographyschool.com/7073/546/Tilt-Shift-iPhone-Photos-7.jpg 640w, https://images.iphonephotographyschool.com/7073/616/Tilt-Shift-iPhone-Photos-7.jpg 720w, https://images.iphonephotographyschool.com/7073/560/Tilt-Shift-iPhone-Photos-7.jpg 769w, https://images.iphonephotographyschool.com/7073/640/Tilt-Shift-iPhone-Photos-7.jpg 750w, https://images.iphonephotographyschool.com/7073/708/Tilt-Shift-iPhone-Photos-7.jpg 828w, https://images.iphonephotographyschool.com/7073/960/Tilt-Shift-iPhone-Photos-7.jpg 1125w, https://images.iphonephotographyschool.com/7073/970/Tilt-Shift-iPhone-Photos-7.jpg 1136w, https://images.iphonephotographyschool.com/7073/996/Tilt-Shift-iPhone-Photos-7.jpg 1334w, https://images.iphonephotographyschool.com/7073/1062/Tilt-Shift-iPhone-Photos-7.jpg 1242w, https://images.iphonephotographyschool.com/7073/1120/Tilt-Shift-iPhone-Photos-7.jpg 1538w, https://images.iphonephotographyschool.com/7073/1120/Tilt-Shift-iPhone-Photos-7.jpg 1792w, https://images.iphonephotographyschool.com/7073/1494/Tilt-Shift-iPhone-Photos-7.jpg 2208w, https://images.iphonephotographyschool.com/7073/1680/Tilt-Shift-iPhone-Photos-7.jpg 2436w»/>
Your subjects will also appear more like toys or models if you make the colors more vibrant. So applying these effects to your tilt-shift photos in post-processing apps will get you better results.
Which Tilt-Shift App Do You Need?
Tilt-shift apps work by applying blur to certain parts of the photo, e.g. the top and bottom of the image, so that only a central strip of the photo is in sharp focus.
The amount of control you have over the area to be blurred, as well as other options such as adjusting color, exposure and vignettes, will vary depending on which app you use.
» alt=»Tilt Shift iPhone Photos 1″ width=»560″ height=»420″ srcset=»» sizes=»(min-width: 768px) 768px, 100vw» data-src=»https://images.iphonephotographyschool.com/7082/1120/Tilt-Shift-iPhone-Photos-1.jpg» data-srcset=»https://images.iphonephotographyschool.com/7082/546/Tilt-Shift-iPhone-Photos-1.jpg 640w, https://images.iphonephotographyschool.com/7082/616/Tilt-Shift-iPhone-Photos-1.jpg 720w, https://images.iphonephotographyschool.com/7082/560/Tilt-Shift-iPhone-Photos-1.jpg 769w, https://images.iphonephotographyschool.com/7082/640/Tilt-Shift-iPhone-Photos-1.jpg 750w, https://images.iphonephotographyschool.com/7082/708/Tilt-Shift-iPhone-Photos-1.jpg 828w, https://images.iphonephotographyschool.com/7082/960/Tilt-Shift-iPhone-Photos-1.jpg 1125w, https://images.iphonephotographyschool.com/7082/970/Tilt-Shift-iPhone-Photos-1.jpg 1136w, https://images.iphonephotographyschool.com/7082/996/Tilt-Shift-iPhone-Photos-1.jpg 1334w, https://images.iphonephotographyschool.com/7082/1062/Tilt-Shift-iPhone-Photos-1.jpg 1242w, https://images.iphonephotographyschool.com/7082/1120/Tilt-Shift-iPhone-Photos-1.jpg 1538w, https://images.iphonephotographyschool.com/7082/1120/Tilt-Shift-iPhone-Photos-1.jpg 1792w, https://images.iphonephotographyschool.com/7082/1494/Tilt-Shift-iPhone-Photos-1.jpg 2208w, https://images.iphonephotographyschool.com/7082/1680/Tilt-Shift-iPhone-Photos-1.jpg 2436w»/>
Apps such as TiltShiftGen2, TiltShift Effect, TiltShift Generator and TiltShift Video all enable you to apply the tilt-shift effect to create fake miniature photos.
I find the user-friendly interface and polished feel of TiltShiftGen2 very easy to use, with great results. So for this tutorial we’ll concentrate on using this app.
How To Use The TiltShiftGen2 App
TiltShiftGen2 is an excellent tilt-shift app that provides a surprisingly good amount of flexibility and control for the price. It costs $0.99 from the App Store.
As well as allowing you to apply selective blur to a photo, it also features some good iPhone filters and the ability to control color saturation, contrast and brightness.
You can use the app’s built in camera to take a photo or simply import one from an album on your iPhone. Let’s go through the tilt-shift process step-by-step.
Open the TiltShiftGen2 app, then tap the Start icon. Before you begin using an app, it’s always a good idea to check the app settings, so tap the Settings icon.
» alt=»Tilt Shift iPhone Photos 20″ width=»320″ height=»480″ srcset=»» sizes=»(min-width: 768px) 768px, 100vw» data-src=»https://images.iphonephotographyschool.com/7089/1120/Tilt-Shift-iPhone-Photos-20.jpg» data-srcset=»https://images.iphonephotographyschool.com/7089/546/Tilt-Shift-iPhone-Photos-20.jpg 640w, https://images.iphonephotographyschool.com/7089/616/Tilt-Shift-iPhone-Photos-20.jpg 720w, https://images.iphonephotographyschool.com/7089/320/Tilt-Shift-iPhone-Photos-20.jpg 769w, https://images.iphonephotographyschool.com/7089/640/Tilt-Shift-iPhone-Photos-20.jpg 750w, https://images.iphonephotographyschool.com/7089/640/Tilt-Shift-iPhone-Photos-20.jpg 828w, https://images.iphonephotographyschool.com/7089/960/Tilt-Shift-iPhone-Photos-20.jpg 1125w, https://images.iphonephotographyschool.com/7089/640/Tilt-Shift-iPhone-Photos-20.jpg 1136w, https://images.iphonephotographyschool.com/7089/640/Tilt-Shift-iPhone-Photos-20.jpg 1334w, https://images.iphonephotographyschool.com/7089/960/Tilt-Shift-iPhone-Photos-20.jpg 1242w, https://images.iphonephotographyschool.com/7089/640/Tilt-Shift-iPhone-Photos-20.jpg 1538w, https://images.iphonephotographyschool.com/7089/640/Tilt-Shift-iPhone-Photos-20.jpg 1792w, https://images.iphonephotographyschool.com/7089/960/Tilt-Shift-iPhone-Photos-20.jpg 2208w, https://images.iphonephotographyschool.com/7089/960/Tilt-Shift-iPhone-Photos-20.jpg 2436w»/>
Tap the Export Image Size option and change it to Original. This will ensure any tilt-shift photos you create are of the highest possible quality.
You might find the shutter noise a bit loud and annoying so feel free to turn it off by tapping the Sound Effect option in the settings. When you’ve finished changing the app settings, tap Done.
Now find or take a suitable photo to convert into a tilt-shift image. To take a photo using the app’s camera simply tap the Camera icon. Or to use an existing photo from your iPhone’s photo library tap the Album icon.
Now that you have an image to work on, it’s time to convert it into a tilt-shift photo!
First we set the most important part of a tilt-shift photo – the blur. Tap the Blur icon and you’ll see four options. The first three (circle, oval and rectangle) control the shape of the area to be blurred. The fourth icon (a cross) removes the blur effect completely.
» alt=»Tilt Shift iPhone Photos 21″ width=»320″ height=»480″ srcset=»» sizes=»(min-width: 768px) 768px, 100vw» data-src=»https://images.iphonephotographyschool.com/7096/1120/Tilt-Shift-iPhone-Photos-21.jpg» data-srcset=»https://images.iphonephotographyschool.com/7096/546/Tilt-Shift-iPhone-Photos-21.jpg 640w, https://images.iphonephotographyschool.com/7096/616/Tilt-Shift-iPhone-Photos-21.jpg 720w, https://images.iphonephotographyschool.com/7096/320/Tilt-Shift-iPhone-Photos-21.jpg 769w, https://images.iphonephotographyschool.com/7096/640/Tilt-Shift-iPhone-Photos-21.jpg 750w, https://images.iphonephotographyschool.com/7096/640/Tilt-Shift-iPhone-Photos-21.jpg 828w, https://images.iphonephotographyschool.com/7096/960/Tilt-Shift-iPhone-Photos-21.jpg 1125w, https://images.iphonephotographyschool.com/7096/640/Tilt-Shift-iPhone-Photos-21.jpg 1136w, https://images.iphonephotographyschool.com/7096/640/Tilt-Shift-iPhone-Photos-21.jpg 1334w, https://images.iphonephotographyschool.com/7096/960/Tilt-Shift-iPhone-Photos-21.jpg 1242w, https://images.iphonephotographyschool.com/7096/640/Tilt-Shift-iPhone-Photos-21.jpg 1538w, https://images.iphonephotographyschool.com/7096/640/Tilt-Shift-iPhone-Photos-21.jpg 1792w, https://images.iphonephotographyschool.com/7096/960/Tilt-Shift-iPhone-Photos-21.jpg 2208w, https://images.iphonephotographyschool.com/7096/960/Tilt-Shift-iPhone-Photos-21.jpg 2436w»/>
To achieve the tilt-shift effect you’d normally use linear blur, so ensure the rectangle blur icon is selected.
You now you need to specify which parts of the photo should be blurred and which parts should be kept in focus. This is done by dragging your finger around the photo until the guidelines are roughly where you want them.
When you release your finger the blur effect is applied to the new position of the guidelines. You can use a pinching action with two fingers to increase or decrease the area that the guidelines cover. The guidelines can also be rotated to position them at an angle.
» alt=»Tilt Shift iPhone Photos 24″ width=»320″ height=»480″ srcset=»» sizes=»(min-width: 768px) 768px, 100vw» data-src=»https://images.iphonephotographyschool.com/7103/1120/Tilt-Shift-iPhone-Photos-24.jpg» data-srcset=»https://images.iphonephotographyschool.com/7103/546/Tilt-Shift-iPhone-Photos-24.jpg 640w, https://images.iphonephotographyschool.com/7103/616/Tilt-Shift-iPhone-Photos-24.jpg 720w, https://images.iphonephotographyschool.com/7103/320/Tilt-Shift-iPhone-Photos-24.jpg 769w, https://images.iphonephotographyschool.com/7103/640/Tilt-Shift-iPhone-Photos-24.jpg 750w, https://images.iphonephotographyschool.com/7103/640/Tilt-Shift-iPhone-Photos-24.jpg 828w, https://images.iphonephotographyschool.com/7103/960/Tilt-Shift-iPhone-Photos-24.jpg 1125w, https://images.iphonephotographyschool.com/7103/640/Tilt-Shift-iPhone-Photos-24.jpg 1136w, https://images.iphonephotographyschool.com/7103/640/Tilt-Shift-iPhone-Photos-24.jpg 1334w, https://images.iphonephotographyschool.com/7103/960/Tilt-Shift-iPhone-Photos-24.jpg 1242w, https://images.iphonephotographyschool.com/7103/640/Tilt-Shift-iPhone-Photos-24.jpg 1538w, https://images.iphonephotographyschool.com/7103/640/Tilt-Shift-iPhone-Photos-24.jpg 1792w, https://images.iphonephotographyschool.com/7103/960/Tilt-Shift-iPhone-Photos-24.jpg 2208w, https://images.iphonephotographyschool.com/7103/960/Tilt-Shift-iPhone-Photos-24.jpg 2436w»/>
The area inside the guidelines will remain in focus and the areas outside of them will be blurred. Adjust the slider control on the right to dial in your desired amount of blur.
Once you’re happy with the blur effect, you might want to think about further enhancing the image. If you think it’s needed, you can apply a filter effect by tapping the Filter icon at the bottom of the screen.
» alt=»Tilt Shift iPhone Photos 25″ width=»320″ height=»480″ srcset=»» sizes=»(min-width: 768px) 768px, 100vw» data-src=»https://images.iphonephotographyschool.com/7113/1120/Tilt-Shift-iPhone-Photos-25.jpg» data-srcset=»https://images.iphonephotographyschool.com/7113/546/Tilt-Shift-iPhone-Photos-25.jpg 640w, https://images.iphonephotographyschool.com/7113/616/Tilt-Shift-iPhone-Photos-25.jpg 720w, https://images.iphonephotographyschool.com/7113/320/Tilt-Shift-iPhone-Photos-25.jpg 769w, https://images.iphonephotographyschool.com/7113/640/Tilt-Shift-iPhone-Photos-25.jpg 750w, https://images.iphonephotographyschool.com/7113/640/Tilt-Shift-iPhone-Photos-25.jpg 828w, https://images.iphonephotographyschool.com/7113/960/Tilt-Shift-iPhone-Photos-25.jpg 1125w, https://images.iphonephotographyschool.com/7113/640/Tilt-Shift-iPhone-Photos-25.jpg 1136w, https://images.iphonephotographyschool.com/7113/640/Tilt-Shift-iPhone-Photos-25.jpg 1334w, https://images.iphonephotographyschool.com/7113/960/Tilt-Shift-iPhone-Photos-25.jpg 1242w, https://images.iphonephotographyschool.com/7113/640/Tilt-Shift-iPhone-Photos-25.jpg 1538w, https://images.iphonephotographyschool.com/7113/640/Tilt-Shift-iPhone-Photos-25.jpg 1792w, https://images.iphonephotographyschool.com/7113/960/Tilt-Shift-iPhone-Photos-25.jpg 2208w, https://images.iphonephotographyschool.com/7113/960/Tilt-Shift-iPhone-Photos-25.jpg 2436w»/>
Try out the various filters to see if they enhance your image. If none of them appeal to you, simply tap the thumbnail labeled Original.
As I mentioned earlier, the tilt-shift effect can be enhanced by the use of color saturation, brightness and contrast. Tap the Color icon and you’ll see four effects with a slider control next to each.
» alt=»Tilt Shift iPhone Photos 26″ width=»320″ height=»480″ srcset=»» sizes=»(min-width: 768px) 768px, 100vw» data-src=»https://images.iphonephotographyschool.com/7123/1120/Tilt-Shift-iPhone-Photos-26.jpg» data-srcset=»https://images.iphonephotographyschool.com/7123/546/Tilt-Shift-iPhone-Photos-26.jpg 640w, https://images.iphonephotographyschool.com/7123/616/Tilt-Shift-iPhone-Photos-26.jpg 720w, https://images.iphonephotographyschool.com/7123/320/Tilt-Shift-iPhone-Photos-26.jpg 769w, https://images.iphonephotographyschool.com/7123/640/Tilt-Shift-iPhone-Photos-26.jpg 750w, https://images.iphonephotographyschool.com/7123/640/Tilt-Shift-iPhone-Photos-26.jpg 828w, https://images.iphonephotographyschool.com/7123/960/Tilt-Shift-iPhone-Photos-26.jpg 1125w, https://images.iphonephotographyschool.com/7123/640/Tilt-Shift-iPhone-Photos-26.jpg 1136w, https://images.iphonephotographyschool.com/7123/640/Tilt-Shift-iPhone-Photos-26.jpg 1334w, https://images.iphonephotographyschool.com/7123/960/Tilt-Shift-iPhone-Photos-26.jpg 1242w, https://images.iphonephotographyschool.com/7123/640/Tilt-Shift-iPhone-Photos-26.jpg 1538w, https://images.iphonephotographyschool.com/7123/640/Tilt-Shift-iPhone-Photos-26.jpg 1792w, https://images.iphonephotographyschool.com/7123/960/Tilt-Shift-iPhone-Photos-26.jpg 2208w, https://images.iphonephotographyschool.com/7123/960/Tilt-Shift-iPhone-Photos-26.jpg 2436w»/>
Slide each one in turn to see the effect on your photo. The aim is to make your subjects look like toys or models. Increasing color saturation to make the colors really vivid is a great way of achieving this.
The controls partially obscure the photo, so to see the entire image simply tap the Color icon to park it out of the way. Tap the Color icon again to bring it back.
One interesting effect is the Vignette control. This darkens the edges of the photo, and I find a little bit of vignette can help draw attention to the subject of the photo. But it’s a matter of personal taste so try it out and apply it if you wish.
Once you’ve made your adjustments, have a careful look at your tilt-shift photo. Does it work? Does the subject look miniature and believable?
» alt=»Tilt Shift iPhone Photos 27″ width=»320″ height=»480″ srcset=»» sizes=»(min-width: 768px) 768px, 100vw» data-src=»https://images.iphonephotographyschool.com/7129/1120/Tilt-Shift-iPhone-Photos-27.jpg» data-srcset=»https://images.iphonephotographyschool.com/7129/546/Tilt-Shift-iPhone-Photos-27.jpg 640w, https://images.iphonephotographyschool.com/7129/616/Tilt-Shift-iPhone-Photos-27.jpg 720w, https://images.iphonephotographyschool.com/7129/320/Tilt-Shift-iPhone-Photos-27.jpg 769w, https://images.iphonephotographyschool.com/7129/640/Tilt-Shift-iPhone-Photos-27.jpg 750w, https://images.iphonephotographyschool.com/7129/640/Tilt-Shift-iPhone-Photos-27.jpg 828w, https://images.iphonephotographyschool.com/7129/960/Tilt-Shift-iPhone-Photos-27.jpg 1125w, https://images.iphonephotographyschool.com/7129/640/Tilt-Shift-iPhone-Photos-27.jpg 1136w, https://images.iphonephotographyschool.com/7129/640/Tilt-Shift-iPhone-Photos-27.jpg 1334w, https://images.iphonephotographyschool.com/7129/960/Tilt-Shift-iPhone-Photos-27.jpg 1242w, https://images.iphonephotographyschool.com/7129/640/Tilt-Shift-iPhone-Photos-27.jpg 1538w, https://images.iphonephotographyschool.com/7129/640/Tilt-Shift-iPhone-Photos-27.jpg 1792w, https://images.iphonephotographyschool.com/7129/960/Tilt-Shift-iPhone-Photos-27.jpg 2208w, https://images.iphonephotographyschool.com/7129/960/Tilt-Shift-iPhone-Photos-27.jpg 2436w»/>
If you need to make any further adjustments simply revisit the Blur, Filter and Color features by tapping on the appropriate icon.
When you’re happy with your tilt-shift photo, it’s time to save it to your camera roll. This is very simple – just tap the Done icon, then tap Save.
» alt=»Tilt Shift iPhone Photos 29″ width=»320″ height=»480″ srcset=»» sizes=»(min-width: 768px) 768px, 100vw» data-src=»https://images.iphonephotographyschool.com/7137/1120/Tilt-Shift-iPhone-Photos-29.jpg» data-srcset=»https://images.iphonephotographyschool.com/7137/546/Tilt-Shift-iPhone-Photos-29.jpg 640w, https://images.iphonephotographyschool.com/7137/616/Tilt-Shift-iPhone-Photos-29.jpg 720w, https://images.iphonephotographyschool.com/7137/320/Tilt-Shift-iPhone-Photos-29.jpg 769w, https://images.iphonephotographyschool.com/7137/640/Tilt-Shift-iPhone-Photos-29.jpg 750w, https://images.iphonephotographyschool.com/7137/640/Tilt-Shift-iPhone-Photos-29.jpg 828w, https://images.iphonephotographyschool.com/7137/960/Tilt-Shift-iPhone-Photos-29.jpg 1125w, https://images.iphonephotographyschool.com/7137/640/Tilt-Shift-iPhone-Photos-29.jpg 1136w, https://images.iphonephotographyschool.com/7137/640/Tilt-Shift-iPhone-Photos-29.jpg 1334w, https://images.iphonephotographyschool.com/7137/960/Tilt-Shift-iPhone-Photos-29.jpg 1242w, https://images.iphonephotographyschool.com/7137/640/Tilt-Shift-iPhone-Photos-29.jpg 1538w, https://images.iphonephotographyschool.com/7137/640/Tilt-Shift-iPhone-Photos-29.jpg 1792w, https://images.iphonephotographyschool.com/7137/960/Tilt-Shift-iPhone-Photos-29.jpg 2208w, https://images.iphonephotographyschool.com/7137/960/Tilt-Shift-iPhone-Photos-29.jpg 2436w»/>
You also have the option to share your tilt-shift photo via Message, Mail, Instagram, Twitter, etc. Simply tap the Share icon in the Done options.
And that’s it… you’ve created your first tilt-shift photo!
Источник


