- Backup disks you can use with Time Machine
- External drive connected to your Mac
- Network-attached storage (NAS) device that supports Time Machine over SMB
- Mac shared as a Time Machine backup destination
- External drive connected to an AirPort Extreme Base Station (802.11ac) or AirPort Time Capsule
- AirPort Time Capsule
- Back up your Mac with Time Machine
- Create a Time Machine backup
- Learn more
- Запуск, приостановка и возобновление резервного копирования Time Machine на Mac
- Способы резервного копирования и защиты файлов
- Time Machine
- iCloud Drive
- Фото iCloud
- CD и DVD
- Другие диски
- Дисковая утилита
- How to Backup iPhone to Time Capsule via Time Machine
- Another Solution
Backup disks you can use with Time Machine
Time Machine can back up certain external storage devices connected to your Mac or available on your network.
To use Time Machine to make a backup of your Mac, you need one of these types of storage devices:
External drive connected to your Mac
Time Machine can back up to an external drive connected to a USB, Thunderbolt, or FireWire port on your Mac. If the disk isn’t using the correct format, Time Machine will prompt you to erase it.
Network-attached storage (NAS) device that supports Time Machine over SMB
Many third-party NAS devices support Time Machine over SMB. For details, check the documentation for your NAS device.
Mac shared as a Time Machine backup destination
To use another Mac on your network as a Time Machine backup destination, complete these steps on the other Mac:
- Choose Apple menu > System Preferences, then click Sharing.
- From the list of services on the left, select File Sharing.
- From the Shared Folders list on the right, click the add button (+), then choose a folder to use for Time Machine backups.
- Control-click the folder that you added, then choose Advanced Options from the shortcuts menu that appears.

- From the Advanced Options dialog, select “Share as a Time Machine backup destination.”
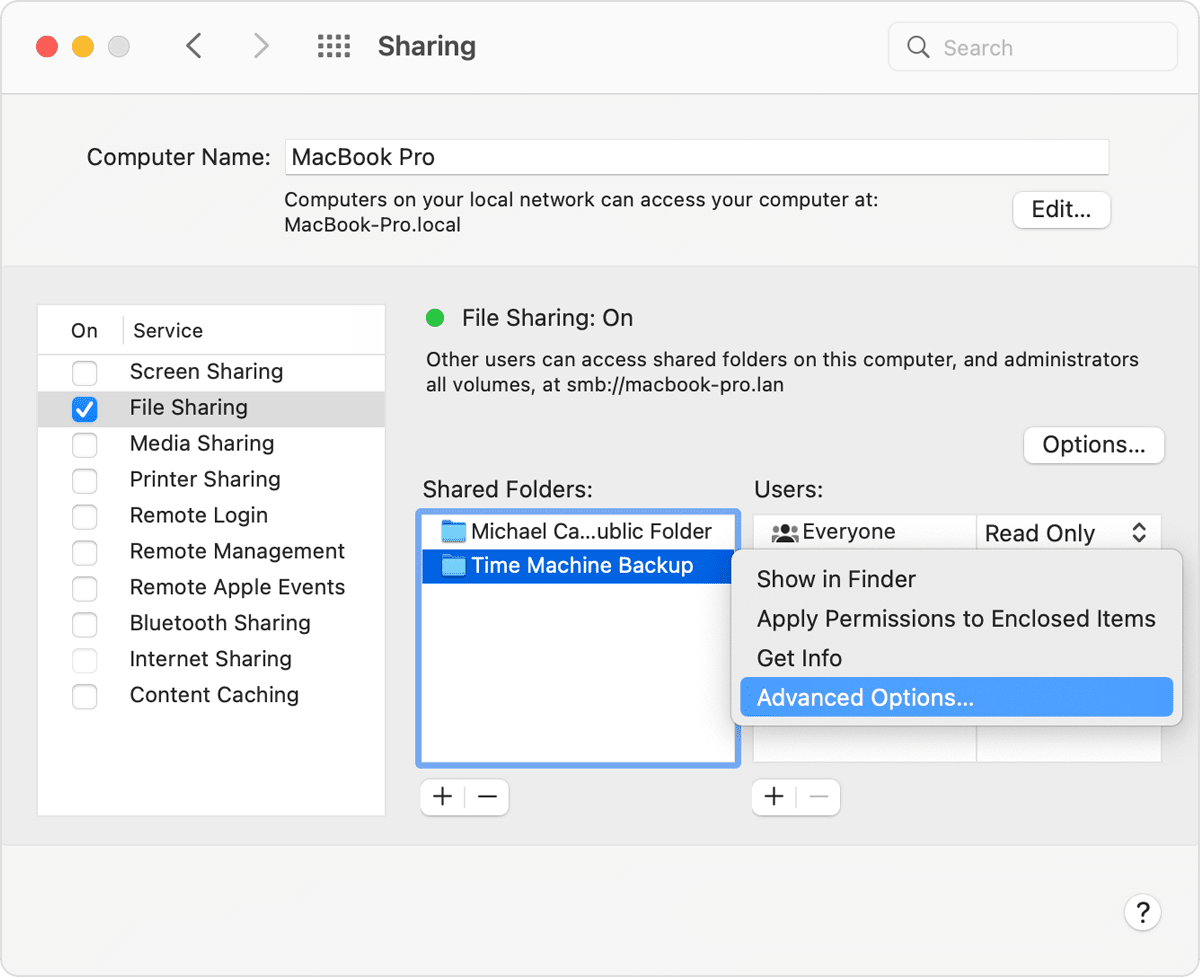
When setting up Time Machine on your other Mac computers, you should now be able to select the shared folder as a backup disk.
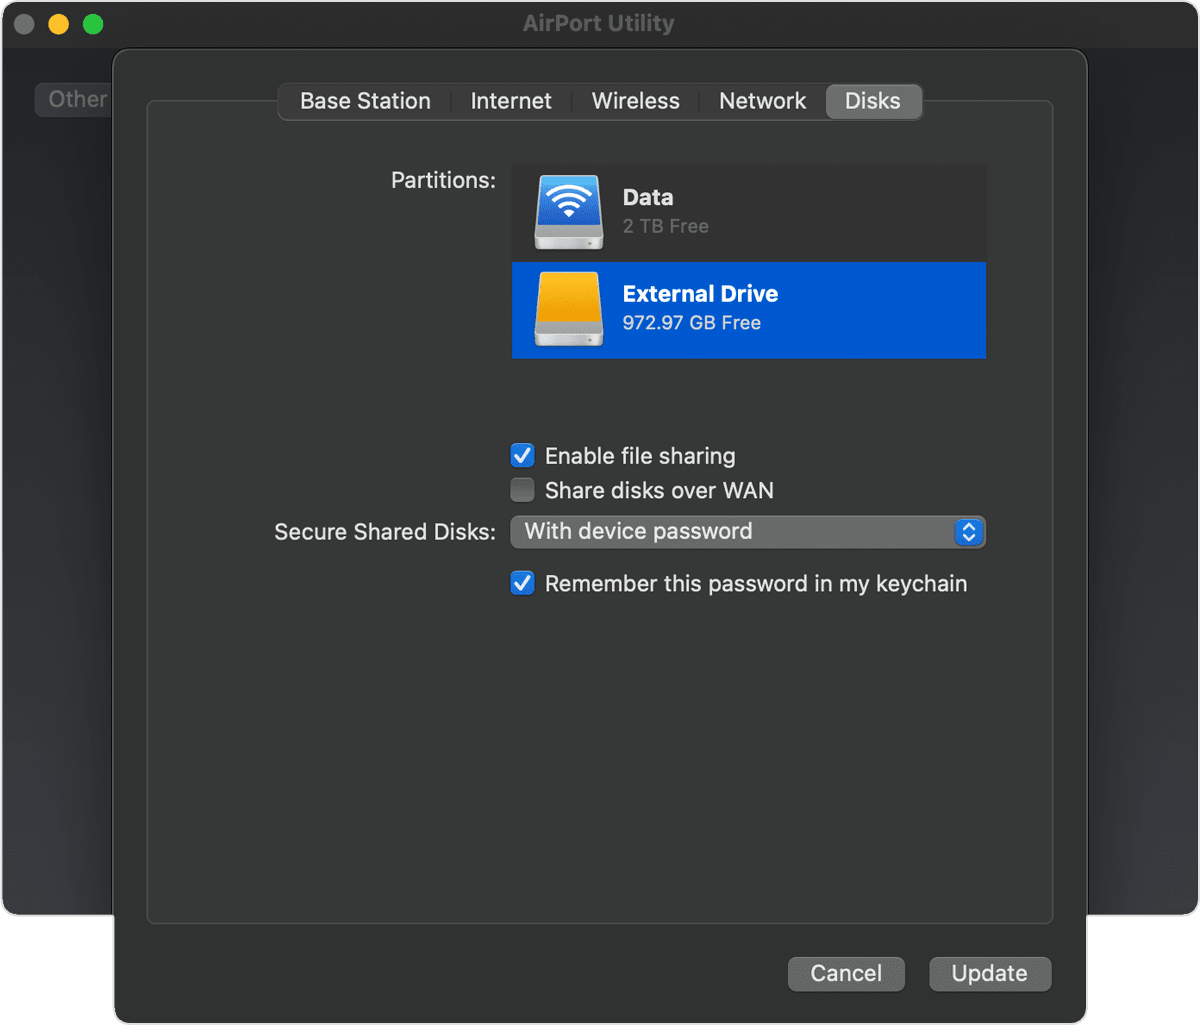
External drive connected to an AirPort Extreme Base Station (802.11ac) or AirPort Time Capsule
Time Machine can back up to an external USB drive connected to an AirPort Extreme Base Station (802.11ac model) or AirPort Time Capsule.
- Connect the drive directly to your Mac, then use Disk Utility to erase it.
- Connect the drive to a USB port on your AirPort base station, then turn it on.
- Open AirPort Utility, then select your base station and click Edit to view its settings.
- Click the Disks tab in the settings window.
- Select your backup disk from the list of partitions, then select “Enable file sharing”:
- If more than one user on your network will back up to this disk with Time Machine, you can use the Secure Shared Disks pop-up menu to make sure that they can view only their own backups, not yours. Choose “With accounts” from the menu, then click the add button (+) to add users.
- Click Update to restart your base station and apply the settings.
AirPort Time Capsule
Time Machine can back up to the built-in hard disk of an AirPort Time Capsule on your network.
Источник
Back up your Mac with Time Machine
Learn how to create a backup of the files on your Mac.
Use Time Machine, the built-in backup feature of your Mac, to automatically back up your personal data, including apps, music, photos, email, and documents. Having a backup allows you to recover files that you later delete or can’t access. Learn how to restore your Mac from a backup.
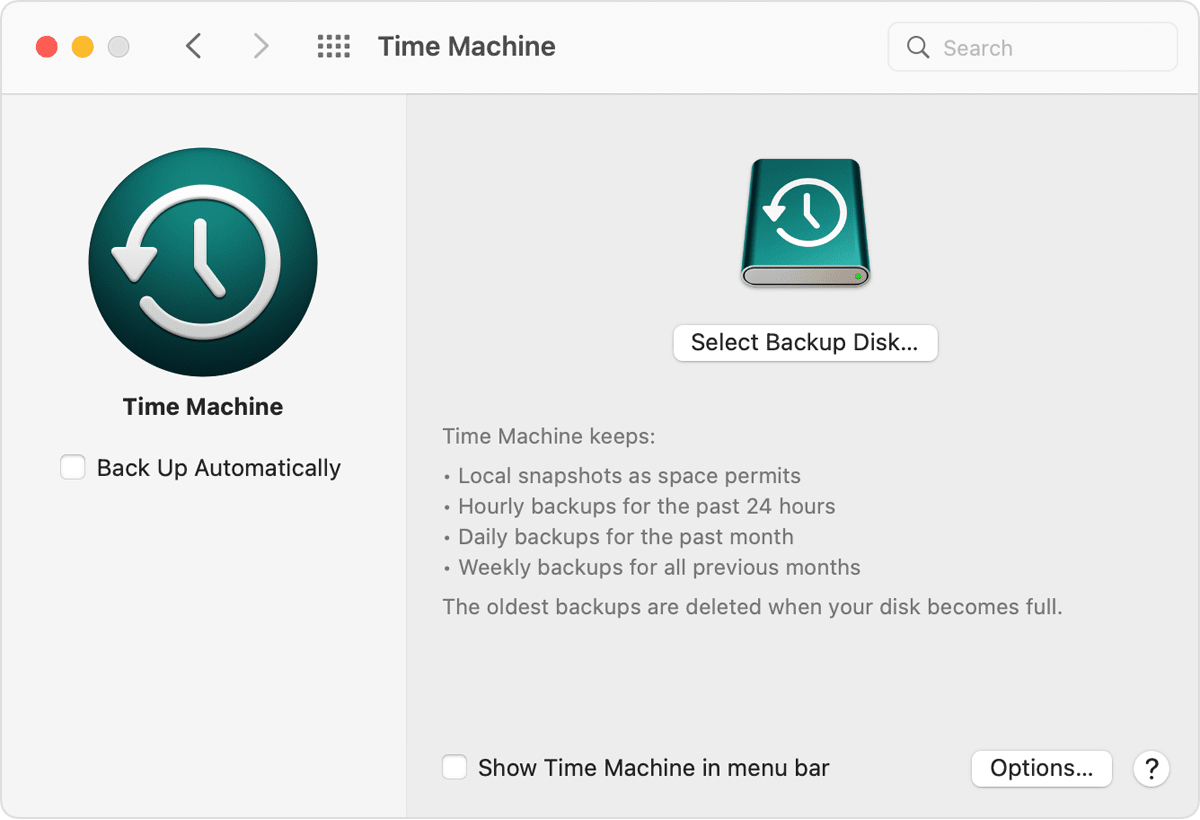
Create a Time Machine backup
- Connect an external storage device, such as a USB or Thunderbolt drive. Learn more about backup disks that you can use with Time Machine.
- Open Time Machine preferences from the Time Machine menu in the menu bar. Or choose Apple menu > System Preferences, then click Time Machine.
- Click Select Backup Disk.
- Select the name of your disk, then click Use Disk. Time Machine immediately begins making periodic backups—automatically and without further action by you.
If you want to start a backup manually, without waiting for the next automatic backup, choose Back Up Now from the Time Machine menu in the menu bar.
Use the same menu to check the status of a backup or skip a backup in progress. For example, if a backup is underway, the menu shows how much of it is done. When a backup is not underway, the menu shows the date and time of the latest backup.

Backup is underway
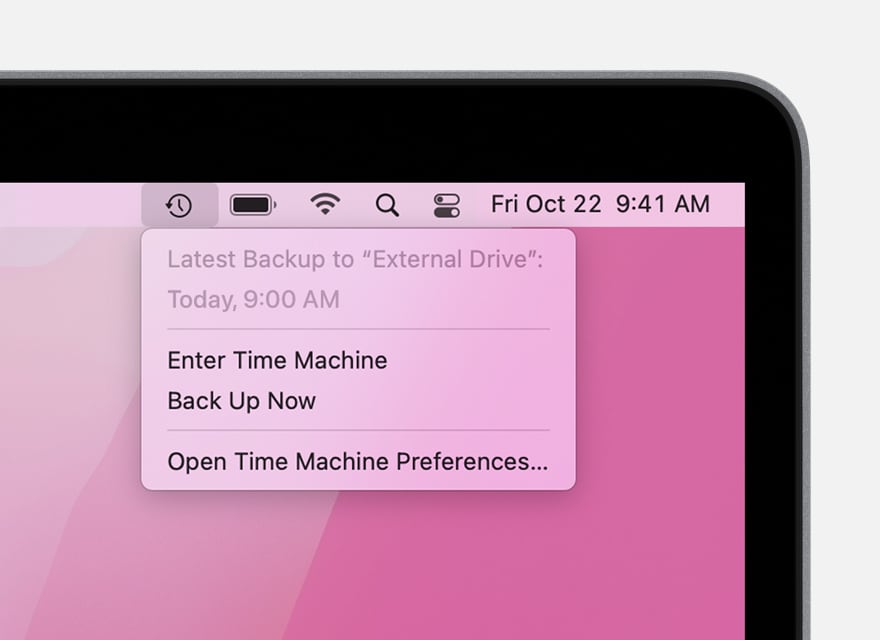
Latest backup
Learn more
- Time Machine automatically makes hourly backups for the past 24 hours, daily backups for the past month, and weekly backups for all previous months. The oldest backups are deleted when your backup disk is full. The first backup might take a long time, but you can continue using your Mac while a backup is underway. Time Machine backs up only the files that changed since the previous backup, so future backups will be faster.
- To exclude items from your backup, open Time Machine preferences, click Options, then click the add (+) button to add an item to be excluded. To stop excluding an item, such as an external hard drive, select the item and click the remove (–) button.
- If you back up to multiple disks, you can press and hold the Option key, then choose Browse Other Backup Disks from the Time Machine menu.
- Learn about other ways to back up and restore files.
Information about products not manufactured by Apple, or independent websites not controlled or tested by Apple, is provided without recommendation or endorsement. Apple assumes no responsibility with regard to the selection, performance, or use of third-party websites or products. Apple makes no representations regarding third-party website accuracy or reliability. Contact the vendor for additional information.
Источник
Запуск, приостановка и возобновление резервного копирования Time Machine на Mac
Резервное копирование Time Machine можно выполнять в любое время, даже если в настройках Time Machine не выбран параметр «Создавать резервные копии автоматически».
На Mac можно сделать следующее.
Запуск резервного копирования: Нажмите значок Time Machine  в строке меню, затем выберите «Создать резервную копию сейчас».
Приостановка резервного копирования: Нажмите значок Time Machine в строке меню, затем выберите «Пропустить резервное копирование».
Возобновление резервного копирования: Нажмите значок Time Machine в строке меню, затем выберите «Создать резервную копию сейчас».
Если значок Time Machine в строке меню отсутствует, выберите меню Apple

> «Системные настройки», нажмите «Time Machine», затем установите флажок «Показывать Time Machine в строке меню».
Источник
Способы резервного копирования и защиты файлов
Важными данными являются фотографии, музыка, документы и ПО. Существует несколько способов защиты файлов.
Time Machine
Time Machine создает копии фотографий, музыки, фильмов и документов, которые хранятся на Mac. После установки необходимых настроек в Time Machine приложение будет регулярно производить резервное копирование информации, хранящейся на Вашем компьютере Mac, без дальнейшего Вашего участия. Подключение нового диска для резервного копирования к компьютеру Mac.
iCloud Drive
iCloud Drive дает возможность безопасно хранить документы в iCloud, извлекать их в нужный момент и получать к ним доступ со всех Ваших компьютеров, а также устройств iPhone, iPad и iPod touch. Если хотите, можно сделать так, чтобы все файлы из папок «Рабочий стол» и «Документы» автоматически сохранялись в iCloud Drive. См. Использование iCloud Drive для хранения документов.
Фото iCloud
Функция «Фото iCloud» дает возможность безопасно хранить все фотографии и видео в медиатеке в iCloud, извлекать их в нужный момент и получать к ним доступ со всех Ваших компьютеров, устройств iOS и iPadOS, Apple TV и сайта iCloud.com. См. раздел Использование Фото iCloud для хранения фотографий в iCloud.
CD и DVD
Можно создать папку записи, содержащую все Ваши важные файлы. Когда Вы захотите создать резервные копии новейших версий этих файлов на CD или DVD, просто откройте эту папку записи и нажмите «Записать». См. раздел Создание и использование папки записи.
Другие диски
Если у Вас есть второй жесткий диск, можно создать резервные копии, скопировав файлы с одного диска на другой. Для экономии места сжимайте объекты, прежде чем копировать их на резервный диск. Для этого выберите объект, затем выберите «Файл» > «Сжать».
Если жесткий диск разбит на разделы, можно создать резервные копии, скопировав файлы из одного раздела на другой. Этот способ резервного копирования не такой надежный, как все предыдущие, т.к. в случае повреждения жесткого диска можно потерять резервные копии вместе с исходными файлами. Информацию о разбиении диска см. в разделе Разбиение на разделы физического диска.
Дисковая утилита
Если количество копируемых файлов превышает емкость одного CD или DVD, можно воспользоваться Дисковой утилитой и создать сжатый образ диска этих файлов.
Источник
How to Backup iPhone to Time Capsule via Time Machine

I’m new to Mac, and I’ve invested in a shiny Apple AirPort Time Capsule for fear of losing data. I know I can backup the entire Mac using Time Machine. But how about data in an iPhone? Is it possible to backup iPhone to Time Capsule as well? If so, how to do that?
The short answer is — no, you can’t use Time Machine to directly backup iPhone data to Time Capsule or an external hard drive.
Why?
Because Time Machine and AirPort Time Capsule are designed to work with macOS based computers only. They do not support backing up data from iOS devices (iPhone, iPad, and iPod Touch), nor can you restore iPhone data via Time Machine.
It just does not work that way.
But…There’s An Indirect Way!
First of all, you backup your iPhone via iTunes on your Mac. Then use Time Machine to back up the iTunes backup files to Time Capsule or an external hard drive.
If you don’t know how to create an iTunes backup for your iPhone, here’s how:
- Connect your iPhone to your Mac via the lightning cable.
- Open the iTunes app on your Mac.
- Click on the iPhone icon and go to Settings > Summary.
- In the “Backups” section, click the “Back Up Now” button to continue.
- Follow the rest instructions to complete the process. A new iPhone backup file will be saved on your Mac. You can use it to restore the device whenever you want.

You can also watch this short video for detailed instructions:
Another Solution
back up your iPhone data to iCloud!
In general, I don’t quite recommend this method because iCloud isn’t really a free product though it offers 5GB storage for free.
But iCloud storage can get filled up very quickly, because these days as camera technology improves, the quality and size of photos increase as well. See this article on how to fix iPhone storage almost full for more.
If you have already purchased enough iCloud storage, here’s how to backup your iPhone to iCloud automatically or manually.
Step 1: On your iPhone, locate the Settings app, tap to open it. Scroll down and tap on iCloud.

Step 2: Scroll down and find Backup, tap on it.

Step 3: Here you go. By default, the iCloud Backup is turned on (with green color). If the color is gray, tap to switch it on. Also, you can tap the “Back Up Now” option to make a backup manually.

This way, iCloud will back up your iPhone data such as photo library, accounts, documents, Health data, Home configuration, and settings.
I hope you find this answer useful. For further information about backing up iPhone data via iTunes or iCloud, check out this official Apple guide.
If you can’t find some of your files or the backup file fails to restore your data, try a third-party iPhone data recovery software.
Bottom line — make no mistakes, backup is king!
Andreas is a freelance tech writer based in California. He works on a Mac in the office and lives with a PC and many old computer electronics at home. While he is not reading or writing, you’ll probably find him playing online games with friends.
Источник


