- Password Visibility Toggle — Android Support Library, revision 24.2.0
- Первый шаг
- Далее
- Замечания
- Полезные инструменты в Android Studio
- Наполнение лэйаута тестовыми данными
- Автоинкремент версии и изменение имени билда
- Создание различных вариантов сборки
- Пипетка
- Просмотр истории блока кода
- Видимость объектов Android
- Design Tools Suite UX enhancements in Android Studio 4.1
- Layout editor
- ConstraintHelpers support
- Design-time attributes toggle
- Visibility control on component tree
- Keyboard shortcuts + keymap settings
- Transform panel
- Resource manager
- Gutter drawable picker
- Vector asset icon auto-download
- Navigation editor
- New destinations tree
- Deeplink dialog new attributes + autocomplete
- Motion editor
- Motion keyframe path graph
- Transition curve editor
Password Visibility Toggle — Android Support Library, revision 24.2.0
Здравствуйте! Предлагаю вниманию читателей перевод статьи об обновлении Android Support Library и одном немаловажном ее новом компоненте Password Visibility Toggle . Оригинал статьи можно найти здесь.
Считаю, что Password Visibility Toggle довольно интересный инструмент, причем довольно простой, который заслуживает отдельного внимания, поэтому прошу под кат.
От себя хочу добавить, что текущее обновление Support Library считается одним из самых масштабных: разделение на несколько маленьких модулей — несомненный плюс, который поможет уменьшить вес вашего .apk файла; большое обновление API; куча deprecations ну и немножко bugfixes нам принесли.
Android Support Library была недавно обновлена с весьма интересными изменениями. Я обратила внимание на Password Visibility Toggle не случайно: буквально несколько дней назад я пыталась реализовать этот функционал в своём рабочем проекте без использования каких-либо библиотек (между прочиим, Lisa Wray разработала прекрасную либу).
Я восхваляла это в твиттере.

Естественно, это было одной из первый вещей, которую я использовала, поскольку мне нужно было немедленно обновить свой проект.
Здесь очень базовый туториал как с этим работать.
Первый шаг
Первый и самый очевидный — это, конечно же, обновить версию Support Library до 24.2.0. Надеюсь, у тебя версии зависимостей прописаны в extra properties. Если да, то это означает, что тебе нужно поменять версию лишь в ОДНОМ месте. Если нет, то тебе прийдется изменять Gradle файл столько раз, сколько версия встречается.
Далее
Следующим шагом будет создание TextInputEditText и задание inputType одним из следующих вариантов: textPassword, numberPassword, textVisiblePassword либо textWebPassword. Я пробовала все 4 типа и заметила, что иконка видимости появляется на всех кроме textVisiblePassword варианта, что довольно очевидно, поскольку эта опция изначально задает видимость пароля по умолчанию.
Этот же код на gist.github автора.
Есть 5 XML аттрибутов связанных с password visibility toggle.
- passwordToggleContentDescription позволяет нам установить строку в качестве content description
- passwordToggleDrawable позволяет нам установить другую иконку, кроме значка видимости visibility toggle icon
- passwordToggleEnabled позволяет нам определить хотим ли мы что бы пароль был переключаемый. Мне кажется, что это должно быть установлено только если ты специально не хочешь сделать поле переключаемым
- passwordToggleTint позволяет нам окрасить значок в какой-либо цвет. Так же работает с custom drawable
- passwordToggleTintMode позволяет нам задать так называемый режим смешивания, в котором мы можем применить оттенок для фона.
Как обыкновенный Android UI компонент в XML, так же возможно реализовать это (passwordToggleContentDescription, passwordToggleDrawable, passwordToggleEnabled, passwordToggleTint and passwordToggleTintMode) непосредственно кодом: необходимо создать TextInputEditText и вызвать один из этих методов.
Замечания
После того, как я это заимплементила, я ожидала, что иконка видимости будет по умолчанию перечёркнута(ссылка на мой твит выше). Твит ниже от Nick Butcher и даже либа от Lisa Wray демонстрирует тоже самое. Я была несколько разочарована попробовав ее и обнаружив, что по-умолчанию изменение состояния видимости значка было лишь его незначительное затемнение вместо зачеркивания. Это не достаточно очевидно, по-моему мнению, так как это могло привести к заблуждению, особенно таких пользователей как я, который уже пробовали эту фичу на других платформах и ожидали такого же поведения. Мне необходимо было создать кастомный StateListDrawable и задать в passwordToggleDrawable XML аттрибуте тип эффекта, которого я хочу достигнуть.
Твит о Password Visibility Toggle от Nick Butcher.
Некоторые слова специально не переводил, так как считаю, что они могут исказить восприятие разработчика. Большинство слов уже считается нормой в нашей работе.
Если есть предложения по улучшению качества перевода либо что-то звучит просто несуразно — критика приветствуется.
Источник
Полезные инструменты в Android Studio

Прошло уже достаточно много времени с момента презентации Android Studio и наверняка у многих накопилось много знаний, нюансов и фишек, используемых часто в работе. Этим и хочется поделиться. Я начну, а вы продолжите…
- SSD
- Наполнение лэйаута тестовыми данными
- Автоинкремент версии и изменение имени билда
- Создание различных вариантов сборки
- Пипетка
- Просмотр истории блока кода
Сборщик Gradle собирает долго. Если на простом проекте время сборки занимает до 10 секунд, то на большом, со множеством модулей — до двух минут. С учётом того, что за день работы проект собирается десятки раз в день, выходит большая утечка времени и появляется раздражительность (комп иногда уходит в ANR, даже браузером невозможно пользоваться). Проблема решается просто — переходом обратно на Эклипс установкой SSD накопителя. Цена вопроса — 100$. Profit — плюс 5-25 минут в день.
Результаты моего тестирования SSD:
1. ANR винды пропали
2. Время сборки сложных проектов уменьшилось от максимум двух минут до максимум 20 секунд.
3. Покупка SSD позволяет безболезненно использовать genymotion в связке со студией.
Сравнение скоростей работы HDD(сверху) и SSD(снизу), подключенного через SATA 1: 
Наполнение лэйаута тестовыми данными
Префикс «tools:» помимо линтовских функций позволяет наполнять лэйаут тестовым данными без последствий для приложения. «Все, что происходит в Вегасе, остается в Вегасе». Всё, что отмечено данным префиксом, отображается в лэйауте и удаляется во время сборки.
Возможны даже такие вещи:
Более подробно здесь — tools.android.com/tips/layout-designtime-attributes.
Ознакомиться с дополнительными возможностями по использованию префикса «tools:» можно здесь — tools.android.com/tech-docs/tools-attributes.
Автоинкремент версии и изменение имени билда
Далее остаётся запустить команду release главного модуля проекта.
Создание различных вариантов сборки
Думаю один из самых простых и популярных вариантов использование данной возможности это создание бесплатной и платной версии приложения или версии под релизный и тестовый сервер.
Ниже пример на данную тему
Указываем варианты сборки — free и paid, и соответствующие параметры в build.gradle
В случае релизного и тестового сервера:
Затем создаём папки в src с соответствующими названиями. Получится следующая структура проекта: 
В ресурсах указываем различающиеся данные. Например, различные ключи для google analytics, crittercism, google backup service и пр.
В коде делаем проверки на BuildConfig.PAID для реализации логики.
Пипетка
Пипетка позволяет узнать код цвета с любой области на экране. Многие её просто не замечают и пользуются пэйнтом для того, чтобы узнать код цвета с картинки. Обратите внимание на левый верхний угол. Данная диаложка вызывается из colors.xml при клике по цвету.
Просмотр истории блока кода

Согласитесь, стандартная ситуация при работе в команде. Не знаю, как давно существует данное решение и есть ли оно в эклипсе, но вещь действительно полезная: 
Источник
Видимость объектов Android
Я сделал много поиска, но не могу найти разницу между tools:visibility = «visible» и android:visibility = «visible» ? В какой ситуации я должен использовать инструменты или андроид?
Вот простое объяснение:
tools:visibility = «visible» используется для управления видимостью просмотра на IDE. Это не влияет на представление в реальном времени. Оно просто используется для целей проектирования в Android Studio
в то время как
android:visibility = «visible» – это фактический код, который будет выполнен во время выполнения и внесет изменения в ваши представления
Tools: атрибуты вносят вклад в предварительный просмотр времени проектирования при редактировании макетов, а
Android: фактически влияет на то, как он будет отображаться на самом устройстве.
Вы можете найти дополнительную информацию здесь и здесь .
Значения TOOLS будут использоваться только в предварительном просмотре макета в Android Studio.t
Значения ANDROID будут использоваться в приложении как обычно.
Поэтому, если вы задаете значения для основного контейнера: tools: visibility: «go» android: visibility: «visible»
Основной контейнер в представлении макета в AS исчезнет, но если вы запустите приложение на эмуляторе / устройстве, он будет виден.
Если вы видите атрибуты компоновки времени разработки
Пространство имен инструментов является специально признанным пространством имен инструментами Android, поэтому все атрибуты, которые вы определяете для элементов вида в пространстве имен tools, будут автоматически удалены, когда приложение будет упаковано, а накладные расходы не будут выполняться.
Поэтому, если нам нужно что-то тестировать в редакторе макетов только во время разработки, которое не влияет на время выполнения, мы можем использовать пространство имен tools .
Пример:
Если вышеуказанный макет отображается в представлении дизайнера Android Studio, первая кнопка будет невидимой. Но во время работы это будет видно.
Точный вопрос должен быть
«Какая разница между android. и tools. на XML-файлах Layout»
Инструменты являются одним из атрибутов проектирования, которые могут облегчить создание макета в XML в рамках разработки. Этот атрибут используется для отображения структуры разработки, какой класс активности выбран для реализации макета. Используя «tools: context», Android Studio автоматически выбирает нужную тему для предварительного просмотра
Android используется во время выполнения приложения, когда вы запускаете apk в устройстве
Источник
Design Tools Suite UX enhancements in Android Studio 4.1

The Design Tools Suite in Android Studio is a collection of tools that aims to support developers in effectively designing, prototyping, building, and debugging their apps. These tools include but are not limited to a Layout Editor, Navigation Editor, Motion Editor, Resource Manager, and Layout Inspector. With Android Studio 4.1, we’ve focused our efforts on the backlog of users’ (your) feedback to enhance these existing tools — as a result, we’ve refined interactions and created missing features. Here’s a round-up of what we’ve done — a closer look at the UX refinements mentioned in the What’s new in Design Tools Talk!
Layout editor
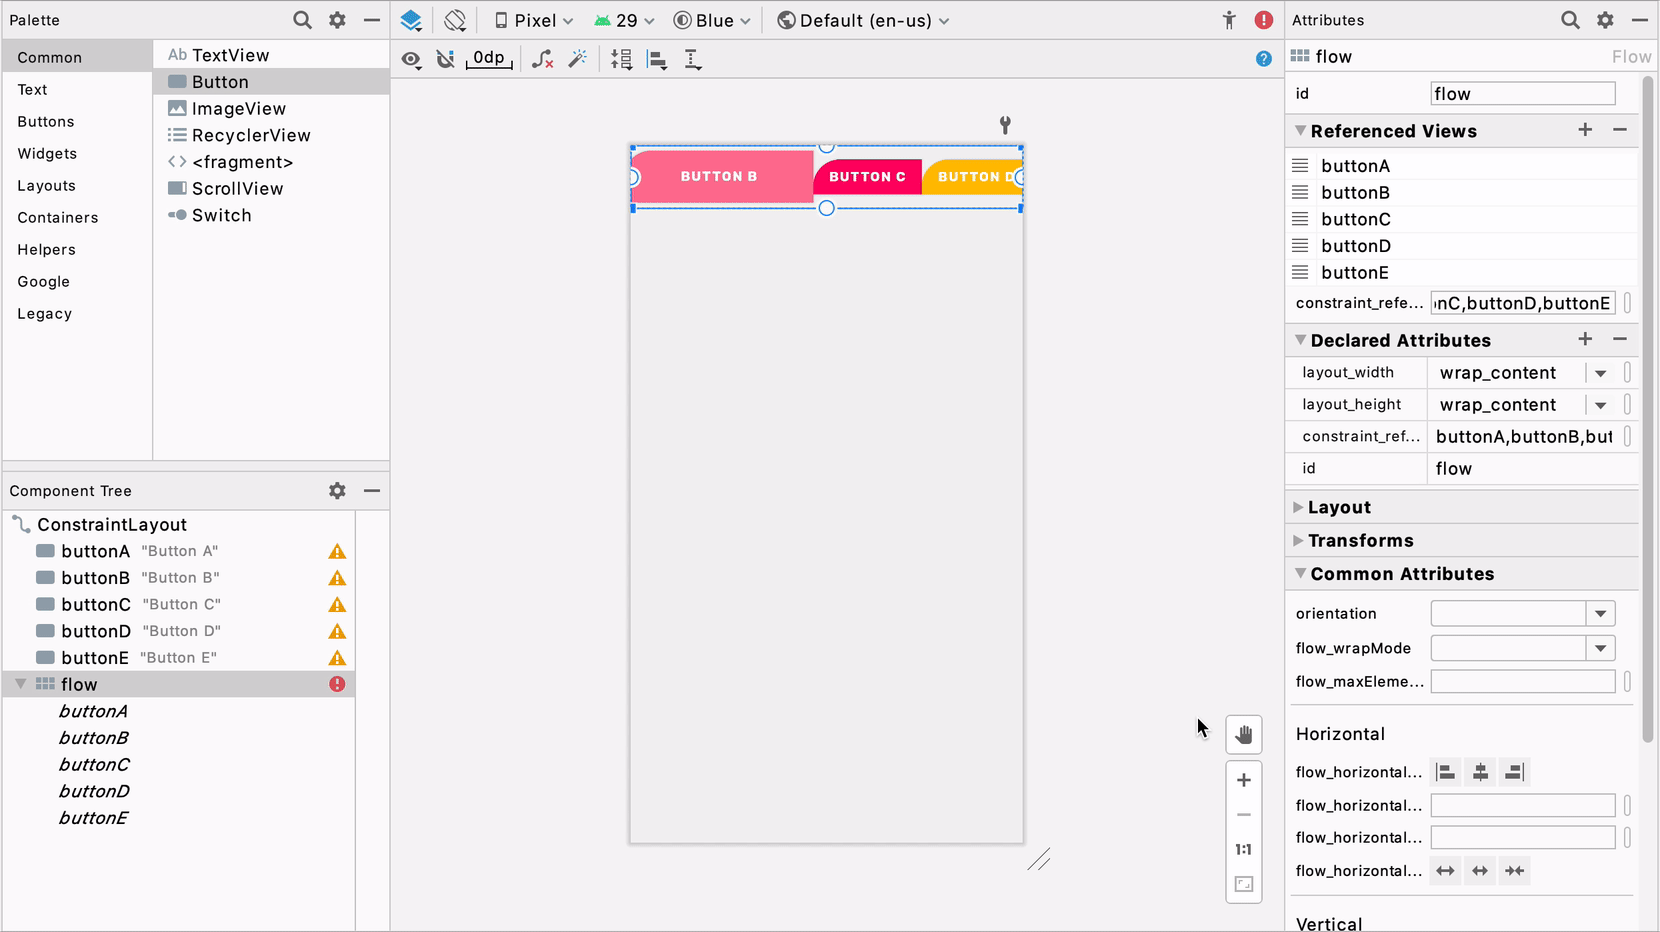
ConstraintHelpers support
ConstraintHelpers such as Barriers and Guidelines were first introduced in ConstraintLayout 1.1 to allow multiple widgets to be referenced as input of an invisible view, and group-align them without code duplication. In 2.0, the helpers concept was extended: VirtualLayouts such as Flow and Groups were added to allow for simultaneously applying behaviors to all referenced widgets. For example, with Flow, views can be easily laid out horizontally or vertically with global adjustments of gaps and wrap styles.
In Android Studio 4.1, we wanted to make sure our tools support and optimize the experience and interaction of using these helpers in the IDE. Thus, we first mapped out the user journey from discovery to creation to manipulation, and then we set out to increase efficiency for every step of the journey. For discovery, we added a helpers section in Palette so that it’s easy to find and use available helpers.

For creation, you can now also select multiple views, and right-click to select a helper — we then automatically add the referenced id’s corresponding to what was selected.
For manipulation, we wanted to make Flow’s functionality more accessible, so we expanded the property panel with commonly used attributes specific to Flow, such as icons for quick alignment and a section for rearranging the order of referenced id’s.
Design-time attributes toggle
Android Studio offers a variety of tools attributes, which are XML attributes in the android:tools namespace that enable design-time features (i.e., showing the layout of a fragment). These attributes are removed when you build your app and have no effect on APK size or runtime behavior — they are merely to aid in the design / development process.
For building UI, we know that tools:visibility and absolute positioning ( tools:layout_editor_absoluteX and tools:layout_editor_absoluteY) are two widely used tools attributes because they allow designers to temporarily show/hide UI as well as to position views precisely in the Layout Editor before setting constraints on them. However, we observed in user studies that it is difficult to know when and if views are set with tools attributes, such that users were surprised by discrepancies between the Layout Editor’s preview and the app’s rendering on an emulator or physical device. For example, in the screenshot below, the images in the right column have absolute positioning, and even though they look nicely laid out in the Layout Editor preview, in the emulator they’re all superimposed on one another in the top left corner.
To resolve this, we decided to add a toggle near the design surface in the Layout Editor to allow users to easily turn on/off tools:visibility and absolute positioning.
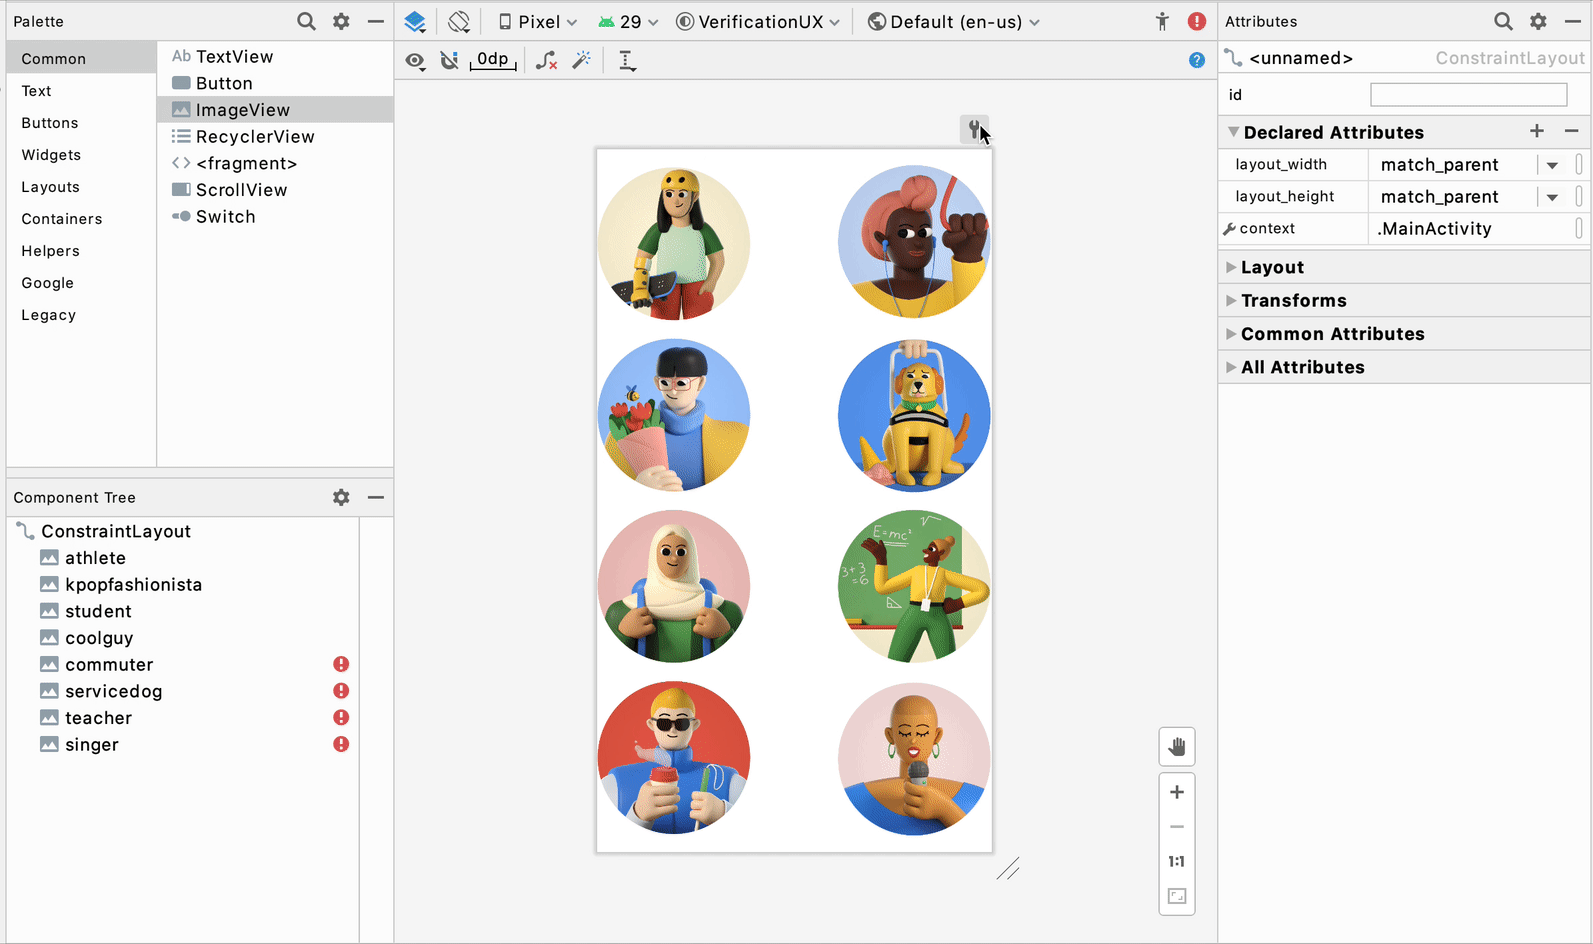
With the toggle, our goal is to provide users with a more accurate / non-design-time rendering and increased awareness about when they’re using these tools attributes.
Visibility control on component tree
Visibility, as stated in the last section, is a very common and important attribute for a view. It’s particularly useful when you need to show/hide certain UIs based on different conditions or certain logic. For example, you may only want authenticated users to be able to see their user data. Thus, we wanted to optimize the visibility attribute by providing a quick way to easily set show/hide/gone visibility in the Layout Editor.
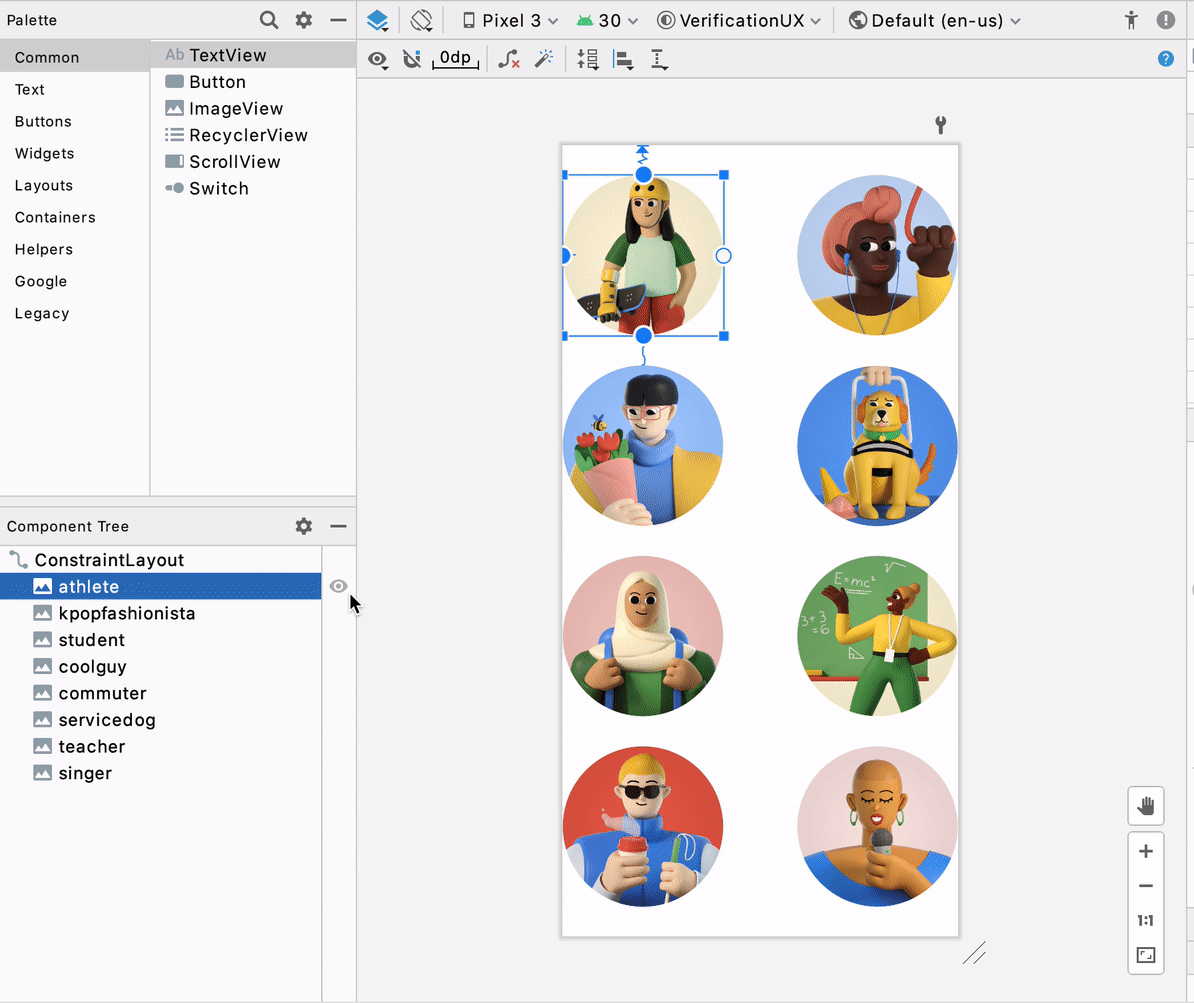
Starting in 4.1, you will be able to use the visibility control picker in the component tree next to any view to quickly change it. This allows you to take one look at the tree and know how the views are shown based on visibility and change them according to whichever parts of the UI you would like to work on.

We included both the tools and android namespaces to accommodate different user needs. One thing to note here is that, during design-time, tools overrides android visibility, and thus this is reflected on the visibility controls as well — if you have a tools:visibility set, it will take precedence on the UI. For instance, in the screenshot below, the student image has an android:visibility = visible and tools:visibility = gone, and you can see that the tools visibility takes precedence.

Keyboard shortcuts + keymap settings
We all recognize the power of keyboard shortcuts in boosting productivity and efficiency for development. In Studio 4.1, we performed an audit of all the keyboard shortcuts in the Design Tools Suite and registered them in Preferences > Keymap, allowing you to discover, change, and edit the shortcuts to best fit your work style.
Transform panel
We’ve heard feedback from developers asking for more precision when manipulating transform attributes on a view. To make it easier to fine tune your view’s transformation, we added a visualizer and sliders to help with 3D rotation of views. On the attribute panel, once you’ve selected a view, you can use the controls under “Transform” to make adjustments.
Resource manager
Gutter drawable picker
Back in Android studio 3.6, we introduced the Color picker resource tab, which helps you quickly update color resource values in your app. The picker pattern was very well received since the interaction here provided a seamless transition from something textual (code) to something visual (colors) — users can stay in context within their code editor while using this graphical user interface (GUI) accelerator at the same time. Thus, in 4.1, we applied the same concept to Drawables — now when you have a drawable resource in your file, you will find a gutter icon that allows you to quickly change drawable resources. Moreover, clicking on “browse” will open the resource dialog allowing for more extensive search.
Vector asset icon auto-download
This update is perhaps not noticeable visually but is nevertheless significant. We received complaints about discrepancies between the Material icons on Material.io and those in our Vector Asset wizard. This was due to misalignment between Studio’s release cadence and updates to Material. To tackle this, we streamlined the process so that now every time Material updates their icon library, the Vector Asset wizard will also automatically update the library in the background. You can now expect we will always have the latest Material icons in the wizard! 🎉
Navigation editor
New destinations tree
Split View was introduced as a new way of switching editing modes for design files in Android Studio 3.6, and this created opportunities for us to optimize the side-by-side view for navigation files and the Navigation Editor. One of those optimizations is to use the component tree structure to represent the destination graph in the Navigation Editor. This way, users can see all their destinations (including nested ones) and actions at a glance, and they map 1:1 to the code in split mode.
As a side note, this was beneficial for the health of our code base as it reuses common components across all our design tools.
Deeplink dialog new attributes + autocomplete
Navigation 2.3.0 introduces two new attribute types for deeplinks: MIME and Action. To align the tools functionalities with that of the library, we added them to the creation dialog for deeplinks in the Navigation Editor, with autocomplete and validation support.
Motion editor
Motion keyframe path graph
MotionLayout supports different types of keyframes, and one of most commonly used types is Position keyframes ( ), which allows developers to modify the path of a widget at a given time during the animation. With the Motion Editor, introduced in 4.0, users can directly manipulate these keyframes by dragging them directly on the surface. However, a problem with this workflow is that, depending on how the keyframe is set up, the attributes applied to the keyframe can mean different things. For example, dragging the keyframe 20% to the left, there is no context of whether this is 20% relative to the path or 20% relative to the parent. To solve this, in 4.1 we added an overlay of the coordinate system as well as axis ghost objects on the design surface during drag, so that every time developers want to manually edit the keyframes, they can better understand their bounding, axis, and direction.

Transition curve editor
Similar to the Transform panel in the Layout Editor mentioned above, we have heard feedback from developers about how it’s difficult to specify Transition curves with pure numbers. Thus, in 4.1, we added support for a GUI curve editor in the Motion Editor, allowing developers to perfect the curves with visualization and control handles.

We hope that you are excited to try out these new improvements! We are constantly gathering feedback and applying them to improve our tools. The goal of the Design Tools Suite is to support, supplement, and boost your coding experience — to find areas where it makes sense to provide visual or GUI support. The learnings we uncovered here will also be applied to tools we build for Jetpack Compose. For instance, these pickers experiences (i.e., visibility toggle, gutter drawable pickers) are a form factor that we can further explore, since they are context-based, non-distracting, and provide a unique way to apply design tooling to the app development process.
As always, if you encounter any issues while using these tools, or have an idea for new features that can improve your productivity, please file a bug. We will continue to optimize the editors’ performance, fix bugs, and incorporate your suggestions and feedback.
Источник


