- Fragment Toolbar.
- Manage it better.
- Introduction
- Toolbar for Fragment. What is wrong with it ?
- What is the solution ?
- Summary
- Android Custom Toolbar In Kotlin | Toolbar Kotlin Example
- What is Android Toolbar
- Android custom Toolbar with Kotlin
- Android Toolbar example [Android app bar] in Kotlin
- Let’s start build Toolbar in the android app :
- Output screenshot Android Toolbar example in kotlin
- Download Android Toolbar example in kotlin source code :
- Android Toolbar Tutorial – XML Layout and Kotlin
- Android Tutorial
- What is Android Toolbar?
- Toolbar Gradle Dependencies
- Android Apps Default Toolbar
- Toolbar from Themes
- Toolbar XML Layout
- 1. Setting Toolbar Background Color
- 2. Setting the Theme
- 3. Setting title, subtitle, icons
- 4. Toolbar Preview
- Android Toolbar Themes
- Android Custom Toolbar
- Creating Toolbar using Kotlin Code
Fragment Toolbar.
Manage it better.

Introduction
Since I started work commercially I met an opinion that working with Fragments is not always intuitive, at least not as much as working with Activities. Especially after watching this video your mindset in context of Fragments might change significantly. Complicated lifecycle, hard management will not change the way of thinking about it.
Few weeks ago I had to deal with really big thing. I’ve moved big app built in 95% on Activities to Fragments. I was very long way, very hard one. I’ve learnt a lot, so wanted to share this knowledge with you.
Toolbar for Fragment. What is wrong with it ?
Let’s assume that we have only one Activity with bottom navigation and the rest of views are Fragments. Normally on every Fragment change toolbar is set as supportActionBar which gives you possibilities to use methods to create, prepare, manage toolbar options menu. It looks simple, doesn’t it?
But it also creates some problems:
- Before creating new toolbar on another Fragment you need to clear the old one.
- If you are clearing it, indeed you are losing state and all data.
- When you are going back to previous Fragments you have to recreate whole action bar.
As you can see it is a very inconvenient process, hard to maintain and generates a lot of boilerplate code. Especially if you are using searchView all those disadvantages mentioned above are unacceptable.
What is the solution ?
Assuming that we have few types of toolbar in app, you can build it using Builder Pattern and handle all cases in one place. All work comes down to choosing options for your Toolbar.
Starting point is to select one of two possible solutions. First one suggests to create one Toolbar and add it from code to your views. The second, which I have chosen is to implement toolbar in every Fragment’s .xml file. Basically, it was much easier for me because it was already done (refactoring code from Activities), so code below will match the second option.
Lets create FragmentToolbar Builder which contains all options we need in our app. I’m using Kotlin to achieve it, but my Fragments are still in Java, so I had to use implementation readable for Java.
Nothing revealing, let’s add those options to our toolbar.
Create BaseFragment which will be inherited by every Fragment.
Finally we are prepared to create Toolbars for our Fragments! Now every Fragment must specify which options will be used or if the Toolbar should even exist. Following the simple example:
To more complex:
Summary
Everyone knows how much time we spend on adding menu options and how many lines in code we need to write or copy/paste. This solution saves your time and keeps code clean. No need to set toolbar as supportActionBar. You don’t have to worry about keeping state and data for menu when Fragment changes (it lives as long as your Fragment). To sum up, management is as simple as possible and fragmentManager backstack changes (adding / removing Fragments) has no effect on toolbar at all.
Personally I feel better when I’m dealing with Activities. Working with Fragments pushed me to simplify this process. So when you’ll be in the same situation — don’t fight with it, just do it by your own.
If you like my work hit clap button and let me know what you think in comments!
Источник
Android Custom Toolbar In Kotlin | Toolbar Kotlin Example
In this custom Toolbar Android Kotlin Tutorial, I will tell you how to create a Toolbar for your Android applications. We will also learn how to add different features to the Toolbar. So, let’s create an Android custom Toolbar with Kotlin.
What is Android Toolbar
Toolbar Android is a ViewGroup that usually appears at the top of the application. It can have a menu icon, logo/title/navigation icon, etc. Toolbar first came with API 21 (Lollipop, Android 5.0). The Toolbar is the replacement of ActionBar which is deprecated now.
 Android Toolbar
So, because of the DarkActionBar theme, you see a default Toolbar with the application name on the top.
We will change the theme from
After doing this, it will remove the default Toolbar of your application. Then, first, change the default Constraint Layout to a Relative Layout . Now to add a custom Toolbar we add a Toolbar widget in activity_main.xml.
After adding the above code you will see a transparent Toolbar with no Text or Color. So, we have to add more properties to style our Toolbar.
Android Toolbar Title: Add a title to the Toolbar
Android Toolbar Logo: Set Logo for the Toolbar
Toolbar Background Color: Change the background color of your Toolbar
Enter Subtitle below Main Title:
These are some attributes to make changes in the toolbar for Android. After all this, the final Toolbar will look like this:
Android custom Toolbar with Kotlin
Now, Let’s learn how to create a custom Toolbar programmatically. Since we have equivalent functions for our XML attributes and properties in Kotlin. So, in our MainActivity.kt file we will add some code.
First, come to your activity_main.xml file and add a Toolbar widget here with id my_toolbar and width and height should be wrap_content.
To add Title, Subtitle, and icon add the following code into your MainActivity.kt file.
The complete MainActivity.kt file look like this:
Note: Since I am using the latest version of Android with the androidx library. I have customized the Toolbar in a simple way. You can add as many styles/colors and appearances to your Toolbar from your styles.xml.
OUTPUT
Android Toolbar / Android Custom Toolbar In Kotlin
 Toolbar Android / Android Custom Toolbar In Kotlin
 Android Custom Toolbar In Kotlin
CONCLUSION
So, in this Toolbar Android Kotlin tutorial, I have explained some steps about the Kotlin toolbar on Android and because of that, I am pretty sure that this Android toolbar example is going to help beginners who want to learn Android toolbar menu example in android studio with Kotlin.
So, What is your favorite attribute to style your Toolbar?
Источник
Android Toolbar example [Android app bar] in Kotlin
Android Toolbar or App bar: is a part of the application, where it provides UI experience on top of the app for easy navigation and quick access to other items. A Toolbar is a generalization of the Android action bar.
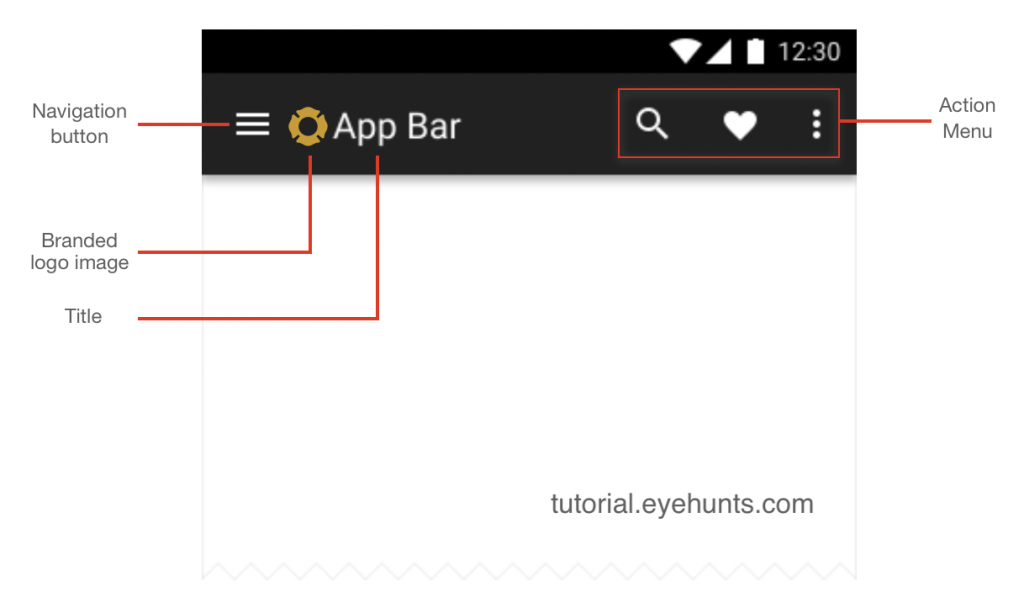
Toolbar (App bar) is supporting a more focused feature set than ActionBar. From start to end, a toolbar may contain a combination of the following optional elements:
- Navigation button: Up arrow or navigation menu toggle icon in starting of Toolbar. You override the default home function and perform any action goto parent activity or open/close navigation menu toggle,
- Branded logo image: It’s useful when you want to show the logo in-app top bar. This may extend to the height of the bar and can be wider.
- Title and subtitle: If an app uses a logo image it should strongly recommend neglecting a title and subtitle. It shows the name of the brand or Activity or user landing page information.
- An action menu: The menu of actions will pin to the end of the Toolbar offering a few main operations to the user like setting, print, save, profile, etc. Or maybe sometimes you needed the same menu for every activity, then you can use the same toolbar in multiple places.
Let’s start build Toolbar in the android app :
This tutorial you will learn how to make Android Toolbar in your android app using a Kotlin Language.
Step 1. Create new project “Build Your First Android App in Kotlin“
Step 2. Set up the app bar (Toolbar)
- Add the v7 appcompat support library to your project,
Note: its updating time to time please check with google doc or add from “open modules settings”
- Make sure the activity extends AppCompatActivity :
Step 3. Set NoActionBar theme in app res/values/styles.xml
Using NoActionbar of themes prevents the app from using the native ActionBar class to provide the app bar.
Step 4. Add Toolbar widget in main_activity.xml
Step 5. create new action menu
if you don’t have any menu resource file then create first “Android Resource directory” then create resource file “my_menu.xml”

Then add fowling code in “my_menu.xml”, download image from here outline_print_white.png, you add your own images
Step 6. add following code in MainActivity.kt class kotlin
Step 7. Run the application, in the emulator or On your Android device
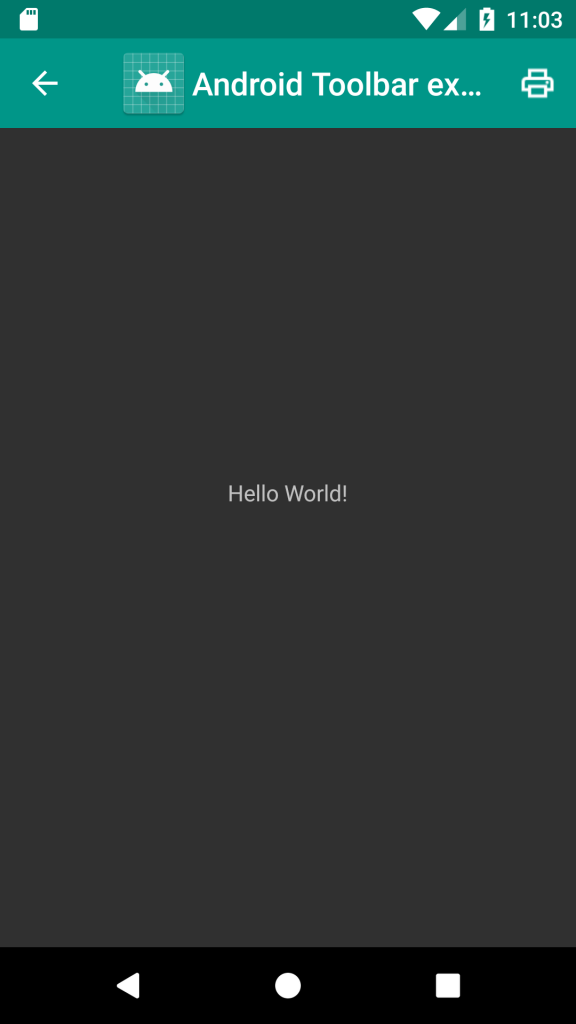
Output screenshot Android Toolbar example in kotlin
Download Android Toolbar example in kotlin source code :
Note : This example (Project) is developed in Android Studio 3.0.1 ,tested on Android 7.1.1 ( Android Nougat), compile SDK version API 26: Android 8.0 (Oreo)
Bonus: Android Toolbar does everything you can do with Android ActionBar, but Toolbar gives you the freedom to do customizations that you can’t do easily with ActionBar.

Degree in Computer Science and Engineer: App Developer and has multiple Programming languages experience. Enthusiasm for technology & like learning technical.
Источник
Android Toolbar Tutorial – XML Layout and Kotlin
Android Tutorial
Android Toolbar widget is used to create menus in the apps. We will learn how to create a Toolbar using the XML layout and Kotlin code. We will implement various toolbar properties in an example Android app.
What is Android Toolbar?
Android Toolbar widget is generally found on the top of the screen. The application title, logo, navigation icon, and the menu bar is displayed inside the toolbar.
The toolbar is the material design replacement for the old and now deprecated ActionBar.
Toolbar Gradle Dependencies
The toolbar is available with the following dependency.
Android Toolbar can be supplied either from the themes or from the layout.
Android Apps Default Toolbar
When you create a new android studio project, you might see that the activity_main.xml doesn’t have any Toolbar defined in the XML. Still, when you see the XML preview, there is a Toolbar with the application name by default at the top.
This is because the following style is defined in the styles.xml, which is ultimately attached in the AndroidManifest.xml file.

Toolbar from Themes
DarkActionBar theme adds the Toolbar at the top of the app by default.
We can change the parent theme in the above image from Theme.AppCompat.Light.DarkActionBar to Theme.AppCompat.Light.NoActionBar to remove the Toolbar that is displayed as a part of the activity theme.
Let’s change the theme and add the Toolbar in the activity_main.xml file.
Toolbar XML Layout
We have added the toolbar in our activity_main.xml layout file using the following code.
This will display a Transparent Toolbar with no text or any other items.
We have to add more properties to utilize Toolbar effectively.
1. Setting Toolbar Background Color
We have to add the following XML attribute in our Toolbar tag for the background color.
2. Setting the Theme
We can set the toolbar theme using the following code.
We are using a default theme for the layout. Dark indicates that the text colors would be light (generally white).
We can also create our own custom themes in the styles.xml file.
3. Setting title, subtitle, icons
- Title: app:title=»Androidly Toolbar»
- Subtitle: app:subtitle=»Sub»
- Logo: app:logo=»@android:drawable/ic_menu_call»
- Navigation Icon: app:navigationIcon=»@drawable/ic_menu_black_24dp»
4. Toolbar Preview
Our toolbar looks like the below image after doing all the above changes.


Toggle the theme to @style/ThemeOverlay.AppCompat.Light and you shall see inverted colors.

Android Toolbar Themes
We can create our own custom styles and assign them as a theme on our Toolbar. This will be much easier than adding all those XML properties.
Let’s use the custom theme in the activity_main.xml file.
The AppTheme style gets updated in the AndroidManifest.xml file. Our Toolbar will look like the below image.

Android Custom Toolbar
We can define our own custom views inside a Toolbar. The following layout defines custom views within the toolbar.

Creating Toolbar using Kotlin Code
We can create toolbars programmatically using Kotlin code. Each of the toolbar XML properties has its equivalent Kotlin methods.
The following MainActivity.kt class is defined below.
Using the as operator, we safely typecast the XML view to the toolbar instance.
The setNavigationOnClickListener triggers a toast message when the navigation icon is clicked from the menu.
Источник


