- Lesson 2.2: How to use margins and paddings in Android layout?
- Step 1. Create a gap between layout elements.
- Step 2. Double margins
- Step 4. Same margin everywhere
- Step 5. Paddings = internal margins
- Step 6. Only for Right-to-Left languages: marginStart, marginEnd, paddingStart and paddingEnd
- Margin vs. Padding Attributes
- Margin and Padding with a View
- Margin → android:layout_margin
- Padding → android:padding
- Margin and Padding with Layout
- Margin
- Padding
- Top padding in android
- Android setPadding(int, int, int, int) method
- Android setPaddingRelative(int, int, int, int) method
- Example
- Top padding in android
- Attributes
- Example
Lesson 2.2: How to use margins and paddings in Android layout?
There are two layout options that could lead to similar effects, but generally have different application: margins and paddings. Both define free space, but margins work outside an element boundaries and paddings inside an element.
Step 1. Create a gap between layout elements.
In LinearLayout that we created in the previous lesson TextViews were touching each other. Let’s move them away a bit. To achieve this in horizontal layout we could add right margin to first and second element or left margin to second and third element. Margin sizes are defined as other dimensions, preferably in density-independent points (dp).
This is a sample code with right margins (android:layout_marginRight):

Right margin reserve a space on the right side of an element, so the next element would be move more to right (Android Studio)
If we switch our LinearLayout to vertical instead of right or left margins we would need top or bottom ones. Top margins we have to add to second and third TextView, bottom to first or second.
This is a sample code with top margins (android:layout_marginTop):

Similar effect as with left and right margins. Due to layout_marginTop elements aren’t so close to each other (Android Studio)
This is not of big use, but margin dimensions don’t have to be integer values – they are float. You could define a margin like 20.5dp or 19.99dp.
Step 2. Double margins
If we have two layout elements next to each other and they have margins “towards” themselves (one left another right or one bottom another top) the gap between would be a sum of both margin values.
For instance the gap between following elements would equal 40dp.
Step 3. Move element from the edge of the screen
In the previous steps we were using margins to move away elements from each other. But if the element is next to screen borders, you could use margins to move it away from them too.
Let’s define marginTop and marginLeft for the first TextView. Now you can see that it’s not anymore touching screen edges.

Margins help us to move elements from the screen edges (Android Studio)
Step 4. Same margin everywhere
If we want to have the same margin for left, right, top and bottom we could use general attribute: android:layout_margin instead of for separated ones.
But if we want to differentiate just one margin, we have to specify all of them.
Step 4. Margins below 0 – weird, but possible
What happen when we define margins below zero? Element would shift from its standard position exactly in the same manner as with positive margin, but in opposite direction.
In our example we have red, green and finally blue colored TextViews. If we set negative margin for the last element, we could shift it over previous TextViews or put it between or before them.

The last layout element is not last anymore due to negative margin value (Android Studio)
This allows us to do some layout tricks, but also could leads to problems – some elements could unintentionally cover others.
Step 5. Paddings = internal margins
All what we have learn about margins is true for paddings. So they could be left, right, top, bottom, general, positive, negative and not only integer. But they work not outside element, but inside it. They move away content by defined value from edges of its container.
If we define paddings for the first TextView as 10dp, it would be much bigger as the text inside is moved by 10dp from each border.

Paddings define space between content inside layout element and edges of that element (Android Studio)
If we want to move all element from the left edge of screen instead of defining left margin for all of them we could define left padding for the root layout element, so in our case LinearLayout tag.
This is sample code for android:paddingLeft:

In TextView padding is shifting a text inside it, but in LinearLayout padding is shifting all layout elements (Android Studio)
If we define paddings below zero, layout element would become smaller as part of its content would be hidden, so it’s not very useful.
Step 6. Only for Right-to-Left languages: marginStart, marginEnd, paddingStart and paddingEnd
If we write and read from left side, before the text we have left margin or left padding. But if we read and write from right side (like in Arabic or Hebrew), we have right margin or right padding before text. And how to deal with it when our app is universal and support LTR and RTL languages? We could use marginStart and marginEnd as well as paddingStart and paddingEnd attributes. They work exactly in the same way as other margins and paddings, but set the space before or after the text .Be aware that those attributes were added in Android 4.2.
Summary: Margins and paddings help to arrange layout elements. Using them you could easily set gaps between elements, shift some elements and make more space around elements content.
Источник
Margin vs. Padding Attributes
There is always a confusion between the padding and margin attribute when you just start designing User interfaces. Be it web development or Android development, margin and padding is standard parameters to position and style User interface elements.
Both provides extra space/gap inside or outside the container. Then what’s the exact difference? Let’s get it cleared. In simple words, margin means to push outside, whereas padding means to push inside.
Now, lets understand what happens when we use these attributes for a View in Android.
Margin and Padding with a View
Let’s see how we can use these attributes with a View in android and how it affects the View’s position and styling.
Margin → android:layout_margin
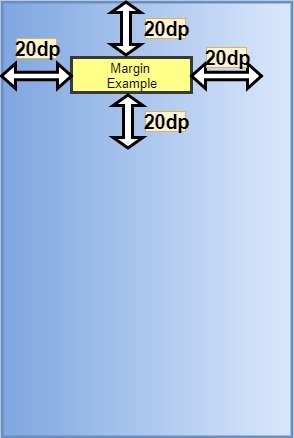
When we say push outside, the view i.e the rectangle pushes its surrounding contents from itself by the dimension specified in the margin attribute. Here, the surrounding contents can be other Views. The following diagram will make it more clear.
Here is how we secify this is our layout XML:
Hence, the other views will be separated from this view by at least 20dp.
We can also different margin values for all the sides, like:
Padding → android:padding
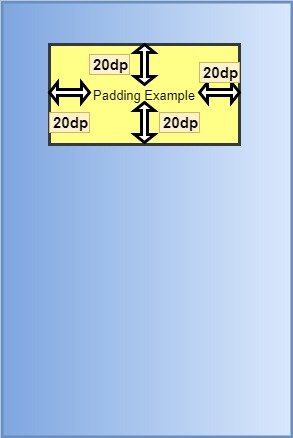
When we say push inside, the view i.e the rectangle pushes its contents from itself by the dimension specified in the padding attribute towards its center. Padding can be considered as margin but inside the View. The following diagram will make it more clear.
Here is how we secify this is our layout XML:
Hence, its content (here text) will be pushed inside of the rectangle by 20dp.
We can also different padding values for all the sides, like:
Margin and Padding with Layout
Now, lets understand what happens when we write these attributes for a Layout.
Margin
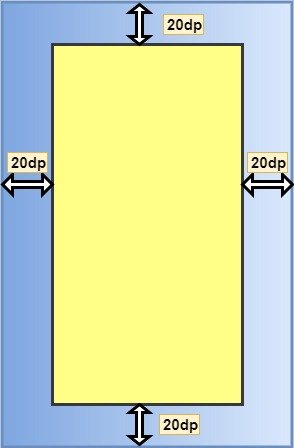
When we say push outside, the root layout i.e the rectangle pushes its surrounding contents from itself by the dimension specified in the margin attribute. Here, the surrounding content will be the screen of the mobile. Hence, the layout(rectangle) pushes itself from the screen of the mobile. The following diagram will make it more clear.
The syntax to apply margin to a layout is similar to that for a view.
Padding
When we say push inside, the root layout i.e the rectangle pushes its contents from itself by the dimension specified in the padding attribute. Here, its content will be the different views that it holds like TextView, ImageView etc. The following diagram will make it more clear.

Note: In Android, padding attribute applied to the parent(root layout) looks the same as margin attribute applied to the child(views inside the layout).
Источник
Top padding in android
In the previous lesson, we learned how to work with Margin in Android Layouts. In this lesson, we will learn how to work with Padding in Android Layout. Padding is within the view and expressed in Android in pixels for the left, top, right and bottom parts of the view.
Here, we will learn what is padding and how it can be worked easily on Android layout. Demo app will be shown to make it easy for a Beginner to understand.
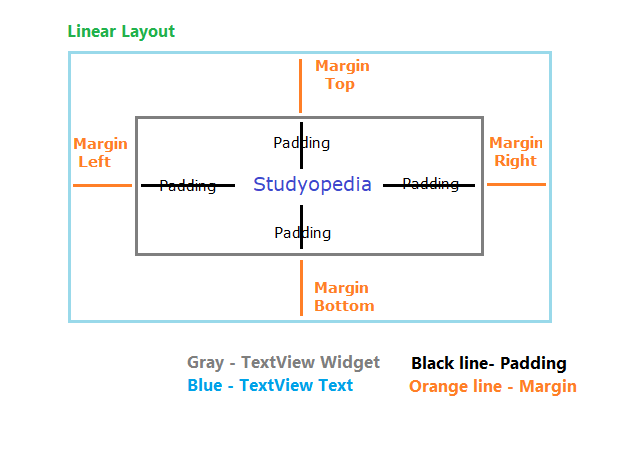
Let’s start with the following illustration, explaining the concept of Padding in Linear Layout. Here the text Studyopedia, is our TextView text. Whereas, the Gray rectangular Box is the space for our View TextView.
A widget in Android occupies a rectangular space. Black line shows padding,

For example, a right padding of 2 will push the view’s content by 2 pixels to the left of the right edge.
The following methods are used to set padding,
setPadding(int, int, int, int): Sets Padding
setPaddingRelative(int, int, int, int): Sets relative padding
Let’s learn about the above two methods,
Android setPadding(int, int, int, int) method
It sets the padding. Here’s the syntax for setPadding() method,
left: left padding in pixels
top: top padding in pixels
right: right padding in pixels
bottom: bottom padding in pixels
Android setPaddingRelative(int, int, int, int) method
It sets the relative padding. Here’s the syntax for setPaddingRelative() method,
start: start padding in pixels
top: end padding in pixels
end: end padding in pixels
bottom: bottom padding in pixels
Padding can be queried by calling the following methods. The methods return the padding value of this view,
| Method | Description |
|---|---|
| getPaddingLeft() | It returns the left padding. |
| getPaddingTop() | It returns the top padding. |
| getPaddingRight() | It returns the right padding. |
| getPaddingBottom() | It returns the bottom padding. |
| getPaddingStart() | It returns the start padding depending on its resolved layout direction. |
| getPaddingEnd() | It returns the end padding depending on its resolved layout direction. |
Example
Time for some examples of the usage of padding in Android, with the emulator output.
Note:
If the minSdkVersion is 17 or higher, then
Use paddingStart instead of paddingLeft attribute, &
Use paddingEnd instead of paddingRight attribute.
If the minSdkVersion is 16 or less, then
Use both older paddingLeft and paddingStart attribute, &
paddingRight and paddingEnd attribute.
Let’s say, you have the following code for TextView, without padding,
Источник
Top padding in android
In simple terms, Margin in Android is outside the view. A View can be a Button, EditText, TextView, etc. Here, we will learn what are margins and how it can be worked easily on Android Layout. Demo app will be shown to make it easy for a Beginner to understand.
Let’s start with the following illustration, explaining the concept of Margins in Linear Layout. Here the text Studyopedia, is our TextView text. Whereas, the Gray rectangular Box is the space for our View TextView. A widget in Android occupies a rectangular space,
Note:
If the minSdkVersion is 17 or more, then
Use layout_marginStart instead of layout_marginLeft attribute, and
Use layout_marginEnd instead of layout_marginRight attribute.
If the minSdkVersion is 16 or less, then
Use both older layout_marginLeft and layout_marginStart attribute, and
layout_marginRight and layout_marginEnd attribute.
Here’s the demo code with Button UI widget, which will be discussed in a broader way later, with more examples,
Attributes
Here are the various attributes of margins in Android,
| Method | Description |
|---|---|
| android:layout_width | Sets the width of the view. |
| android:layout_height | Sets the height of the view. |
| android:layout_margin | Add extra space on the left, top, right and bottom sides of the view. |
| android:layout_marginLeft | Add extra space on the left side of the view. |
| android:layout_marginTop | Add extra space on the top side of the view. |
| android:layout_marginRight | Add extra space on the right side of this view. |
| android:layout_marginBottom | Add extra space on the bottom side of the view. |
| android:layout_marginStart | Add extra space on the start side of the view. |
| android:layout_marginEnd | Add extra space on the end side of the view. |
| android:layout_marginHorizontal | Add extra space on the left and right sides of this view. |
| android:layout_marginVertical | Add extra space on the top and bottom sides of this view. |
Example
Time for some examples with the emulator output,
Let’s say, you have the following code for TextView, without margin,
Источник


