- Полный список
- Touch in Android
- Gestures
- Custom Gestures
- Creating Custom Gestures
- Using Custom Gestures
- Handling single and multi touch on Android — Tutorial
- 1. Android Touch
- 1.1. Android touch basics
- 1.2. Single touch
- 1.3. Multi touch
- 1.4. GestureDetectors
- 2. Prerequisites
- 3. Exercise: Custom view and touch events
- 3.1. Draw via touch
- 3.2. Allow to pick the line width
- 3.3. Tracking
- 4. Exercise: Multitouch
- 5. Exercise: Using ScaleGestureDetector
Полный список
Раньше мы для View-компонентов использовали OnClickListener и ловили короткие нажатия. Теперь попробуем ловить касания и перемещения пальца по компоненту. Они состоят из трех типов событий:
— нажатие (палец прикоснулся к экрану)
— движение (палец движется по экрану)
— отпускание (палец оторвался от экрана)
Все эти события мы сможем ловить в обработчике OnTouchListener, который присвоим для View-компонента. Этот обработчик дает нам объект MotionEvent, из которого мы извлекаем тип события и координаты.
На этом уроке рассмотрим только одиночные касания. А мультитач – на следующем уроке.
Project name: P1021_Touch
Build Target: Android 2.3.3
Application name: Touch
Package name: ru.startandroid.develop.p1021touch
Create Activity: MainActivity
strings.xml и main.xml нам не понадобятся, их не трогаем.
MainActivity реализует интерфейс OnTouchListener для того, чтобы выступить обработчиком касаний.
В onCreate мы создаем новый TextView, сообщаем ему, что обработчиком касаний будет Activity, и помещаем на экран.
Интерфейс OnTouchListener предполагает, что Activity реализует его метод onTouch. На вход методу идет View для которого было событие касания и объект MotionEvent с информацией о событии.
Методы getX и getY дают нам X и Y координаты касания. Метод getAction дает тип события касания:
ACTION_DOWN – нажатие
ACTION_MOVE – движение
ACTION_UP – отпускание
ACTION_CANCEL – практически никогда не случается. Насколько я понял, возникает в случае каких-либо внутренних сбоев, и следует трактовать это как ACTION_UP.
В случае ACTION_DOWN мы пишем в sDown координаты нажатия.
В случае ACTION_MOVE пишем в sMove координаты точки текущего положения пальца. Если мы будем перемещать палец по экрану – этот текст будет постоянно меняться.
В случае ACTION_UP или ACTION_CANCEL пишем в sUp координаты точки, в которой отпустили палец.
Все это в конце события выводим в TextView. И возвращаем true – мы сами обработали событие.
Теперь мы будем водить пальцем по экрану (курсором по эмулятору) в приложении, и на экране увидим координаты начала движения, текущие координаты и координаты окончания движения.
Все сохраним и запустим приложение.

Ставим палец (курсор) на экран

Если вчерашний вечер не удался, голова не болит, рука тверда и не дрожит :), то появились координаты нажатия.
Если же рука дрогнула, то появится еще и координаты перемещения.

Продолжаем перемещать палец и видим, как меняются координаты Move.
Теперь отрываем палец от экрана и видим координаты точки, в которой это произошло

В целом все несложно. При мультитаче процесс немного усложнится, там уже будем отслеживать до 10 касаний.
Если вы уже знакомы с техникой рисования в Android, то вполне можете создать приложение выводящее на экран геометрическую фигуру, которую можно пальцем перемещать. Простейший пример реализации можно посмотреть тут: http://forum.startandroid.ru/viewtopic.php?f=28&t=535.
На следующем уроке:
— обрабатываем множественные касания
Присоединяйтесь к нам в Telegram:
— в канале StartAndroid публикуются ссылки на новые статьи с сайта startandroid.ru и интересные материалы с хабра, medium.com и т.п.
— в чатах решаем возникающие вопросы и проблемы по различным темам: Android, Kotlin, RxJava, Dagger, Тестирование
— ну и если просто хочется поговорить с коллегами по разработке, то есть чат Флудильня
— новый чат Performance для обсуждения проблем производительности и для ваших пожеланий по содержанию курса по этой теме
Источник
Touch in Android
Much like iOS, Android creates an object that holds data about the user’s physical interaction with the screen – an Android.View.MotionEvent object. This object holds data such as what action is performed, where the touch took place, how much pressure was applied, etc. A MotionEvent object breaks down the movement into to the following values:
An action code that describes the type of motion, such as the initial touch, the touch moving across the screen, or the touch ending.
A set of axis values that describe the position of the MotionEvent and other movement properties such as where the touch is taking place, when the touch took place, and how much pressure was used. The axis values may be different depending on the device, so the previous list does not describe all axis values.
The MotionEvent object will be passed to an appropriate method in an application. There are three ways for a Xamarin.Android application to respond to a touch event:
Assign an event handler to View.Touch — The Android.Views.View class has an EventHandler which applications can assign a handler to. This is typical .NET behavior.
Implementing View.IOnTouchListener — Instances of this interface may be assigned to a view object using the View. SetOnListener method.This is functionally equivalent to assigning an event handler to the View.Touch event. If there is some common or shared logic that many different views may need when they are touched, it will be more efficient to create a class and implement this method than to assign each view its own event handler.
Override View.OnTouchEvent — All views in Android subclass Android.Views.View . When a View is touched, Android will call the OnTouchEvent and pass it a MotionEvent object as a parameter.
Not all Android devices support touch screens.
Adding the following tag to your manifest file causes Google Play to only display your app to those devices that are touch enabled:
Gestures
A gesture is a hand-drawn shape on the touch screen. A gesture can have one or more strokes to it, each stroke consisting of a sequence of points created by a different point of contact with the screen. Android can support many different types of gestures, from a simple fling across the screen to complex gestures that involve multi-touch.
Android provides the Android.Gestures namespace specifically for managing and responding to gestures. At the heart of all gestures is a special class called Android.Gestures.GestureDetector . As the name implies, this class will listen for gestures and events based on MotionEvents supplied by the operating system.
To implement a gesture detector, an Activity must instantiate a GestureDetector class and provide an instance of IOnGestureListener , as illustrated by the following code snippet:
An Activity must also implement the OnTouchEvent and pass the MotionEvent to the gesture detector. The following code snippet shows an example of this:
When an instance of GestureDetector identifies a gesture of interest, it will notify the activity or application either by raising an event or through a callback provided by GestureDetector.IOnGestureListener . This interface provides six methods for the various gestures:
OnDown — Called when a tap occurs but is not released.
OnFling — Called when a fling occurs and provides data on the start and end touch that triggered the event.
OnLongPress — Called when a long press occurs.
OnScroll — Called when a scroll event occurs.
OnShowPress — Called after an OnDown has occurred and a move or up event has not been performed.
OnSingleTapUp — Called when a single tap occurs.
In many cases applications may only be interested in a subset of gestures. In this case, applications should extend the class GestureDetector.SimpleOnGestureListener and override the methods that correspond to the events that they are interested in.
Custom Gestures
Gestures are a great way for users to interact with an application. The APIs we have seen so far would suffice for simple gestures, but might prove a bit onerous for more complicated gestures. To help with more complicated gestures, Android provides another set of API’s in the Android.Gestures namespace that will ease some of the burden associated with custom gestures.
Creating Custom Gestures
Since Android 1.6, the Android SDK comes with an application pre-installed on the emulator called Gestures Builder. This application allows a developer to create pre-defined gestures that can be embedded in an application. The following screen shot shows an example of Gestures Builder:
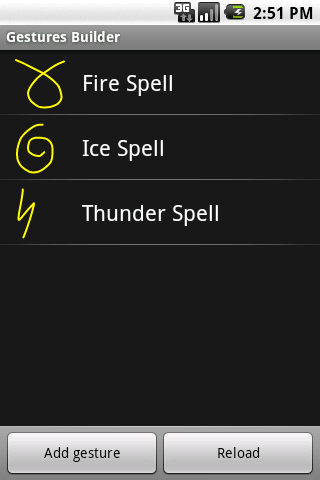
An improved version of this application called Gesture Tool can be found Google Play. Gesture Tool is very much like Gestures Builder except that it allows you to test gestures after they have been created. This next screenshot shows Gestures Builder:

Gesture Tool is a bit more useful for creating custom gestures as it allows the gestures to be tested as they are being created and is easily available through Google Play.
Gesture Tool allows you create a gesture by drawing on the screen and assigning a name. After the gestures are created they are saved in a binary file on the SD card of your device. This file needs to be retrieved from the device, and then packaged with an application in the folder /Resources/raw. This file can be retrieved from the emulator using the Android Debug Bridge. The following example shows copying the file from a Galaxy Nexus to the Resource directory of an application:
Once you have retrieved the file it must be packaged with your application inside the directory /Resources/raw. The easiest way to use this gesture file is to load the file into a GestureLibrary, as shown in the following snippet:
Using Custom Gestures
To recognize custom gestures in an Activity, it must have an Android.Gesture.GestureOverlay object added to its layout. The following code snippet shows how to programmatically add a GestureOverlayView to an Activity:
The following XML snippet shows how to add a GestureOverlayView declaratively:
The GestureOverlayView has several events that will be raised during the process of drawing a gesture. The most interesting event is GesturePerformed . This event is raised when the user has completed drawing their gesture.
When this event is raised, the Activity asks a GestureLibrary to try and match the gesture that the user with one of the gestures created by Gesture Tool. GestureLibrary will return a list of Prediction objects.
Each Prediction object holds a score and name of one of the gestures in the GestureLibrary . The higher the score, the more likely the gesture named in the Prediction matches the gesture drawn by the user. Generally speaking, scores lower than 1.0 are considered poor matches.
The following code shows an example of matching a gesture:
Источник
Handling single and multi touch on Android — Tutorial
Single and multi touch in Android. This tutorial describes how to use the touch API in Android applications.
1. Android Touch
1.1. Android touch basics
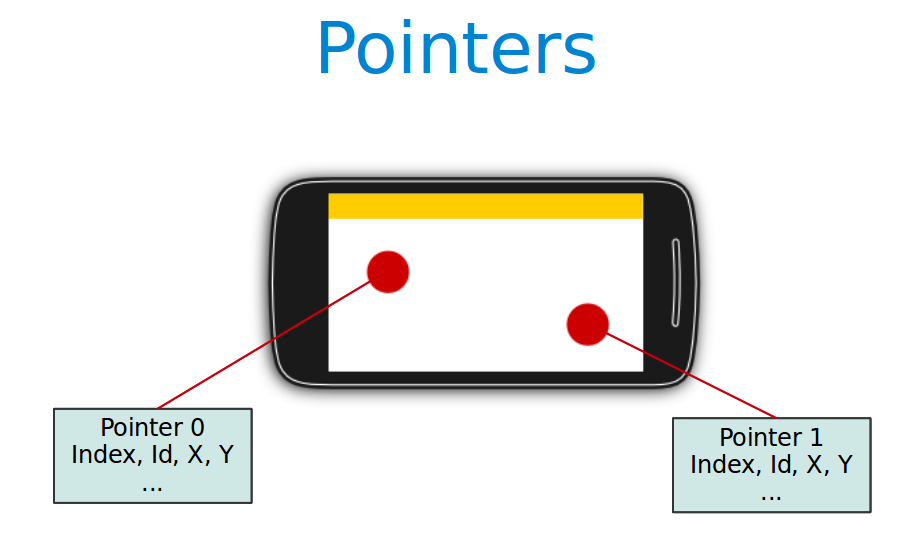
The Android standard View class support touch events. You can react to touch events in your custom views and your activities. Android supports multiple pointers, e.g. fingers which are interacting with the screen.
The base class for touch support is the MotionEvent class which is passed to Views via the onTouchEvent() method.
To react to touch events
you override the onTouchEvent() method.
The MotionEvent class contains the touch related information, e.g., the number of pointers, the X/Y coordinates and size and pressure of each pointer.
This method returns true if the touch event has been handled by the view. Android tries to find the deepest view which returns true to handles the touch event. If the view is part of another view (parent view), the parent can claim the event by returning true from the onInterceptTouchEvent() method. This would send an MotionEvent.ACTION_CANCEL event to the view which received previously the touch events.
To react to touch events in an activity, register an OnTouchListener for the relevant Views .
1.2. Single touch
If single input is used you can use the getX() and getY() methods to get the current position of the first finger.
Via the getAction() method you receive the action which was performed. The MotionEvent class provides the following constants to determine the action which was performed.
| Event | Description |
|---|---|
| Multitouch can not be tested on the emulator. You need a real Android device as input device. |
1.4. GestureDetectors
Android provide the GestureDetector class which allow to consume MotionEvents and to create higher level gesture events to listeners.
For example the ScaleGestureDetector class allows to determine the predefined gesture of increasing and decreasing the size of the object via two fingers.
2. Prerequisites
The following assumes that you have already basic knowledge in Android development.
3. Exercise: Custom view and touch events
3.1. Draw via touch
This exercise demonstrates the handling of (single) touch events within a custom view.
Create an Android project called com.vogella.android.touch.single with the activity called SingleTouchActivity. This activity uses a DialogFragment to set the color which is used for drawing.
Create the following layout called fragment_colorpicker.xml .
Create the following TouchEventView class which implements a View which supports single touch.
Adjust the activity_main.xml layout file to the following.
Add this view to your activity.
If you run your application you will be able to draw on the screen with your finger (or with the mouse in the emulator).
Change your coding so that you use a layout definition based on XML.
To use your own view in an XML layout definition you have to use the full-qualified class name (class including package information).
3.2. Allow to pick the line width
Add a menu to your application
3.3. Tracking
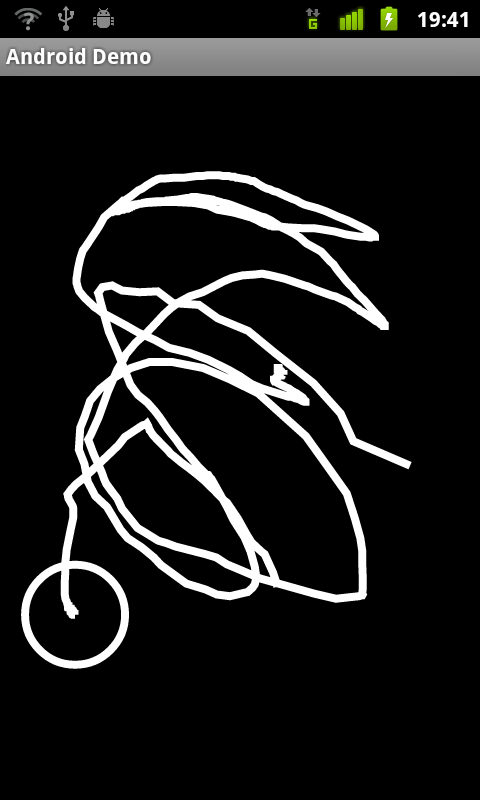
Add code to your drawing example so that the current position of a finger is marked via a circle. To draw a circle you can use the addCircle(x, y, 50, Path.Direction.CW) method call on a Path or use the canvas element directly.
Make sure that only the current position is highlighted with a circle. The circle should appears as soon as the finger goes down and vanish once the finger goes up.
The result should look like the following.
4. Exercise: Multitouch
In this exercise you create a view which support multitouch and allows you to track several fingers on your device. On the Android emulator you can only simulate singletouch with the mouse.
Create an Android project called com.vogella.android.multitouch with an activity called MainActivity.
Create the following MultitouchView class.
Add this view to the layout of your activity.
Your generated activity can remain the same.
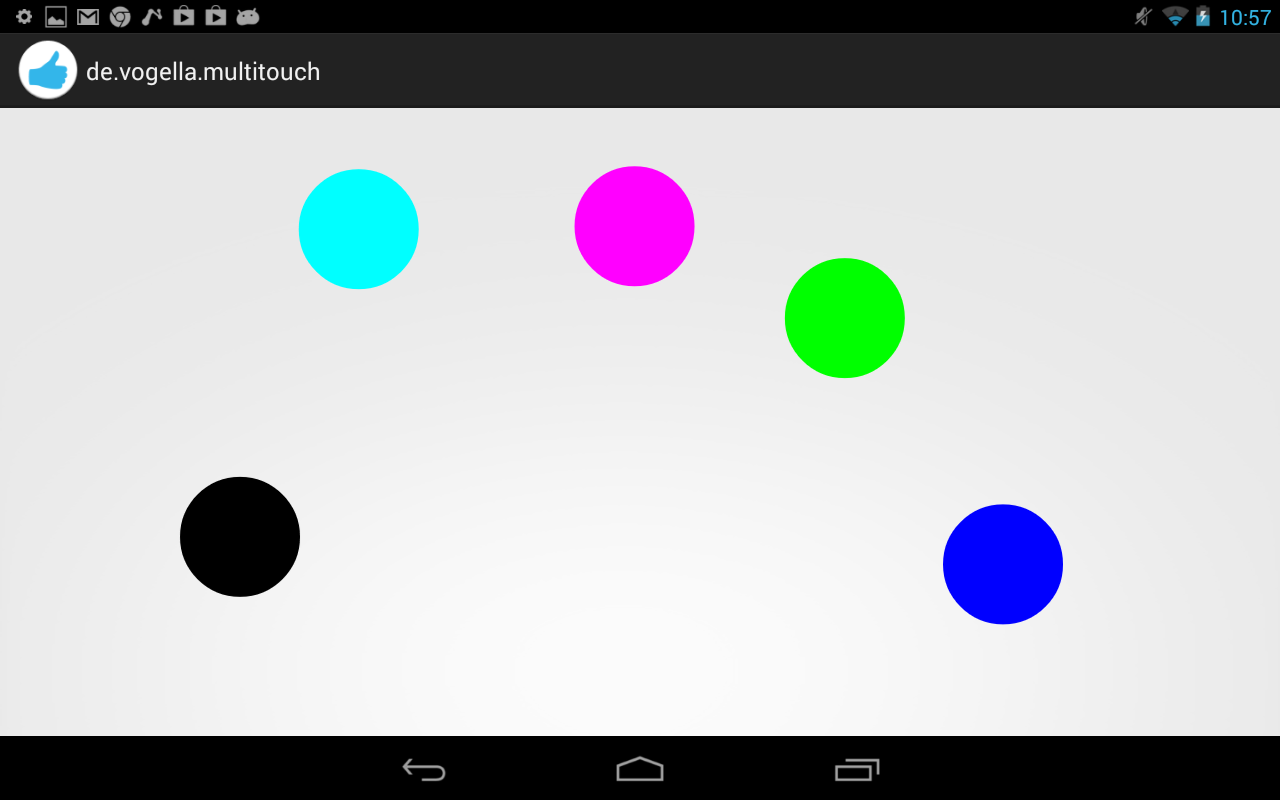
If you run your application you will be able to draw on the screen with your fingers. Every device has an upper limit how many pointers are supported, test out how many simultaneous pointers your device supports. This application should look similar to the following screenshot.
5. Exercise: Using ScaleGestureDetector
Create the Android project called de.vogella.android.touch.scaledetector with an activity called ScaleDetectorTestActivity.
Create the following class.
Add this view to your activity.
If you run your application you should be able to shrink and enlarge the image via a multi-touch gesture (pitch zoom).
Источник


