- How to Transfer Data from Android to iPhone 13/12/11/XS/X/8/7
- 3 Steps to Transfer Data from Android to iPhone in 1 Click
- Step 1. Run the Android to iPhone Data Transfer Tool
- Step 2. Choose «Phone Transfer» feature
- Step 3. Transfer SMS, Contacts, Calendar, Photos, Video and Music from Android to iPhone
- Part2: Free Ways to Transfer Data from Android to iPhone 13/12/11/X/8/7
- 2.1 Transfer contacts from Android to iPhone (10 MINS)
- 2.2 Sync Notes, Email and Calendars from Android to iPhone (10 MINS)
- 2.3 Transfer Music and Video from Android to iPhone (10 MINS)
- 2.4 Get Android Apps on iPhone (60 MINS)
- 2.5 Transfer Photos from Android to iPhone (10 MINS, Free Way)
- 2.6 Sync documents to iPhone from Android (20 MINS, Free Way)
- Move from Android to iPhone, iPad, or iPod touch
- Before you begin
- Tap Move Data from Android
- Open the Move to iOS app
- Wait for a code
- Use the code
- Connect to a temporary Wi-Fi network
- Choose your content and wait
- Set up your iOS device
- Finish up
- If you need help with the transfer
- If you need help after the transfer
How to Transfer Data from Android to iPhone 13/12/11/XS/X/8/7


Want to switch from Android to a new iPhone 13? That’s nice. However, I guess that it may worry you a lot about how to transfer data from Android to iPhone. Don’t worry! There are some ways to move data from Android phones to your iPhone, making it possible to migrate all your important data safely.
3 Steps to Transfer Data from Android to iPhone in 1 Click
- Contacts in account: MobileTrans — Phone Transfer can transfer contacts on Twitter, Facebook, Google, and any account supported by your Android device. Therefore, please make sure whether you want to transfer contacts in the accounts or not. If yes, please sign in the accounts on your Android device.
- One-click Backup and Restore: Use this mode when you only have one phone at hand. Just backup data on your Android phone to the computer, and restore it to your iPhone whenever you need it.
Step 1. Run the Android to iPhone Data Transfer Tool
Run MobileTrans — Phone Transfer, the best Android to iPhone data transfer tool on the computer, and you will see the window as follows. After then, connect your Android phone and your iPhone with the computer via USB cables respectively. Make sure that both devices can be successfully detected by your computer.
![]()
Step 2. Choose «Phone Transfer» feature
In the main window, choose the «Phone Transfer» mode, and you will see the program displays as follows. You can use the «Flip» button to switch the places of your phones and make sure that the iPhone is the destination one.
![]()
Step 3. Transfer SMS, Contacts, Calendar, Photos, Video and Music from Android to iPhone
After then, you can see that all contents that can be transferred are listed in the middle of the window. Check the wanted files and click «Start «. During the process, never to disconnect either device. Then all the data will be transferred from Android to iPhone 13/12/11/XS/X/8/7.
![]()
To learn more about how to transfer data from Android to iPhone, follow this video:
Part2: Free Ways to Transfer Data from Android to iPhone 13/12/11/X/8/7
As we can see above, we can transfer data from Android to iPhone by MobileTrans — Phone Transfer. If you’d like to find a free way to transfer data from Android to iPhone, please check the blow parts.
2.1 Transfer contacts from Android to iPhone (10 MINS)
To transfer Android contacts to iPhone 13/12/11/X/8/7, you can save all contacts on the Android SD card, and upload to your accounts, like Google, Yahoo!, iCloud, and then sync to your iPhone. In the following part, I’d like to show you how to make it via Google account.

Step 1. On your Android phone, go to the Contacts app. Tap the button on the left of the home button to show the menu list. Tap Import/Export.

Step 2. Click Export to USB storage> > OK to save the contact list to your SD card. Connect your Android phone with your computer via a USB cable as a disk. Open the SD card file to export the vCard file to your computer.

Step 3. Open your Gmail webpage on your computer. Click Gmail > click Contacts to show the contact control panel. Click More > Import…. > click Choose File to select the vCard file you have saved in steps 2 to import it.

Step 4. On your iPhone, click Settings > Mail, Contacts, Calendars > Add Account. > Google. Log in with your Gmail account and tap Next to finish the setup. Turn on Contacts. Then, contacts will be synced to your iPhone).
2.2 Sync Notes, Email and Calendars from Android to iPhone (10 MINS)
Your Android phone features the Google sync and enjoys syncing all your important calendars to Google account. Great. You can sync calendars from Google to the iPhone easily. Combine these two steps, you can transfer data from Android to iPhone successfully.
Follow the easy steps below:
Step 1. On your Android phone, click Settings. Scroll down the screen to find Account & sync. Find your Gmail account and tap Sync Calendars. Then, tap Sync Now to update the calendars to your Gmail account. Contacts can also be synced at the same time.
Step 2. On your iPhone, tap Settings and go to Mail, Contacts, Calendars and click Add Account. Choose Gmail and enter your Gmail account info, like name, email address, password. Tap Next and turn on Calendars, Email, and Note. Then, the syncing process begins.

2.3 Transfer Music and Video from Android to iPhone (10 MINS)
Can’t wait to bring music and video on your Android phone to the iPhone 13? No problem. iTunes can do that for you easily.
Step 1. Connect your Android phone to the computer and save music and videos on it to the computer. Install iTunes on the computer. Run it and get your iPhone connected with a USB cable.

Step 2. In the iTunes Window, click File > Add Folder to Library…. Browse your computer to find the music and video folder and transfer video and music to iTunes Library.

Step 3. Click your iPhone under DEVICES to get the iPhone control panel. Click Music tab > Sync Music. Tick your wanted music or playlists and click Apply.

Step 4. To transfer video from Android to iPhone, you can click Movies, TV Shows, or other video categories. Then, Tick your wanted videos and click Apply.

2.4 Get Android Apps on iPhone (60 MINS)
What to run Android apps on the iPhone? To your regret, Android apps don’t work on the iPhone (iOS 14 supported). However, many Android apps have iPhone versions or replacements that do the same things. You can search and get such apps from the App Store in iTunes easily.
Additionally, if some apps need you to create an account for playing or stores your data in the cloud, the data will come with you when moving to the iPhone. Or, the data will be lost after installing them on your new iPhone. Thus, after switching from Android to iPhone, you can get what you want from the App Store or search the internet for getting the best free apps for iPhone.

2.5 Transfer Photos from Android to iPhone (10 MINS, Free Way)
You probably don’t want to lose hundreds of thousands of photos that record your priceless memories. Here is a way out. To transfer Android photos to iPhone, you can draw support from iTunes.
At the very beginning, mount your Android phone on the computer as a USB drive. Drag and drop all your desired photos in a folder on your computer. Connect your iPhone to the computer by plugging in a USB cable. By clicking your iPhone, you get the control panel. Go to Photos and tick Sync Photos from and find the photo folder. Go to the lower right corner and click Apply to sync photos from Android to iPhone.

2.6 Sync documents to iPhone from Android (20 MINS, Free Way)
Want to bring your documents, like Excel, PPT, PDF, TXT, DOC, and more to your new iPhone for viewing on the go? To make it, Dropbox is a good helper for you. It lets you upload your wanted documents to the cloud without any hassle. Then, launch the Dropbox on your iPhone to view or edit any documents you want. Learn more about Dropbox.
Источник
Move from Android to iPhone, iPad, or iPod touch
Ready to transfer to iOS? Download the Move to iOS app to get help switching from your Android device to your new iPhone, iPad, or iPod touch.
If you can’t use the Google Play Store, learn how to download Move to iOS.
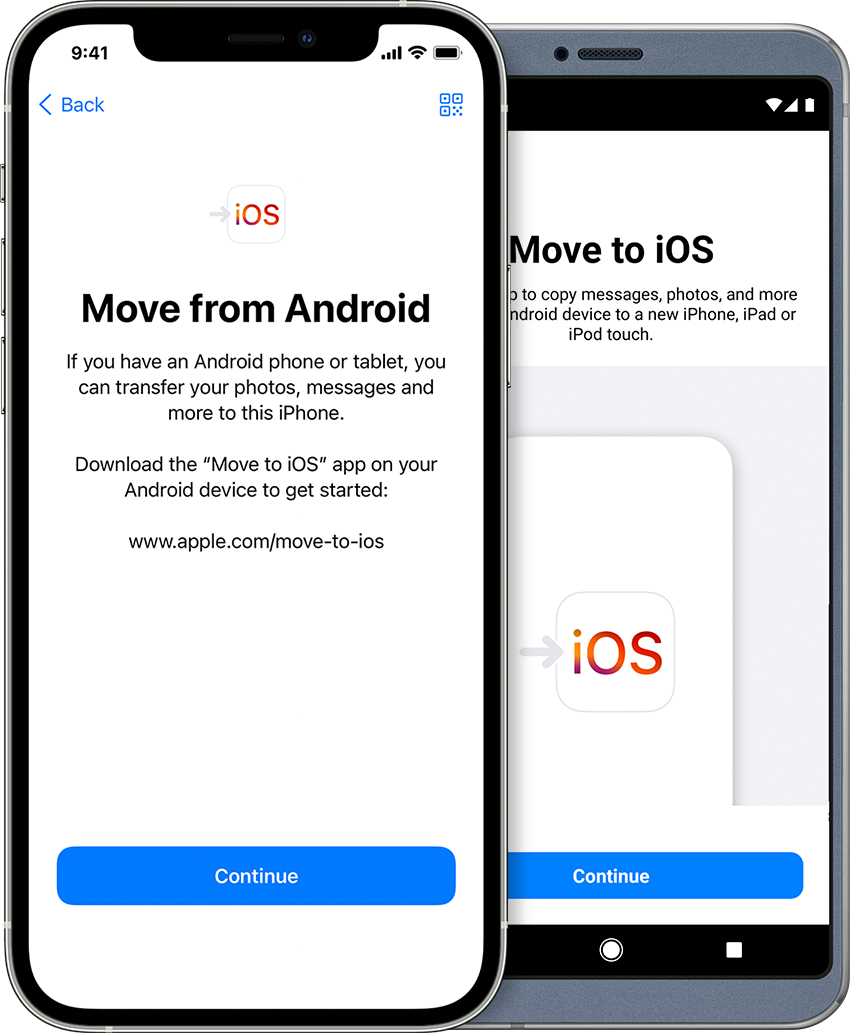
Before you begin
- On your Android device, make sure that Wi-Fi is turned on.
- Plug your new iOS device and your Android device into power.
- Make sure that the content you’re moving, including what’s on your external Micro SD card, will fit on your new iOS device
- If you want to transfer your Chrome bookmarks, update to the latest version of Chrome on your Android device.

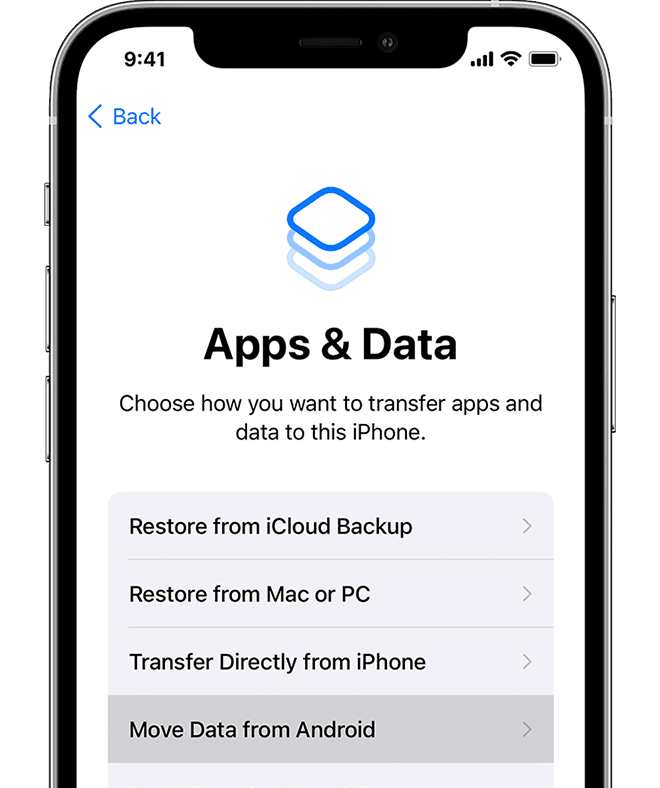
Tap Move Data from Android
While you set up your new iOS device, look for the Apps & Data screen. Then tap Move Data from Android. (If you already finished setup, you need to erase your iOS device and start over. If you don’t want to erase, just transfer your content manually.)
Open the Move to iOS app
On your Android device, open the Move to iOS app. If you don’t have the Move to iOS app, you can tap the QR code button on your new iOS device and scan the QR code using the camera on your Android device to open the Google Play Store. Tap Continue, and read the terms and conditions that appear. To continue, tap Agree.
Wait for a code
On your iOS device, tap Continue when you see the Move from Android screen. Then wait for a ten-digit or six-digit code to appear. If your Android device shows an alert that you have a weak internet connection, you can ignore the alert.
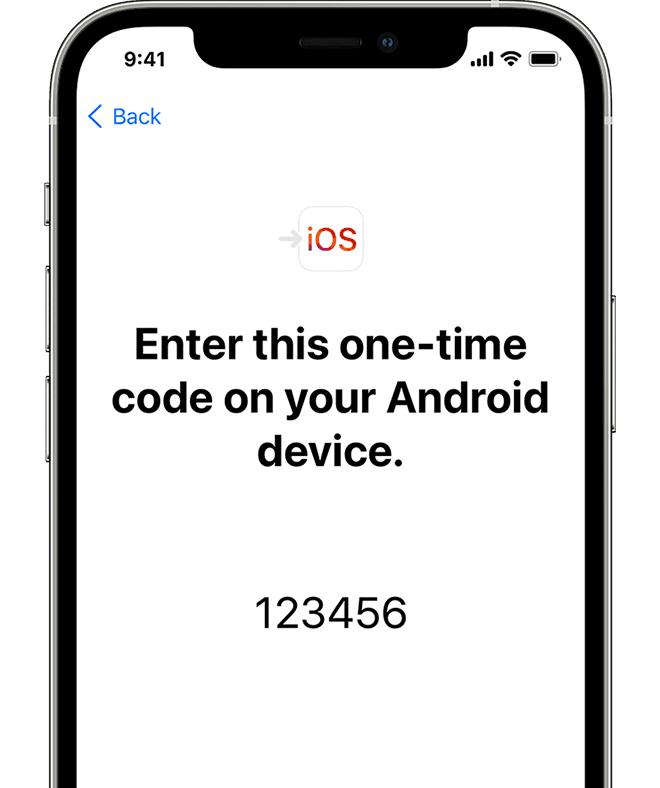
Use the code
Enter the code on your Android device.
Connect to a temporary Wi-Fi network
Your iOS device will create a temporary Wi-Fi network. When asked, tap Connect to join that network on your Android device. Then wait for the Transfer Data screen to appear.
Choose your content and wait
On your Android device, select the content that you want to transfer and tap Continue. Then—even if your Android device shows that the process is complete—leave both devices alone until the loading bar that appears on your iOS device finishes. The whole transfer can take a while, depending on how much content you’re moving.
Here’s what gets transferred: contacts, message history, camera photos and videos, photo albums, files and folders, accessibility settings, display settings, web bookmarks, mail accounts, and calendars. If they’re available on both Google Play and the App Store, some of your free apps will also transfer. After the transfer completes, you can download any free apps that were matched from the App Store.
Set up your iOS device
After the loading bar finishes on your iOS device, tap Done on your Android device. Then tap Continue on your iOS device and follow the onscreen steps to finish setup for your iOS device.
Finish up
Make sure that all of your content transferred. Music, books, and PDFs need to be moved over manually.
Need to get the apps that were on your Android device? Go to the App Store on your iOS device to download them.
If you need help with the transfer
- Make sure that you leave both devices alone until the transfer finishes. For example, on your Android device, the Move to iOS app should stay onscreen the whole time. If you use another app or get a phone call on your Android before the transfer finishes, your content won’t transfer.
- On your Android device, turn off apps or settings that might affect your Wi-Fi connection, like the Sprint Connections Optimizer or the Smart Network Switch. Then find Wi-Fi in Settings, touch and hold each known network, and forget the network. Then try the transfer again.
- Restart both of your devices and try again.
- On your Android device, turn off your cellular data connection. Then try the transfer again.
If you need help after the transfer
- Get help if Messages doesn’t work as expected after you transfer your content.
- If you don’t see apps from your Android device on your new iOS device, find and download them in the App Store on your new device.
- You might find that only some content transferred and your iOS device ran out of space, or your iOS device might appear full even though the transfer didn’t finish. If so, erase your iOS device and start the transfer again. Make sure that your Android content doesn’t exceed the available space on your iOS device.
Information about products not manufactured by Apple, or independent websites not controlled or tested by Apple, is provided without recommendation or endorsement. Apple assumes no responsibility with regard to the selection, performance, or use of third-party websites or products. Apple makes no representations regarding third-party website accuracy or reliability. Contact the vendor for additional information.
Источник


