- Use iCloud to transfer data from your previous iOS or iPadOS device to your new iPhone, iPad, or iPod touch
- How to transfer your iCloud backup to your new device
- Finish up
- Transfer data from your old iPhone or iPad to a new one
- Before you begin
- Instructions
- Transfer Options
- Choose what data to transfer
- Choose which apps to transfer
- Use the Finder or iTunes to transfer data from your previous iOS device to your new iPhone, iPad, or iPod touch
- How to transfer your backup to your new device
- Finish up
- Use Quick Start to transfer data to a new iPhone, iPad, or iPod touch
- Set up your new device with Quick Start
- 4 Methods to Transfer Apps from iPhone to iPhone 13
- Method 1: How to Transfer Apps from iPhone to iPhone 13 via Quick Start
- Method 2: How to Share Apps from iPhone to iPhone by AirDrop
- Method 3: How to Move Apps from iPhone to iPhone by iTunes
- Method 4: How to Share Apps from iPhone to iPhone by iCloud
- Bonus Tip: Transfer data from iPhone to iPhone by MobileTrans
- MobileTrans — Phone Transfer
- Conclusion
Use iCloud to transfer data from your previous iOS or iPadOS device to your new iPhone, iPad, or iPod touch
Transfer your personal data and purchased content to your new device using your previous device’s iCloud backup.
How to transfer your iCloud backup to your new device
- Turn on your new device. A «Hello» screen should appear. If you’ve already set up your new device, you need to erase it before you can use these steps.*
- Follow the steps until you see the Wi-Fi screen.
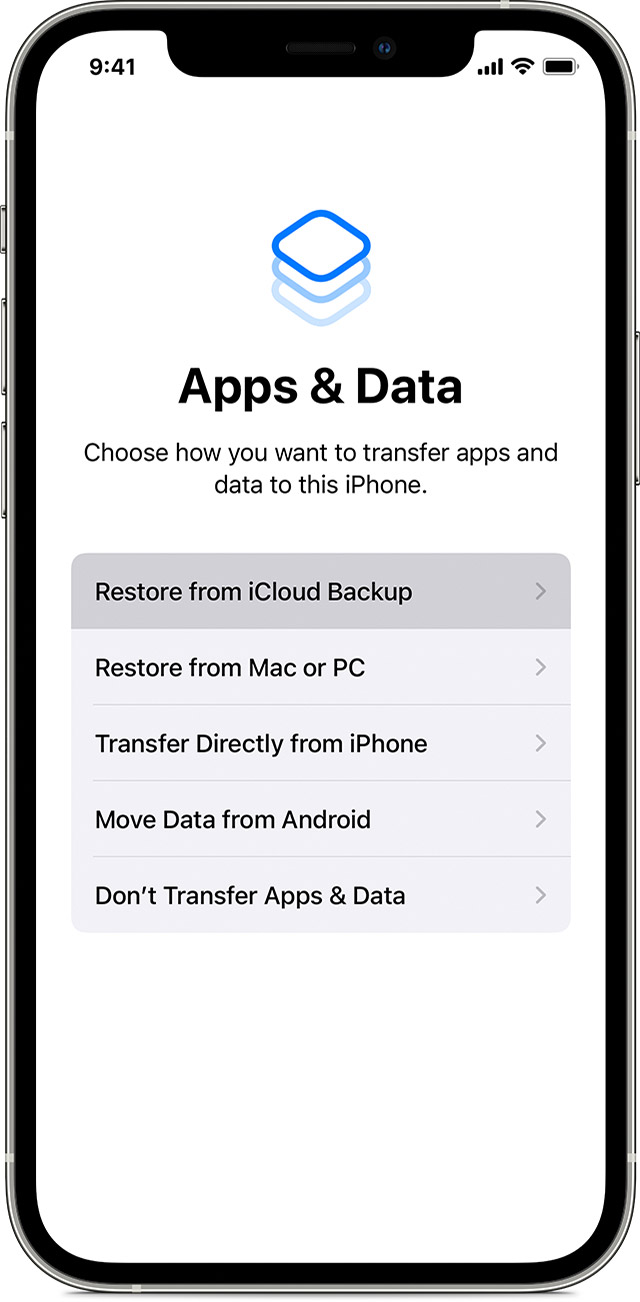
- Tap a Wi-Fi network to join. Follow the steps until you see the Apps & Data screen, then tap Restore from iCloud Backup.
- Sign in to iCloud with your Apple ID and password.
- When asked, choose a backup. Make sure that it’s the correct one by checking the date and size of each. Learn what to do if you’re asked to update to a newer version of iOS or iPadOS.
- If you purchased iTunes or App Store content using multiple Apple IDs, sign in to each. If you can’t remember the passwords, you can skip this step by tapping «Don’t have an Apple ID or forgot it.»
- Stay connected and wait for the restore process to finish, then complete the rest of the onscreen setup steps. If possible, keep your device connected to Wi-Fi and plugged into power after setup. This allows content like your photos, music, and apps stored in iCloud to automatically download back to your device.
* To erase your device that’s using iOS or iPadOS 15 or later, tap Settings > General > Transfer or Reset [Device] > Erase All Content and Settings. On iOS or iPadOS 14 or earlier, tap Settings > General > Reset > Erase All Content and Settings. This erases all data on your device. After you erase it, your device restarts and the «Hello» screen appears.
Finish up
After you transfer to your new iOS or iPadOS device, you might need to complete a few more steps to finish the process. If you have an Apple Watch, learn how to restore it from a backup and pair it with your new iPhone.
Источник
Transfer data from your old iPhone or iPad to a new one
Unboxing a new iPhone or iPad is always exciting. Setting it up and transferring your data over from a previous device? Not that fun. Starting with iOS 13, Apple has greatly simplified migrating data over by introducing a direct, iOS device to iOS device transfer option. The solution works well, but there are quite a few cases where it simply won’t do, or won’t be ideal:
- Your old iPhone or iPad hasn’t yet been updated to iOS 14 or above. In this case, transferring your data with iMazing will be quicker since you won’t need to update iOS at all.
- Your old iPhone or iPad cannot be updated to iOS 14. In that case, iMazing’s solution is optimal.
- You are already backing up your iOS devices with iMazing. Transferring your data will be faster since most of it is already on your computer.
- You would like to choose what to transfer, for a good spring cleaning or because you just don’t have enough space on the new device. iMazing offers multiple levels of customization.
- Apple’s direct transfer option fails. We’re here to help.
iMazing’s Transfer to another Device wizard will guide you every step of the way. All you have to do is connect your old and new iPhone or iPad to your PC or Mac, and follow iMazing’s instructions. Let’s get started.
Before you begin
Download and install iMazing on your Mac or PC computer
Instructions
To transfer data from an iPhone, iPad or iPod Touch to another device:
- Launch iMazing and connect both of your devices.
- In the left sidebar, select the device with the data you want to transfer.

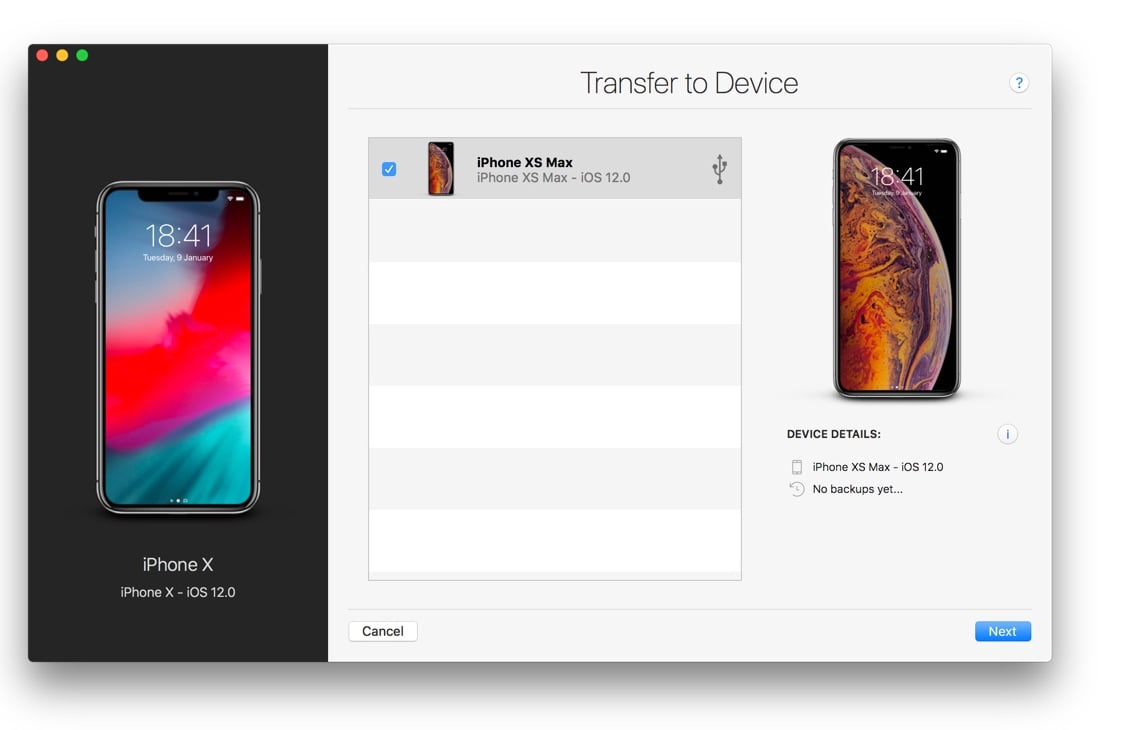
- In the Actions Panel, select Transfer to another Device. This will open the Transfer Wizard.
- Choose the target device by clicking the checkbox next to it, and then select Next.
- You’ll now have the opportunity to customize the transfer process. You can click on either Customize buttons to select what data or apps to transfer, and choose a name for the target device.
- Click Next when you are satisfied with your transfer options, and follow the wizard until the operation starts:
- iMazing will start the transfer process, first backing up the source device, then restoring that backup to the target. The target device will then restart.
💡 Tip: Once the transfer has started, you can safely click Close Window to minimize the wizard and return to iMazing’s interface.
Transfer Options
The transfer options allow you to customize what data and apps you want to transfer. ![]()
💡 Tip: If you are transferring your device to another device which has already some data on it, we advise to check the option Erase target device(s). This will prevent potential conflicts with the Apple ID already configured on your target device.
💡 Apps Tip: If you have downloaded some of your apps with iMazing, you’ll have the option to install apps from your app library when transferring your data. This can be a life saver as you’ll be sure that you don’t have to wait for apps to be downloaded by iOS after the transfer completes, downloads which can take a very long time. Read more about downloading apps before transferring data.
Choose what data to transfer
Select what datasets you want to transfer. Use the Select All checkbox to select or deselect all datasets. The following must be transferred.
| Accounts: | Accounts are all email, contacts, calendars and other cloud service configured on your device. |
| Other Data and Preferences: | Other data and preferences are all settings, system files etc so basically all the data not related to a dataset in particular. |

Choose which apps to transfer
Choose what apps you want to transfer. Use the Select All checkbox to select or deselect all apps.
Источник
Use the Finder or iTunes to transfer data from your previous iOS device to your new iPhone, iPad, or iPod touch
Transfer your personal data and purchased content to your new device from a backup that you made in the Finder or iTunes.
If your backup isn’t encrypted, your Health and Activity data from your iOS device or Apple Watch won’t transfer.
How to transfer your backup to your new device
- Turn on your new device. A «Hello» screen should appear. If you already set up your new device, you need to erase it before you can use these steps.*
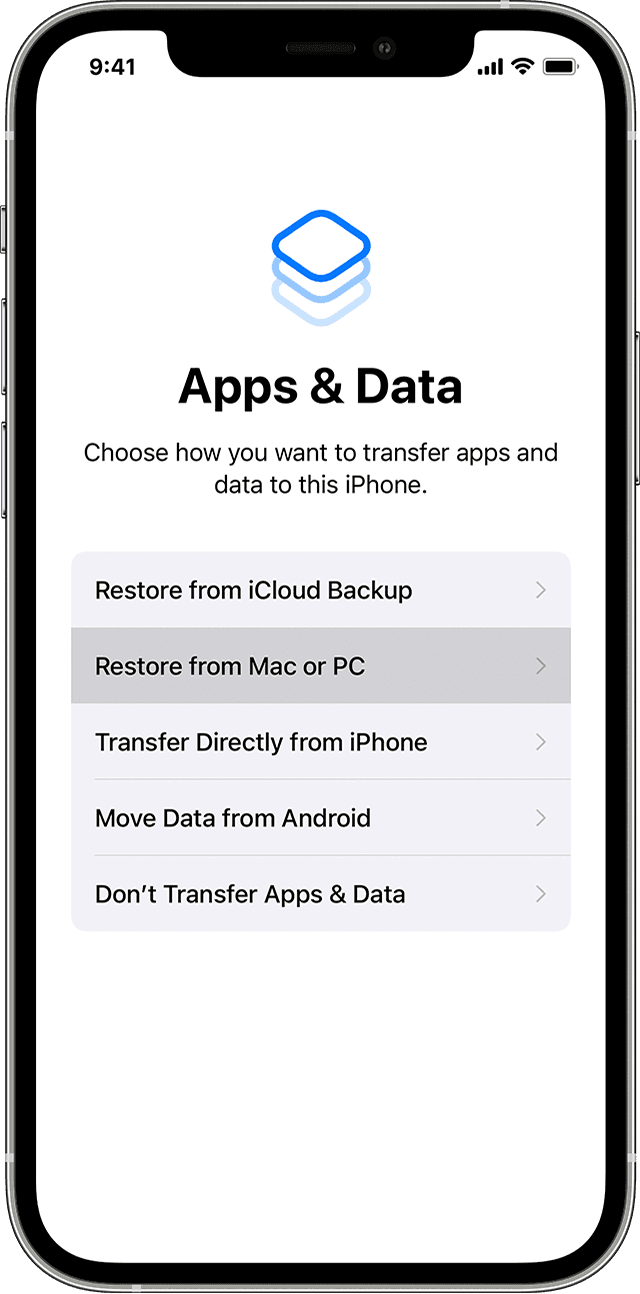
- Follow the steps until you see the Apps & Data screen, then tap Restore from Mac or PC.
- Connect your new device to the computer that you used to back up your previous device.
- Open iTunes or a Finder window on your computer and select your device. You might be asked to trust your device.
- Select Restore Backup. Then choose a backup. Make sure it’s the correct one by looking at the date and size of each. Learn what to do if asked to update to a newer version of iOS or iPadOS.
- If you need to restore from an encrypted backup, enter your password when asked.
- Wait for the restore process to finish, then complete the rest of the setup steps on your iOS or iPadOS device. If possible, keep your device connected to Wi-Fi and plugged into power after setup. This allows content like your photos, music, and apps stored in iCloud to automatically download back to your device.
* To erase your device that’s using iOS or iPadOS 15 or later, tap Settings > General > Transfer or Reset [Device] > Erase All Content and Settings. On iOS or iPadOS 14 or earlier, tap Settings > General > Reset > Erase All Content and Settings. This erases all data on your device. After you erase it, your device restarts and the «Hello» screen appears.
Finish up
After you transfer to your new iOS or iPadOS device, you might need to complete a few more steps to finish the process. If you have an Apple Watch, learn how to restore it from a backup and pair it with your new iPhone.
Источник
Use Quick Start to transfer data to a new iPhone, iPad, or iPod touch
Set up your new iOS device automatically using an iPhone, iPad, or iPod touch.
Set up your new device with Quick Start
Quick Start occupies both devices, so make sure that you choose a time when you won’t need to use your current device for several minutes.
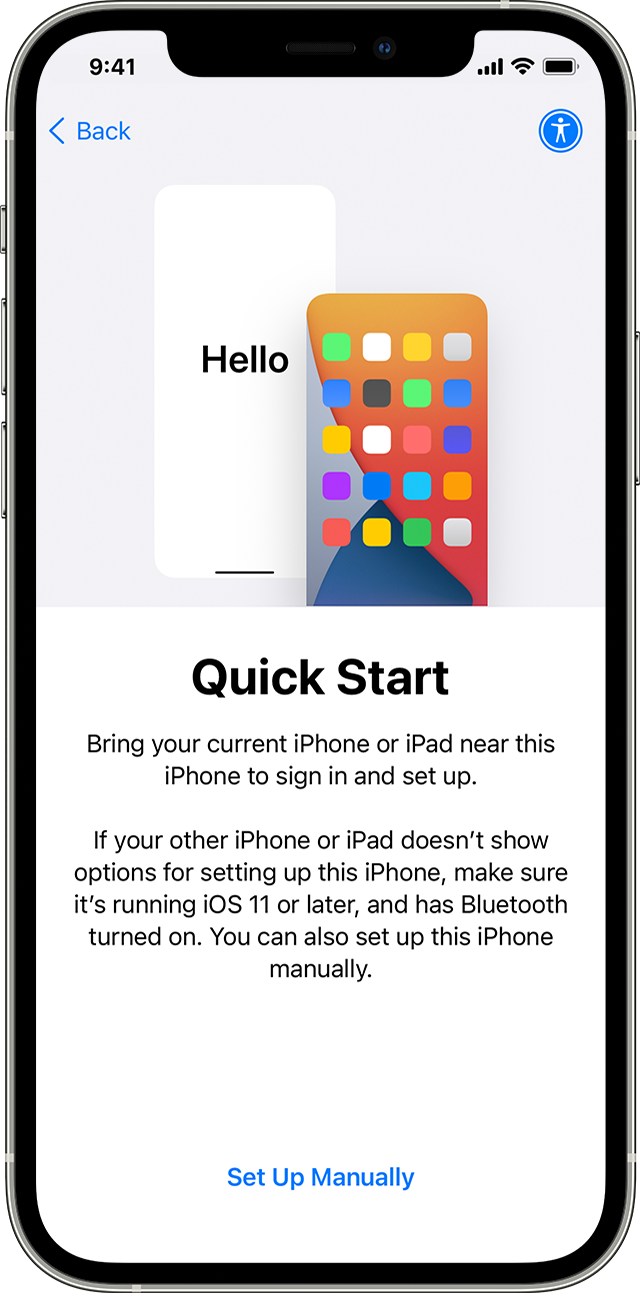
- Turn on your new device and place it near your current device.
- A screen appears on your current device that offers the option of using your Apple ID to set up your new device. Make sure that it’s the Apple ID that you want to use, then tap Continue. If you don’t see the option to continue on your current device, make sure that Bluetooth is turned on.
- Wait for an animation to appear on your new device. Hold your current device over the new device, then center the animation in the viewfinder.
- Wait for a message that says Finish on New [Device]. If you can’t use your current device’s camera, tap Authenticate Manually, then follow the onscreen steps.
- When asked, enter your current device’s passcode on your new device. Then follow the instructions to set up Face ID or Touch ID on your new device.
- When you see the Transfer Data from [Device] screen, tap Continue to begin transferring your data from your previous device to your new device. Or you can tap Other Options to transfer apps, data, and settings from your most recent iCloud backup or transfer from a backup on your computer.
Keep your devices near each other and plugged in to power until the data migration process is complete. Transfer times can vary based on factors such as network conditions and the amount of data being transferred.
Источник
4 Methods to Transfer Apps from iPhone to iPhone 13


“I recently purchased a new iPhone 13 for my son as a present. However, he still is getting stuck with the old iPhone, and I feel like I wasted my money. He says the old iPhone has his favorite gaming application and cannot afford to lose other important data within the several installed apps. If I find a way to transfer all apps at once from his old iPhone to the new one, my son would appreciate my gift. Is this possible? Kindly assist.”
There are droves of iPhone users worldwide who are stuck trying to transfer apps from one iPhone to another iPhone. It could be that you have a new iPhone or want to shift from one iPhone to another iPhone. Moving apps one by one is undoubtedly tiresome and is therefore not a suitable option on the users’ cards. Fortunately, there are plenty of good ways to move apps from iPhone to iPhone without data loss.
Method 1: How to Transfer Apps from iPhone to iPhone 13 via Quick Start
When you get your new iPhone 13, you can use quick start to set up your new device quickly. With Quick Start, you can transfer all data including phone settings from the old phone to new iPhone 13. This feature works with the help of Bluetooth and your Apple ID, so before moving apps from one iPhone to another, make sure that Bluetooth is enabled on both iPhones and that they are within the Bluetooth range.
Step 1. Place two iPhones within the Bluetooth range and turn the Bluetooth on.

Step 2. When your two iPhones are paired, there will be an animation to appear on your new device. Use your old iPhone to scan the animation on the new iPhone.

Step 3. Enter the old password on the new iPhone to start transfer all content. It will take a few minutes to finish the process.
Please note this method will transfer all content and apps from the old iPhone to the new iPhone. If you want to transfer one app from iPhone to another, you can try AirDrop.
Hi!If you get tired of reading articles, you can watch the tutorial video:
Method 2: How to Share Apps from iPhone to iPhone by AirDrop
Airdrop for iOS is the Bluetooth equivalent for Android devices. An airdrop is an inbuilt tool within Apple devices that allows sharing files between Apple devices like iPhone, iPad, and Mac PC. Just like you would send files between android devices via Bluetooth, you can also send files between iOS devices via Airdrop.
Step 1. Select the apps on the old iPhone that you want to send to the new iPhone and hit the “Share” button then choose the destination iPhone.
![]()
Step 2. On your new iPhone, tap “Accept” to allow Airdrop transfer selected apps from your old to the new iPhone.
![]()
Method 3: How to Move Apps from iPhone to iPhone by iTunes
Using iTunes to move apps from iPhone to iPhone is a seamless process involving backup to iTunes and restore from iTunes. Yes, it is as simple as that. However, you should make sure that the contents and settings of the new iPhone are first erased. Also, make sure that iTunes is installed on your computer. The steps below illustrate how to move apps from iPhone to iPhone by iTunes.
Step 1. Connect the previous iPhone to your computer using a suitable media, If iTunes fails to launch automatically, simply tap the icon to run it.
Step 2. Locate and click the “Device” icon on iTunes’ interface then select the “Summary” option. Now click the “Back Up Now” tab and wait until the backup process is complete then disconnect your old iPhone from the computer.
![]()
Step 3. Insert a new SIM card to the new iPhone or reuse the previous SIM card. Switch on your new iPhone and follow the on-screen steps until the “Apps & Data” screen is displayed.
Step 4. Select the “Restore from iTunes Backup” option then click “Next”.
![]()
Step 5. Now connect the new iPhone to the same computer you used to backup to iTunes above. Again, run iTunes and click on the device icon. Choose “Restore Backup” and select the right backup. Click “Restore” to allow iTunes to move your apps and other files into your new iPhone.
![]()
Method 4: How to Share Apps from iPhone to iPhone by iCloud
iCloud is another desirable alternative that you can use to share apps from one iPhone to another iPhone with ease. This method resembles iTunes and thus involves the backup and restore process. During the entire process, make sure you have a steady Wi-Fi connection and that you have enough storage space on iCloud as well. The following steps illustrate how to share apps from iPhone to iPhone by iCloud.
Step 1. Turn on a Wi-Fi network and connect your old iPhone to this network.
Step 2. On this old iPhone, navigate to the “Settings” tab then select your account name. Choose “iCloud” from the given options and follow with the “iCloud Backup” option.
![]()
Step 3. Enable the “iCloud Backup” and subsequently select the “Back Up Now” option. Patiently wait until the backup process is complete.
![]()
Step 4. Now insert either a new SIM card into your new iPhone or use the previous SIM card and power on your new iPhone. If you had set up your new iPhone, then you have to wipe it out first.
Step 5. When the Wi-Fi screen appears, select your Wi-Fi network and follow the on-screen instructions until the “Apps & Data Screen” appears.
Step 6. Choose the “Restore from iCloud Backup” option and enter your Apple ID to sign in to iCloud. Choose the backup you recently created and wait for iCloud to restore your files into your new iPhone.
![]()
Bonus Tip: Transfer data from iPhone to iPhone by MobileTrans
MobileTrans is a powerful phone transfer tool that enables users to transfer all categories of files, including apps from one phone to another with ease. The program supports the transfer of data between smartphones irrespective of whether it is an Android, iOS, or a WinPhone. All this is possible with just a single click.
MobileTrans — Phone Transfer
Transfer from data from iPhone to iPhone With 1 Click!
- • Support transfer 17 kinds of data between two iOS devices, including contacts, messages, photos, videos, notes and more.
- • Move data from iPhone to iPhone, iPad, iPod Touch.
- • Except iOS devices, you can also transfer from iPhone to Android, Android to Android.
- • Compatible with 8000+ different phone models.
- • 100% safe, faster and easier than any other methods.
The following steps clearly illustrate how you can transfer data from iPhone to iPhone using MobileTrans — Phone Transfer.
Step 1. Download, install and launch MobileTrans on your PC. Select the “Phone Transfer” option from the main interface to proceed to the next step.
![]()
Step 2. Use USB to connect your two iPhones to the computer. When the connection is established, you should see the two iPhone icons side by side. You can click the “Flip” button to switch the destination and source iPhones.
![]()
Step 3. Now choose the data you want to transfer from the old iPhone to the new iPhone. Hit the “Start” button to allow the program to move data from the old iPhone to the new iPhone. If you want to get rid of any data on the destination phone, just check the “Clear data before copy” button. Monitor the transfer progress, and please don’t disconnect any of the iPhones as the process runs.
![]()
When the program has completed the app transfer process, check on the destination phone that the chosen data were transferred successfully.
Conclusion
From the above guide, it is now easy to figure out the standout method for app transfer from iPhone to iPhone. However, it’s almost evident that scores of users will settle for MobileTrans as their ultimate solution. This is because MobileTrans is straightforward, fast, and flexible as compared to other methods. Try MobileTrans today and bury your iPhone to iPhone data transfer for good.
Источник


