- Transfer data from your old iPhone or iPad to a new one
- Before you begin
- Instructions
- Transfer Options
- Choose what data to transfer
- Choose which apps to transfer
- What to do before you sell, give away, or trade in your iPhone, iPad, or iPod touch
- If you still have your iPhone, iPad, or iPod touch
- Transfer information to your new device
- Remove your personal information from your old device
- If you no longer have your iPhone, iPad, or iPod touch
- If you’re trading in an Android device to Apple
- Learn more
- Use the Finder or iTunes to transfer data from your previous iOS device to your new iPhone, iPad, or iPod touch
- How to transfer your backup to your new device
- Finish up
- Transfer Data from Old iPhone to iPhone 11
- How to Transfer Data from iPhone 6/7/8/X/XS to New iPhone 11
- Method 1: Use Quick Start to Set Up your New iPhone 11 (both iPhones must run above iOS 11)
- How to Use Quick Start
- Use iPhone Migration to Transfer Data Directly from Old iPhone to iPhone 11
- Method 2: Use Syncios Data Transfer to Migrate Old iPhone Data to iPhone 11 Directly
- You can also learn from a video tutorial
- Method 3: Use Syncios Data Transfer to Restore iCloud & iTunes Backups to iPhone 11
- Restore iTunes Backups to iPhone 11:
- Restore iCloud Backups to iPhone 11:
- Method 4: Use iCloud or iTunes to Transfer Data from Previous iPhone to your New iPhone 11
- Transfer your iCloud Backup to your New iPhone 11
- Transfer your iTunes Backup to your New iPhone 11
- Conclusion
Transfer data from your old iPhone or iPad to a new one
Unboxing a new iPhone or iPad is always exciting. Setting it up and transferring your data over from a previous device? Not that fun. Starting with iOS 13, Apple has greatly simplified migrating data over by introducing a direct, iOS device to iOS device transfer option. The solution works well, but there are quite a few cases where it simply won’t do, or won’t be ideal:
- Your old iPhone or iPad hasn’t yet been updated to iOS 14 or above. In this case, transferring your data with iMazing will be quicker since you won’t need to update iOS at all.
- Your old iPhone or iPad cannot be updated to iOS 14. In that case, iMazing’s solution is optimal.
- You are already backing up your iOS devices with iMazing. Transferring your data will be faster since most of it is already on your computer.
- You would like to choose what to transfer, for a good spring cleaning or because you just don’t have enough space on the new device. iMazing offers multiple levels of customization.
- Apple’s direct transfer option fails. We’re here to help.
iMazing’s Transfer to another Device wizard will guide you every step of the way. All you have to do is connect your old and new iPhone or iPad to your PC or Mac, and follow iMazing’s instructions. Let’s get started.
Before you begin
Download and install iMazing on your Mac or PC computer
Instructions
To transfer data from an iPhone, iPad or iPod Touch to another device:
- Launch iMazing and connect both of your devices.
- In the left sidebar, select the device with the data you want to transfer.

- In the Actions Panel, select Transfer to another Device. This will open the Transfer Wizard.
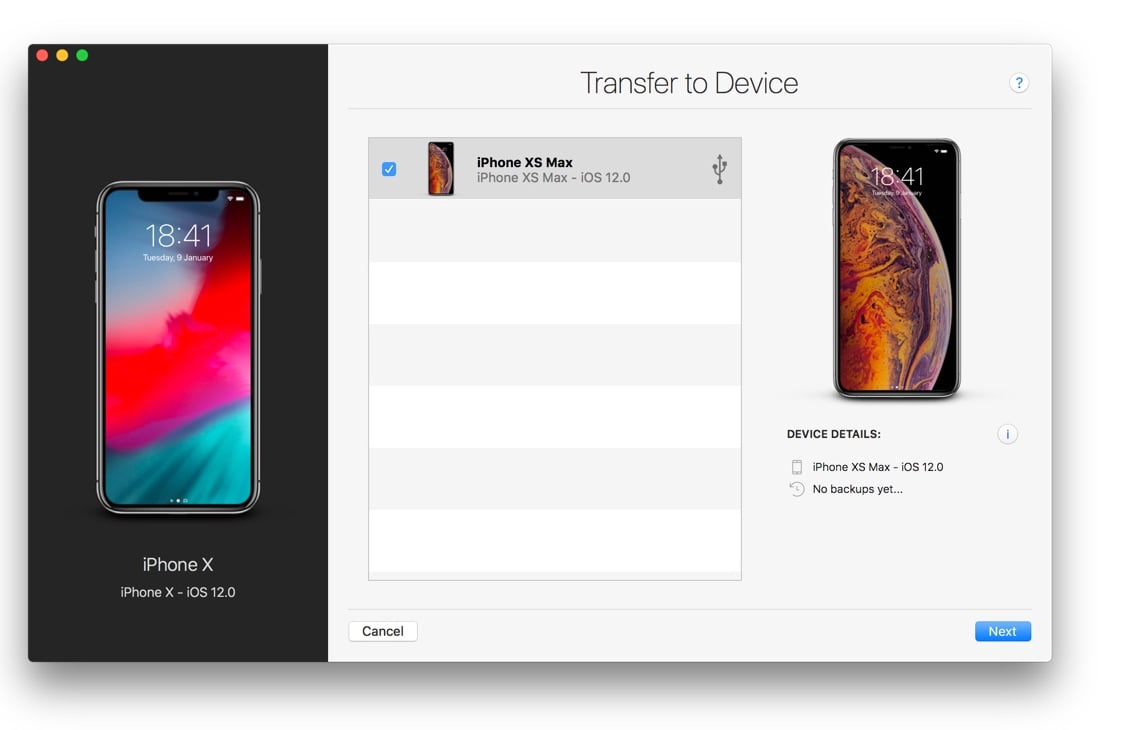
- Choose the target device by clicking the checkbox next to it, and then select Next.
- You’ll now have the opportunity to customize the transfer process. You can click on either Customize buttons to select what data or apps to transfer, and choose a name for the target device.
- Click Next when you are satisfied with your transfer options, and follow the wizard until the operation starts:
- iMazing will start the transfer process, first backing up the source device, then restoring that backup to the target. The target device will then restart.
💡 Tip: Once the transfer has started, you can safely click Close Window to minimize the wizard and return to iMazing’s interface.
Transfer Options
The transfer options allow you to customize what data and apps you want to transfer. ![]()
💡 Tip: If you are transferring your device to another device which has already some data on it, we advise to check the option Erase target device(s). This will prevent potential conflicts with the Apple ID already configured on your target device.
💡 Apps Tip: If you have downloaded some of your apps with iMazing, you’ll have the option to install apps from your app library when transferring your data. This can be a life saver as you’ll be sure that you don’t have to wait for apps to be downloaded by iOS after the transfer completes, downloads which can take a very long time. Read more about downloading apps before transferring data.
Choose what data to transfer
Select what datasets you want to transfer. Use the Select All checkbox to select or deselect all datasets. The following must be transferred.
| Accounts: | Accounts are all email, contacts, calendars and other cloud service configured on your device. |
| Other Data and Preferences: | Other data and preferences are all settings, system files etc so basically all the data not related to a dataset in particular. |

Choose which apps to transfer
Choose what apps you want to transfer. Use the Select All checkbox to select or deselect all apps.
Источник
What to do before you sell, give away, or trade in your iPhone, iPad, or iPod touch
Use these steps to transfer information to your new device, then remove your personal information from your old device.
Before you sell, give away, or trade in your device, you should first transfer information to your new device, then remove your personal information from your old device.
You shouldn’t manually delete your contacts, calendars, reminders, documents, photos, or any other iCloud information while you’re signed in to iCloud with your Apple ID. This would delete your content from the iCloud servers and any of your devices signed in to iCloud.
If you still have your iPhone, iPad, or iPod touch
Follow these steps to transfer information to your new device, then remove your personal information from your old device.
Transfer information to your new device
If you have a new iPhone, iPad, or iPod touch, you can use Quick Start to automatically transfer information from your old device to your new device if you’re using iOS 11 or later. Use iCloud, iTunes, or the Finder to transfer information to your new device if you’re using iOS 10 or earlier.
If your phone number will change with your new device, add additional trusted phone numbers to your account to ensure you don’t lose access. If you no longer have access to your old phone number, you can generate a two-factor authentication code on your old device if needed.
Remove your personal information from your old device
- If you paired an Apple Watch with your iPhone, unpair your Apple Watch.
- Back up your device.
- Sign out of iCloud and the iTunes & App Store.
- If you’re using iOS 10.3 or later, tap Settings > [your name]. Scroll down and tap Sign Out. Enter your Apple ID password and tap Turn Off.
- If you’re using iOS 10.2 or earlier, tap Settings > iCloud > Sign Out. Tap Sign Out again, then tap Delete from My [device] and enter your Apple ID password. Then go to Settings > iTunes & App Store > Apple ID > Sign Out.
- If you’re switching to a non-Apple phone, deregister iMessage.
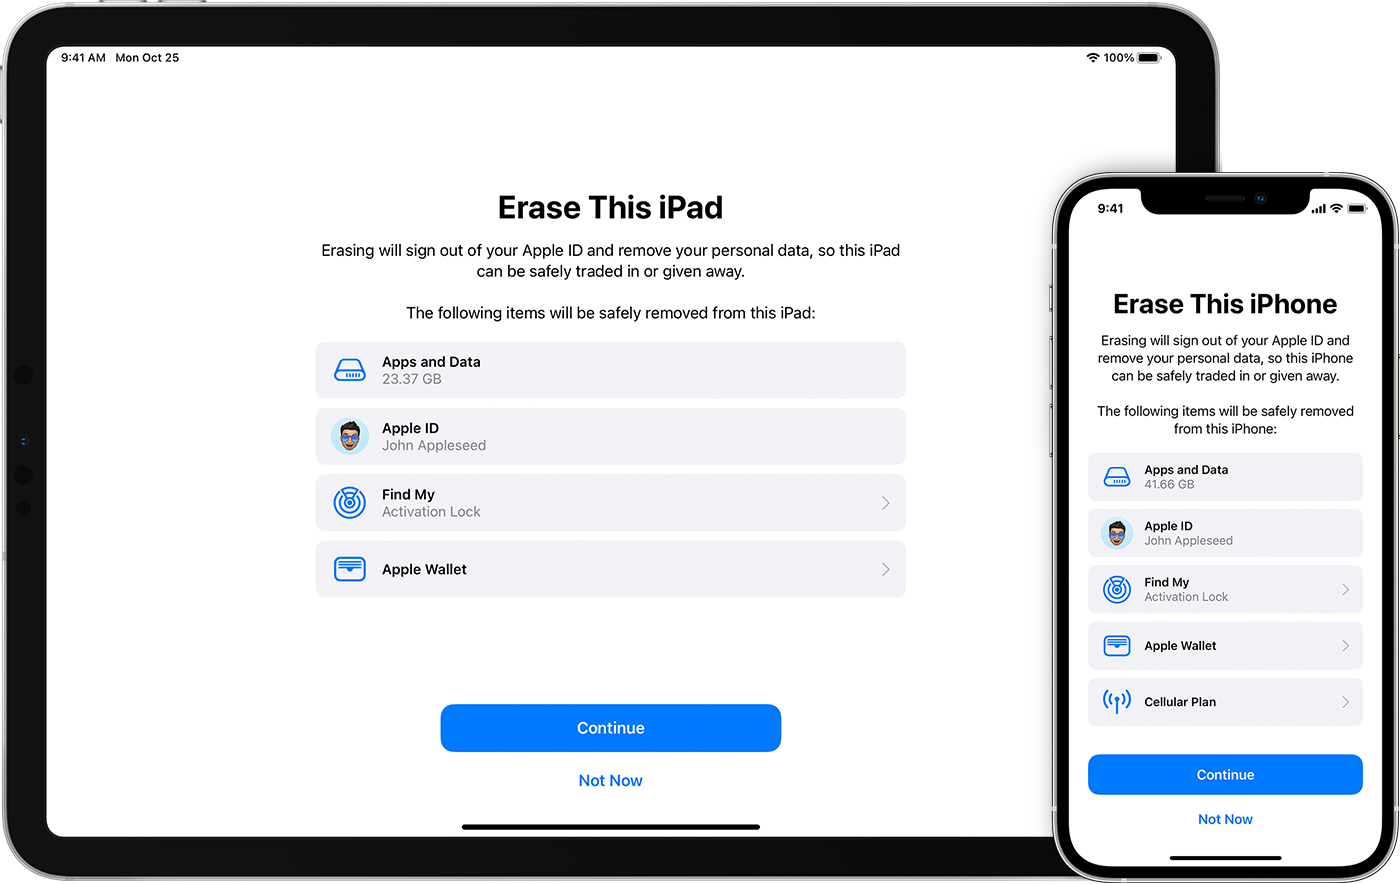
- Go back to Settings and tap General > Transfer or Reset [device] > Erase All Content and Settings. If you turned on Find My [device], you might need to enter your Apple ID and password. If your device uses eSIM, choose the option to erase your device and the eSIM profile when asked.
- If asked for your device passcode or Restrictions passcode, enter it. Then tap Erase [device].
- Contact your carrier for help transferring service to a new owner. If you aren’t using a SIM card with your device, you can contact them to get help transferring service to the new owner.
- Remove your old device from your list of trusted devices.
When you erase your iPhone, iPad, or iPod touch, Find My [device] and Activation Lock are turned off.

If you no longer have your iPhone, iPad, or iPod touch
If the steps above weren’t completed and you no longer have your device, use these steps:
- Ask the new owner to erase all content and settings using the above steps.
- If you’re using iCloud and Find My [device] on the device, sign in to iCloud.com/find or the Find My app on another device, select the device, and click Erase. After the device has been erased, click Remove from Account.
- If you can’t follow either of the above steps, change your Apple ID password. This won’t remove personal information that’s stored on your old device, but it prevents the new owner from deleting your information from iCloud.
- If you’re switching to a non-Apple phone, deregister iMessage.
- If you’re using Apple Pay, you can remove your credit or debit cards at iCloud.com. Choose Account Settings to see which devices are using Apple Pay, then click the device. Next to Apple Pay, click Remove.
- Remove your old device from your list of trusted devices.
If you’re trading in an Android device to Apple
Before you send in an Android device to Apple as a trade-in, be sure to do the following:
- Back up your data.
- Erase the device.
- Remove any SIM cards, memory cards, cases, and screen protectors.
Contact your device’s manufacturer if you need help.
Learn more
- Make a backup of your iPhone, iPad, or iPod touch or restore from a backup.
- Remove all of your cards from Apple Pay.
- Get help if your iPhone, iPad, or iPod touch is lost or stolen.
- Learn about Activation Lock.
- No matter the model or condition, we can turn your device into something good for you and good for the planet. Learn how to trade in or recycle your iPhone, iPad, or iPod touch with Apple Trade In.
When you tap Erase All Content and Settings, it completely erases your device, including any credit or debit cards you added for Apple Pay and any photos, contacts, music, or apps. It will also turn off iCloud, iMessage, FaceTime, Game Center, and other services. Your content won’t be deleted from iCloud when you erase your device.
Источник
Use the Finder or iTunes to transfer data from your previous iOS device to your new iPhone, iPad, or iPod touch
Transfer your personal data and purchased content to your new device from a backup that you made in the Finder or iTunes.
If your backup isn’t encrypted, your Health and Activity data from your iOS device or Apple Watch won’t transfer.
How to transfer your backup to your new device
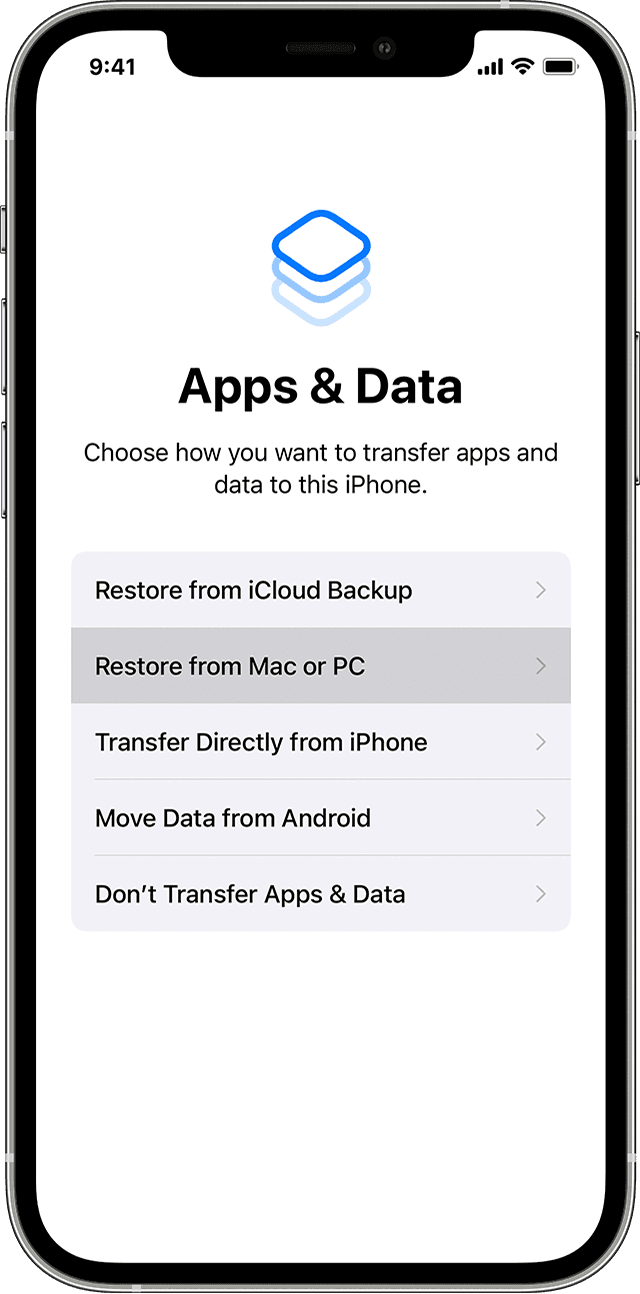
- Turn on your new device. A «Hello» screen should appear. If you already set up your new device, you need to erase it before you can use these steps.*
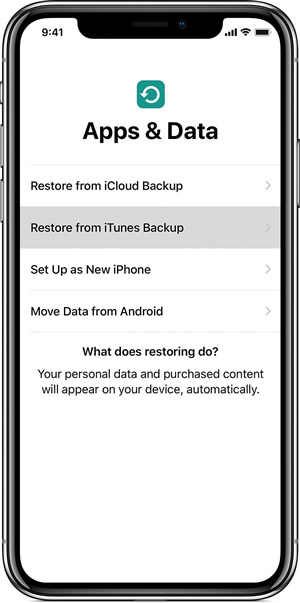
- Follow the steps until you see the Apps & Data screen, then tap Restore from Mac or PC.
- Connect your new device to the computer that you used to back up your previous device.
- Open iTunes or a Finder window on your computer and select your device. You might be asked to trust your device.
- Select Restore Backup. Then choose a backup. Make sure it’s the correct one by looking at the date and size of each. Learn what to do if asked to update to a newer version of iOS or iPadOS.
- If you need to restore from an encrypted backup, enter your password when asked.
- Wait for the restore process to finish, then complete the rest of the setup steps on your iOS or iPadOS device. If possible, keep your device connected to Wi-Fi and plugged into power after setup. This allows content like your photos, music, and apps stored in iCloud to automatically download back to your device.
* To erase your device that’s using iOS or iPadOS 15 or later, tap Settings > General > Transfer or Reset [Device] > Erase All Content and Settings. On iOS or iPadOS 14 or earlier, tap Settings > General > Reset > Erase All Content and Settings. This erases all data on your device. After you erase it, your device restarts and the «Hello» screen appears.
Finish up
After you transfer to your new iOS or iPadOS device, you might need to complete a few more steps to finish the process. If you have an Apple Watch, learn how to restore it from a backup and pair it with your new iPhone.
Источник
Transfer Data from Old iPhone to iPhone 11
 > How to > iPhone > How to Transfer Data from iPhone 6/7/8/X/XS to New iPhone 11
How to Transfer Data from iPhone 6/7/8/X/XS to New iPhone 11
Every September, Apple always brings us exciting news, and so does this September. Here comes with the latest iPhone generation, iPhone 11, iPhone 11 Pro and iPhone 11 Pro Max. Apple gives more colors to choose, black, white, yellow, lavender and mint green, as well as the standard Product (RED) for your new lower-cost iPhone. These new generations possess with strong power, vibrant screen and upgraded camera. More importantly, iPhone 11 is far cheaper than we were expecting!
Before getting started your iPhone 11, you have a more important thing need to do. Yep, migrate data from your old iPhone to this new iPhone 11. I know, this could be a massive project since you have to sync important data, messages, contacts, photos, music, WhatsApp, notes, etc from one phone to another. But don’t worry, we have four useful methods for you to solve this problem. Apple Quick Start and Syncios Data Transfer can really help you much. Start to learn how they work!
![]()
- Method 1: Use Quick Start to Automatically Set Up your New iPhone 11 (both iPhones must run above iOS 11)
- Method 2: Use Syncios Data Transfer to Migrate Old iPhone Data to iPhone 11 Directly(Video Tutorial) *Recommend
- Method 3: Use Syncios Data Transfer to Restore iCloud & iTunes Backups to iPhone 11
- Method 4: Use iCloud or iTunes to Transfer Data from Previous iPhone to your New iPhone 11
Method 1: Use Quick Start to Set Up your New iPhone 11 (both iPhones must run above iOS 11)
Quick Start, an app for migrating data between iOS devices, as well as sync iCloud data to iOS devices, owned by Apple Inc. This function is capable for iPhones which run above iOS 11. *Plus: If both devices are running iOS 12.4 or later, then you are allowed to transfer all data from current old device to new iPhone 11 wirelessly.
How to Use Quick Start
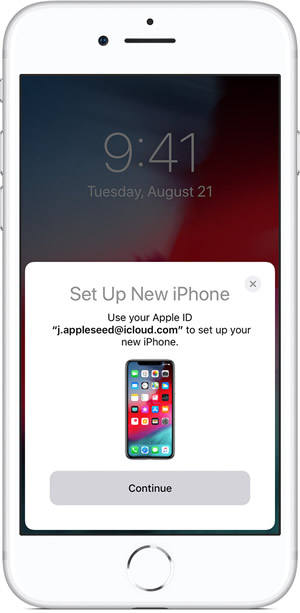
Step 1 Turn on both your iPhones and place it next together. Once the Quick Start screen appears on old iPhone, type in with your Apple ID to get ready to set up iPhone 11. Then tap ‘Continue’. Plus: Please check whether you have turned on Bluetooth if the ‘Continue’ button doesn’t show on your old iPhone.
Step 2 Once an animation appears on iPhone 11, hold your current device over iPhone 11 and drag the animation in the center of the viewfinder. Wait till ‘Finish’ messages appears on iPhone 11. Plus: If your iPhone 11’s camera doesn’t work now, tap ‘Authenticate’ on screen then follow the steps which appears.
Step 3 Enter old iPhone’s passcode on iPhone 11 when a prompt comes up.
Step 4 Follow the instructions to set up Face ID or Touch ID on iPhone 11.
Step 5 Enter your Apple ID on iPhone 11 when a prompt comes up.
Step 6 Quick Start offers to restore apps, data and settings from most recent iCloud backup, or you can choose to update old iPhone’s backup then restore back on iPhone 11. You can also choose whether you want to sync place, other privacy, Apple Pay and Siri settings to iPhone 11. Plus: For updating backup, you need to enable Wi-Fi on your iPhone.
Use iPhone Migration to Transfer Data Directly from Old iPhone to iPhone 11
*Tips: Both devices must run in iOS 12.4 or later when transfer wirelessly.
Step 1.2.3.4 are the same as ‘How to use Quick Start‘ shows.
Tips: If you want to migrate data via wired connection, connect the devices with USB cable. Connect the Lightning to USB 3 Camera Adapter to old iPhone, then plug the Lightning to USB cable in to iPhone 11 and connect the other end to the adapter. You should also connect the Lightning to USB 3 Camera Adapter to power through its Lightning port.
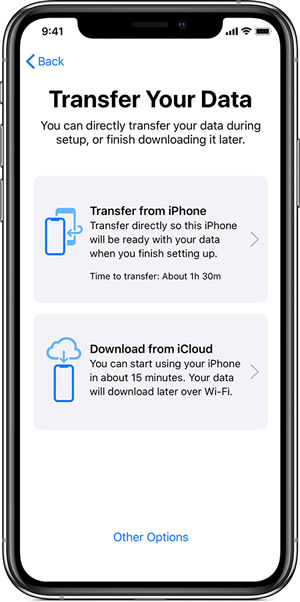
Step 5 Tap on ‘Transfer from iPhone’ module to directly transfer old iPhone data to iPhone 11. If you’re using the wired method, once the transfer icon shows like this means your devices are connected. You can also choose whether you want to sync place, other privacy, Apple Pay and Siri settings to iPhone 11.
Step 6 Make sure your iPhones are near each other and with enough power until the data migration stuff finished. Time for transmission will different due to connection type, network conditions and the amount of data that need to transfer.
Method 2: Use Syncios Data Transfer to Migrate Old iPhone Data to iPhone 11 Directly
We introduce you a much more stable and convenient approach to transfer data from old iPhone to new iPhone 11. Syncios Data Transfer supports to transfer 13 types of categories include contacts, messages chats, video, camera roll, photo library, audio, call-history, safari history, bookmarks, WhatsApp, book, notes and voice mail between iOS devices without data loss. Meanwhile, you can restore iTunes and iCloud backups to iPhone 11 as well.
Step 1 Please download and install Syncios Data Transfer on your computer first. Then launch it and connect both your iPhone 11 and old iPhone device to computer via USB cable. Choose ‘Transfer‘ module which is display by default. Make sure your iPhone 11 is on the ‘RIGHT-TARGET‘ side. If not, tap the ‘Flip‘ button to switch their positions. Then click ‘Next‘ for the next step.
Tips: If you encounter any detection problem during the process, please check our iOS tutorial for help.
![]()
Step 2 All contents that can be transferred between iPhone will display on the screen. Simply select desired contents and click ‘Next‘ to load these data, then click on ‘Next‘ again to transfer selected data from old iPhone to new iPhone 11.
![]()
You can also learn from a video tutorial
Method 3: Use Syncios Data Transfer to Restore iCloud & iTunes Backups to iPhone 11
And yes, you can use Syncios Data Transfer to restore backup from iTunes and iCloud to iPhone 11. You can also restore these data on Android if you have an Android device.
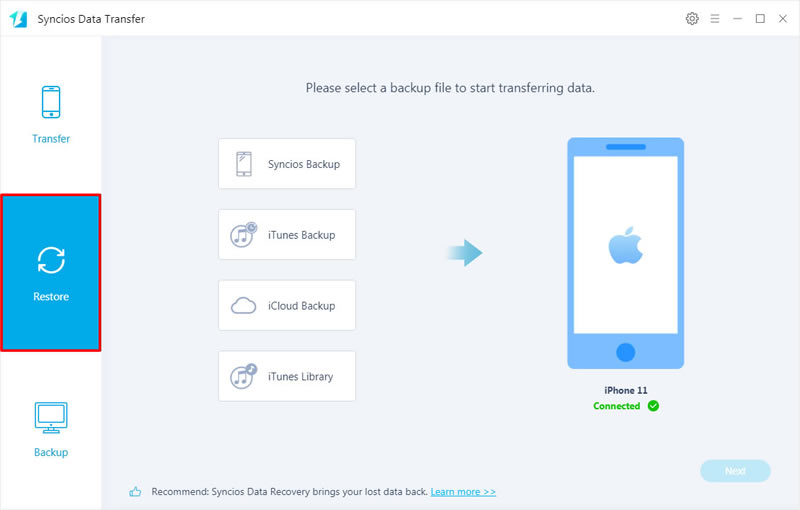
This time, go to ‘Restore’ module and connect your iPhone 11 to computer. You will see four restoring form — ‘Syncios Backups‘, ‘iTunes Backups‘, ‘iCloud Backups‘ and ‘iTunes Library‘. To transfer old iPhone data to iPhone 11, we will choose to use ‘iTunes Backups’ and ‘iCloud Backups’.
Restore iTunes Backups to iPhone 11:
Choose ‘iTunes Backups‘ to select certain iTunes backup. Syncios will detect your iTunes on your computer and all backups you’ve made by iTunes will list on the pop-up window. Then repeat the operations that shows in ‘Use Syncios Data Transfer to Migrate Old iPhone Data to iPhone 11 Directly — Step 2’.

Restore iCloud Backups to iPhone 11:
Choose ‘iCloud Backups‘ to download iCloud backups on Syncios. In this part you are going to login with your iCloud account, click ‘Download more iCloud backup‘ to download certain iCloud backups. If you have used this before, Then repeat the operations that shows in ‘Use Syncios Data Transfer to Migrate Old iPhone Data to iPhone 11 Directly — Step 2’.
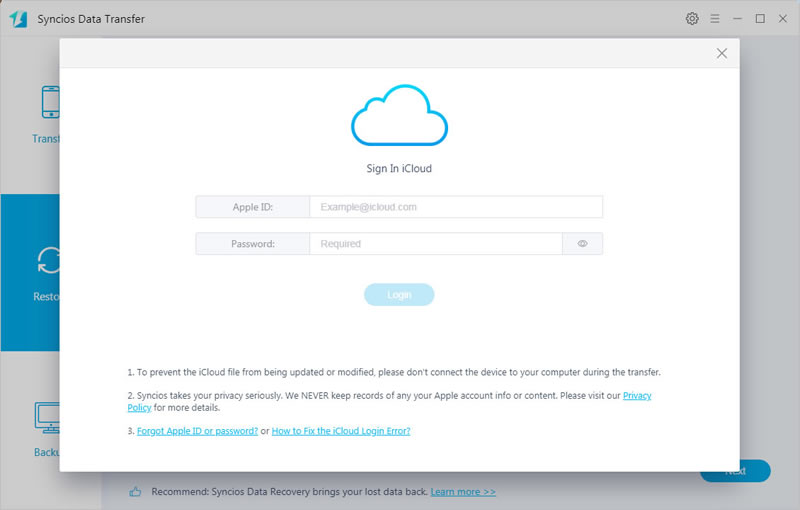
*Notice: Syncios Team takes your privacy seriously. We NEVER records of any your Apple account info or content at any time during session.
Method 4: Use iCloud or iTunes to Transfer Data from Previous iPhone to your New iPhone 11
You can set up your new iPhone 11 from a backup of your previous iPhone, iPad, or iPod touch.
Transfer your iCloud Backup to your New iPhone 11
Step 1 Turn on iPhone 11 and wait till a ‘Hello’ screen appear.
Step 2 Follow the instructions until the ‘Wi-Fi‘ screen show up.
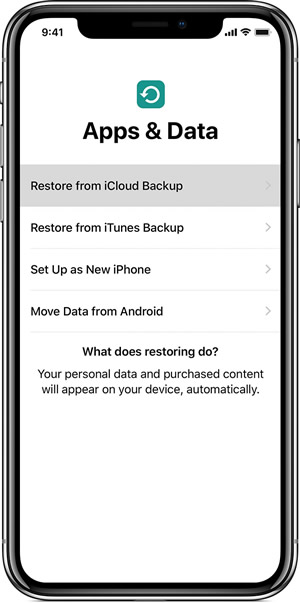
Step 3 Tap one of the Wi-Fi network to join and keep following the instructions till the ‘Apps & Data‘ screen come up. Then select ‘Restore from iCloud Backup‘ function.
Step 4 Sign in with your Apple ID and password.
Step 5 Choose the certain iCloud backup you want.
Step 6 Wait till complete.
Transfer your iTunes Backup to your New iPhone 11
Step 1 Turn on iPhone 11 and wait till a ‘Hello’ screen appear.
Step 2 Follow the instructions till the ‘Apps & Data‘ screen come up. Then select ‘Restore from iTunes Backup‘ function and click ‘Next‘.
Step 3 Connect your iPhone 11 to computer which you used to back up old iPhone.
Step 4 Launch iTunes on computer and select your iPhone 11.
Step 5 Click on ‘Restore Backup‘ to choose a certain backup.
Step 6 If you need to restore from an encrypted backup, enter your password when asked.
Step 7 Wait till complete and follow to rest of instruction to setup your iPhone 11.
Conclusion
Above are what we want to recommend you to use. Hope these four methods can help you transfer old iPhone data to new iPhone 11. Since Syncios Data Transfer possesses with the most powerful and comprehensive functions, why not download it and have a try?
Источник


