- How to transfer data from your old Android phone to your new one
- How to back up data on your old Android phone
- How to transfer photos and videos to your new Android phone
- How to restore data and settings to your new Android phone
- Mid-range camera king
- Google Pixel 4a
- These are the best rugged Android phones
- The Google Pixel 5 is the best phone for taking photos, period
- The Xperia 1 III is our favorite phone for shooting video
- Harish Jonnalagadda
- 4 Ways to Transfer Photos from Android to Android
- Part 1: How to transfer photos from Android to Android using MobileTrans?
- MobileTrans — Phone Transfer
- Part 2: How to transfer photos from Android to Android using Bluetooth?
- Part 3: How to transfer photos from Android to Android using Android Beam
- Part 4: How to transfer photos from Android to Android using dr.fone — Phone Manager (Android)?
- dr.fone — Phone Manager (Android)
How to transfer data from your old Android phone to your new one
![]() Source: Alex Dobie / Android Central
Source: Alex Dobie / Android Central
When it’s time to switch from your older Android phone to a new one, you’ll want to make sure all of your data makes it way across safely. Thankfully, Google makes it extremely convenient to migrate your texts, call logs, contacts, music, and photos over to your new phone seamlessly.
How to back up data on your old Android phone
You’ll need to make sure that all the relevant data on your old phone is backed up to the cloud before you make the switch to your new phone. Google automatically backs up contacts, call logs, texts, and settings — including Do Not Disturb details — to Drive, so you’ll be able to restore all that data to your new phone just by logging in with your Google account during initial configuration.
Best of all, the data that’s automatically backed up by Google doesn’t count toward your storage quota, so you don’t have to worry about running out of storage. The feature backs up call history, app data, contacts, device and home screen settings, and text messages. So before you switch to a new phone, it makes sense to see if this data is already on the cloud.
Note: I’m using a OnePlus 7T for reference, but the steps outlined below will be the same for all Android phones running Android 7.0 Nougat and above. You can always search for backup in the settings search bar to find the option.
- Open Settings from the app drawer or home screen.
- Scroll down to the bottom of the page.
Go to the System menu.
 Source: Android Central
Hit Back up now to sync the latest data on the phone with Google Drive.
Source: Android Central
Pro tip: Go to contacts.google.com to see if all the contacts from your previous phone migrated to your Google account. The contacts that you see on this page will be the ones that will show up on your new phone.
Once the data is backed up, you can get started with setting up your new phone. Before we do that, however, let’s make sure your photos and videos are being backed up to Google Photos.
How to transfer photos and videos to your new Android phone
Google Photos is an outstanding service for backing up photos and videos. It seamlessly backs up data, has granular sharing controls, and uses on-device machine learning to automatically group faces. However, the best feature is the unlimited storage at high quality. You can save your photos and videos at Original quality — the quality at which they were taken — or select High quality, which retains the same level of detail while cutting down on the size.
You don’t have to worry about running out of storage if you select the High-quality option, and this particular feature makes Photos a fantastic service for storing your photos and videos. As the data is backed up to a cloud, you’ll be able to access your photos and videos from your new phone as well as on the web. If you haven’t set up Photos yet, here’s how to get started.
- Open Photos from the app drawer or home screen.
- Select the hamburger menu (three horizontal lines) from the top left of the screen.
Tap Settings.
Source: Android Central
Ensure that the Backup mode is set to High quality.
Source: Android Central
That’s all there is to it. Once your photos and videos are safely backed up to Google Photos, you can get started with setting up your new phone.
How to restore data and settings to your new Android phone
You’ve unboxed your new phone and are ready to set it up. There are a few ways to restore data from your older device, and here I’m highlighting the option that has worked best for me over the years (I switch phones once every two weeks, so I know what I’m talking about). You’ll need your old phone for this, so make sure you don’t reset the data just yet. At this point, you should switch the SIM card over to the new phone. Let’s get started.
- Select your device language and hit Start on the welcome page.
- Select your home Wi-Fi network and sign in.
Hit Next at the Copy apps & data screen to begin migrating data from your old phone.
Source: Android Central
Hit Next once again here. I’ll have detailed instructions on how to set things up on your old phone down below.
Source: Android Central
You’ll see your phone’s model number highlighted on the Verify your phone page. Stay at this page and grab your old phone. You’ll now need to authorize data transfer from your old phone so that texts, calls, and relevant data can migrate seamlessly to the new device. Here’s what you need to do on the old phone:
- Open Settings from the app drawer or home screen.
- Navigate to the Google tab.
Select Set up & restore.
Source: Android Central
Your phone will now search for nearby devices. You can then verify the patterns on both devices to make sure the connection is established.
Source: Android Central
You’ll see a Copying your account progress bar at this point. Once you see this, switch back to your new phone.
Source: Android Central
You’ll be able to see a sign-in window for all the Google accounts registered on your older device. Because you set up direct data transfer, you won’t need to enter two-factor authentication when signing in using this method. Don’t fret if you do not see the two-factor dialog box; that is normal behavior. Should both phones lose connectivity at any point during the restore, just start over and you’ll be able to set it up.
- Sign in to your Google account.
- Confirm the screen lock of your old phone to authenticate the data transfer.
You’ll now arrive at the Choose what to restore page. If you want everything from your old phone transferred to the new one, leave all the settings as is and select Restore.
Source: Android Central
Hit Restore to start installing data on your new phone. You should see a confirmation message of the same.
Source: Android Central
After selecting the restore options, you’ll be able to choose whether to back up data and use location automatically at the Google services page. After selecting the services, you can set up a PIN to use face unlock and fingerprint authentication.
The rest of the options after configuring biometric authentication will vary by manufacturer, and you can easily follow along with the on-screen instructions. The best part with a cloud restore is that even your home screen is preserved. That includes the background as well as the app layout, so you can get started on your new phone without any additional setup.
That’s all there is to it. Once setup is finished and you get to the home screen, you’ll see the Play Store running in the background and restoring data from your old phone. This may take up to an hour based on the amount of content installed on your old phone and your internet connection, so you can let that run while configuring the rest of the options on your new phone.
Mid-range camera king
![]()
Google Pixel 4a
Flagship camera for a lot less
The Pixel 4a takes the outstanding camera from the Pixel 4 and makes it much more accessible. This is the best camera you’ll find on a mid-range phone by some margin, and you also get 6GB of RAM and 128GB of storage, a minimalist design, and robust internal hardware with all-day battery life.
We may earn a commission for purchases using our links. Learn more.
![]()
These are the best rugged Android phones
Living the rough and tumble life? Get yourself a smartphone that can handle everything you throw at it — or throw your phone at.
![]()
The Google Pixel 5 is the best phone for taking photos, period
If you want the best Android camera, you should go with the Google Pixel 5. Many great options get close, though. So we’ve gathered a solid list to get you started.
![]()
The Xperia 1 III is our favorite phone for shooting video
If video recording is your thing, look no further than the Sony Xperia 1 III. It offers a large screen, three great cameras, and extremely robust manual video controls.

Harish Jonnalagadda
Harish Jonnalagadda is the Asia Editor at Android Central. A reformed hardware modder, he now spends his time writing about India’s technology revolution. Previously, he used to ponder the meaning of life at IBM. Contact him on Twitter at @chunkynerd.
Источник
4 Ways to Transfer Photos from Android to Android


“Is there an easy solution to help me? I change to a new android phone and need to transfer all photos from old to new phone.”
You want to share the pictures taken during trips with your friends or family members or you just got a brand new Android device and want to move all your loved photos from the old Android to the new Android device?
If you want to transfer photos from Android to Android, but you don’t know much about Android photo transfer then this is just the article for you. Keep on reading this to know everything related to how to transfer pictures from Android to Android.
Part 1: How to transfer photos from Android to Android using MobileTrans?
MobileTrans is a very handy data transfer software that can meet most of your Android needs. With MobileTrans — Phone Transfer, you will be able to transfer photos from Android to Android easily and efficiently.
Besides, you can easily do the data transfer between Android and iOS devices in one click when you need to upgrade to a new device.
Let’s check how to transfer photos from Android to Android with MobileTrans — Phone Transfer.
MobileTrans — Phone Transfer
1-Click Phone to Phone Transfer
- • Easy, fast and safe.
- • Transfer photos, text messages, contacts, notes, and many other file types.
- • Move data between devices with different operating systems, i.e iOS to Android.
- • Supports iOS devices that run the latest iOS 14

- • Supports over 8000+ Android devices. Works for all models of iPhone, iPad, and iPod.

- Download and install MobileTrans on your computer. Select the «Phone Transfer» module.
![]()
Then connect both your Android phones to the computer. Select Photos from the supported file type list and click on the «Start» button.
![]()
There you go! You have successfully transferred photos from one Android to another Android Device.
![]()
Here is the video tutorial for you:
Part 2: How to transfer photos from Android to Android using Bluetooth?
Another simple way for Android photo transfer is via Bluetooth, and probably this is the only way that works on almost every device presently in usage in this world. You just have to follow the two simple steps to know how to transfer pictures from Android to Android.
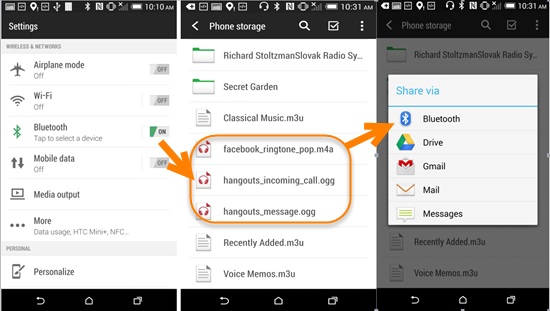
- Turn on the Bluetooth on both android devices and pair Bluetooth with those two devices. Select Bluetooth option that will be available in the settings then turn it вЂon’ on both android devices for file sharing. After that, establish a connection between the two phones to pair them successfully and exchange files.
- Now, share photos between those two android devices.
- When the two smartphones have been successfully paired and connected, open the “File Manager” option on the phone desktop, then select the music that you want to transfer and press it for 2 seconds to share to the destination phone via Bluetooth.
Part 3: How to transfer photos from Android to Android using Android Beam
Android Beam is a software that allows you to send content between devices just by pressing them back-to-back. Android Beam is very ideal for sharing content – web pages, maps, videos, photos, and more – with other people’s Android phones and tablets. Many latest Android phones have integrated NFC hardware under their panel and support Android Beam on them.
Here are the tips on how to transfer photos from Android to Android using Android Beam.
Step 1: Check for NFC Support
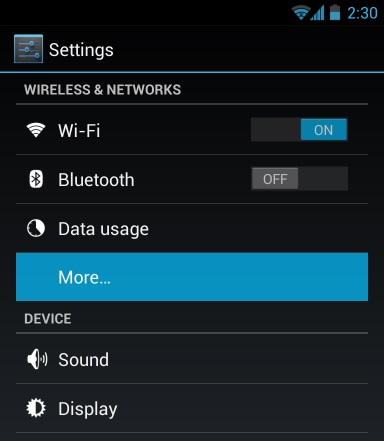
- Before you try to transfer photos between two Android devices using Android Beam, you will need to ensure that both your Android devices support NFC. Some Android smartphones support NFC, however, some don’t come with NFC support, so it is necessary to check before you launch this process.
- To check for NFC support, open your device’s Settings screen and tap on “More…” that will be located under Wireless & networks.

Step 2: Open the Content that You Want to Share
Once your device confirms that you have NFC support and you can use Android Beam, you need to navigate to the content that you want to share. For example, here’s how you would share various types of content using this toolkit:
- Web Page: Open it in Chrome (it is always advisable to use chrome for this purpose).
- YouTube Video: Open it in the default YouTube app, pre-download the app on both devices).
- Map Directions or a Location: Open the Google Maps app and pull up the directions or the location that you want to share.
- Contact Information: Open the contact card in the People app on the sender device.
- An App: Open its download page on Google Play Store.
- Photos: Open a photo in the gallery. You can also send multiple photos by opening the default gallery app, you just have to long-press a photo’s thumbnail, and then tap all the other photos you want to send to select them. With the photos selected, you can finally start the beaming process.
Step 3: Beam the Content
- Now, before you can send your content between two devices with Android Beam, they must both be powered on and completely unlocked. If either device screen is off, or if either device is at its lock screen (or is password-encrypted), Android Beam won’t work, and you can’t transfer photos.
- With both devices on and unlocked, press them back-to-back to transfer your music from one Android to Another.
Part 4: How to transfer photos from Android to Android using dr.fone — Phone Manager (Android)?
dr.fone — Phone Manager (Android)
Transfer Photos from Android to Android flexibly and easily.
- • Transfer files between Android and computer, including contacts, photos, music, SMS, and more.
- • Manage, export/import your music, photos, videos, contacts, SMS, Apps, etc.
- • Transfer iTunes to Android (vice versa). • Manage your Android device on the computer.
- • Fully compatible with Android 10.
- Download and install dr.fone — Phone Manager on your computer. Select the «Phone Manager» from all the models.

Connect both your Android phones to the computer. dr.fone will recognize them and display them like below. Select the Android phone which you would like to transfer photos from.
![]()
Go to the Photos tab on the top. It will display all the photos on your source Android phone. Select the photos you would like to transfer and click Export > Export to Device to transfer the selected photos to the target Android phone.
![]()
So, in this article, we discussed how to transfer photos from Android to Android. I would recommend everyone to use the Wondershare toolkit for this process as it is the safest, secure, and easy to use toolkit for Android photo transfer process. They are the best toolkit makers all over the globe. Lastly, I hope that you enjoyed reading this article on how to transfer pictures from Android to Android.
Источник


