- Use Quick Start to transfer data to a new iPhone, iPad, or iPod touch
- Set up your new device with Quick Start
- Move from Android to iPhone, iPad, or iPod touch
- Before you begin
- Tap Move Data from Android
- Open the Move to iOS app
- Wait for a code
- Use the code
- Connect to a temporary Wi-Fi network
- Choose your content and wait
- Set up your iOS device
- Finish up
- If you need help with the transfer
- If you need help after the transfer
- Transfer Data from Old iPhone to iPhone 11
- How to Transfer Data from iPhone 6/7/8/X/XS to New iPhone 11
- Method 1: Use Quick Start to Set Up your New iPhone 11 (both iPhones must run above iOS 11)
- How to Use Quick Start
- Use iPhone Migration to Transfer Data Directly from Old iPhone to iPhone 11
- Method 2: Use Syncios Data Transfer to Migrate Old iPhone Data to iPhone 11 Directly
- You can also learn from a video tutorial
- Method 3: Use Syncios Data Transfer to Restore iCloud & iTunes Backups to iPhone 11
- Restore iTunes Backups to iPhone 11:
- Restore iCloud Backups to iPhone 11:
- Method 4: Use iCloud or iTunes to Transfer Data from Previous iPhone to your New iPhone 11
- Transfer your iCloud Backup to your New iPhone 11
- Transfer your iTunes Backup to your New iPhone 11
- Conclusion
Use Quick Start to transfer data to a new iPhone, iPad, or iPod touch
Set up your new iOS device automatically using an iPhone, iPad, or iPod touch.
Set up your new device with Quick Start
Quick Start occupies both devices, so make sure that you choose a time when you won’t need to use your current device for several minutes.
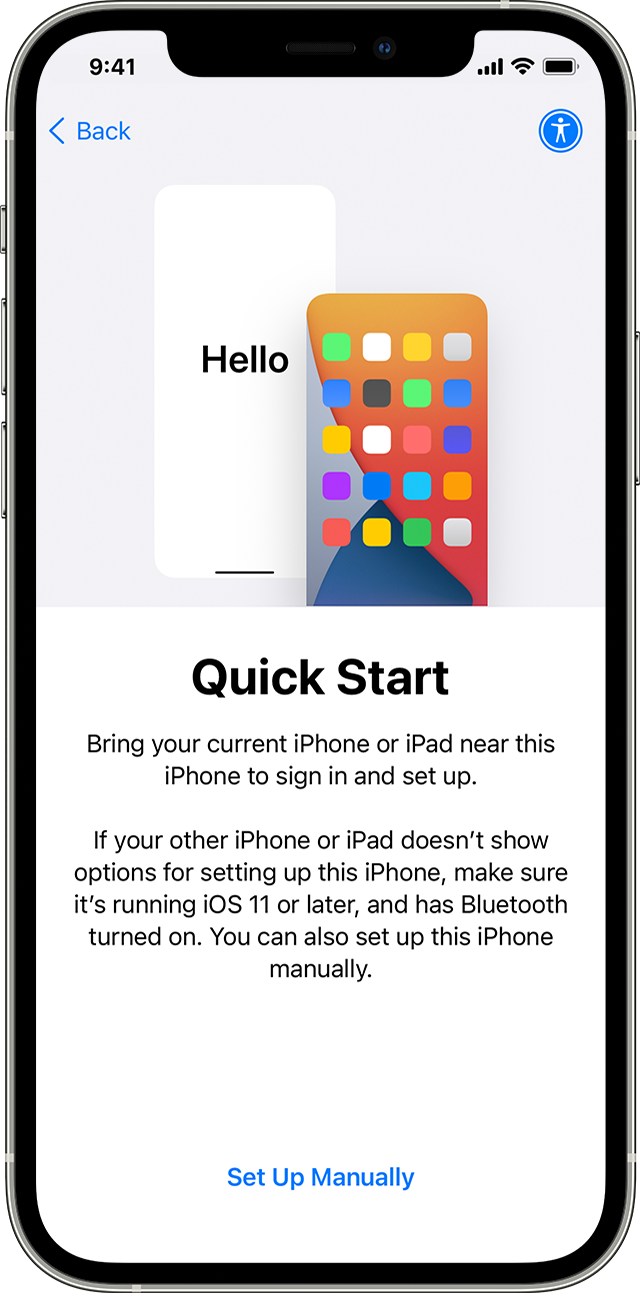
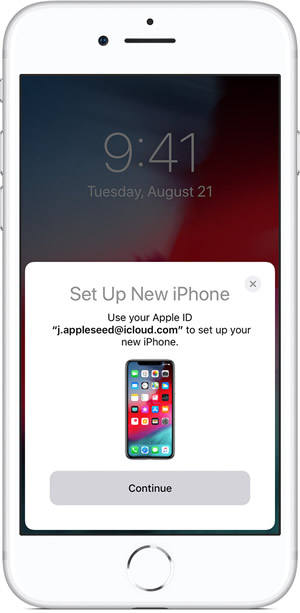
- Turn on your new device and place it near your current device.
- A screen appears on your current device that offers the option of using your Apple ID to set up your new device. Make sure that it’s the Apple ID that you want to use, then tap Continue. If you don’t see the option to continue on your current device, make sure that Bluetooth is turned on.
- Wait for an animation to appear on your new device. Hold your current device over the new device, then center the animation in the viewfinder.
- Wait for a message that says Finish on New [Device]. If you can’t use your current device’s camera, tap Authenticate Manually, then follow the onscreen steps.
- When asked, enter your current device’s passcode on your new device. Then follow the instructions to set up Face ID or Touch ID on your new device.
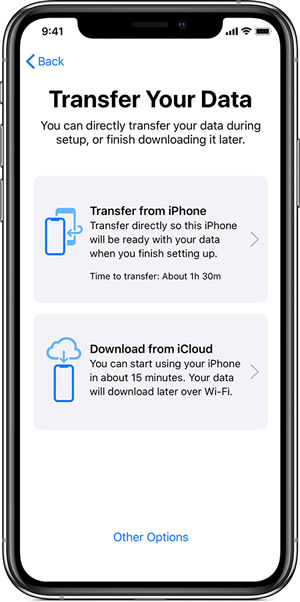
- When you see the Transfer Data from [Device] screen, tap Continue to begin transferring your data from your previous device to your new device. Or you can tap Other Options to transfer apps, data, and settings from your most recent iCloud backup or transfer from a backup on your computer.
Keep your devices near each other and plugged in to power until the data migration process is complete. Transfer times can vary based on factors such as network conditions and the amount of data being transferred.
Источник
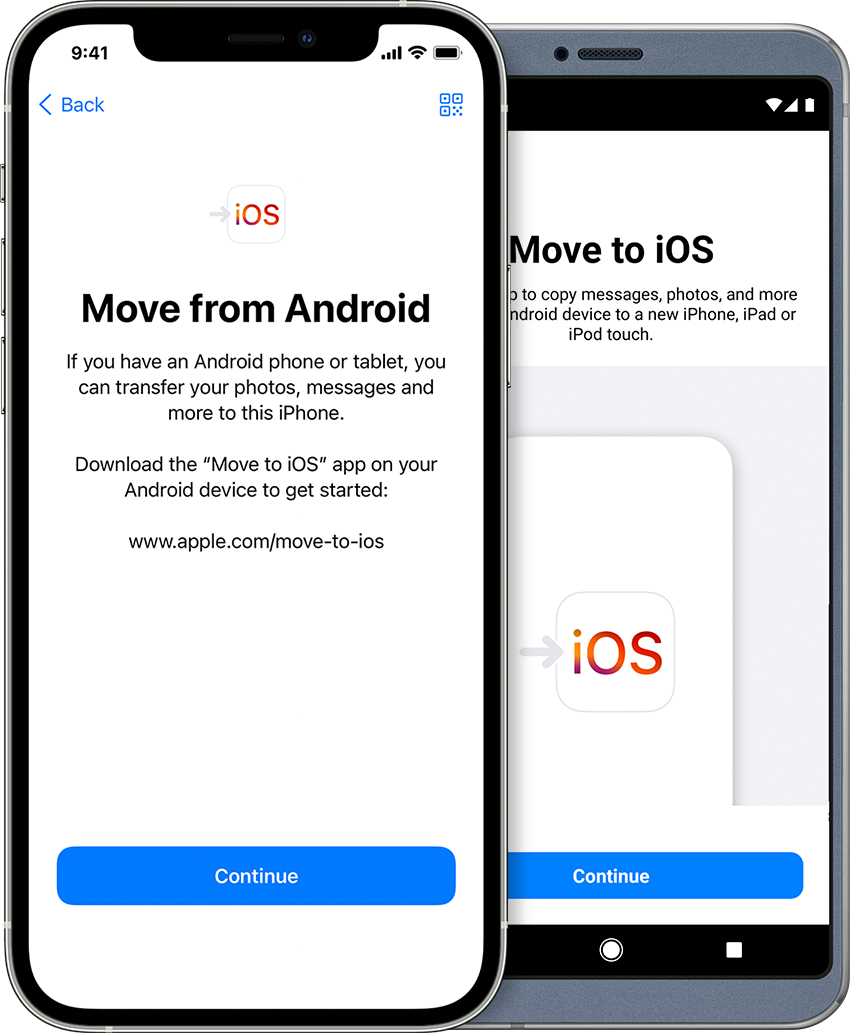
Move from Android to iPhone, iPad, or iPod touch
Ready to transfer to iOS? Download the Move to iOS app to get help switching from your Android device to your new iPhone, iPad, or iPod touch.
If you can’t use the Google Play Store, learn how to download Move to iOS.
Before you begin
- On your Android device, make sure that Wi-Fi is turned on.
- Plug your new iOS device and your Android device into power.
- Make sure that the content you’re moving, including what’s on your external Micro SD card, will fit on your new iOS device
- If you want to transfer your Chrome bookmarks, update to the latest version of Chrome on your Android device.

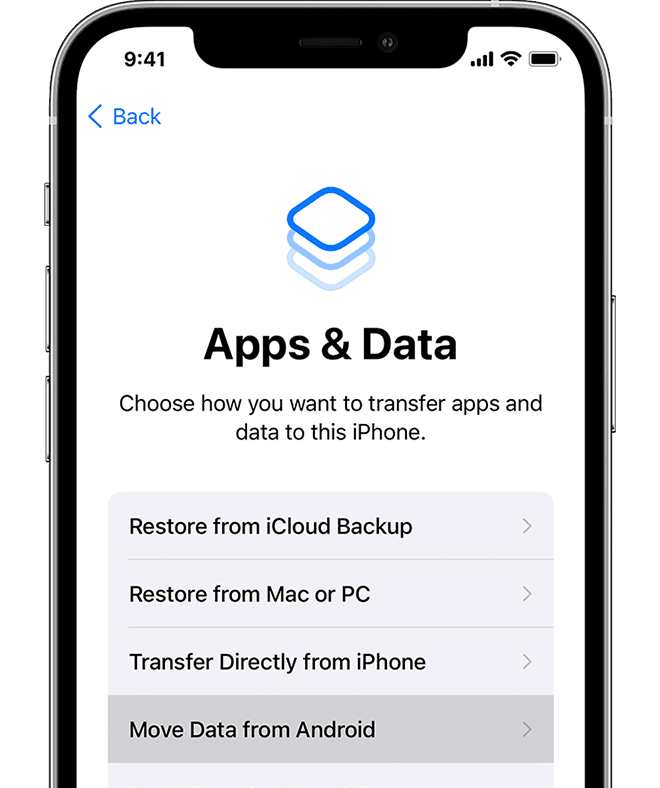
Tap Move Data from Android
While you set up your new iOS device, look for the Apps & Data screen. Then tap Move Data from Android. (If you already finished setup, you need to erase your iOS device and start over. If you don’t want to erase, just transfer your content manually.)
Open the Move to iOS app
On your Android device, open the Move to iOS app. If you don’t have the Move to iOS app, you can tap the QR code button on your new iOS device and scan the QR code using the camera on your Android device to open the Google Play Store. Tap Continue, and read the terms and conditions that appear. To continue, tap Agree.
Wait for a code
On your iOS device, tap Continue when you see the Move from Android screen. Then wait for a ten-digit or six-digit code to appear. If your Android device shows an alert that you have a weak internet connection, you can ignore the alert.
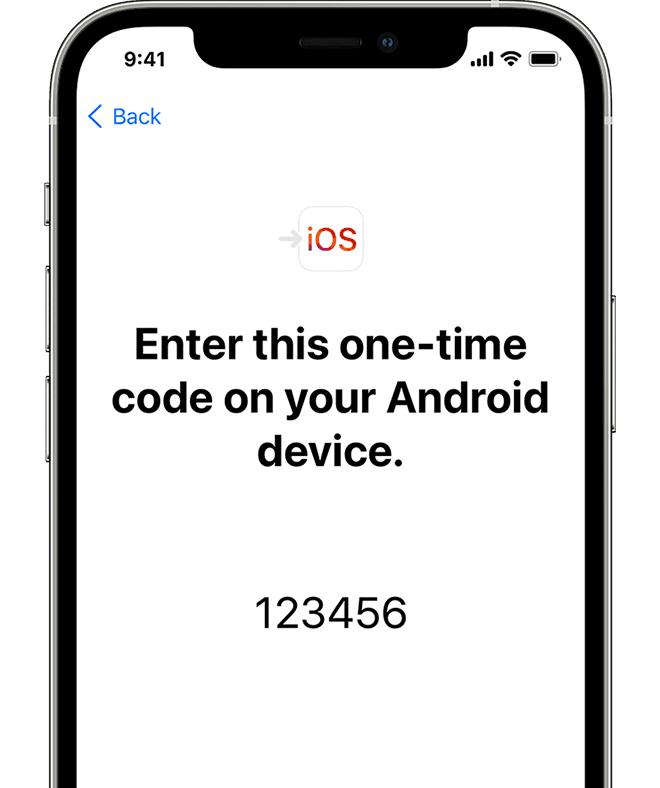
Use the code
Enter the code on your Android device.
Connect to a temporary Wi-Fi network
Your iOS device will create a temporary Wi-Fi network. When asked, tap Connect to join that network on your Android device. Then wait for the Transfer Data screen to appear.
Choose your content and wait
On your Android device, select the content that you want to transfer and tap Continue. Then—even if your Android device shows that the process is complete—leave both devices alone until the loading bar that appears on your iOS device finishes. The whole transfer can take a while, depending on how much content you’re moving.
Here’s what gets transferred: contacts, message history, camera photos and videos, photo albums, files and folders, accessibility settings, display settings, web bookmarks, mail accounts, and calendars. If they’re available on both Google Play and the App Store, some of your free apps will also transfer. After the transfer completes, you can download any free apps that were matched from the App Store.
Set up your iOS device
After the loading bar finishes on your iOS device, tap Done on your Android device. Then tap Continue on your iOS device and follow the onscreen steps to finish setup for your iOS device.
Finish up
Make sure that all of your content transferred. Music, books, and PDFs need to be moved over manually.
Need to get the apps that were on your Android device? Go to the App Store on your iOS device to download them.
If you need help with the transfer
- Make sure that you leave both devices alone until the transfer finishes. For example, on your Android device, the Move to iOS app should stay onscreen the whole time. If you use another app or get a phone call on your Android before the transfer finishes, your content won’t transfer.
- On your Android device, turn off apps or settings that might affect your Wi-Fi connection, like the Sprint Connections Optimizer or the Smart Network Switch. Then find Wi-Fi in Settings, touch and hold each known network, and forget the network. Then try the transfer again.
- Restart both of your devices and try again.
- On your Android device, turn off your cellular data connection. Then try the transfer again.
If you need help after the transfer
- Get help if Messages doesn’t work as expected after you transfer your content.
- If you don’t see apps from your Android device on your new iOS device, find and download them in the App Store on your new device.
- You might find that only some content transferred and your iOS device ran out of space, or your iOS device might appear full even though the transfer didn’t finish. If so, erase your iOS device and start the transfer again. Make sure that your Android content doesn’t exceed the available space on your iOS device.
Information about products not manufactured by Apple, or independent websites not controlled or tested by Apple, is provided without recommendation or endorsement. Apple assumes no responsibility with regard to the selection, performance, or use of third-party websites or products. Apple makes no representations regarding third-party website accuracy or reliability. Contact the vendor for additional information.
Источник
Transfer Data from Old iPhone to iPhone 11
 > How to > iPhone > How to Transfer Data from iPhone 6/7/8/X/XS to New iPhone 11
How to Transfer Data from iPhone 6/7/8/X/XS to New iPhone 11
Every September, Apple always brings us exciting news, and so does this September. Here comes with the latest iPhone generation, iPhone 11, iPhone 11 Pro and iPhone 11 Pro Max. Apple gives more colors to choose, black, white, yellow, lavender and mint green, as well as the standard Product (RED) for your new lower-cost iPhone. These new generations possess with strong power, vibrant screen and upgraded camera. More importantly, iPhone 11 is far cheaper than we were expecting!
Before getting started your iPhone 11, you have a more important thing need to do. Yep, migrate data from your old iPhone to this new iPhone 11. I know, this could be a massive project since you have to sync important data, messages, contacts, photos, music, WhatsApp, notes, etc from one phone to another. But don’t worry, we have four useful methods for you to solve this problem. Apple Quick Start and Syncios Data Transfer can really help you much. Start to learn how they work!
![]()
- Method 1: Use Quick Start to Automatically Set Up your New iPhone 11 (both iPhones must run above iOS 11)
- Method 2: Use Syncios Data Transfer to Migrate Old iPhone Data to iPhone 11 Directly(Video Tutorial) *Recommend
- Method 3: Use Syncios Data Transfer to Restore iCloud & iTunes Backups to iPhone 11
- Method 4: Use iCloud or iTunes to Transfer Data from Previous iPhone to your New iPhone 11
Method 1: Use Quick Start to Set Up your New iPhone 11 (both iPhones must run above iOS 11)
Quick Start, an app for migrating data between iOS devices, as well as sync iCloud data to iOS devices, owned by Apple Inc. This function is capable for iPhones which run above iOS 11. *Plus: If both devices are running iOS 12.4 or later, then you are allowed to transfer all data from current old device to new iPhone 11 wirelessly.
How to Use Quick Start
Step 1 Turn on both your iPhones and place it next together. Once the Quick Start screen appears on old iPhone, type in with your Apple ID to get ready to set up iPhone 11. Then tap ‘Continue’. Plus: Please check whether you have turned on Bluetooth if the ‘Continue’ button doesn’t show on your old iPhone.
Step 2 Once an animation appears on iPhone 11, hold your current device over iPhone 11 and drag the animation in the center of the viewfinder. Wait till ‘Finish’ messages appears on iPhone 11. Plus: If your iPhone 11’s camera doesn’t work now, tap ‘Authenticate’ on screen then follow the steps which appears.
Step 3 Enter old iPhone’s passcode on iPhone 11 when a prompt comes up.
Step 4 Follow the instructions to set up Face ID or Touch ID on iPhone 11.
Step 5 Enter your Apple ID on iPhone 11 when a prompt comes up.
Step 6 Quick Start offers to restore apps, data and settings from most recent iCloud backup, or you can choose to update old iPhone’s backup then restore back on iPhone 11. You can also choose whether you want to sync place, other privacy, Apple Pay and Siri settings to iPhone 11. Plus: For updating backup, you need to enable Wi-Fi on your iPhone.
Use iPhone Migration to Transfer Data Directly from Old iPhone to iPhone 11
*Tips: Both devices must run in iOS 12.4 or later when transfer wirelessly.
Step 1.2.3.4 are the same as ‘How to use Quick Start‘ shows.
Tips: If you want to migrate data via wired connection, connect the devices with USB cable. Connect the Lightning to USB 3 Camera Adapter to old iPhone, then plug the Lightning to USB cable in to iPhone 11 and connect the other end to the adapter. You should also connect the Lightning to USB 3 Camera Adapter to power through its Lightning port.
Step 5 Tap on ‘Transfer from iPhone’ module to directly transfer old iPhone data to iPhone 11. If you’re using the wired method, once the transfer icon shows like this means your devices are connected. You can also choose whether you want to sync place, other privacy, Apple Pay and Siri settings to iPhone 11.
Step 6 Make sure your iPhones are near each other and with enough power until the data migration stuff finished. Time for transmission will different due to connection type, network conditions and the amount of data that need to transfer.
Method 2: Use Syncios Data Transfer to Migrate Old iPhone Data to iPhone 11 Directly
We introduce you a much more stable and convenient approach to transfer data from old iPhone to new iPhone 11. Syncios Data Transfer supports to transfer 13 types of categories include contacts, messages chats, video, camera roll, photo library, audio, call-history, safari history, bookmarks, WhatsApp, book, notes and voice mail between iOS devices without data loss. Meanwhile, you can restore iTunes and iCloud backups to iPhone 11 as well.
Step 1 Please download and install Syncios Data Transfer on your computer first. Then launch it and connect both your iPhone 11 and old iPhone device to computer via USB cable. Choose ‘Transfer‘ module which is display by default. Make sure your iPhone 11 is on the ‘RIGHT-TARGET‘ side. If not, tap the ‘Flip‘ button to switch their positions. Then click ‘Next‘ for the next step.
Tips: If you encounter any detection problem during the process, please check our iOS tutorial for help.
![]()
Step 2 All contents that can be transferred between iPhone will display on the screen. Simply select desired contents and click ‘Next‘ to load these data, then click on ‘Next‘ again to transfer selected data from old iPhone to new iPhone 11.
![]()
You can also learn from a video tutorial
Method 3: Use Syncios Data Transfer to Restore iCloud & iTunes Backups to iPhone 11
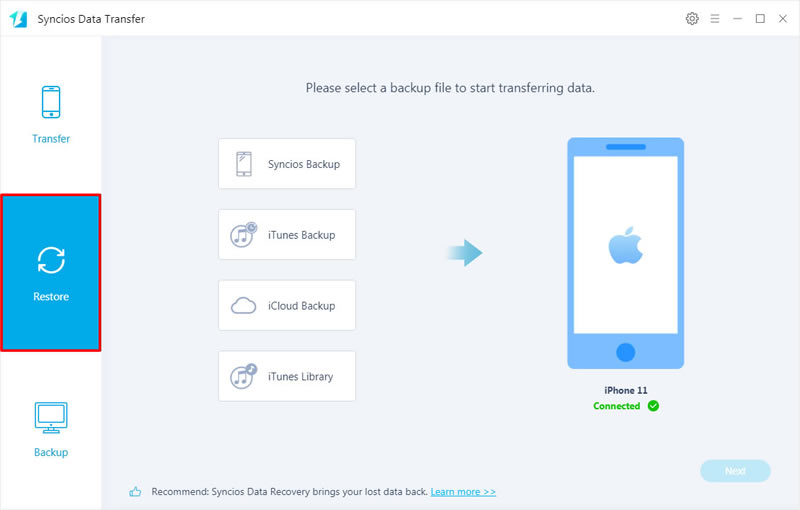
And yes, you can use Syncios Data Transfer to restore backup from iTunes and iCloud to iPhone 11. You can also restore these data on Android if you have an Android device.
This time, go to ‘Restore’ module and connect your iPhone 11 to computer. You will see four restoring form — ‘Syncios Backups‘, ‘iTunes Backups‘, ‘iCloud Backups‘ and ‘iTunes Library‘. To transfer old iPhone data to iPhone 11, we will choose to use ‘iTunes Backups’ and ‘iCloud Backups’.
Restore iTunes Backups to iPhone 11:
Choose ‘iTunes Backups‘ to select certain iTunes backup. Syncios will detect your iTunes on your computer and all backups you’ve made by iTunes will list on the pop-up window. Then repeat the operations that shows in ‘Use Syncios Data Transfer to Migrate Old iPhone Data to iPhone 11 Directly — Step 2’.

Restore iCloud Backups to iPhone 11:
Choose ‘iCloud Backups‘ to download iCloud backups on Syncios. In this part you are going to login with your iCloud account, click ‘Download more iCloud backup‘ to download certain iCloud backups. If you have used this before, Then repeat the operations that shows in ‘Use Syncios Data Transfer to Migrate Old iPhone Data to iPhone 11 Directly — Step 2’.
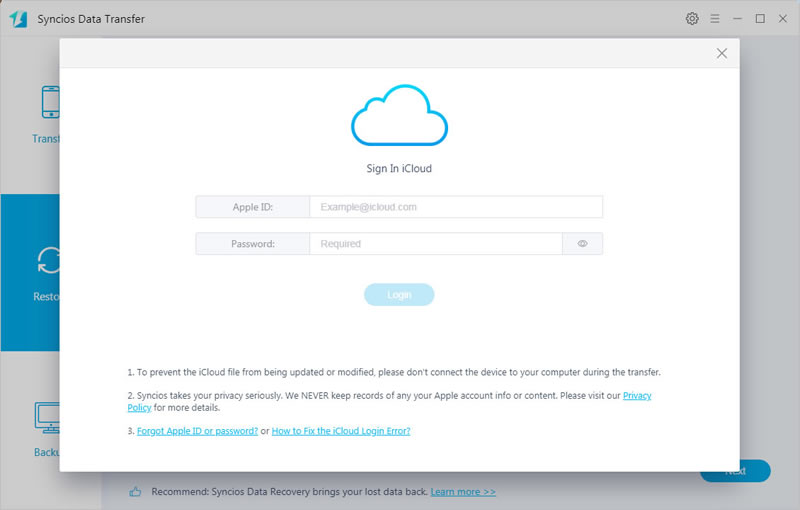
*Notice: Syncios Team takes your privacy seriously. We NEVER records of any your Apple account info or content at any time during session.
Method 4: Use iCloud or iTunes to Transfer Data from Previous iPhone to your New iPhone 11
You can set up your new iPhone 11 from a backup of your previous iPhone, iPad, or iPod touch.
Transfer your iCloud Backup to your New iPhone 11
Step 1 Turn on iPhone 11 and wait till a ‘Hello’ screen appear.
Step 2 Follow the instructions until the ‘Wi-Fi‘ screen show up.
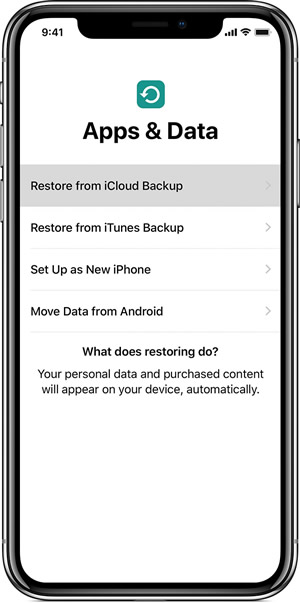
Step 3 Tap one of the Wi-Fi network to join and keep following the instructions till the ‘Apps & Data‘ screen come up. Then select ‘Restore from iCloud Backup‘ function.
Step 4 Sign in with your Apple ID and password.
Step 5 Choose the certain iCloud backup you want.
Step 6 Wait till complete.
Transfer your iTunes Backup to your New iPhone 11
Step 1 Turn on iPhone 11 and wait till a ‘Hello’ screen appear.
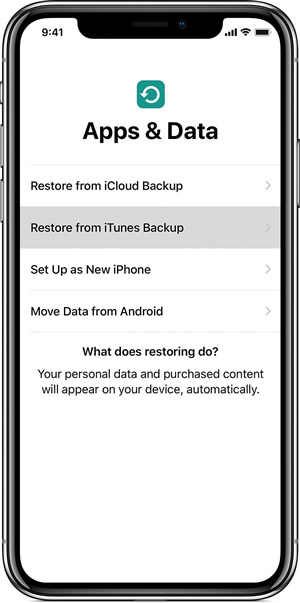
Step 2 Follow the instructions till the ‘Apps & Data‘ screen come up. Then select ‘Restore from iTunes Backup‘ function and click ‘Next‘.
Step 3 Connect your iPhone 11 to computer which you used to back up old iPhone.
Step 4 Launch iTunes on computer and select your iPhone 11.
Step 5 Click on ‘Restore Backup‘ to choose a certain backup.
Step 6 If you need to restore from an encrypted backup, enter your password when asked.
Step 7 Wait till complete and follow to rest of instruction to setup your iPhone 11.
Conclusion
Above are what we want to recommend you to use. Hope these four methods can help you transfer old iPhone data to new iPhone 11. Since Syncios Data Transfer possesses with the most powerful and comprehensive functions, why not download it and have a try?
Источник


