- Transfer photos and videos from your iPhone, iPad, or iPod touch
- Use iCloud Photos
- Import to your Mac
- Import to your Windows PC
- Sync photos between your Mac and iPhone or iPad
- Sync photos to your device
- Remove automatically synced photos from your device
- How to Transfer Photos from Mac to iPhone in 6 Ways
- Part 1. 4 Methods to Transfer Photos from Mac to iPhone Without iTunes
- Method 1. Transfer Photos from Mac to iPhone with EaseUS MobiMover
- Method 2. Copy Photos from Mac to iPhone Using iCloud
- Option 1. Use iCloud Photos app
- Option 2. Use the iCloud Website
- Method 3. Import Photos from Mac to iPhone via AirDrop
- Method 4. Move Photos from Mac to iPhone with Google Photos
- Part 2. How to Import Photos from Mac to iPhone Using iTunes/Finder
- The Bottom Line
Transfer photos and videos from your iPhone, iPad, or iPod touch
Learn how to transfer photos and videos from your iPhone, iPad, or iPod touch to your Mac or PC. You can also make your photos available on all your devices with iCloud Photos.
Use iCloud Photos
iCloud Photos keeps your photos and videos safe, up to date, and available automatically on all of your Apple devices, on iCloud.com, and even your PC. When you use iCloud Photos, you don’t need to import photos from one iCloud device to another. iCloud Photos always uploads and stores your original, full-resolution photos. You can keep full-resolution originals on each of your devices, or save space with device-optimized versions instead. Either way, you can download your originals whenever you need them. Any organizational changes or edits you make are always kept up to date across all your Apple devices. Learn how to set up and use iCloud Photos.
The photos and videos that you keep in iCloud Photos use your iCloud storage. Before you turn on iCloud Photos, make sure that you have enough space in iCloud to store your entire collection. You can see how much space you need and then upgrade your storage plan if necessary.
Import to your Mac
You can use the Photos app to import photos from your iPhone, iPad, or iPod touch to your Mac.
- Connect your iPhone, iPad, or iPod touch to your Mac with a USB cable.
- Open the Photos app on your computer.
- The Photos app shows an Import screen with all the photos and videos that are on your connected device. If the Import screen doesn’t automatically appear, click the device’s name in the Photos sidebar.
- If asked, unlock your iOS or iPadOS device using your passcode. If you see a prompt on your iOS or iPadOS device asking you to Trust This Computer, tap Trust to continue.
- Choose where you want to import your photos. Next to «Import to,» you can choose an existing album or create a new one.
- Select the photos you want to import and click Import Selected, or click Import All New Photos.

- Wait for the process to finish, then disconnect your device from your Mac.
Import to your Windows PC
You can import photos to your PC by connecting your device to your computer and using the Windows Photos app:
- Make sure that you have the latest version of iTunes on your PC. Importing photos to your PC requires iTunes 12.5.1 or later.
- Connect your iPhone, iPad, or iPod touch to your PC with a USB cable.
- If asked, unlock your iOS or iPadOS device using your passcode.
- If you see a prompt on your iOS or iPadOS device asking you to Trust This Computer, tap Trust or Allow to continue.
If you have iCloud Photos turned on, you need to download the original, full resolution versions of your photos to your iPhone before you import to your PC. Find out how.
When you import videos from your iOS or iPadOS device to your PC, some might be rotated incorrectly in the Windows Photos app. You can add these videos to iTunes to play them in the correct orientation.
If you’re having trouble importing photos from your iOS or iPadOS device to Windows 10, try these steps:
- On your iOS or iPadOS device, open the Settings app. Tap Camera, then tap Formats.
- Tap Most Compatible. From now on, your camera will create photos and videos in JPEG and H.264 formats.
Источник
Sync photos between your Mac and iPhone or iPad
You can sync photos on your Mac to your device. You can sync all or a selection of photos from your Photos library on your Mac. For example, you can sync a selection of favourite albums or photos of people.
You can also sync photos from your Pictures folder or another folder that you organise to hold photos. For example, you can import photos from a camera into a folder in the Finder. You can organise your photos in multiple folders within a folder and sync the folders to a device.
Synced photos appear in the Photos app on your device.
Important: If you already use iCloud Photos on your Mac and devices, your photos are updated automatically. You can’t use the syncing method described here unless you turn off iCloud Photos in Photos preferences. See Use iCloud Photos to store photos in iCloud and What is iCloud?
Sync photos to your device
Connect your device to your Mac.
You can connect your device using a USB or USB-C cable or using a Wi-Fi connection. See Sync content between your Mac and iPhone or iPad over Wi-Fi.
In the Finder  on your Mac, select the device in the Finder sidebar.

If you connect your device to your Mac using a USB cable and can’t see the device in the Finder sidebar, see If your device doesn’t appear in the sidebar.
Click Photos in the button bar.

Note: When iCloud Photos is turned on, no photo syncing options appear when you click Photos in the button bar.
Select “Sync Photos to your device from” tickbox, then choose Photos, Pictures or a folder from the pop-up menu.
Do one of the following:
When syncing photos from the Photos app: Click “All photos and albums” or “Selected albums”. If you click the “Selected albums” button, select the tickboxes of the albums you want to sync in the Albums list.

Click Photos or People to see your photos organised by that category.
When syncing photos from a folder: Click “All folders” or “Selected folders”. If you clicked “Selected folders”, select the tickboxes of the folders you want to sync in the Folders list.
Select syncing options:
Select the “Include videos” tickbox to include videos when syncing from a folder or Photos library.
When syncing from the Photos app, select the “Only favourites” tickbox to sync only photos specified as favourites.
When syncing from the Photos app, select the “Automatically include photos from” tickbox and choose a time period from the pop-up menu to sync only photos taken within that period.
When you’re ready to sync, click Apply.
You can choose to sync your Mac and your device automatically whenever you connect them. See Turn automatic syncing on or off on Mac.
Before disconnecting your device from your Mac, click the Eject button  in the Finder sidebar.
Remove automatically synced photos from your device
To remove an unwanted folder of photos from your Mac and device, delete photos from the Photos app or delete the folder from your Mac and sync your device.
To remove an album or folder of photos from just your device while keeping it on your Mac, follow these steps:
Connect your device to your Mac.
You can connect your device using a USB or USB-C cable or using a Wi-Fi connection. See Sync content between your Mac and iPhone or iPad over Wi-Fi.
In the Finder on your Mac, select your device in the sidebar, then click Photos in the button bar.
In the folders list, deselect the tickbox of the albums or folders you want removed.
Sync your Mac with the device.
WARNING: If you delete an automatically synced item from your Mac, the deleted item is removed from your device the next time you sync.
Before disconnecting your device from your Mac, click the Eject button in the Finder sidebar.
Источник
How to Transfer Photos from Mac to iPhone in 6 Ways
Photo transfer between two devices is needed in many situations. You may want to enrich the photo library on the target device, make a backup of your precious pictures somewhere else, or sheerly share images between two of your devices.В
That’s why many of you want to transfer photos from iPhone to iPhone, copy photos from PC to iPhone, import photos from Mac to iPhone, and more. Since the ways for the former two situations are detailed already, here I’d like to show you how to get photos from Mac to iPhone.
Part 1. 4 Methods to Transfer Photos from Mac to iPhone Without iTunes
Although iTunes does help you copy photos from Mac to your iPhone, you may not want to use it for many reasons, such as data syncing.В
Then «How do I transfer photos from Mac to iPhone without iTunes?», you asked. There are several ways to move photos (and videos) from Mac to your iPhone without using iTunes, including using professional iOS data transfer software, iCloud, AirDrop, andВ Google Photos. Even if you prefer to transfer photos from Mac to iPhone without iCloud, you can still find other alternative ways. (Of course, you can apply the very same ways to transfer photos from Mac to iPad.)
Method 1. Transfer Photos from Mac to iPhone with EaseUS MobiMover
The commonest solution to import photos from Mac (or PC) to iPhone without iTunes is to use an iPhone data transfer tool like EaseUS MobiMover. With EaseUS MobiMover (no ads and plugins) installed on your computer, you can easily:
- Transfer files from computer to iPhone/iPad and vice versa
- Transfer data from one iPhone/iPad to another
- Manage iOS content by deleting, editing, creating items
What’s more, EaseUS MobiMover is also a free video downloader. That means you can save a video from Facebook, Twitter, YouTube, or other sites to your computer or iPhone/iPad. If you have ever wanted to download online videos to your devices for offline watching, EaseUS MobiMover will fit your needs exactly.
To transfer photos from Mac to iPhone:
Step 1.В Launch EaseUS MobiMover on your computer > Connect your iPhone to your Mac >В Select the «Mac to Phone» option on the main interface > Click the «Select Files» to continue.В
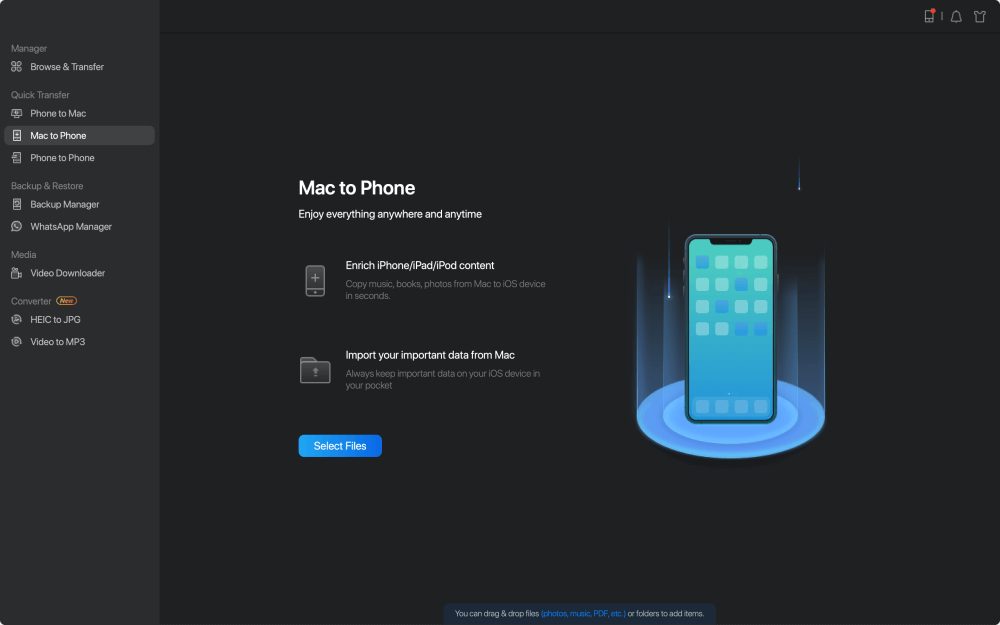
Step 2. With MobiMover, you can choose to transfer photos as well as many other popular files from Mac to your iPhone and iPad. Then, click the «Open» button to load the files.В

Step 3.В MobiMover will show the files you’ve selected on the screen. If you’ve missed an item, you can click «Add Contents» to import more files. Next, click the «Transfer» button to start the transfer process.В

You can also copy other types of content, including videos, music, ringtones, voice memos, books, and more, from Mac to your iPhone/iPad or get files from Windows PC to your devices using EaseUS MobiMover. If you need to transfer data to or from your iDevice often, software like EaseUS MobiMover is an essential tool for you. Don’t hesitate to give it a try.
Method 2. Copy Photos from Mac to iPhone Using iCloud
Another way to copy photos from Mac to iPhone should be using iCloud. By enabling the iCloud Photos on the Mac, your photos will by default automatically upload to your iCloud account, and eventually sync with other iOS devices using the same Apple ID. To use iCloud, you’ll need to:
- Make sure there is enough iCloud storage available.
- Install the Photos app on your Mac (macOS Yosemite and later)В if you don’t.
- Create a folder to house the photos you wish to export on your Mac.В
If you’ve prepared well, you can follow the steps below to transfer photos from Mac to iPhone. Note that iCloud offers two options for users to manage files, one is via iCloud Control Panel and another is via the iCloud website. You can apply the one you prefer.
Option 1. Use iCloud Photos app
Step 1. On your iPhone, go to the «Settings» app and choose [your name] > «iCloud» > «Photos».
Step 2. Enable «iCloud Photos». (Turn on «iCloud Photo Library» in earlier iOS versions.)
Step 3. On your Mac, go to the Apple menu and choose «System Preferences».
Step 4. Choose «iCloud» and sign in.
Step 5. Click «Options» next to «Photos» and switch on «iCloud Photos». Click «Done».
Step 6. After the syncing process, you can go to the Photos app on your iPhone to check the images.
![]()
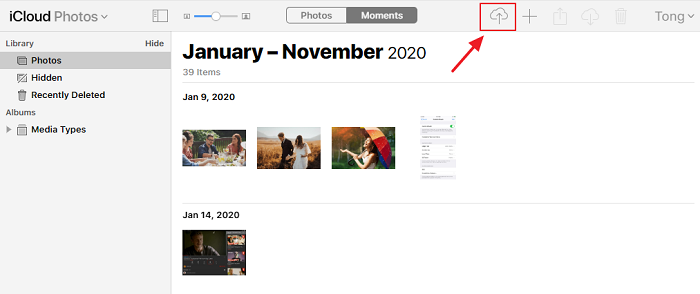
Option 2. Use the iCloud Website
Step 1. Likewise, make sure your iCloud Photos has been enabled on your iPhone.
Step 2. Open icloud.com on a new web browser and sign in to your Apple ID.
Step 3. From the iCloud page, choose «Photos.»
Step 4. Click «Upload»В (It looks like a cloud) at the top of this page.
Step 5. Choose the images from the folder on your Mac that you want to upload.
Step 6. Click «Choose.»
Step 7. Then, all of your photos will be uploaded to iCloud Photos.
Method 3. Import Photos from Mac to iPhone via AirDrop
AirDrop is another wireless option toВ move photos from Mac to iPhone. With AirDrop enabled, you are able to share photos, videos, contacts, and other content between two iOS devices. (You can check the official guide from AppleВ to learn what is AirDrop on Mac and how to AirDrop on Mac.) To use AirDrop, here are some preparations you need to do.В
- Make sure your WiFi and Bluetooth have been enabled on both your iPhone and Mac.
- Make sureВ anyВ Personal Hotspots have been turned off.В
- Your AirDrop settings should be set to Contacts Only or Every one instead of Receiving Off.
- PutВ your iPhone and Mac are within 9 meters (30 feet) of each other.
To import photos from Mac to iPhone via AirDrop:
Step 1. Turn on AirDrop on your Mac.В Learn how to fixВ theВ AirDrop not workingВ issue in case of need.В
- Go to «Finder» > «Go» > «AirDrop» and switch on «Bluetooth» and «WiFi» to turn on AirDrop on your Mac.
- Set the option «Allow to be discovered by» as «Everyone» or «Contacts Only».
Step 2. Turn on AirDrop on iPhone.
- Swipe up from the top/bottom of your device screen to open «Control Center».
- Tap on AirDrop and set your iPhone to be discovered by «Contacts Only» or «Everyone».
Step 3. Once the Mac and the iPhone are connected. You can send photos from Mac to iPhone using AirDrop freely. There are two ways to transfer photos from Mac to iPhone without iTunes using AirDrop.
- Drag the photos you want to send from Mac to iPhone to the image of the recipient and click «Send».
- Or you can click the «Share» button in an App, choose «AirDrop», choose the recipient and then click «Done».
Step 4. Check the transferred items in the Photos app on your iOS device.

Method 4. Move Photos from Mac to iPhone with Google Photos
Using AirDrop is not the only solution to transfer photos from Mac to your iPhone wirelessly. Cloud-based photo-sharing services like Google Photos allows you to share photos across your devices. To use cloud storage services to sync files across your devices, you need to make sure:
- You are using the same account on both your Mac and then iOS device.
- There is enough storage in the could for you to store the files.
Make sure the requirements are met and follow the steps below to transfer photos from Mac to iPhone.
Step 1. Upload photos from Mac to Google Photos.
- If you have installed Google Photos for Mac, upload photos from the app directly.
- If not, go to Google Photos, sign in, and then click the «Upload» button to send photos from Mac.
Step 2. Download and install the Google Photos app on your iPhone.
Step 3. Sign in with the account you used to upload the photos.
Step 4. Then, all photos imported from your Mac will be displayed. You can select and download your wanted pictures to your iPhone.

These are the four proven ways to transfer photos from Mac to iPhone without iTunes. Among them, using EaseUS MobiMover allows you to transfer photos from Mac to iPhone via a USB cable while the other three help you to send photos wirelessly. If you prefer to import pictures from Mac to iPhone without iTunes, apply one of them to get things done within minutes.
Part 2. How to Import Photos from Mac to iPhone Using iTunes/Finder
If you are sure you want to remove the existing music, movies, TV shows, books, and tones from your device and sync it with iTunes. You will learn how to do it in this part. It’s worth noting that starting fromВ macOS Catalina, iTunes is replaced by Finder and all functions of iTunes will be delivered to Finder. So, you can use iTunes inВ macOS Mojave and earlier versions, or Finder in macOS Catalina and later.
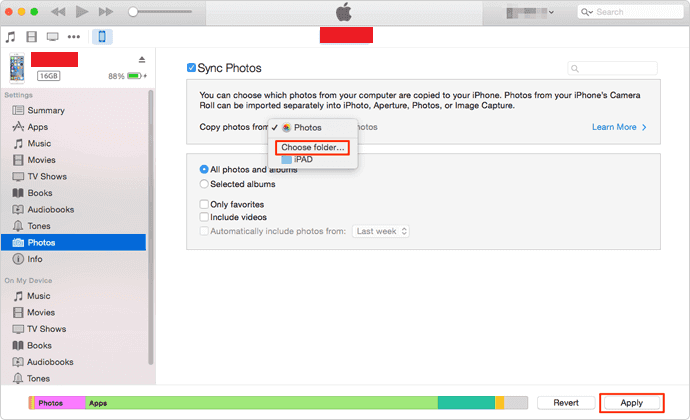
To import photos from Mac to iPhone with iTunes:
Step 1. Connect your iPhone to your computer.
Step 2. After iTunes runs automatically, click the device icon and choose «Photos».
Step 3. Check «Sync Photos» and choose the pictures you are going to copy from the option «Copy photos from».
Step 4. Click «Apply» to start syncing photos from Mac to your iPhone via iTunes.
To sync photos from Mac to iPhone via Finder
Step 1. Open Finder and connect your iPhone to the computer.
Step 2. Unlock your mobile device and trust the Mac.
Step 3. In Finder, choose your iPhone and select the category you want to share.
Step 4. Check the «Sync [category]» option and select the specific items you want to share.
Step 5. Click «Apply» to start transferring files from Mac to your device.
Step 6. When it has done, go to the Photos app on your iPhone to check the items.
![]()
The Bottom Line
Now you know how to put photos on iPhone from Mac using different ways. If you also need to add other types of content to your iPhone or iPad from a Mac, refer to the guide on how to transfer files from Mac to iPhone/iPadВ to learn more details.
о™љо™љо™љо™љо™љ
4.5 out of 5 stars, based on 10 votes
EaseUS MobiMover allows you to easily transfer all data from your iPhone to your PC. The app is available for both Windows and Macs so irrespective of which platform you use, you are covered.

EaseUs MobiMover solves this problem as it allows you to transfer data from an iPhone to a Mac, Mac to an iPhone, or from one iPhone to another iPhone fast.

EaseUS MobiMover is a program that allows you to share files between your iOS device and your PC in an easy manner. This is very useful, since both operative systems are not compatible.

EaseUS MobiMover for Mac and PC is a powerful tool for transferring data from your Apple mobile device to your computer, managing the variety of files that you create, and moving those huge videos quickly.

Related Articles — ALSO ON EaseUS SOFTWARE
Источник


