- Transfer photos and videos from your iPhone, iPad, or iPod touch
- Use iCloud Photos
- Import to your Mac
- Import to your Windows PC
- How to Transfer Photos from iPhone to New iPhone (iPhone 12 Supported)
- iPhone to iPhone Transfer Tips
- PhoneTrans – Full-Way iPhone Photos Transfer Tool
- Method 1:В Transfer Photos Videos with Photo Transfer Tools
- #1. PhoneTrans –В Transfer Pictures from iPhone to iPhone inВ Minutes
- #2.В AnyTrans – A Professional Data Management Tool
- AnyTrans – iPhone Photos Transfer
- Option 1. Selectively TransferВ with AnyTrans
- Step 1. Connect your devices to transfer photos.
- Step 2. Transfer photos to a new iPhone.
- Option 2. Transfer All Photos in 1-Click
- Step 1. Connect your devices and choose Phone Switcher.
- Step 2.В Confirm your target iPhone.
- Step 3. Transfer photos from iPhone to iPhone.
- Using iCloud Photos to Transfer Photos from iPhone to iPhone
- Let’s checkВ howВ toВ sync photos from iPhone to iPhone using iCloud:
- How to Transfer Photos from the old iPhone to the new iPhone:
- Method 3: Transfer Photos from iPhone to iPhoneВ UsingВ iTunes
- AirDrop Photos from iPhone to iPhone
- Step 1. Enable AirDrop on two iPhones
- Step 2. Select photos you want to transfer from the Photos app
- Step 3. Receive photos from the target iPhone
- Send Photos from One iPhone to Another via Email
- How to Transfer Photos from iPhone to iPhone via Copy iCloud Link
- The Bottom Line
Transfer photos and videos from your iPhone, iPad, or iPod touch
Learn how to transfer photos and videos from your iPhone, iPad, or iPod touch to your Mac or PC. You can also make your photos available on all your devices with iCloud Photos.
Use iCloud Photos
iCloud Photos keeps your photos and videos safe, up to date, and available automatically on all of your Apple devices, on iCloud.com, and even your PC. When you use iCloud Photos, you don’t need to import photos from one iCloud device to another. iCloud Photos always uploads and stores your original, full-resolution photos. You can keep full-resolution originals on each of your devices, or save space with device-optimized versions instead. Either way, you can download your originals whenever you need them. Any organizational changes or edits you make are always kept up to date across all your Apple devices. Learn how to set up and use iCloud Photos.
The photos and videos that you keep in iCloud Photos use your iCloud storage. Before you turn on iCloud Photos, make sure that you have enough space in iCloud to store your entire collection. You can see how much space you need and then upgrade your storage plan if necessary.
Import to your Mac
You can use the Photos app to import photos from your iPhone, iPad, or iPod touch to your Mac.
- Connect your iPhone, iPad, or iPod touch to your Mac with a USB cable.
- Open the Photos app on your computer.
- The Photos app shows an Import screen with all the photos and videos that are on your connected device. If the Import screen doesn’t automatically appear, click the device’s name in the Photos sidebar.
- If asked, unlock your iOS or iPadOS device using your passcode. If you see a prompt on your iOS or iPadOS device asking you to Trust This Computer, tap Trust to continue.
- Choose where you want to import your photos. Next to «Import to,» you can choose an existing album or create a new one.
- Select the photos you want to import and click Import Selected, or click Import All New Photos.

- Wait for the process to finish, then disconnect your device from your Mac.
Import to your Windows PC
You can import photos to your PC by connecting your device to your computer and using the Windows Photos app:
- Make sure that you have the latest version of iTunes on your PC. Importing photos to your PC requires iTunes 12.5.1 or later.
- Connect your iPhone, iPad, or iPod touch to your PC with a USB cable.
- If asked, unlock your iOS or iPadOS device using your passcode.
- If you see a prompt on your iOS or iPadOS device asking you to Trust This Computer, tap Trust or Allow to continue.
If you have iCloud Photos turned on, you need to download the original, full resolution versions of your photos to your iPhone before you import to your PC. Find out how.
When you import videos from your iOS or iPadOS device to your PC, some might be rotated incorrectly in the Windows Photos app. You can add these videos to iTunes to play them in the correct orientation.
If you’re having trouble importing photos from your iOS or iPadOS device to Windows 10, try these steps:
- On your iOS or iPadOS device, open the Settings app. Tap Camera, then tap Formats.
- Tap Most Compatible. From now on, your camera will create photos and videos in JPEG and H.264 formats.
Источник
How to Transfer Photos from iPhone to New iPhone (iPhone 12 Supported)
Got a new iPhone 12? Want to transfer your precious photos from the old iPhone to the new iPhone? Read on this guide to get 6 efficient ways to transfer pictures from iPhone to iPhone effortlessly. Applying to all iPhone models: iPhone 12/11/XS/XR/X/8/7/6/5/4.
iPhone to iPhone Transfer Tips
Transfer/Sync iPhone
Transfer Media Data
Transfer Personal Info
PhoneTrans – Full-Way iPhone Photos Transfer Tool
Free download PhoneTrans to transfer all photos (Camera Roll, Photo Library, Photo Stream, and Albums) from old iPhone toВ new iPhone simply.
According to our users’ report, they usually have the plan to transfer photos from iPhone to iPhone in the following cases:
- Get a new iPhone 12 series, and want to transfer photos to the new iPhone.
- Have some interesting photos, and want to share photos between your iPhone and your families’ or friends’ iPhone.
- Or just want to transfer photos from one iPhone to another for an extra backup.
No matter which situation you are in, you are totally on the right page. TransferringВ picturesВ from one iPhone to another is quite easy. In this post, weВ will show you how to transfer pictures from iPhone to iPhone iPad iPod touch in 6 different ways:В usingВ iTunes, iCloud, AirDrop, and professionalВ iPhone photos transfer tool.
Method 1:В Transfer Photos Videos with Photo Transfer Tools
Unlike transferring photos via iCloud, previewing and selectively transfer photos is possible if you use transfer software. Here are 2 of them recommended in this part. All of them are proved to be quite effective and can work out really well. Sure, with a tool, time will be saving and no skills are required.
#1. PhoneTrans –В Transfer Pictures from iPhone to iPhone inВ Minutes
PhoneTrans commits to providing a quick and easy way for data(photos) transfer between iPhones. No matter you want to transfer photos selectively or packed them in one to send, you can complete them with PhoneTrans with a few clicks. PhoneTrans supports 3 transfer options on iPhone switching.
- Quick TransferВ – It supports data (photos) transfer from iPhone to iPhone selectively and wholly within clicks.
- Phone Clone – It provides a perfect way to 1:1 copy the iPhone to the other iPhone.
- Phone Merge – Phone Merge can easily migrate iPhone data without any data loss, no overwritten, and no duplicates.
Each of them can help iPhone users to accomplish photos transfer quickly and safely. Let’s check out how PhoenTrans works on photo transfer from iPhone to iPhone.
Step 1. Download PhoneTrans and launch it on a computer. At the same time, you can connect both of your iPhones to the computer.
* 100% Clean & Safe
Step 2. Choose the Quick Transfer as it supports selectively transfer Photos between iPhones. Clone Phone can 1:1 copy your iPhone while the Merge Phone can remove duplicate photos. But both of them don’t provide a solution to transfer photos selectively.
![]()
Choose Phone to Phone – Quick Transfer
Step 3. Just follow the instructions on the screen, you need toВ select Photos and click on Transfer Now to start photos transfer from iPhone to iPhone.
![]()
Select Photos and Click on Transfer Now
Now all you can do is wait for a while, PhoneTrans will complete the photo transfer from iPhone to iPhone in minutes. Then there will pop up a window and tell you the Successfully Transferred.
#2.В AnyTrans – A Professional Data Management Tool
According to our test,В the iOS photos transfer tool –В AnyTrans can be the quickest and easiest way to do the task,В even transfer a large number of photos between iPhones.В No more annoying photo transfer from iPhone to iPhone limitations. Just open AnyTrans on your computer and follow its instructions, the photo transfer would complete in minutes.
AnyTrans – iPhone Photos Transfer
- Just a few minutes and 1 click to move all photos.
- The ONLY way to transfer photos in all albums.
- CopyВ everything to the new iPhone in 1 clickВ as you prefer.
- Work well with allВ iPhone models as well as iOS systems.
Now,В Free Download AnyTrans , then follow theВ steps below to learn how to transfer photos from iPhone to iPhone effortlessly.
Option 1. Selectively TransferВ with AnyTrans
Step 1. Connect your devices to transfer photos.
Install AnyTrans on yourВ Mac or PCВ > Run it > Connect both of your iPhones to the computer (PC or Mac) with USB cables > Click on the “Photos” category.
![]()
Click Photos in Device Manager
Step 2. Transfer photos to a new iPhone.
Pick up the album with the photos you want to transfer > Select the specific photos you want to transfer > Click on the “To iPhone” button to transfer photos to another iPhone.
![]()
Select the photos you want to transfer
Since iOS 11 and iPhone 7,В Apple started using HEIC photos to replace JPG for saving photos on iOS devices and Macs. While this new file format is remarkably more efficient in terms of storage space and high quality, it is not yet widely compatible.
But, don’t worry, AnyTrans fully supports this image format. And if you’d like to convert HEIC photos to JPG or other formats online,В iMobie HEIC Converter will help you. With it, you can view the HEIC file on Windows and Mac easily.
We have prepared a video tutorial here to show you how to transfer photos from iPhone to new iPhoneВ (iPhone 12 supported). After watching this video, you might have a better idea of how AnyTrans works.
Option 2. Transfer All Photos in 1-Click
Step 1. Connect your devices and choose Phone Switcher.
Free Download AnyTrans В and install it on your computer > Connect both of your iPhones to the computer with USB cables >В Choose “Phone Switcher” mode > Click on the “Phone to iPhone” option.
![]()
Choose Phone to iPhone on Phone Switcher
Step 2.В Confirm your target iPhone.
Confirm your source iPhone and target iPhone, and then click theВ “Next” button to continue.
![]()
Confirm the Source iPhone and the Target iPhone
Step 3. Transfer photos from iPhone to iPhone.
Uncheck the “Select All” button and check the “My Photos” and “My Photo Stream” category only > Click on theВ “Next” В button to start transferring photos to your new iPhone.
![]()
Check Photos Category to Transfer
Option 1 is perfect when you want to transfer part of photos from one iPhone to another, and Option 2 is suited for you when you need to transfer all photos from iPhone to iPhone.
If you just get a new iPhone, in addition to only transfer photos from an iPhone to another, you can actually transfer more data from old iPhone to new iPhone with AnyTrans.
Using iCloud Photos to Transfer Photos from iPhone to iPhone
iCloud Photos allows you to sync photos across all iOS devices. It replaced the traditional Camera Roll and Photo Stream options with an All Photos section. There is no 30 days or 1,000 photos restriction either. There areВ some tips to know before starting the tutorial about how to transfer photos from iPhone to iPhone via iCloud:
- The two iPhones need to be iOS 8.3 or later.
- You need to enable iCloud Photo Library on both iPhones.
- The two iPhones should log into the same Apple ID.
- You will need to be connected to a wireless network to upload the photos.
- You need to make sure there is enough iCloud storage space since iCloud Photo Library uses your iCloud storage allotment.
Let’s checkВ howВ toВ sync photos from iPhone to iPhone using iCloud:
-
- Head to Settings on your iPhone > [your name] > Tap on iCloud.
- Click on Photos which is Off now.
- Enable the iCloud Photos.
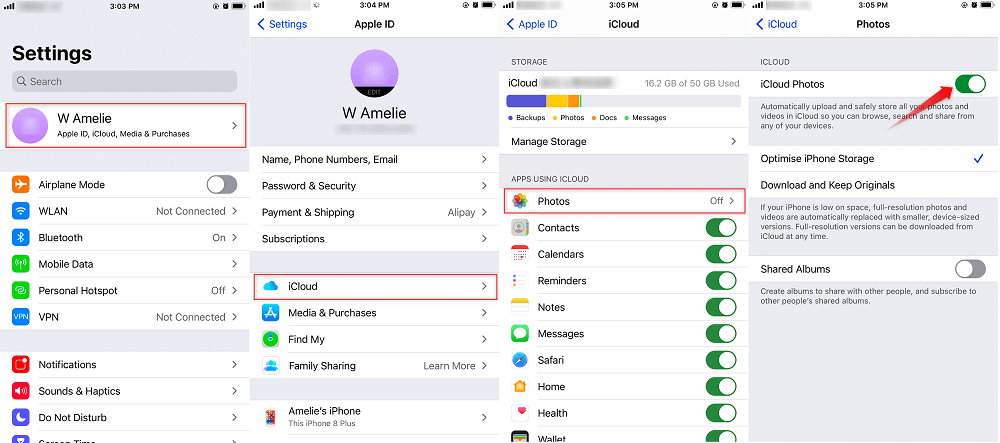
Transfer Photos from iPhone to iPhone Using iCloud
Once you completed all these steps, the iCloud Photos are enabled and the button already turned green.
How to Transfer Photos from the old iPhone to the new iPhone:
-
- Open the new iPhone > tap Restore from iCloud Backup on the Apps & Data page.
- В Log into the same iCloud ID(Apple ID) you have used to sync the photosВ > Choose a backup to restore.
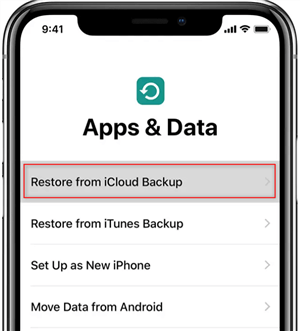
Restore Photos from iCloud Backup
Method 3: Transfer Photos from iPhone to iPhoneВ UsingВ iTunes
iTunes can be one of the most common ways for iOS users to transfer files. But iTunes will erase the existing photos in Photo Library when you try to transfer pics to your new iPhone. Also, if you have turned on iCloud Photo Library on your iPhone when syncing photos from iDevice to iDevice with iTunes, you may get a pop up: “iCloud Photos is On. XXX can access photos in iCloud. Photos can be downloaded to your device via Wi-Fi or cellular network”.
In this case, you have to turn off the iCloud Photo Library on your iPhone, or you can’t finish the sync process via iTunes. But if you turn off the iCloud Photo Library on your device, all the photos stored in iCloud but not on your device will be erased.
Here’sВ how to transfer photos from iPhone to iPhone using iTunes:
- Connect your iPhone to the computer with a USB cable.
- For Mac users, launch the “Photos” app if it doesn’t open automatically.
- For Windows users, click Import Pictures and Videos when AutoPlay appears.
- Pick up the photos you want to transfer.
- Click “Import or Import Selected” toВ import photos from your iPhone to your PC or Mac computer.
- Connect your new iPhone, family, or friends’ iPhone to the computer with a USB cable.
- Launch “iTunes” on your computer.
- Click the “Device” button in the upper-right corner of iTunes.
- Click on the “Photos” option on the left panel.
- Select “Sync Photos” from Application or Folder.
- Click the “Apply” button to sync photos to your new iPhone.
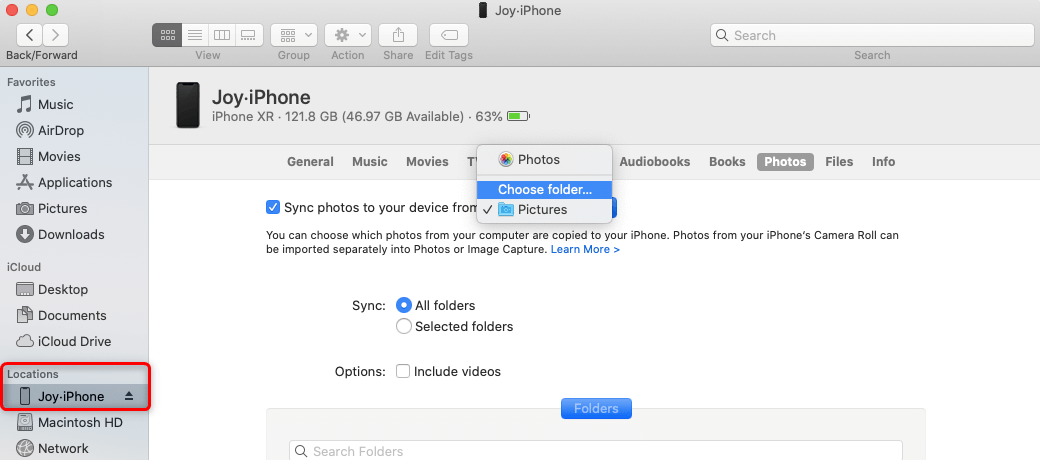
Sync Photos from Mac to iPhone via Finder
AirDrop Photos from iPhone to iPhone
The AirDrop requires iOS 7 on iPhone 5 and later, if you have a few photos to transfer, it’s a good choice. But if you have hundreds or thousands of photos need to transfer, this method is not recommended. Now, let’s check how to transfer picturesВ from one iPhone to another using AirDrop:
Step 1. Enable AirDrop on two iPhones
- LaunchВ Control CenterВ by swiping up from the bottom bezel of your iPhone.
- Press and hold your finger on the upper-left box with the airplane buttons.
- TapВ AirDrop > ChooseВ Contacts OnlyВ orВ EveryoneВ to turn AirDrop on.
Step 2. Select photos you want to transfer from the Photos app
- Open the Photos app on your iPhone and find the pictures you want to send.
- Tap the Share icon in the lower-left corner.
- The AirDrop option will show and tap on it.
Step 3. Receive photos from the target iPhone
- AirDrop will pop up and ask if you want to receive photos just send from the iPhone.
- Receive the photos and they will be saved to the Photos app.
![]()
How to Transfer Photos from iPhone to iPhone with AirDrop
Send Photos from One iPhone to Another via Email
When there were no other transfer options available, people used to use the email feature to send and receive content including photos. In this method, what you do isВ that you email yourself all the photos you want to share and then you access your email account on the device where you want your photos. Since all it requires is sending an email, you should be done in no time.
Here’s how to send photos to a new iPhone using Email:
- Compose a new email in your favorite email client on your iPhone.
- When the compose screen opens, tap on the option to add a new attachment.
- Add all the photos that you want to transfer to your new iPhone.
- Send the email once all the photos have been attached.
- On your target iPhone, open the same email inbox and download the attachments.
- Your photos are now available for viewing on yourВ target iPhone.
- Your task is done.
![]()
How to Transfer Photos from iPhone to iPhone with Email
How to Transfer Photos from iPhone to iPhone via Copy iCloud Link
iOS 14 brings some more new features, you can share your files with the new function – Copy iCloud Link. It supports transferring photos from iPhone to iPhone with just a link. It’s quite easy which only requires your iPhone are updated to iOS 14. Keep on reading and knock out how to transfer photos with it.
Open your iPhone and go to Photos > Choose the photos you want to transfer > Click on the Share button > Scroll down to the Copy iCloud Link > Give it seconds to prepare the Link.
![]()
Copy iCloud Link to Transfer Photos from iPhone to iPhone
Once it completed the link copy, you can go to the messages, email, WhatsApp, etc. to paste the link and send the link to the iPhone you want to share the photos with. Click on the ADD ALL or Choose the Select to save the pics to your Library.

Add Photos from iCloud Link
Our users sent us letters saying that they want some other info about how to transfer files to the new iPhone, and how to import photos to their Mac. So, here we would like to add a part to talk about these two topics.
For those users who want to import photos from iPhone to the Mac or PC, you have many options to do the task, like iCloud Photos, the Photos app on your computer, Email, etc. And the guideВ How to ImportВ Photos Videos from iPhone to Computer with 7 WaysВ collected all the possible ways to help you send your iPhone photos to your computer.
For the users who want to get the ideas to transfer data from iPhone to iPhone, you can refer to this guide to get more details:В How to Transfer Data from iPhone to New iPhone >
The Bottom Line
Apparently, compared with the iCloud and iTunes way, AnyTransВ and PhoneTrans both offer you a much easier way to transfer photos from iPhone to iPhone. Except for photo transfer, they also support transferring more than 20 files from iPhone to iPhone, includingВ contacts, messages, voice memos, notes, music, etc. Why not give them a try now?
Источник


