- Работа с камерой в Android
- Camera
- In this document
- Key Classes
- See also
- Considerations
- The Basics
- Manifest Declarations
- Using Existing Camera Apps
- Image capture intent
- Video capture intent
- Receiving camera intent result
- Building a Camera App
- Detecting camera hardware
- Accessing cameras
- Checking camera features
- Creating a preview class
- Placing preview in a layout
- Capturing pictures
- Capturing videos
- Configuring MediaRecorder
- Starting and stopping MediaRecorder
- Releasing the camera
- Saving Media Files
- Camera Features
- Checking feature availability
- Using camera features
- Metering and focus areas
- Face detection
- Time lapse video
Работа с камерой в Android
Работа с камерой на телефоне всегда представляла для меня интерес. Как же это все устроено… И вот мне в руки попал телефон с Android’ом. Я не преминул возможностью попробовать разобраться в этом. Вот что получилось в итоге.
Рассмотрим небольшую программу, которая позволяет делать снимки.
Все операции проводятся с помощью класса Camera.
Необходимо завести переменную
и инициализировать ее
После завершения работы с камерой необходимо сделать
в противном случае камера останется заблокированной и недоступной для других приложений.
Для обычных приложений типа фотокамеры инициализацию лучше всего производить в onResume, а освобождение в onPause.
Обязательным условием при работе с камерой является создание окна предпросмотра (preview). Это окно должно являться объектом класса Surfaceи для отображения на экране подходит SurfaceView.
Объявим
Чтобы задать preview, необходимо вызвать метод setPreviewDisplay, параметром которого является объект класса SurfaceHolder.
Чтобы включить отображение preview, вызываем
Если этого не сделать, то камера не сможет делать снимки.
Собственно для того, чтобы сделать снимок, необходимо вызвать метод
С помощью параметров (кстати, любой из них может быть null) задаются обработчики разных событий:
- shutter — вызывается в момент получения изображения с матрицы
- raw — программе передаются для обработки raw данные (если поддерживается аппаратно)
- postview — программе передаются полностью обработанные данные (если поддерживается аппаратно)
- jpg — программе передается изображение в виде jpg. Здесь можно организовать запись изображения на карту памяти.
Вызов takePicture можно поместить непосредственно в обработчик onClick кнопки — в этом случае фотографирование произойдет сразу после нажатия на нее, но можно и воспользоваться предварительной автофокусировкой.
В этом случае задается обработчик Camera.AutoFocusCallback, в котором необходимо реализовать метод
Тогда после вызова в обработчике нажатия на кнопку camera.autoFocus(), однократно будет вызван обработчик, в котором мы уже и примем решение об удачной фокусировке и необходимости сделать снимок.
Для работы с SurfaceHolder можно задать SurfaceHolder.Callback
surfaceHolder.addCallback();
В этом случае необходимо реализовать методы
C помощью них приложению будет сообщаться о том, что Surface успешно создано, если оно изменено или то, что оно удалено.
Размер нашего preview можно менять в процессе выполнения программы:
Для приложения камеры удобнее всего сразу задать расположение экрана как
setRequestedOrientation(ActivityInfo.SCREEN_ORIENTATION_LANDSCAPE);
В противном случае нам придется, например, в surfaceCreated проверять расположение экрана и поворачивать preview с помощью, например, camera.setDisplayOrientation(0) .
Это не очень удобно, потому что поворот экрана занимает какое-то время. В этот момент происходит вызов onPause и onResume, пересоздается Surface.
Также имеется возможность объявить обработчик Camera.PreviewCallback, с помощью которого путем реализации метода
можно получать и обрабатывать каждый кадр, отображаемый в preview.
И последний важный момент. Чаще всего получается так, что отношение сторон SurfaceView отличается от отношения сторон в preview камеры. Поэтому для того, чтобы избежать искажений изображения на экране, необходимо подкорректировать размер отображаемого окна предпросмотра.
Чуть не забыл. В манифест необходимо добавить permission
MainScreen.java
main.xml
AndroidManifest.xml
Программа отлаживалась и тестировалась на телефоне LG Optimus One P500.
При написании использовались следующие источники информации:
Источник
Camera
In this document
Key Classes
See also
The Android framework includes support for various cameras and camera features available on devices, allowing you to capture pictures and videos in your applications. This document discusses a quick, simple approach to image and video capture and outlines an advanced approach for creating custom camera experiences for your users.
Considerations
Before enabling your application to use cameras on Android devices, you should consider a few questions about how your app intends to use this hardware feature.
- Camera Requirement — Is the use of a camera so important to your application that you do not want your application installed on a device that does not have a camera? If so, you should declare the camera requirement in your manifest.
- Quick Picture or Customized Camera — How will your application use the camera? Are you just interested in snapping a quick picture or video clip, or will your application provide a new way to use cameras? For a getting a quick snap or clip, consider Using Existing Camera Apps. For developing a customized camera feature, check out the Building a Camera App section.
- Storage — Are the images or videos your application generates intended to be only visible to your application or shared so that other applications such as Gallery or other media and social apps can use them? Do you want the pictures and videos to be available even if your application is uninstalled? Check out the Saving Media Files section to see how to implement these options.
The Basics
The Android framework supports capturing images and video through the Camera API or camera Intent . Here are the relevant classes:
Camera This class is the primary API for controlling device cameras. This class is used to take pictures or videos when you are building a camera application. SurfaceView This class is used to present a live camera preview to the user. MediaRecorder This class is used to record video from the camera. Intent An intent action type of MediaStore.ACTION_IMAGE_CAPTURE or MediaStore.ACTION_VIDEO_CAPTURE can be used to capture images or videos without directly using the Camera object.
Manifest Declarations
Before starting development on your application with the Camera API, you should make sure your manifest has the appropriate declarations to allow use of camera hardware and other related features.
- Camera Permission — Your application must request permission to use a device camera.
Note: If you are using the camera via an intent, your application does not need to request this permission.
Camera Features — Your application must also declare use of camera features, for example:
For a list of camera features, see the manifest Features Reference.
Adding camera features to your manifest causes Google Play to prevent your application from being installed to devices that do not include a camera or do not support the camera features you specify. For more information about using feature-based filtering with Google Play, see Google Play and Feature-Based Filtering.
If your application can use a camera or camera feature for proper operation, but does not require it, you should specify this in the manifest by including the android:required attribute, and setting it to false :
For more information about getting user location, see Location Strategies.
Using Existing Camera Apps
A quick way to enable taking pictures or videos in your application without a lot of extra code is to use an Intent to invoke an existing Android camera application. A camera intent makes a request to capture a picture or video clip through an existing camera app and then returns control back to your application. This section shows you how to capture an image or video using this technique.
The procedure for invoking a camera intent follows these general steps:
- Compose a Camera Intent — Create an Intent that requests an image or video, using one of these intent types:
- MediaStore.ACTION_IMAGE_CAPTURE — Intent action type for requesting an image from an existing camera application.
- MediaStore.ACTION_VIDEO_CAPTURE — Intent action type for requesting a video from an existing camera application.
- Start the Camera Intent — Use the startActivityForResult() method to execute the camera intent. After you start the intent, the Camera application user interface appears on the device screen and the user can take a picture or video.
- Receive the Intent Result — Set up an onActivityResult() method in your application to receive the callback and data from the camera intent. When the user finishes taking a picture or video (or cancels the operation), the system calls this method.
Image capture intent
Capturing images using a camera intent is quick way to enable your application to take pictures with minimal coding. An image capture intent can include the following extra information:
- MediaStore.EXTRA_OUTPUT — This setting requires a Uri object specifying a path and file name where you’d like to save the picture. This setting is optional but strongly recommended. If you do not specify this value, the camera application saves the requested picture in the default location with a default name, specified in the returned intent’s Intent.getData() field.
The following example demonstrates how to construct a image capture intent and execute it. The getOutputMediaFileUri() method in this example refers to the sample code shown in Saving Media Files.
When the startActivityForResult() method is executed, users see a camera application interface. After the user finishes taking a picture (or cancels the operation), the user interface returns to your application, and you must intercept the onActivityResult() method to receive the result of the intent and continue your application execution. For information on how to receive the completed intent, see Receiving camera intent result.
Video capture intent
Capturing video using a camera intent is a quick way to enable your application to take videos with minimal coding. A video capture intent can include the following extra information:
- MediaStore.EXTRA_OUTPUT — This setting requires a Uri specifying a path and file name where you’d like to save the video. This setting is optional but strongly recommended. If you do not specify this value, the Camera application saves the requested video in the default location with a default name, specified in the returned intent’s Intent.getData() field.
- MediaStore.EXTRA_VIDEO_QUALITY — This value can be 0 for lowest quality and smallest file size or 1 for highest quality and larger file size.
- MediaStore.EXTRA_DURATION_LIMIT — Set this value to limit the length, in seconds, of the video being captured.
- MediaStore.EXTRA_SIZE_LIMIT — Set this value to limit the file size, in bytes, of the video being captured.
The following example demonstrates how to construct a video capture intent and execute it. The getOutputMediaFileUri() method in this example refers to the sample code shown in Saving Media Files.
When the startActivityForResult() method is executed, users see a modified camera application interface. After the user finishes taking a video (or cancels the operation), the user interface returns to your application, and you must intercept the onActivityResult() method to receive the result of the intent and continue your application execution. For information on how to receive the completed intent, see the next section.
Receiving camera intent result
Once you have constructed and executed an image or video camera intent, your application must be configured to receive the result of the intent. This section shows you how to intercept the callback from a camera intent so your application can do further processing of the captured image or video.
In order to receive the result of an intent, you must override the onActivityResult() in the activity that started the intent. The following example demonstrates how to override onActivityResult() to capture the result of the image camera intent or video camera intent examples shown in the previous sections.
Once your activity receives a successful result, the captured image or video is available in the specified location for your application to access.
Building a Camera App
Some developers may require a camera user interface that is customized to the look of their application or provides special features. Creating a customized camera activity requires more code than using an intent, but it can provide a more compelling experience for your users.
The general steps for creating a custom camera interface for your application are as follows:
- Detect and Access Camera — Create code to check for the existence of cameras and request access.
- Create a Preview Class — Create a camera preview class that extends SurfaceView and implements the SurfaceHolder interface. This class previews the live images from the camera.
- Build a Preview Layout — Once you have the camera preview class, create a view layout that incorporates the preview and the user interface controls you want.
- Setup Listeners for Capture — Connect listeners for your interface controls to start image or video capture in response to user actions, such as pressing a button.
- Capture and Save Files — Setup the code for capturing pictures or videos and saving the output.
- Release the Camera — After using the camera, your application must properly release it for use by other applications.
Camera hardware is a shared resource that must be carefully managed so your application does not collide with other applications that may also want to use it. The following sections discusses how to detect camera hardware, how to request access to a camera, how to capture pictures or video and how to release the camera when your application is done using it.
Caution: Remember to release the Camera object by calling the Camera.release() when your application is done using it! If your application does not properly release the camera, all subsequent attempts to access the camera, including those by your own application, will fail and may cause your or other applications to be shut down.
Detecting camera hardware
If your application does not specifically require a camera using a manifest declaration, you should check to see if a camera is available at runtime. To perform this check, use the PackageManager.hasSystemFeature() method, as shown in the example code below:
Android devices can have multiple cameras, for example a back-facing camera for photography and a front-facing camera for video calls. Android 2.3 (API Level 9) and later allows you to check the number of cameras available on a device using the Camera.getNumberOfCameras() method.
Accessing cameras
If you have determined that the device on which your application is running has a camera, you must request to access it by getting an instance of Camera (unless you are using an intent to access the camera).
To access the primary camera, use the Camera.open() method and be sure to catch any exceptions, as shown in the code below:
Caution: Always check for exceptions when using Camera.open() . Failing to check for exceptions if the camera is in use or does not exist will cause your application to be shut down by the system.
On devices running Android 2.3 (API Level 9) or higher, you can access specific cameras using Camera.open(int) . The example code above will access the first, back-facing camera on a device with more than one camera.
Checking camera features
Once you obtain access to a camera, you can get further information about its capabilities using the Camera.getParameters() method and checking the returned Camera.Parameters object for supported capabilities. When using API Level 9 or higher, use the Camera.getCameraInfo() to determine if a camera is on the front or back of the device, and the orientation of the image.
Creating a preview class
For users to effectively take pictures or video, they must be able to see what the device camera sees. A camera preview class is a SurfaceView that can display the live image data coming from a camera, so users can frame and capture a picture or video.
The following example code demonstrates how to create a basic camera preview class that can be included in a View layout. This class implements SurfaceHolder.Callback in order to capture the callback events for creating and destroying the view, which are needed for assigning the camera preview input.
If you want to set a specific size for your camera preview, set this in the surfaceChanged() method as noted in the comments above. When setting preview size, you must use values from getSupportedPreviewSizes() . Do not set arbitrary values in the setPreviewSize() method.
Placing preview in a layout
A camera preview class, such as the example shown in the previous section, must be placed in the layout of an activity along with other user interface controls for taking a picture or video. This section shows you how to build a basic layout and activity for the preview.
The following layout code provides a very basic view that can be used to display a camera preview. In this example, the FrameLayout element is meant to be the container for the camera preview class. This layout type is used so that additional picture information or controls can be overlayed on the live camera preview images.
On most devices, the default orientation of the camera preview is landscape. This example layout specifies a horizontal (landscape) layout and the code below fixes the orientation of the application to landscape. For simplicity in rendering a camera preview, you should change your application’s preview activity orientation to landscape by adding the following to your manifest.
Note: A camera preview does not have to be in landscape mode. Starting in Android 2.2 (API Level 8), you can use the setDisplayOrientation() method to set the rotation of the preview image. In order to change preview orientation as the user re-orients the phone, within the surfaceChanged() method of your preview class, first stop the preview with Camera.stopPreview() change the orientation and then start the preview again with Camera.startPreview() .
In the activity for your camera view, add your preview class to the FrameLayout element shown in the example above. Your camera activity must also ensure that it releases the camera when it is paused or shut down. The following example shows how to modify a camera activity to attach the preview class shown in Creating a preview class.
Note: The getCameraInstance() method in the example above refers to the example method shown in Accessing cameras.
Capturing pictures
Once you have built a preview class and a view layout in which to display it, you are ready to start capturing images with your application. In your application code, you must set up listeners for your user interface controls to respond to a user action by taking a picture.
In order to retrieve a picture, use the Camera.takePicture() method. This method takes three parameters which receive data from the camera. In order to receive data in a JPEG format, you must implement an Camera.PictureCallback interface to receive the image data and write it to a file. The following code shows a basic implementation of the Camera.PictureCallback interface to save an image received from the camera.
Trigger capturing an image by calling the Camera.takePicture() method. The following example code shows how to call this method from a button View.OnClickListener .
Note: The mPicture member in the following example refers to the example code above.
Caution: Remember to release the Camera object by calling the Camera.release() when your application is done using it! For information about how to release the camera, see Releasing the camera.
Capturing videos
Video capture using the Android framework requires careful management of the Camera object and coordination with the MediaRecorder class. When recording video with Camera , you must manage the Camera.lock() and Camera.unlock() calls to allow MediaRecorder access to the camera hardware, in addition to the Camera.open() and Camera.release() calls.
Note: Starting with Android 4.0 (API level 14), the Camera.lock() and Camera.unlock() calls are managed for you automatically.
Unlike taking pictures with a device camera, capturing video requires a very particular call order. You must follow a specific order of execution to successfully prepare for and capture video with your application, as detailed below.
- Open Camera — Use the Camera.open() to get an instance of the camera object.
- Connect Preview — Prepare a live camera image preview by connecting a SurfaceView to the camera using Camera.setPreviewDisplay() .
- Start Preview — Call Camera.startPreview() to begin displaying the live camera images.
- Start Recording Video — The following steps must be completed in order to successfully record video:
- Unlock the Camera — Unlock the camera for use by MediaRecorder by calling Camera.unlock() .
- Configure MediaRecorder — Call in the following MediaRecorder methods in this order. For more information, see the MediaRecorder reference documentation.
- setCamera() — Set the camera to be used for video capture, use your application’s current instance of Camera .
- setAudioSource() — Set the audio source, use MediaRecorder.AudioSource.CAMCORDER .
- setVideoSource() — Set the video source, use MediaRecorder.VideoSource.CAMERA .
- Set the video output format and encoding. For Android 2.2 (API Level 8) and higher, use the MediaRecorder.setProfile method, and get a profile instance using CamcorderProfile.get() . For versions of Android prior to 2.2, you must set the video output format and encoding parameters:
- setOutputFormat() — Set the output format, specify the default setting or MediaRecorder.OutputFormat.MPEG_4 .
- setAudioEncoder() — Set the sound encoding type, specify the default setting or MediaRecorder.AudioEncoder.AMR_NB .
- setVideoEncoder() — Set the video encoding type, specify the default setting or MediaRecorder.VideoEncoder.MPEG_4_SP .
- setOutputFile() — Set the output file, use getOutputMediaFile(MEDIA_TYPE_VIDEO).toString() from the example method in the Saving Media Files section.
- setPreviewDisplay() — Specify the SurfaceView preview layout element for your application. Use the same object you specified for Connect Preview.
Caution: You must call these MediaRecorder configuration methods in this order, otherwise your application will encounter errors and the recording will fail.
- Prepare MediaRecorder — Prepare the MediaRecorder with provided configuration settings by calling MediaRecorder.prepare() .
- Start MediaRecorder — Start recording video by calling MediaRecorder.start() .
- Stop Recording Video — Call the following methods in order, to successfully complete a video recording:
- Stop MediaRecorder — Stop recording video by calling MediaRecorder.stop() .
- Reset MediaRecorder — Optionally, remove the configuration settings from the recorder by calling MediaRecorder.reset() .
- Release MediaRecorder — Release the MediaRecorder by calling MediaRecorder.release() .
- Lock the Camera — Lock the camera so that future MediaRecorder sessions can use it by calling Camera.lock() . Starting with Android 4.0 (API level 14), this call is not required unless the MediaRecorder.prepare() call fails.
- Stop the Preview — When your activity has finished using the camera, stop the preview using Camera.stopPreview() .
- Release Camera — Release the camera so that other applications can use it by calling Camera.release() .
Note: It is possible to use MediaRecorder without creating a camera preview first and skip the first few steps of this process. However, since users typically prefer to see a preview before starting a recording, that process is not discussed here.
Tip: If your application is typically used for recording video, set setRecordingHint(boolean) to true prior to starting your preview. This setting can help reduce the time it takes to start recording.
Configuring MediaRecorder
When using the MediaRecorder class to record video, you must perform configuration steps in a specific order and then call the MediaRecorder.prepare() method to check and implement the configuration. The following example code demonstrates how to properly configure and prepare the MediaRecorder class for video recording.
Prior to Android 2.2 (API Level 8), you must set the output format and encoding formats parameters directly, instead of using CamcorderProfile . This approach is demonstrated in the following code:
The following video recording parameters for MediaRecorder are given default settings, however, you may want to adjust these settings for your application:
Starting and stopping MediaRecorder
When starting and stopping video recording using the MediaRecorder class, you must follow a specific order, as listed below.
- Unlock the camera with Camera.unlock()
- Configure MediaRecorder as shown in the code example above
- Start recording using MediaRecorder.start()
- Record the video
- Stop recording using MediaRecorder.stop()
- Release the media recorder with MediaRecorder.release()
- Lock the camera using Camera.lock()
The following example code demonstrates how to wire up a button to properly start and stop video recording using the camera and the MediaRecorder class.
Note: When completing a video recording, do not release the camera or else your preview will be stopped.
Note: In the above example, the prepareVideoRecorder() method refers to the example code shown in Configuring MediaRecorder. This method takes care of locking the camera, configuring and preparing the MediaRecorder instance.
Releasing the camera
Cameras are a resource that is shared by applications on a device. Your application can make use of the camera after getting an instance of Camera , and you must be particularly careful to release the camera object when your application stops using it, and as soon as your application is paused ( Activity.onPause() ). If your application does not properly release the camera, all subsequent attempts to access the camera, including those by your own application, will fail and may cause your or other applications to be shut down.
To release an instance of the Camera object, use the Camera.release() method, as shown in the example code below.
Caution: If your application does not properly release the camera, all subsequent attempts to access the camera, including those by your own application, will fail and may cause your or other applications to be shut down.
Saving Media Files
Media files created by users such as pictures and videos should be saved to a device’s external storage directory (SD Card) to conserve system space and to allow users to access these files without their device. There are many possible directory locations to save media files on a device, however there are only two standard locations you should consider as a developer:
- Environment.getExternalStoragePublicDirectory ( Environment.DIRECTORY_PICTURES ) — This method returns the standard, shared and recommended location for saving pictures and videos. This directory is shared (public), so other applications can easily discover, read, change and delete files saved in this location. If your application is uninstalled by the user, media files saved to this location will not be removed. To avoid interfering with users existing pictures and videos, you should create a sub-directory for your application’s media files within this directory, as shown in the code sample below. This method is available in Android 2.2 (API Level 8), for equivalent calls in earlier API versions, see Saving Shared Files.
- Context.getExternalFilesDir ( Environment.DIRECTORY_PICTURES ) — This method returns a standard location for saving pictures and videos which are associated with your application. If your application is uninstalled, any files saved in this location are removed. Security is not enforced for files in this location and other applications may read, change and delete them.
The following example code demonstrates how to create a File or Uri location for a media file that can be used when invoking a device’s camera with an Intent or as part of a Building a Camera App.
Note: Environment.getExternalStoragePublicDirectory() is available in Android 2.2 (API Level 8) or higher. If you are targeting devices with earlier versions of Android, use Environment.getExternalStorageDirectory() instead. For more information, see Saving Shared Files.
For more information about saving files on an Android device, see Data Storage.
Camera Features
Android supports a wide array of camera features you can control with your camera application, such as picture format, flash mode, focus settings, and many more. This section lists the common camera features, and briefly discusses how to use them. Most camera features can be accessed and set using the through Camera.Parameters object. However, there are several important features that require more than simple settings in Camera.Parameters . These features are covered in the following sections:
For general information about how to use features that are controlled through Camera.Parameters , review the Using camera features section. For more detailed information about how to use features controlled through the camera parameters object, follow the links in the feature list below to the API reference documentation.
Table 1. Common camera features sorted by the Android API Level in which they were introduced.
| Feature | API Level | Description |
|---|---|---|
| Face Detection | 14 | Identify human faces within a picture and use them for focus, metering and white balance |
| Metering Areas | 14 | Specify one or more areas within an image for calculating white balance |
| Focus Areas | 14 | Set one or more areas within an image to use for focus |
| White Balance Lock | 14 | Stop or start automatic white balance adjustments |
| Exposure Lock | 14 | Stop or start automatic exposure adjustments |
| Video Snapshot | 14 | Take a picture while shooting video (frame grab) |
| Time Lapse Video | 11 | Record frames with set delays to record a time lapse video |
| Multiple Cameras | 9 | Support for more than one camera on a device, including front-facing and back-facing cameras |
| Focus Distance | 9 | Reports distances between the camera and objects that appear to be in focus |
| Zoom | 8 | Set image magnification |
| Exposure Compensation | 8 | Increase or decrease the light exposure level |
| GPS Data | 5 | Include or omit geographic location data with the image |
| White Balance | 5 | Set the white balance mode, which affects color values in the captured image |
| Focus Mode | 5 | Set how the camera focuses on a subject such as automatic, fixed, macro or infinity |
| Scene Mode | 5 | Apply a preset mode for specific types of photography situations such as night, beach, snow or candlelight scenes |
| JPEG Quality | 5 | Set the compression level for a JPEG image, which increases or decreases image output file quality and size |
| Flash Mode | 5 | Turn flash on, off, or use automatic setting |
| Color Effects | 5 | Apply a color effect to the captured image such as black and white, sepia tone or negative. |
| Anti-Banding | 5 | Reduces the effect of banding in color gradients due to JPEG compression |
| Picture Format | 1 | Specify the file format for the picture |
| Picture Size | 1 | Specify the pixel dimensions of the saved picture |
Note: These features are not supported on all devices due to hardware differences and software implementation. For information on checking the availability of features on the device where your application is running, see Checking feature availability.
Checking feature availability
The first thing to understand when setting out to use camera features on Android devices is that not all camera features are supported on all devices. In addition, devices that support a particular feature may support them to different levels or with different options. Therefore, part of your decision process as you develop a camera application is to decide what camera features you want to support and to what level. After making that decision, you should plan on including code in your camera application that checks to see if device hardware supports those features and fails gracefully if a feature is not available.
You can check the availabilty of camera features by getting an instance of a camera’s parameters object, and checking the relevant methods. The following code sample shows you how to obtain a Camera.Parameters object and check if the camera supports the autofocus feature:
You can use the technique shown above for most camera features. The Camera.Parameters object provides a getSupported. () , is. Supported() or getMax. () method to determine if (and to what extent) a feature is supported.
If your application requires certain camera features in order to function properly, you can require them through additions to your application manifest. When you declare the use of specific camera features, such as flash and auto-focus, Google Play restricts your application from being installed on devices which do not support these features. For a list of camera features that can be declared in your app manifest, see the manifest Features Reference.
Using camera features
Most camera features are activated and controlled using a Camera.Parameters object. You obtain this object by first getting an instance of the Camera object, calling the getParameters() method, changing the returned parameter object and then setting it back into the camera object, as demonstrated in the following example code:
This technique works for nearly all camera features, and most parameters can be changed at any time after you have obtained an instance of the Camera object. Changes to parameters are typically visible to the user immediately in the application’s camera preview. On the software side, parameter changes may take several frames to actually take effect as the camera hardware processes the new instructions and then sends updated image data.
Important: Some camera features cannot be changed at will. In particular, changing the size or orientation of the camera preview requires that you first stop the preview, change the preview size, and then restart the preview. Starting with Android 4.0 (API Level 14) preview orientation can be changed without restarting the preview.
Other camera features require more code in order to implement, including:
- Metering and focus areas
- Face detection
- Time lapse video
A quick outline of how to implement these features is provided in the following sections.
Metering and focus areas
In some photographic scenarios, automatic focusing and light metering may not produce the desired results. Starting with Android 4.0 (API Level 14), your camera application can provide additional controls to allow your app or users to specify areas in an image to use for determining focus or light level settings and pass these values to the camera hardware for use in capturing images or video.
Areas for metering and focus work very similarly to other camera features, in that you control them through methods in the Camera.Parameters object. The following code demonstrates setting two light metering areas for an instance of Camera :
The Camera.Area object contains two data parameters: A Rect object for specifying an area within the camera’s field of view and a weight value, which tells the camera what level of importance this area should be given in light metering or focus calculations.
The Rect field in a Camera.Area object describes a rectangular shape mapped on a 2000 x 2000 unit grid. The coordinates -1000, -1000 represent the top, left corner of the camera image, and coordinates 1000, 1000 represent the bottom, right corner of the camera image, as shown in the illustration below.
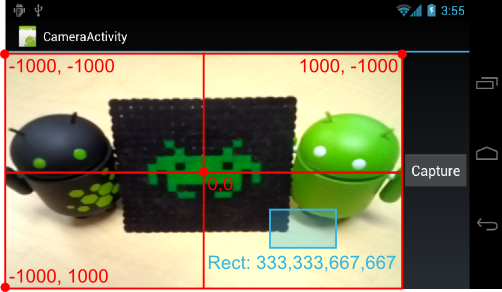
Figure 1. The red lines illustrate the coordinate system for specifying a Camera.Area within a camera preview. The blue box shows the location and shape of an camera area with the Rect values 333,333,667,667.
The bounds of this coordinate system always correspond to the outer edge of the image visible in the camera preview and do not shrink or expand with the zoom level. Similarly, rotation of the image preview using Camera.setDisplayOrientation() does not remap the coordinate system.
Face detection
For pictures that include people, faces are usually the most important part of the picture, and should be used for determining both focus and white balance when capturing an image. The Android 4.0 (API Level 14) framework provides APIs for identifying faces and calculating picture settings using face recognition technology.
Note: While the face detection feature is running, setWhiteBalance(String) , )»>setFocusAreas(List ) and )»>setMeteringAreas(List ) have no effect.
Using the face detection feature in your camera application requires a few general steps:
- Check that face detection is supported on the device
- Create a face detection listener
- Add the face detection listener to your camera object
- Start face detection after preview (and after every preview restart)
The face detection feature is not supported on all devices. You can check that this feature is supported by calling getMaxNumDetectedFaces() . An example of this check is shown in the startFaceDetection() sample method below.
In order to be notified and respond to the detection of a face, your camera application must set a listener for face detection events. In order to do this, you must create a listener class that implements the Camera.FaceDetectionListener interface as shown in the example code below.
After creating this class, you then set it into your application’s Camera object, as shown in the example code below:
Your application must start the face detection function each time you start (or restart) the camera preview. Create a method for starting face detection so you can call it as needed, as shown in the example code below.
You must start face detection each time you start (or restart) the camera preview. If you use the preview class shown in Creating a preview class, add your startFaceDetection() method to both the surfaceCreated() and surfaceChanged() methods in your preview class, as shown in the sample code below.
Note: Remember to call this method after calling startPreview() . Do not attempt to start face detection in the onCreate() method of your camera app’s main activity, as the preview is not available by this point in your application’s the execution.
Time lapse video
Time lapse video allows users to create video clips that combine pictures taken a few seconds or minutes apart. This feature uses MediaRecorder to record the images for a time lapse sequence.
To record a time lapse video with MediaRecorder , you must configure the recorder object as if you are recording a normal video, setting the captured frames per second to a low number and using one of the time lapse quality settings, as shown in the code example below.
These settings must be done as part of a larger configuration procedure for MediaRecorder . For a full configuration code example, see Configuring MediaRecorder. Once the configuration is complete, you start the video recording as if you were recording a normal video clip. For more information about configuring and running MediaRecorder , see Capturing videos.
Источник


