- Take and edit Live Photos
- How to take a Live Photo
- How to find and play your Live Photos
- How to change the key photo
- How to add Live Photo effects
- How to edit Live Photos
- How to share your Live Photos
- How to turn off Live Photos
- PopPic — 3D Photo Camera 4+
- 3D Depth Effect Photo Editor
- PopPic 3D LLC
- Designed for iPhone
- iPhone Screenshots
- Description
- How to Recover Photos from iPhone that Won’t Turn on
- How to Get Photos off iPhone That Won’t Turn On
- Main Features of D-Back
- Retrieve Photos From iPhone That Won’t Turn on From iTunes Backup
- Retrieve Photos From iPhone That Won’t Turn on From iCloud Backup
- Retrieve Photos From iPhone That Won’t Turn on via iCloud.com
- Fix iPhone Won’t Turn on Issue to Recover Photos Without Backup
- Solution 1. Charge Your iPhone for a While
- Solution 2. Check if the Computer Recognizes the Device
- Solution 3. Force Restart Your iPhone
- Solution 4. Fix iPhone Won’t Turn on Issue With iMyFone D-Back (No Data Loss)
- Conlusion
Take and edit Live Photos
With Live Photos, your iPhone records what happens 1.5 seconds before and after you take a picture. You take a Live Photo just like you do a traditional photo. Then you can pick a different key photo, add a fun effect, edit your Live Photo, and share with your family and friends.
How to take a Live Photo
- Open the Camera app.
- Make sure that your Camera is set to photo mode and that Live Photos is turned on. When it’s on, you see the Live Photos button at the top of your Camera.

- Hold your device* still.
- Tap the shutter button .
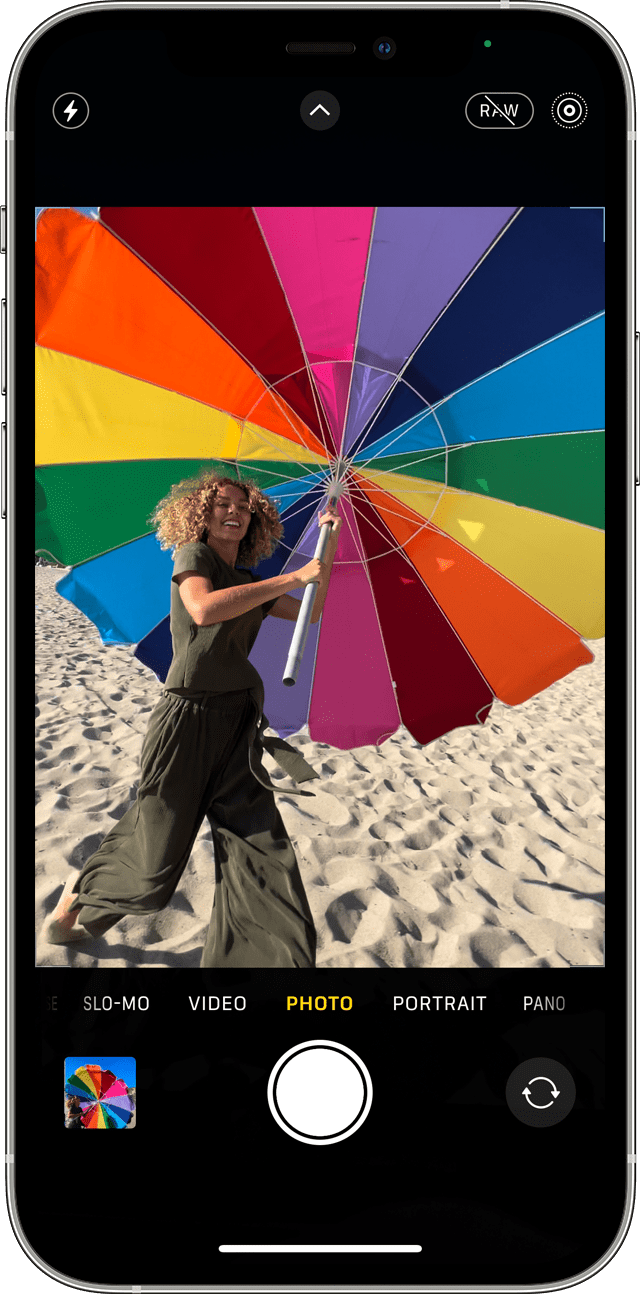
Live Photos is on by default. You can turn Live Photos off temporarily or permanently.
How to find and play your Live Photos
- Open the Photos app.
- Tap the Albums tab.
- Scroll down to Media Types and tap Live Photos.
- Tap one of the photos to open it.
- Press and hold the screen to play the Live Photo.
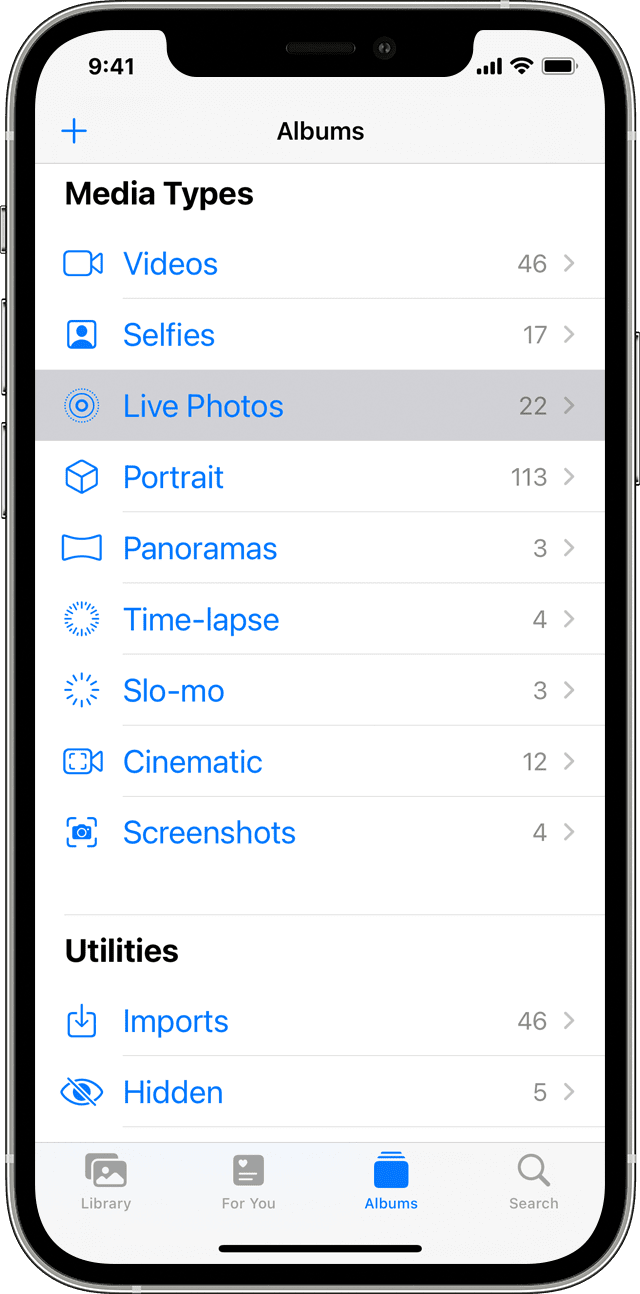
You can enjoy your Live Photo every time you unlock your device too. Just set it as your Lock Screen wallpaper.
How to change the key photo
- Open the Live Photo and tap Edit.
- Tap the Live Photos button .
- Move the slider to change the frame.
- Release your finger, then tap Make Key Photo.
- Tap Done.
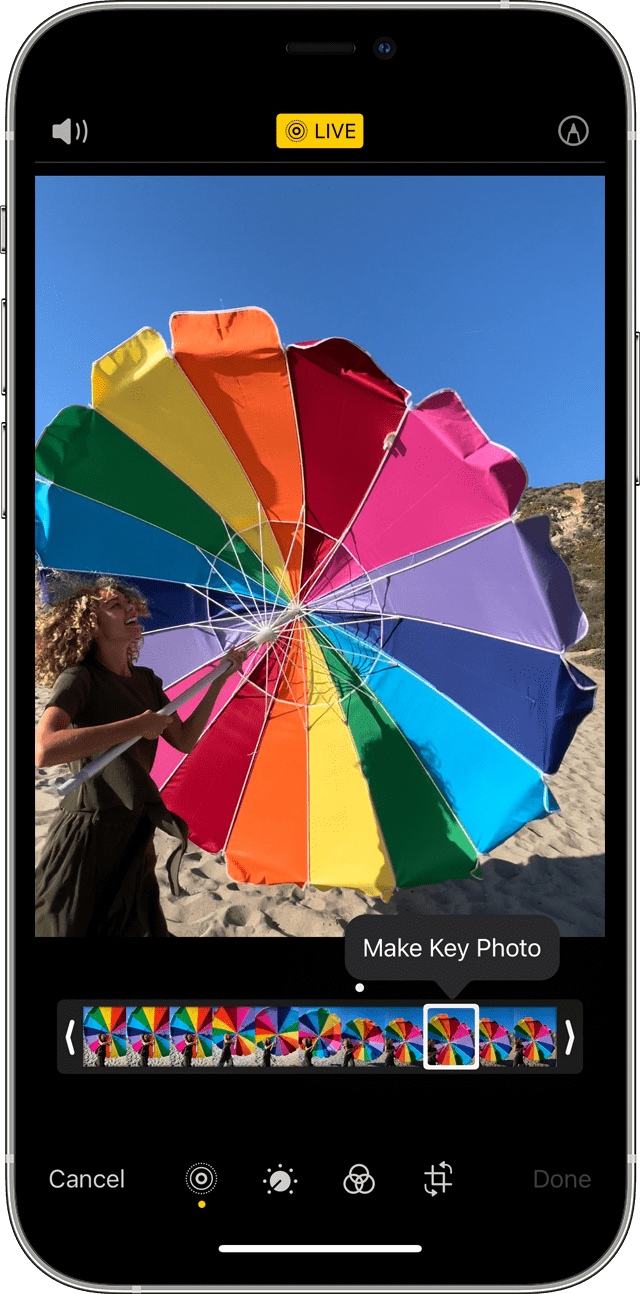
You can also toggle the Live Photo effect between off and on. When you’re editing a Live Photo, tap the LIVE button at the top of the screen to turn Live Photo off or back on.
How to add Live Photo effects
- Open the Live Photo.
- Tap the Live Photos button near the top of the screen.
- Choose Loop, Bounce, or Long Exposure.
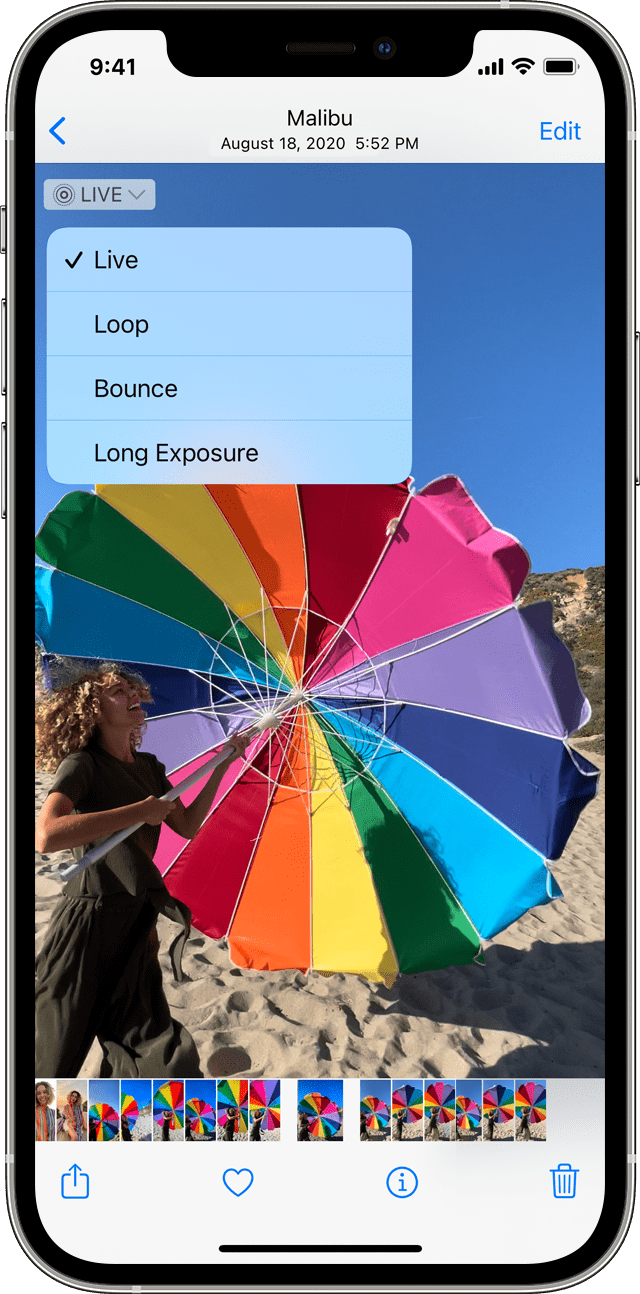
Loop: Turn a Live Photo you love into a video loop. Choose an image yourself, or look in the For You tab to see photos that would make great loops.
Bounce: Make your Live Photo rock back and forth. Watch your Live Photo as it happened, then it instantly plays in reverse.
Long Exposure: Capture the elements of time and movement. Create a beautiful effect that used to be possible only with a DSLR camera. Fireworks become bright streaks across the night sky. A waterfall becomes a magical blur.
How to edit Live Photos
- Open the Photos app and tap the Albums tab.
- Go to Live Photos under Media Types.
- Tap the Live Photo that you want to edit.
- Tap Edit, then make your adjustments.
- Tap Done.
If you edit your Live Photo in a third-party app, you might lose any Live Photo effects that you’ve applied.
How to share your Live Photos
- Open the photo that you want to share, then tap the Share button .
- If you want to share the still photo and not the Live Photo, tap Live in the upper-left corner of the photo.
- Choose how you want to share your photo. Note that if you share via Mail, the Live Photo is sent as a still image.
When you receive a Live Photo on your iPhone, iPad, or iPod touch via Messages, tap the photo to open it, then firmly press and hold to see it come to life.
If you’re using Messages on your Mac, double-click the Live Photo to open it. The Live Photo plays through once. To play it again, click the LIVE button in the bottom-left corner of the photo.
How to turn off Live Photos
From the Camera app, tap the Live Photos button to turn off Live Photos. A slash through the Live Photos button means that the feature is off.
The Camera app turns Live Photos on again automatically. To keep Live Photos off permanently, follow these steps:
- Go to Settings.
- Tap Camera > Preserve Settings.
- Make sure that the switch next to Live Photo is turned on.
Источник
PopPic — 3D Photo Camera 4+
3D Depth Effect Photo Editor
PopPic 3D LLC
Designed for iPhone
-
- 4.8 • 24.6K Ratings
-
- Free
- Offers In-App Purchases
iPhone Screenshots
![]()
![]()
![]()
Description
PopPic lets you take amazing 3D photos that you can view and share with friends and family.
PopPic works just like a normal camera, but instead of taking flat photos, it also captures an extra dimension: depth.
Photos taken with PopPic can be explored in 3D. Tilt your phone to change your viewpoint. Pinch to move toward and away from the subject. Add depth effects and motion to bring your photos to life. Share your creations with friends and family on Instagram, Facebook, or Snapchat, or save them to your camera roll.
FEATURES:
* Take 3D photos that you can explore by rotating your phone.
* Adjust focus and depth of field after taking the photo.
* Get creative with depth effects and filters.
* Add motion to bring your photos to life.
* Share your 3D photos with friends.
* Import photos from your camera roll and view them in 3D.
WHAT PEOPLE ARE SAYING ABOUT POPPIC:
Over 20,000 people have given PopPic a perfect 5-star rating on the App Store. Here’s what a few of them had to say:
«This is a stunning app. It does things that are so unique and so awesome» -Keywiz
«I love it, takes beautiful pics.» -Boogie724
«Simply Enjoyable & Fun» -gordie06
«Absolutely flawless.» -OxfordLawn
POP PIC PRO:
PopPic Pro is an upgrade to unlock our complete collection of over 40 filters and effects, new types of custom motion, HD video output, and sharing without a PopPic watermark.
PopPic Pro is available as a one-time purchase or monthly subscription with free trial.
We think you’ll love PopPic Pro, but even if you choose not to upgrade, you can still take, view, and share as many 3D photos as you like, and a number of our filters and depth effects will be free forever.
Источник
How to Recover Photos from iPhone that Won’t Turn on
home_icon Created with Sketch.
Home > iOS Data Recovery > How to Recover Photos from iPhone that Won’t Turn on
![]()
January 4, 2017 (Updated: June 28, 2021)
1074 views , 3 min read
In fact, similar situation is quite familiar to many iPhone users. Facing a dead phone that won’t turn on — screen got broken, damaged by water, or just got bricked, sometimes what users worry about the most is the data saved in it, photos in particular. It’s fairly easy to get the iPhone repaired, but no one can make sure the photos won’t get lost — especially when there is no backup on hand.
Can you retrieve photos from a dead iPhone? The answer is YES. Then how to do that? In this article, several methods are introduced to recover photos from iPhone that won’t turn on and possible solutions are offered to help reboot your iPhone.

How to Get Photos off iPhone That Won’t Turn On
It is undoubtedly possible to retrieve photos from iPhone that won’t turn on if you have backup files on either iTunes or iCloud. An ideal tool, iMyFone D-Back iPhone Data Recovery can help you get back what you want effectively and spare much trouble.
Main Features of D-Back
- Recover photos from various scenarios: iPhone won’t turn on, broken screen, iPhone got frozen, accidental deletion and so on.
- Four different data recovery modes are provided to meet different needs.
- Supports to selectively recover only the data you need.
- Enables you to have a complete preview before starting the whole data recovery progress.
- Compatible with nearly all iOS devices including iPhone 12 and all iOS versions including iOS 14.
Install this program and follow these very simple steps to get photos off iPhone that won’t turn on from iTunes/iCloud backup.


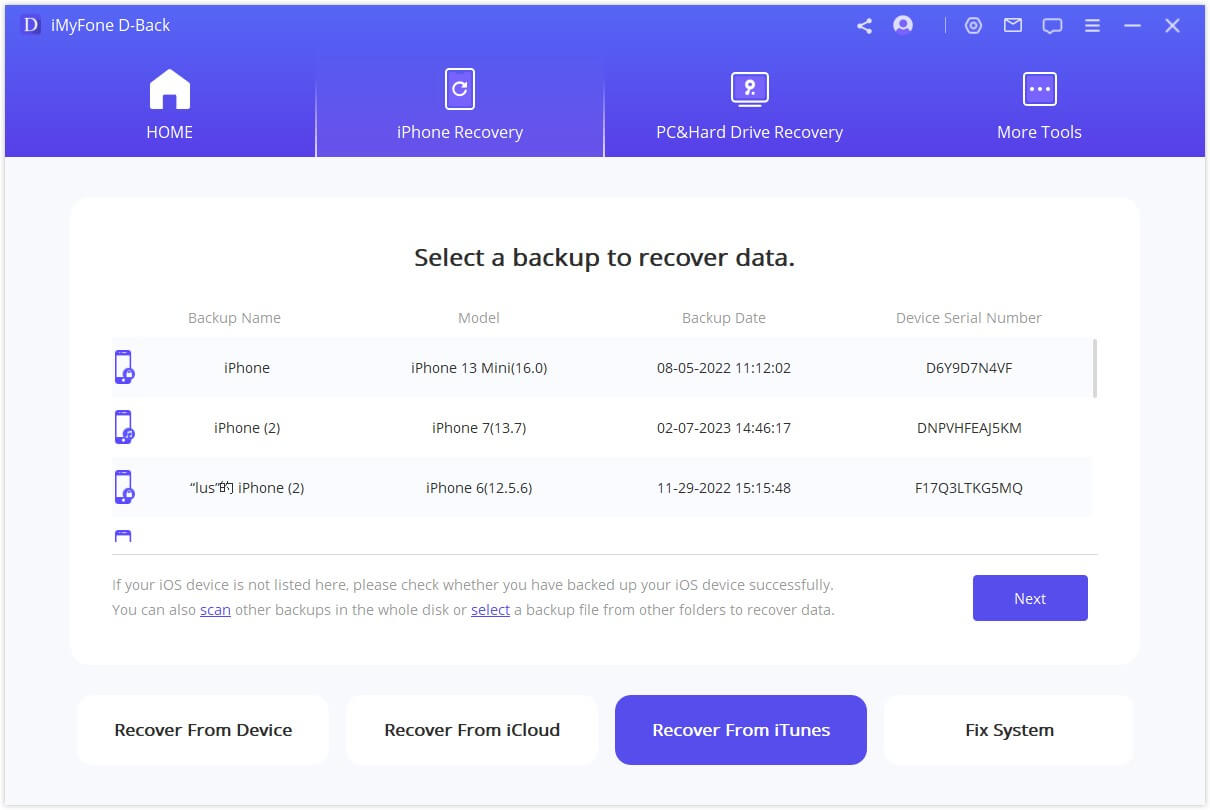
Retrieve Photos From iPhone That Won’t Turn on From iTunes Backup
Step 1. Launch the program. Select «Recover from iTunes Backup» and then click «Start».
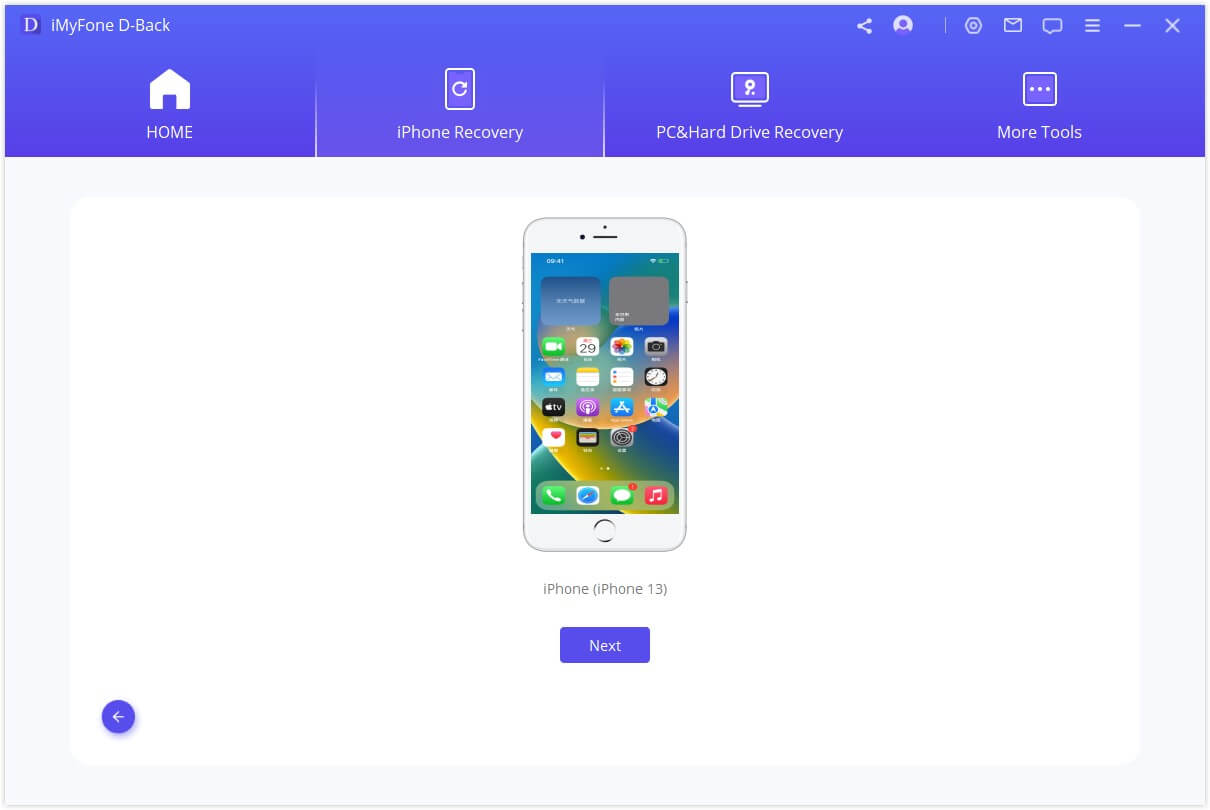
Step 2. In the next window, choose the exact iTunes backup from which you want to recover data and click «Next».
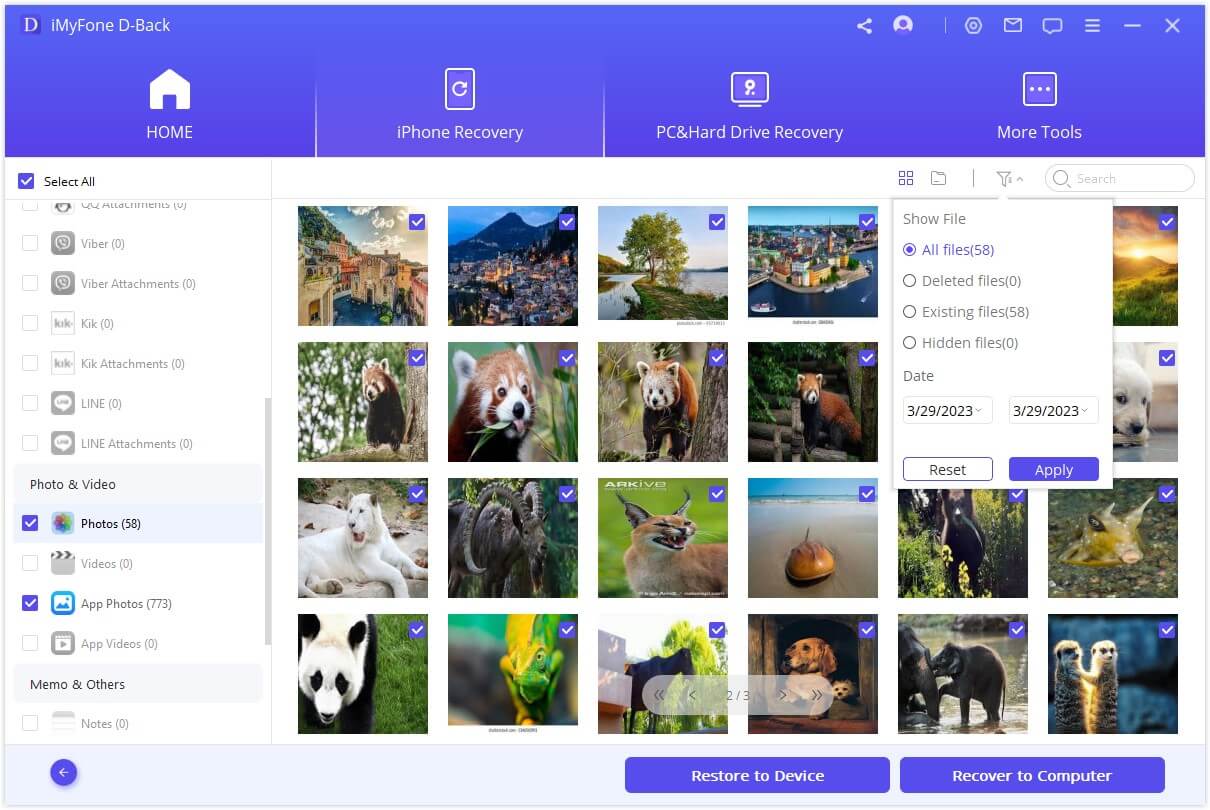
Step 3. Select «Photos» as the type of data you want to recover and then click «Scan». Please wait a moment while it scans.

Step 4. Once the scanning process is completed, preview and select the photos you want to retrieve and then click «Recover» to save them to your computer.
Retrieve Photos From iPhone That Won’t Turn on From iCloud Backup
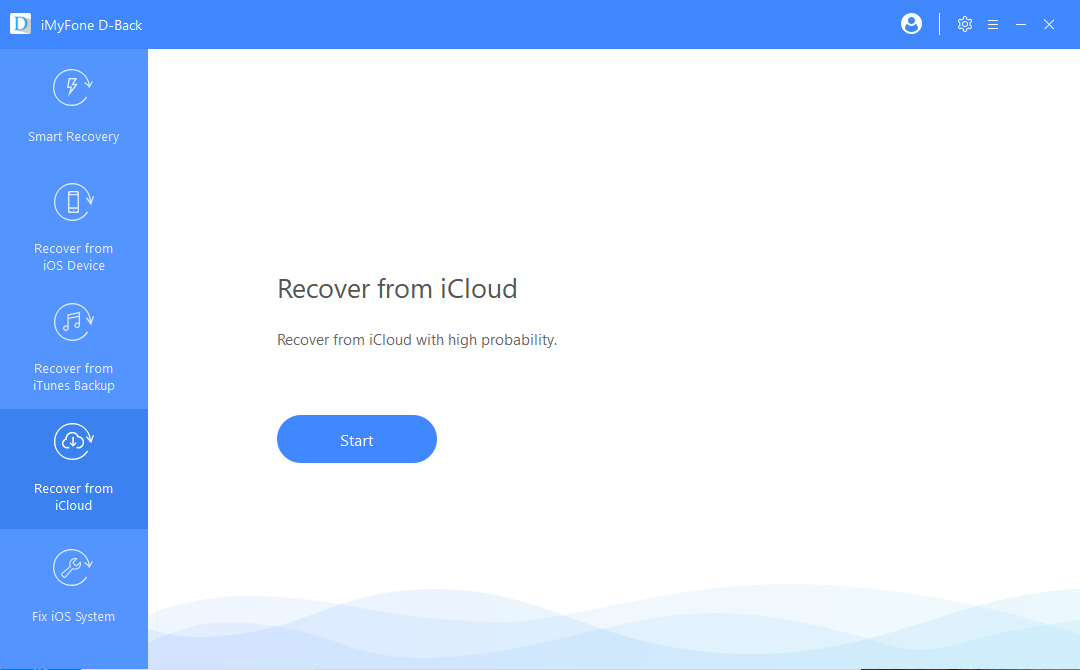
Step 1. Click «Start» at the «Recover from iCloud» tab.
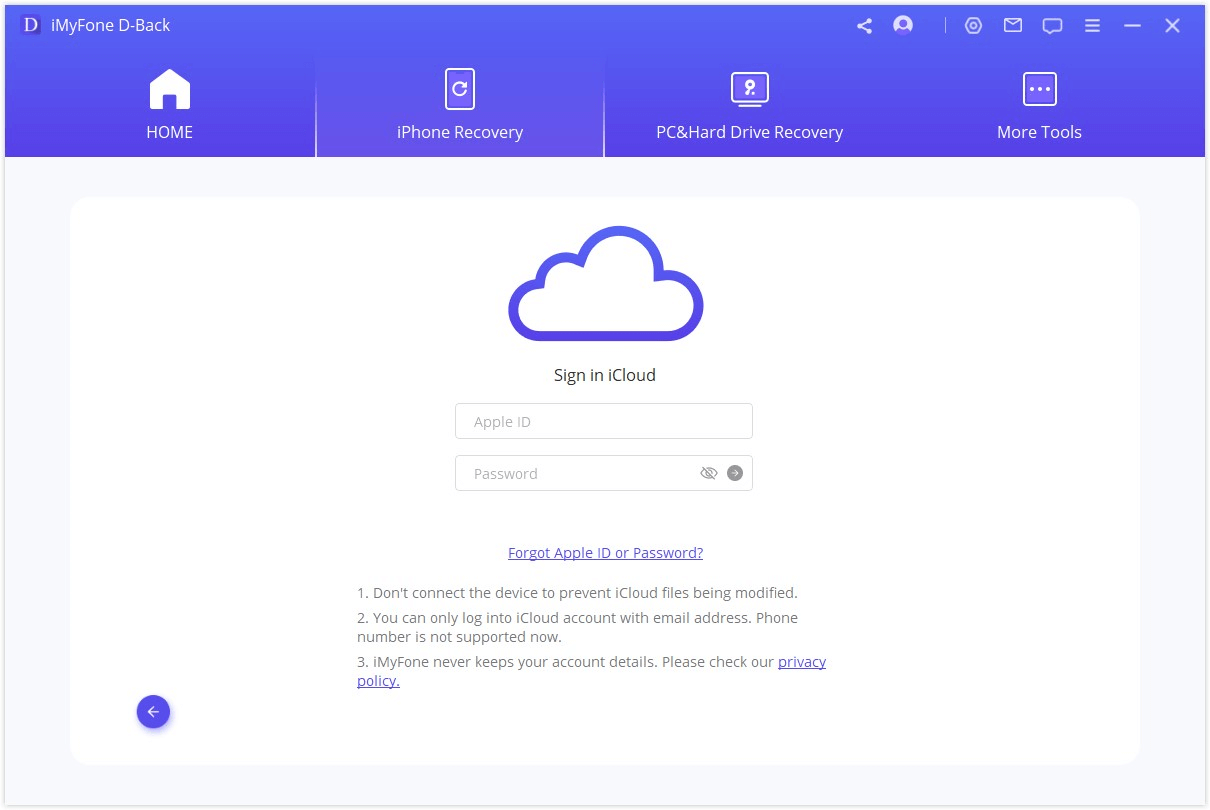
Step 2. Sign in iCloud by entering iCloud account credentials.
Step 3. Choose iCloud Backup from all the category listed, then click on «Scan». All iCloud backup will be shown.

Step 4. Choose the iCloud backup you want to recover data from, then hit «Next».
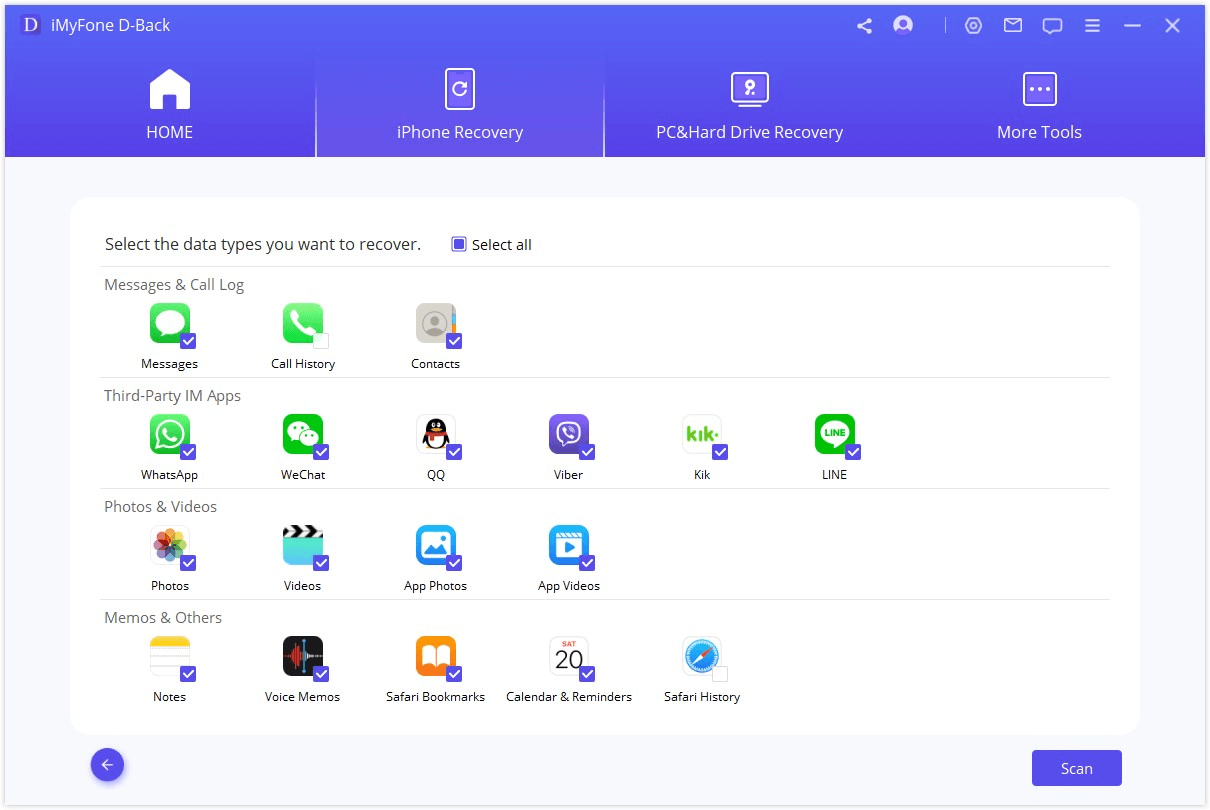
Step 5. Select the file type you want to recover then click «Scan».

Step 6. When the scan is completed, all files will be displayed on the interface. Click to preview them, after selecting what you want, click «Recover» to retrieve them back.
Retrieve Photos From iPhone That Won’t Turn on via iCloud.com
If you have always kept your photos synced to iCloud, then congrats — you can visit the iCloud website and get your photos recovere if your iPhone won’t turn on.
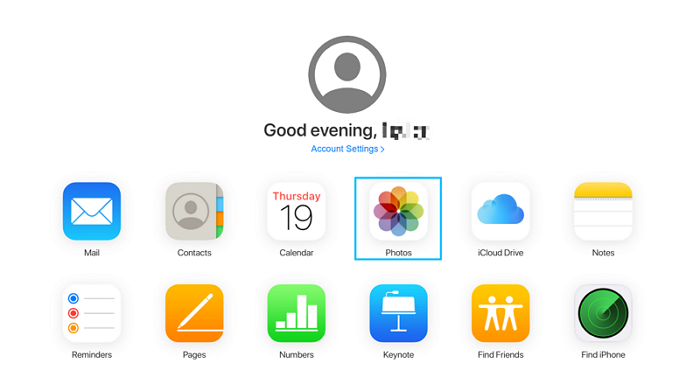
Step 1. Head to iCloud.com and log into your account. Choose «Photos» from the interface.
Step 2. Select the photos you want to retrieve and get them downloaded.
Fix iPhone Won’t Turn on Issue to Recover Photos Without Backup
If, unfortunately, you don’t have any backup of your lost photos, which means none of the methods above can come in handy, then you need to solve the problem from another angle. That is to say, you need to get your iPhone fixed first, without losing any data of course.
Solution 1. Charge Your iPhone for a While
The lack of sufficient power can prevent an iPhone from turning on. Therefore, the first thing you should try is to charge the phone. If you’re afraid that your charger may be faulty, replace it and then charge the device for up to 30 minutes before trying to use it.
Solution 2. Check if the Computer Recognizes the Device
The other thing you can do is connecting your iPhone to the computer to see if iTunes recognizes it. If it does, you’d better create a backup immediately.

Solution 3. Force Restart Your iPhone
Sometimes simply force restarting your iPhone can solve many minor issues quickly.
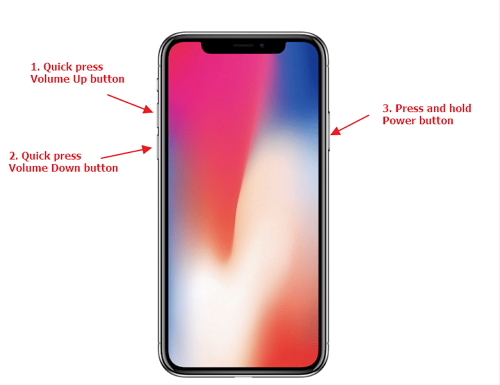
For iPhone 8 or later models, press the volume up and down button. Next keep holding the power button down till Apple logo turns up on your screen.
For iPhone 7 or 7 Plus, hold down the volume down button along with power button till the Apple logo flashes on your screen.
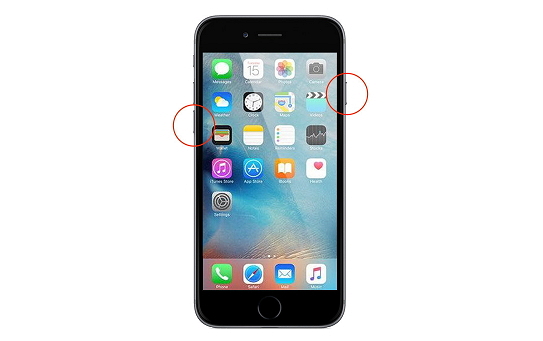
For iPhone 6s or earlier models, keep holding the power and the home button down until Apple logo appears on your screen.

Solution 4. Fix iPhone Won’t Turn on Issue With iMyFone D-Back (No Data Loss)
What if the 3 methods mentioned above all fail to work? In a situation like this, you may need a professional tool to help you out efficiently. iMyFone D-Back is capable of fixing common iOS issues including iPhone won’t turn on without any data loss.
Follow the steps below to try to get your iPhone to turn on:
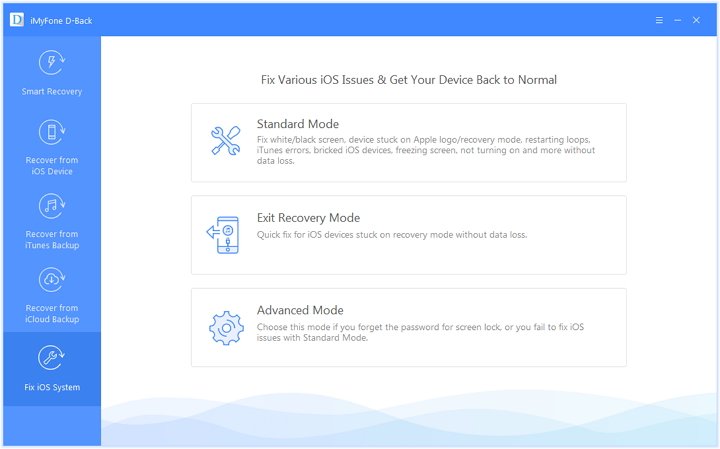
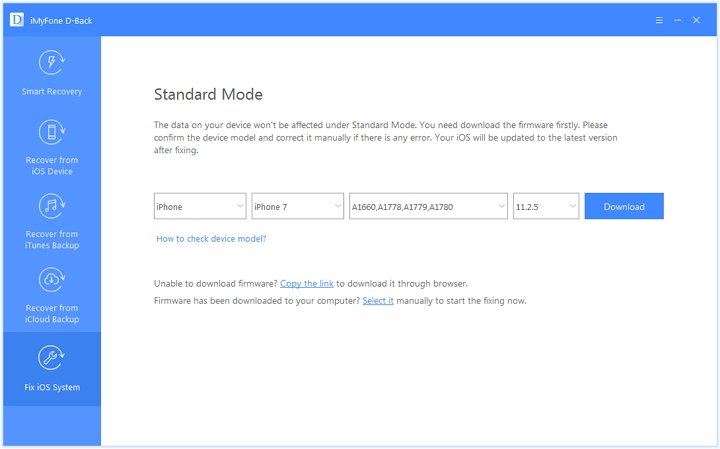
Step 1. Download and install the program. Launch it and connect your iPhone with it. Choose «Standard Mode» to move on.
Step 2. As fixing this issue requires updating the firmware, you need to click the «Download» button for the program to get the corresponding firmware based on the version of your iPhone.
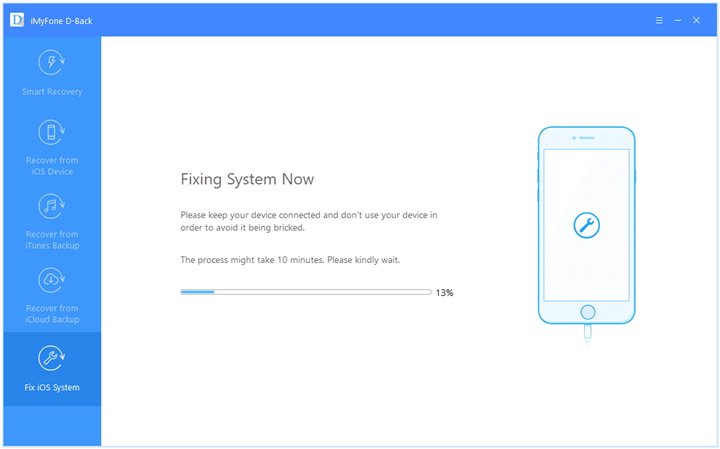
Step 3. iMyFone D-Back will begin repairing your iPhone as soon as it finishes downloading the firmware. After that, your iPhone will be restored to the normal condition and function smoothly again. Please rest assured that your data will not get harmed in В theВ slightest during the whole process.
Conlusion
After reading this guide, you may have already known more about how to retrieve photos from iPhone that won’t turn on and how to fix iPhone won’t turn on issue. Taken together , iMyFone D-Back is the best choice you can consider while besieged by tricky issues related to iOS devices. Recovering data from iPhone and fixing iOS system without any hassle, this tool is definitely something you can never miss. Besides, if you want to recover data from an Android phone that won’t turn on, D-Back for Android is also available for you. Don’t hesitate to get the free trial!
Источник


