- If your iPhone won’t turn on or is frozen
- If your screen is black or frozen
- On your iPhone 8 or later, including iPhone SE (2nd generation)
- On your iPhone 7 or iPhone 7 Plus
- On your iPhone 6s and earlier, including iPhone SE (1st generation)
- If your iPhone turns on but gets stuck during start up
- Use Switch Control on your device to control another Apple device
- Use your iPhone, iPad, or iPod touch to control another device
- Use your Mac to control another device
- Stop controlling another device
- Stop controlling a Mac
- Stop controlling an iPhone, iPad, or iPod touch
- Turn off Switch Control
- Turn off Switch Control on an iPhone, iPad, or iPod touch
- Turn off Switch Control on a Mac
- If your computer doesn’t recognize your iPhone, iPad, or iPod
- Additional steps for Mac
- Use iTunes to sync your iPhone, iPad, or iPod with your computer
- What you can sync with iTunes
- Sync or remove content using iTunes
- Sync your content using Wi-Fi
- Use Home Sharing to share media from a computer to other devices
- Before you set up Home Sharing
- Set up Home Sharing
- Set up Home Sharing on your Mac
- Set up Home Sharing on your PC
- Use Home Sharing
- Use Home Sharing on your Mac
- Use Home Sharing on your PC
- Use Home Sharing on your iPhone, iPad, or iPod touch
- See shared music
- See shared videos
- Use Home Sharing on your Apple TV
If your iPhone won’t turn on or is frozen
If your iPhone has a frozen screen, doesn’t respond when you touch it, or becomes stuck when you turn it on, learn what to do.
iPhone screen is black or frozen
iPhone is stuck on the Apple logo
If your screen is black or frozen
Follow the steps for your device.
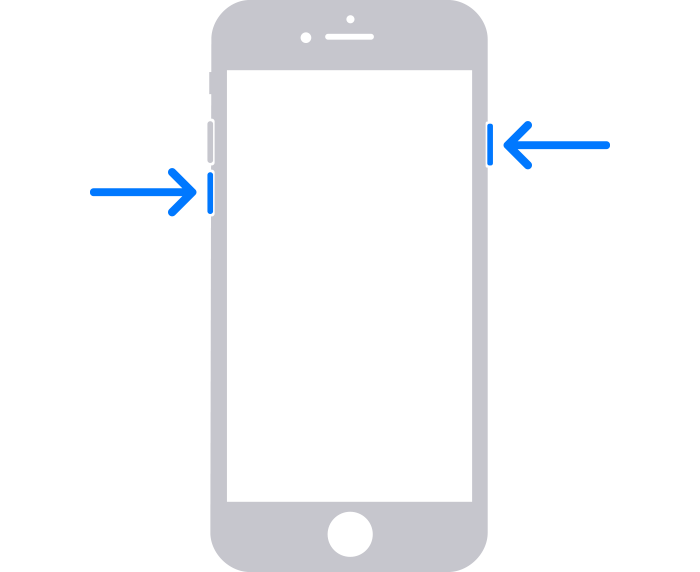
On your iPhone 8 or later, including iPhone SE (2nd generation)
- Press and quickly release the volume up button.
- Press and quickly release the volume down button.
- Press and hold the side button until you see the Apple logo.

- If your phone doesn’t turn on, follow these steps to check your hardware and charge your phone. You might need to charge for up to an hour.
- If your phone still doesn’t turn on, contact Apple Support.
On your iPhone 7 or iPhone 7 Plus
- Press and hold both the side button and the volume down button until you see the Apple logo.
- If your phone doesn’t turn on, follow these steps to check your hardware and charge your phone. You might need to charge for up to an hour.
- If your phone still doesn’t turn on, contact Apple Support.
On your iPhone 6s and earlier, including iPhone SE (1st generation)
- Press and hold both the Home button and the side button or the top button until you see the Apple logo.
- If your phone doesn’t turn on, follow these steps to check your hardware and charge your phone. You might need to charge for up to an hour.
- If your phone still doesn’t turn on, contact Apple Support.

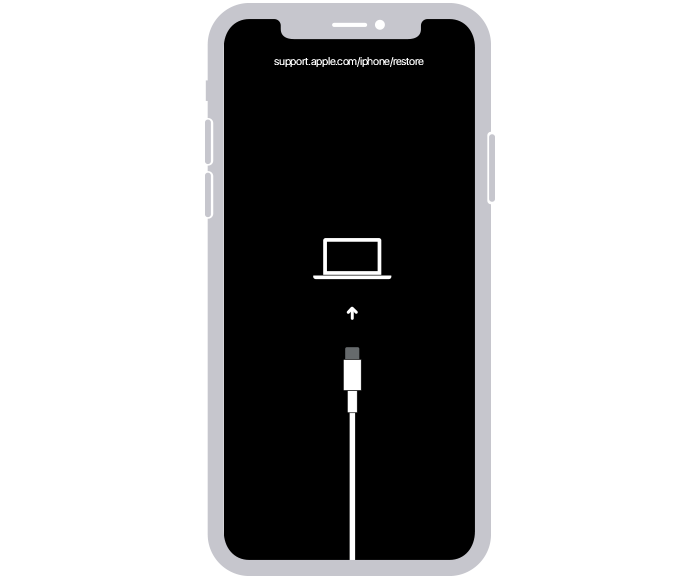
If your iPhone turns on but gets stuck during start up
If you see the Apple logo or a red or blue screen during startup, try these steps:
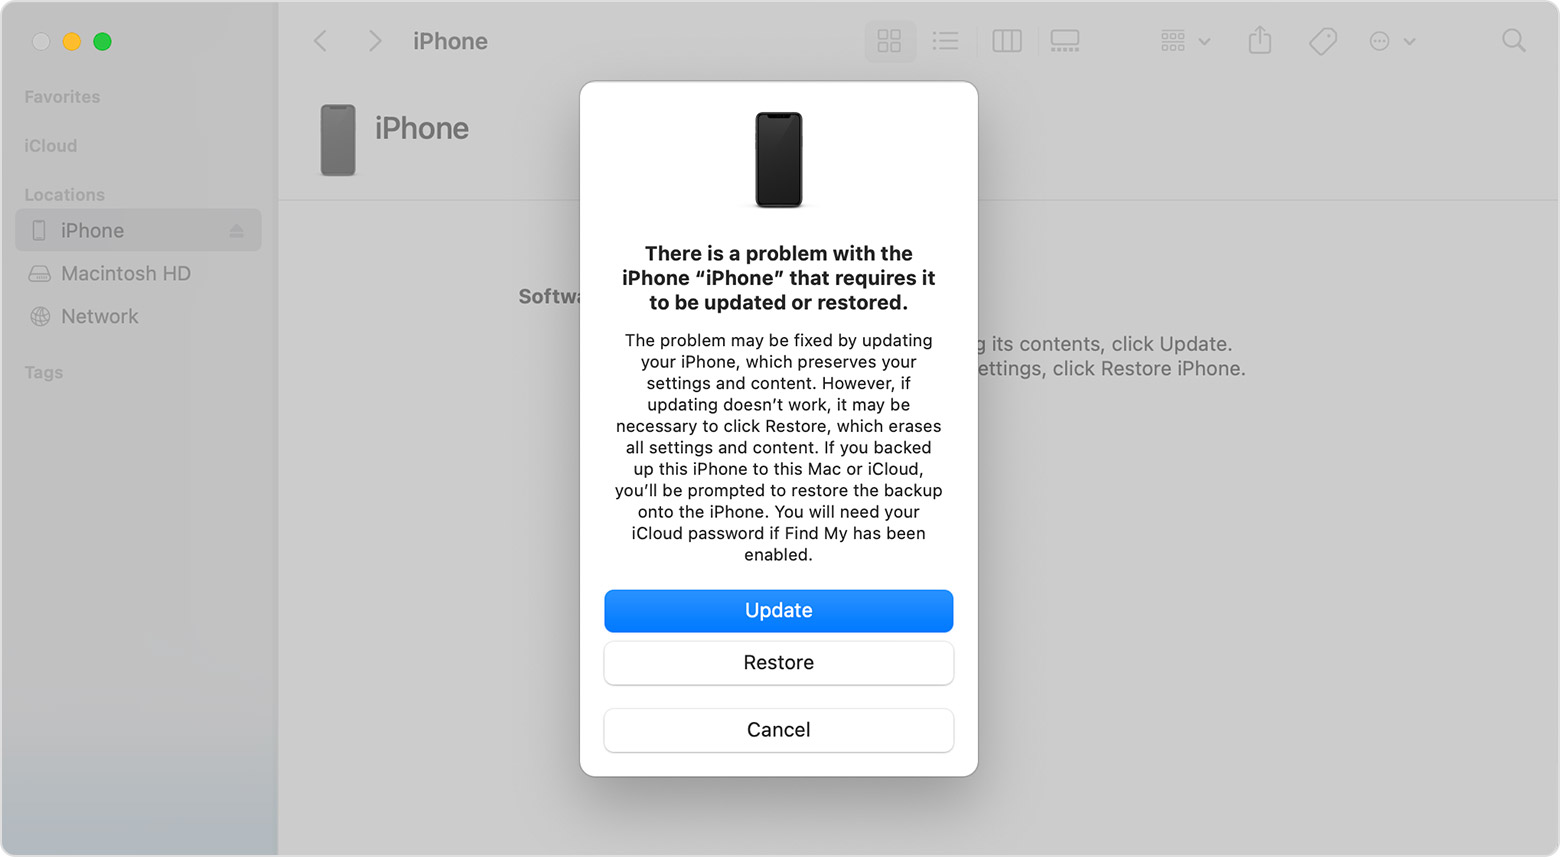
- Connect your iPhone to a computer. On a Mac with macOS Catalina, open the Finder. On a Mac with macOS Mojave or earlier, or on a PC, open iTunes. Find out which macOS your Mac is using.
- Select your iPhone on your computer.
- While your iPhone is connected, follow these steps:
- On your iPhone 8 or later, including iPhone SE (2nd generation): Press and quickly release the volume up button. Press and quickly release the volume down button. Then press and hold the side button.
Источник
Use Switch Control on your device to control another Apple device
With Use Other Devices for Switch Control, you can control your other Apple devices remotely on the same Wi-Fi network without adjusting any switch connections. This enables you to navigate your Mac or Apple TV with the same switch setup that you use to control your iPhone.
Use your iPhone, iPad, or iPod touch to control another device
- Connect your devices to the same Wi-Fi network.
- Sign in to iCloud with the same Apple ID on both devices.
- If you want to control a Mac, choose Apple menu > System Preferences on your computer.
- Select Accessibility. In the sidebar, choose Switch Control.
- Check the checkbox next to «Allow platform switching to control your computer.»
- If you haven’t already, turn on Switch Control on your iPhone, iPad, or iPod touch.
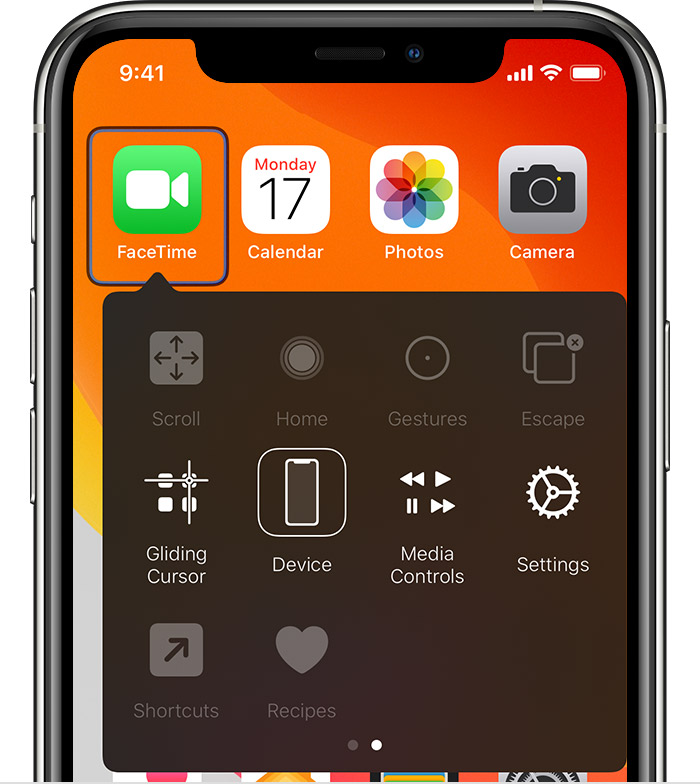
- Use your switch to navigate the Switch Control menu. Select Device.
- Select Use Other Device.
- Select the device that you want to control, then select Connect. Now you can use the switch connected to your iPhone, iPad, or iPod touch to control the other device.
Use your Mac to control another device
- Connect your devices to the same Wi-Fi network.
- Sign in to iCloud with the same Apple ID on both devices.
- If you haven’t already, turn on Switch Control on your Mac.
- Use your switch to navigate the Switch Control Home panel. Choose Devices.
- Select the device that you want to control, then select Connect. Now you can use the switch connected to your Mac to control the other device.

Stop controlling another device
To stop controlling another device, press and hold your switch for ten seconds. Your switch will control the original device again.
You can also follow these steps:
Stop controlling a Mac
- Use your switch to navigate the Switch Control Home panel. Choose Devices.
- Select Disconnect. Your switch will control the original device again.
Stop controlling an iPhone, iPad, or iPod touch
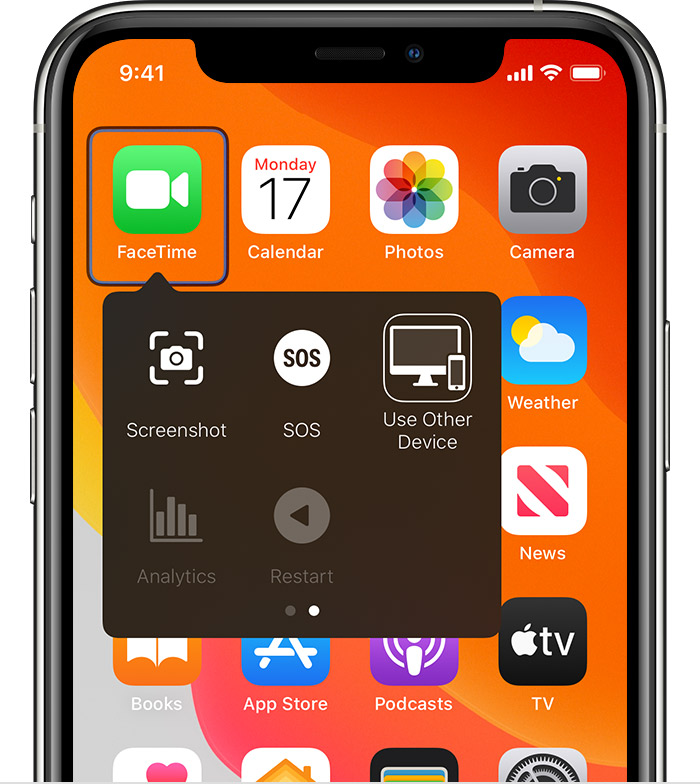
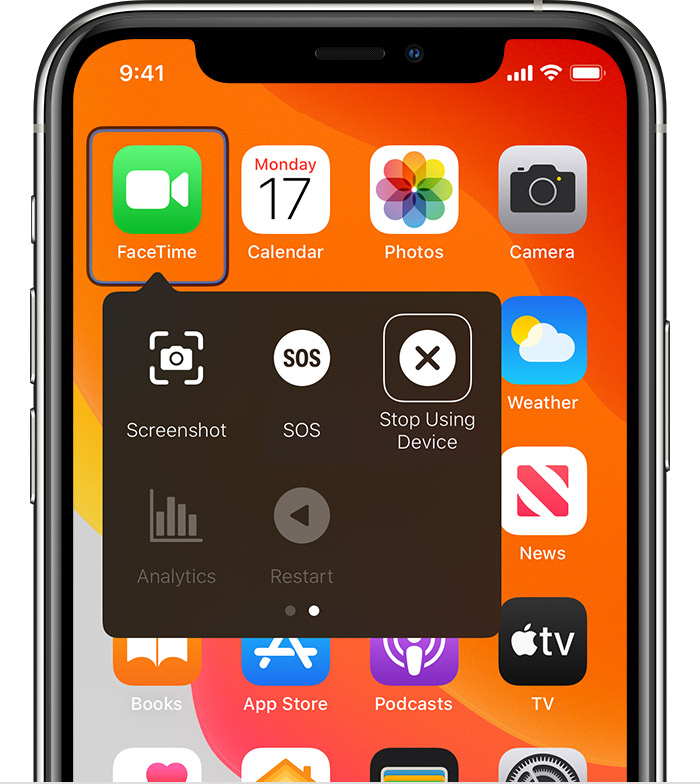
- Use your switch to navigate the Switch Control menu. Select Device.
- Select Stop Using Device. Your switch will control the original device again.
Turn off Switch Control
If you’d like to turn off Switch Control entirely, follow these steps for your device:
Turn off Switch Control on an iPhone, iPad, or iPod touch
Use your switch to navigate to Settings > Accessibility > Switch Control, and turn the setting off.
You can also triple-click the Home button or the Side button on certain models at any time to exit Switch Control.
Turn off Switch Control on a Mac
Use your switch to navigate to System Preferences > Accessibility > Switch Control, and deselect Enable Switch Control.
Источник
If your computer doesn’t recognize your iPhone, iPad, or iPod
If you connect your device to your computer with a USB cable and your computer doesn’t recognize your iPhone, iPad, or iPod, learn what to do.
If your computer doesn’t recognize your connected device, you might see an unknown error or a «0xE» error. Follow these steps and try to connect your device again after each step.
- Make sure that your iOS or iPadOS device is turned on, unlocked, and on the Home screen.
- Check that you have the latest software on your Mac or Windows PC. If you’re using iTunes, make sure you have the latest version.
- If you see a Trust this Computer alert, unlock your device and tap Trust. If you can’t unlock your device because you forgot your passcode, find out what to do.
- Unplug all USB accessories from your computer except for your device. Try each USB port to see if one works. Then try a different Apple USB cable.*
- Restart your computer.
- Restart your iPhone, iPad, or iPod touch.
- Follow these additional steps for your Mac or Windows PC.
- Try connecting your device to another computer. If you have the same issue on another computer, contact Apple Support.
Additional steps for Mac
- Connect your iOS or iPadOS device and make sure that it’s unlocked and on the Home screen.
- On your Mac, choose Finder > Preferences from the Finder menu bar, then click Sidebar at the top of the preferences window. Make sure that «CDs, DVDs and iOS Devices» is checked.
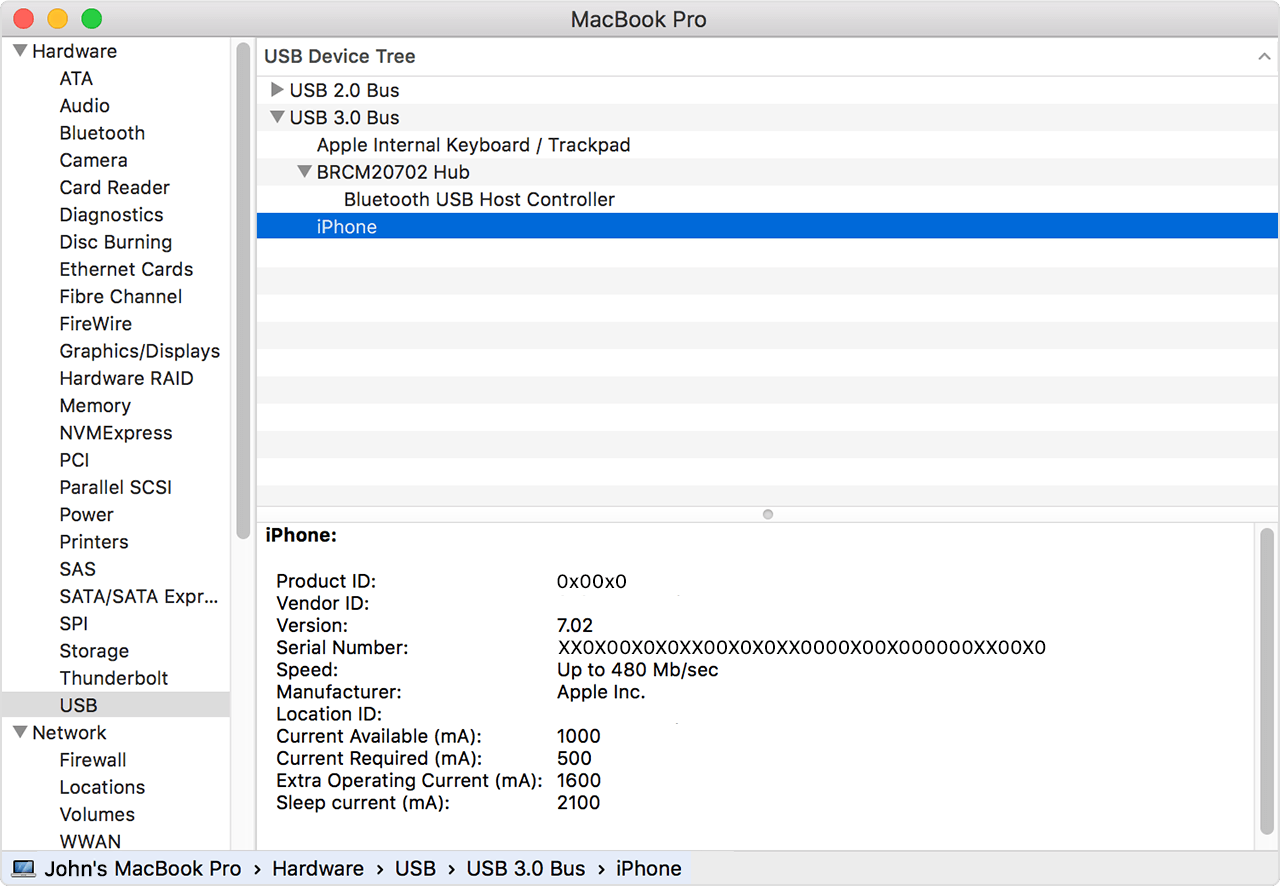
- Press and hold the Option key, then choose System Information from the Apple menu . From the list on the left, select USB.
- If you see your iPhone, iPad, or iPod under USB Device Tree, get the latest macOS or install the latest updates. If you don’t see your device or still need help, contact Apple Support.
Information about products not manufactured by Apple, or independent websites not controlled or tested by Apple, is provided without recommendation or endorsement. Apple assumes no responsibility with regard to the selection, performance, or use of third-party websites or products. Apple makes no representations regarding third-party website accuracy or reliability. Contact the vendor for additional information.
Источник
Use iTunes to sync your iPhone, iPad, or iPod with your computer
Learn how to sync music, movies, and more using iTunes on your Mac or PC.
If you’re using macOS Mojave or earlier or a Windows PC, use iTunes to sync content to your devices. Before you use iTunes to sync content to your iOS or iPadOS device, consider using iCloud, Apple Music, or similar services to keep content from your Mac or PC in the cloud. This way, you can access your music, photos, and more on your devices when you aren’t near your computer. Learn more about using Apple Music or iCloud Photos instead of iTunes.
If you use iCloud or other services like Apple Music to keep your content up-to-date across all of your devices, some syncing features through iTunes might be turned off.
What you can sync with iTunes
- Albums, songs, playlists, movies, TV shows, podcasts, and audiobooks.
- Photos and videos.
- Contacts and calendars.
iTunes features might vary by country or region.
Sync or remove content using iTunes
- Open iTunes and connect your device to your computer with a USB cable.
- Click the device icon in the upper-left corner of the iTunes window. Learn what to do if you don’t see the icon.
- From the list under Settings on the left side of the iTunes window, click the type of content that you want to sync or remove. * To turn syncing on for a content type, select the checkbox next to Sync.
- Select the checkbox next to each item that you want to sync.
- Click the Apply button in the lower-right corner of the window. If syncing doesn’t start automatically, click the Sync button.


* You can only sync your device with one iTunes library at a time. If you see a message that your device is synced with another iTunes library, your device was previously connected to another computer. If you click «Erase and Sync» in that message, all content of the selected type on your device will be erased and replaced with content from this computer.
Sync your content using Wi-Fi
After you set up syncing with iTunes using USB, you can set up iTunes to sync to your device with Wi-Fi instead of USB.
- Connect your device to your computer with a USB cable, then open iTunes and select your device. Learn what to do if your device doesn’t appear on your computer.
- Click Summary on the left side of the iTunes window.
- Select «Sync with this [device] over Wi-Fi.»
- Click Apply.
When the computer and the device are on the same Wi-Fi network, the device appears in iTunes. The device syncs automatically whenever it’s plugged in to power and iTunes is open on the computer.
Источник
Use Home Sharing to share media from a computer to other devices
With Home Sharing, you can share, stream, and import media from up to five computers that are connected to your home Wi-Fi network.
Before you set up Home Sharing
- Update all of your Apple devices to the latest versions of iOS, iPadOS, macOS, and tvOS. On your PC, make sure that you have the latest version of iTunes for Windows.
- Connect all of your devices to the same Wi-Fi or Ethernet network.
- Make sure that all of your devices are signed in with the same Apple ID and authorized to play purchases using that Apple ID.
Apps and features might vary by country or region. Learn more about what’s available in your country or region.
Set up Home Sharing
Before you can use Home Sharing, you need to set it up on your Mac or PC.
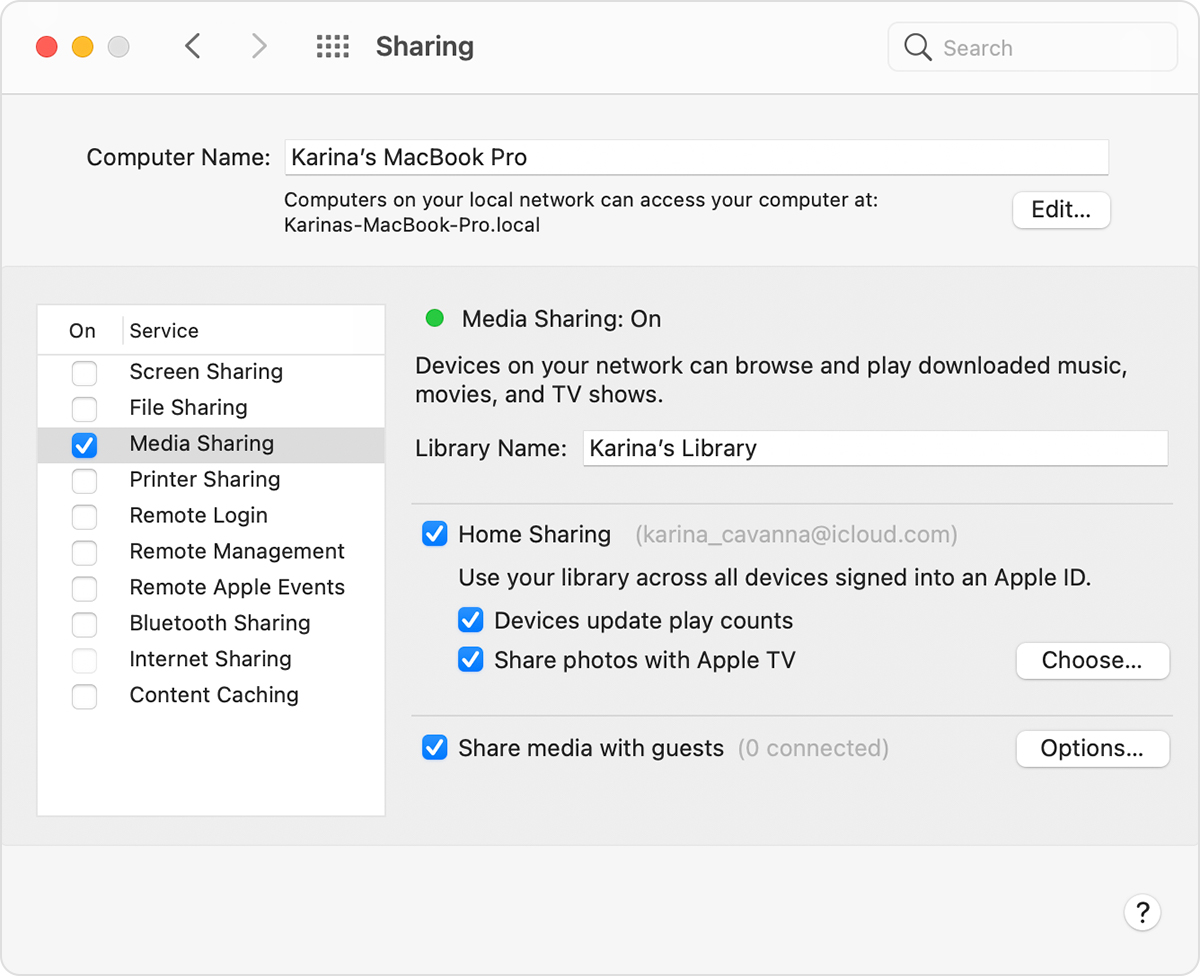
Set up Home Sharing on your Mac
- Choose Apple menu > System Preferences.
- Click Sharing.
- Click Media Sharing.
- Select Home Sharing and sign in with your Apple ID. Use the same Apple ID for every computer or device on your Home Sharing network.
- Click Turn On Home Sharing.
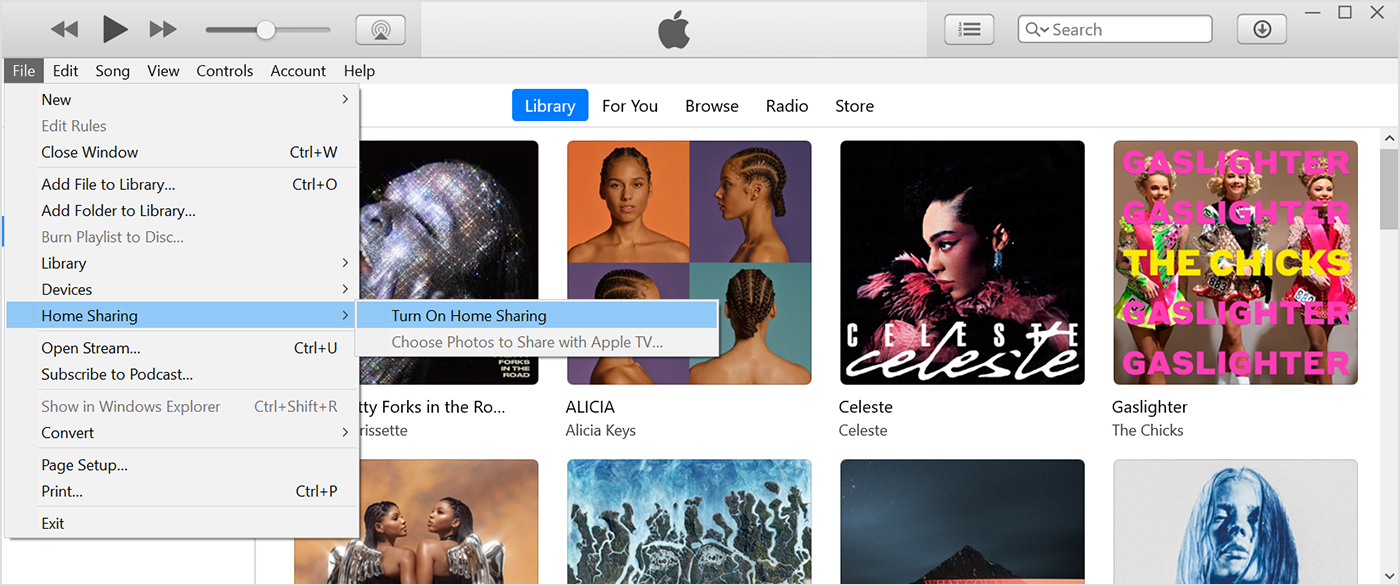
Set up Home Sharing on your PC
- Open iTunes for Windows.
- If you’re not signed in, sign in with your Apple ID. Use the same Apple ID for every computer or device on your Home Sharing network.
- From the menu bar at the top of the iTunes window, choose File > Home Sharing > Turn on Home Sharing.
You can use Home Sharing with up to five computers that are connected to your home Wi-Fi or Ethernet network.
Use Home Sharing
On your Mac or PC, you can use Home Sharing to see shared libraries from other computers that are connected to the same Wi-Fi network and signed in with the same Apple ID.
To see a shared library from a computer on your iPhone, iPad, iPod touch, or Apple TV, you need to be signed in with the same Apple ID as the computer and connected to the same Wi-Fi network.
You can use Home Sharing to access your media library across computers that are on the same Wi-Fi network. And you can stream music, movies, and TV shows from one authorized computer to another. Just make sure that your computers are powered on, awake, and have the Music app or iTunes for Windows open.
Use Home Sharing on your Mac
To access your media library:
- Open the Music app.
- If you’re not signed in, sign in with your Apple ID. Use the same Apple ID for every computer or device on your Home Sharing network.
- In the sidebar, click Library.
- Click the media library.
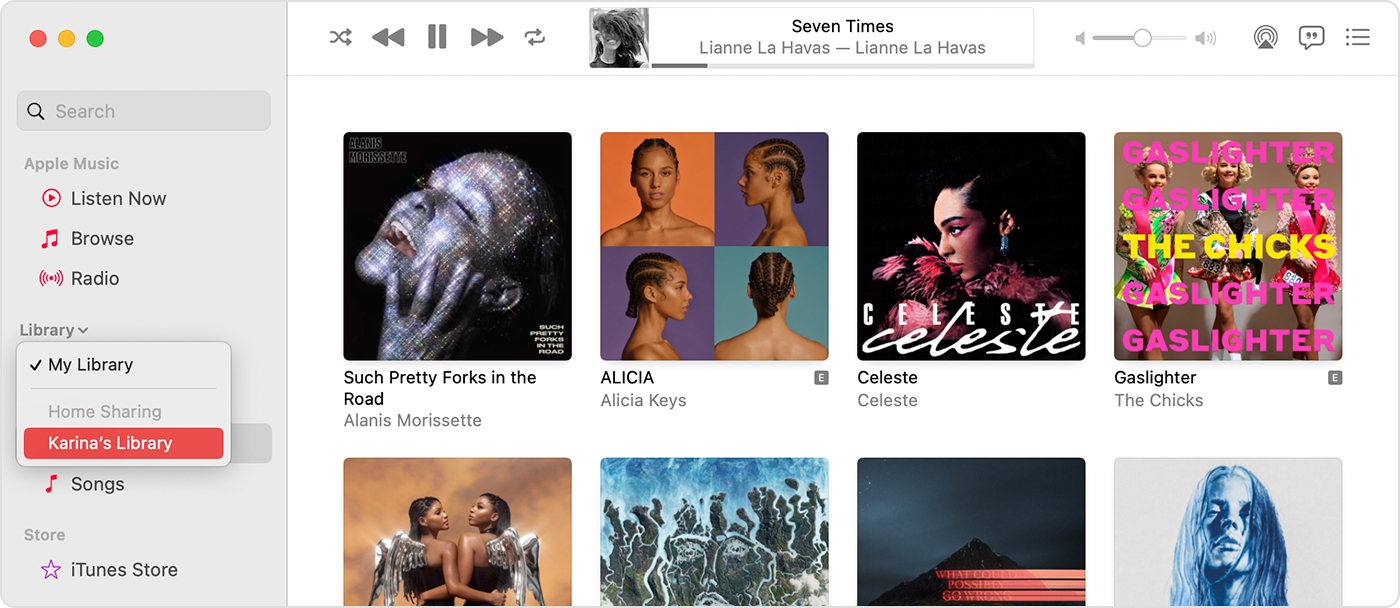
To go back to your music library, click Eject in the sidebar.
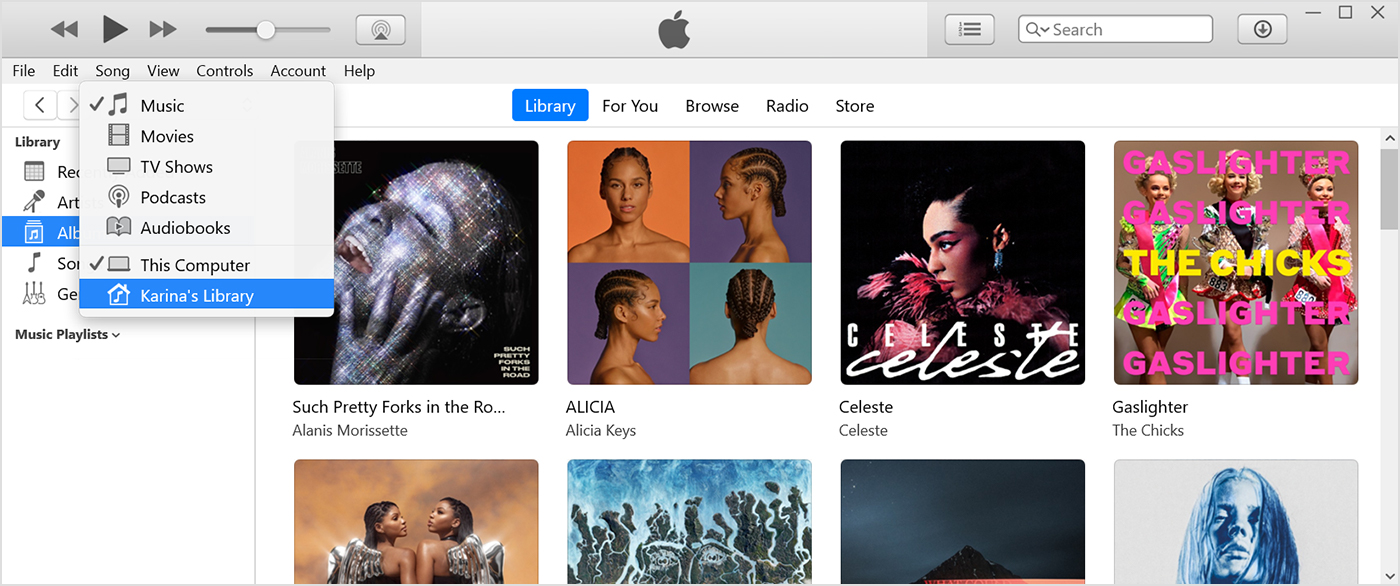
Use Home Sharing on your PC
You can use Home Sharing to stream music, movies, and TV shows from one authorized computer to another. Just make sure that your computers are powered on, awake, and have the Music app or iTunes for Windows open.
To see all of your shared libraries, click Music in the upper-left corner of the iTunes window.
Use Home Sharing on your iPhone, iPad, or iPod touch
To use Home Sharing to access your computer’s media library on your iPhone, iPad, and iPod touch, sign in to Home Sharing on your device:
- To see a music library, go to Settings > Music. To see a video library, go to Settings > TV > iTunes Videos.
- Under Home Sharing, tap Sign In.
- Sign in with your Apple ID. Use the same Apple ID for every computer or device on your Home Sharing network.
After you sign in, connect your iPhone, iPad, or iPod touch to the same Wi-Fi network as your computer, and open the Music app, Apple TV app, or iTunes for Windows on your computer.
See shared music
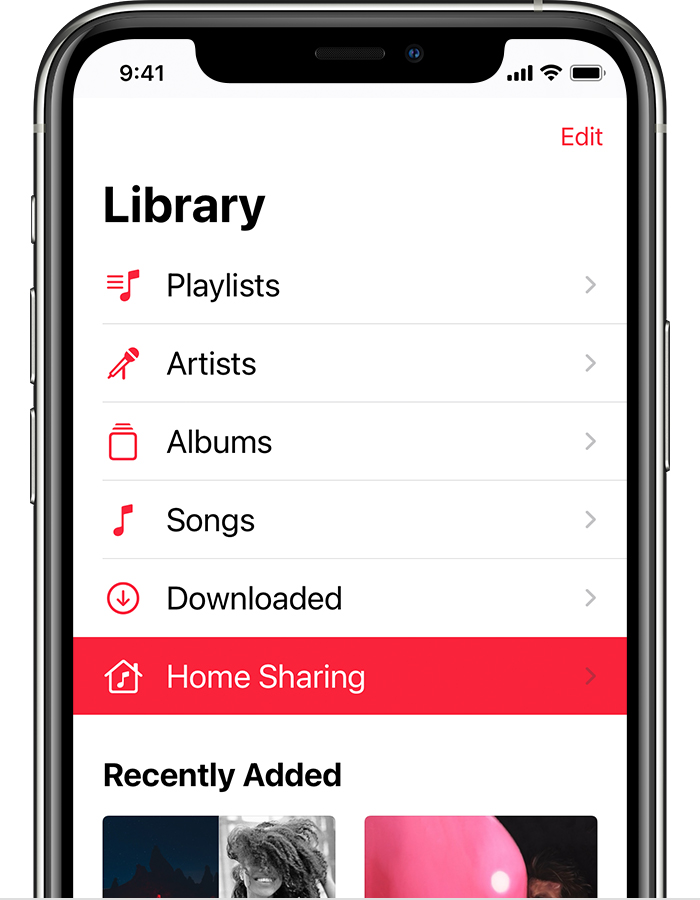
- Open the Music app and tap Library.
- Tap Home Sharing. Don’t see it? Tap Edit, select Home Sharing, then tap Done.
- Choose a shared library.
See shared videos
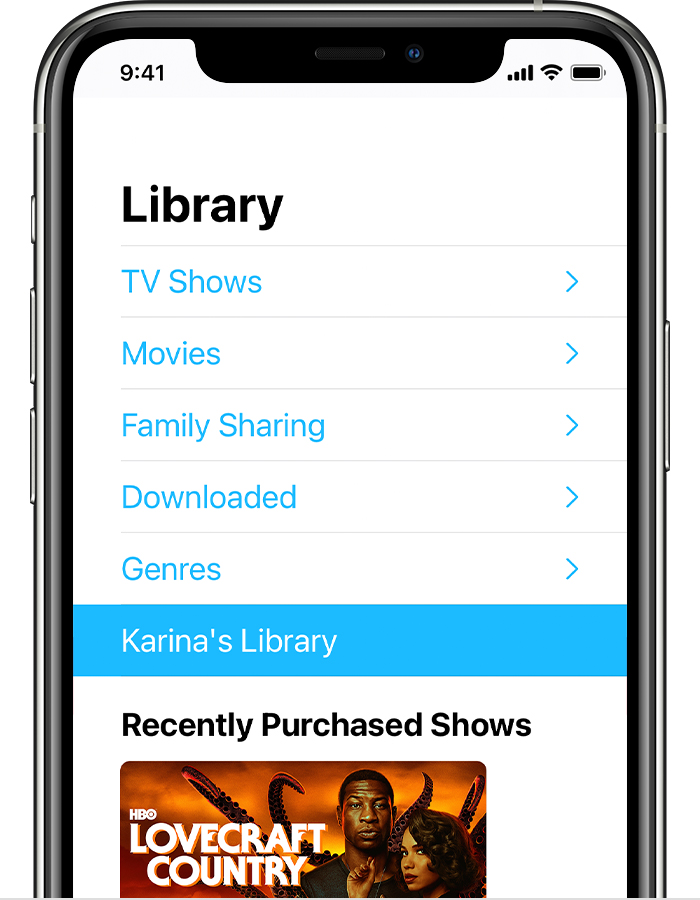
- Open the TV app.
- Tap Library.
- Choose a shared library.
![]()
Use Home Sharing on your Apple TV
To use Home Sharing to access your computer’s media library on your Apple TV, sign in to Home Sharing on your Apple TV:
- Go to Settings > Users and Accounts > Home Sharing.
- Select Turn on Home Sharing.
- Sign in with your Apple ID. Use the same Apple ID for every computer or device on your Home Sharing network.
After you sign in, follow these steps to access your computer’s media library on your Apple TV:
- Connect your Apple TV to the same Wi-Fi network as your computer.
- On your computer, open the Music app, Apple TV app, or iTunes for Windows.
- On your Apple TV, go to the Home screen, select Computers, and choose a shared library.
You can also view photos from your computer on your Apple TV.
- On your Mac: Choose Apple menu > System Preferences. Click Sharing. Click Media Sharing, then select Share Photos with Apple TV.
- On your PC: Open iTunes for Windows. In the menu bar, go to File > Home Sharing, then select Choose Photos to Share with Apple TV.
Источник


