- Two-factor authentication for Apple ID
- How it works
- Trusted devices
- Trusted phone numbers
- Verification codes
- Set up two-factor authentication for your Apple ID
- Turn on two-factor authentication on your iPhone, iPad, or iPod touch
- Turn on two-factor authentication on your Mac
- Upgrade to two-factor authentication on the web
- What to remember when you use two-factor authentication
- Manage your account
- Manage your trusted phone numbers
- Update your trusted phone number on your Apple ID account page
- Update your trusted phone number through account recovery
- View and manage your trusted devices
- Generate app-specific passwords
- Question: Q: TURNING off TWO-FACTOR AUTHENTICATION
- Helpful answers
- Question: Q: Turn off Two-factor authentication
- All replies
Two-factor authentication for Apple ID
Two-factor authentication is an extra layer of security for your Apple ID designed to ensure that you’re the only person who can access your account, even if someone knows your password.

![]()
![]()
How it works
With two-factor authentication, only you can access your account on a trusted device or the web. When you want to sign in to a new device for the first time, you’ll need to provide two pieces of information—your password and the six-digit verification code that’s automatically displayed on your trusted devices or sent to your phone number. By entering the code, you’re verifying that you trust the new device. For example, if you have an iPhone and are signing into your account for the first time on a newly purchased Mac, you’ll be prompted to enter your password and the verification code that’s automatically displayed on your iPhone.
Because your password alone is no longer enough to access your account, two-factor authentication dramatically improves the security of your Apple ID and all the personal information you store with Apple.
Once signed in, you won’t be asked for a verification code on that device again unless you sign out completely, erase the device, or need to change your password for security reasons. When you sign in on the web, you can choose to trust your browser, so you won’t be asked for a verification code the next time you sign in from that computer.
Trusted devices
A trusted device is an iPhone, iPad, or iPod touch with iOS 9 or later, or Mac with OS X El Capitan or later that you’ve already signed in to using two-factor authentication. It’s a device we know is yours and that can be used to verify your identity by displaying a verification code from Apple when you sign in on a different device or browser. An Apple Watch with watchOS 6 or later can receive verification codes when you sign in with your Apple ID, but cannot act as a trusted device for password resets.
Trusted phone numbers
A trusted phone number is a number that can be used to receive verification codes by text message or automated phone call. You must verify at least one trusted phone number to enroll in two-factor authentication.
You should also consider verifying an additional phone number you can access, such as a home phone, or a number used by a family member or close friend. You can use this number if you temporarily can’t access your primary number or your own devices.
Verification codes
A verification code is a temporary code sent to your trusted device or phone number when you sign in to a new device or browser with your Apple ID. You can also get a verification code from Settings on your trusted device.
A verification code is different from the device passcode you enter to unlock your iPhone, iPad, or iPod touch.
Set up two-factor authentication for your Apple ID
You can follow these steps to turn on two-factor authentication on your device. Learn more about the availability of two-factor authentication.
Turn on two-factor authentication on your iPhone, iPad, or iPod touch
- Go to Settings > [your name] > Password & Security.
- Tap Turn On Two-Factor Authentication.

- Tap Continue.
- Enter the phone number where you want to receive verification codes when you sign in. You can choose to receive the codes by text message or automated phone call.
- Tap Next.
- Enter the verification code to verify your phone number and turn on two-factor authentication.

You might be asked to answer your Apple ID security questions.
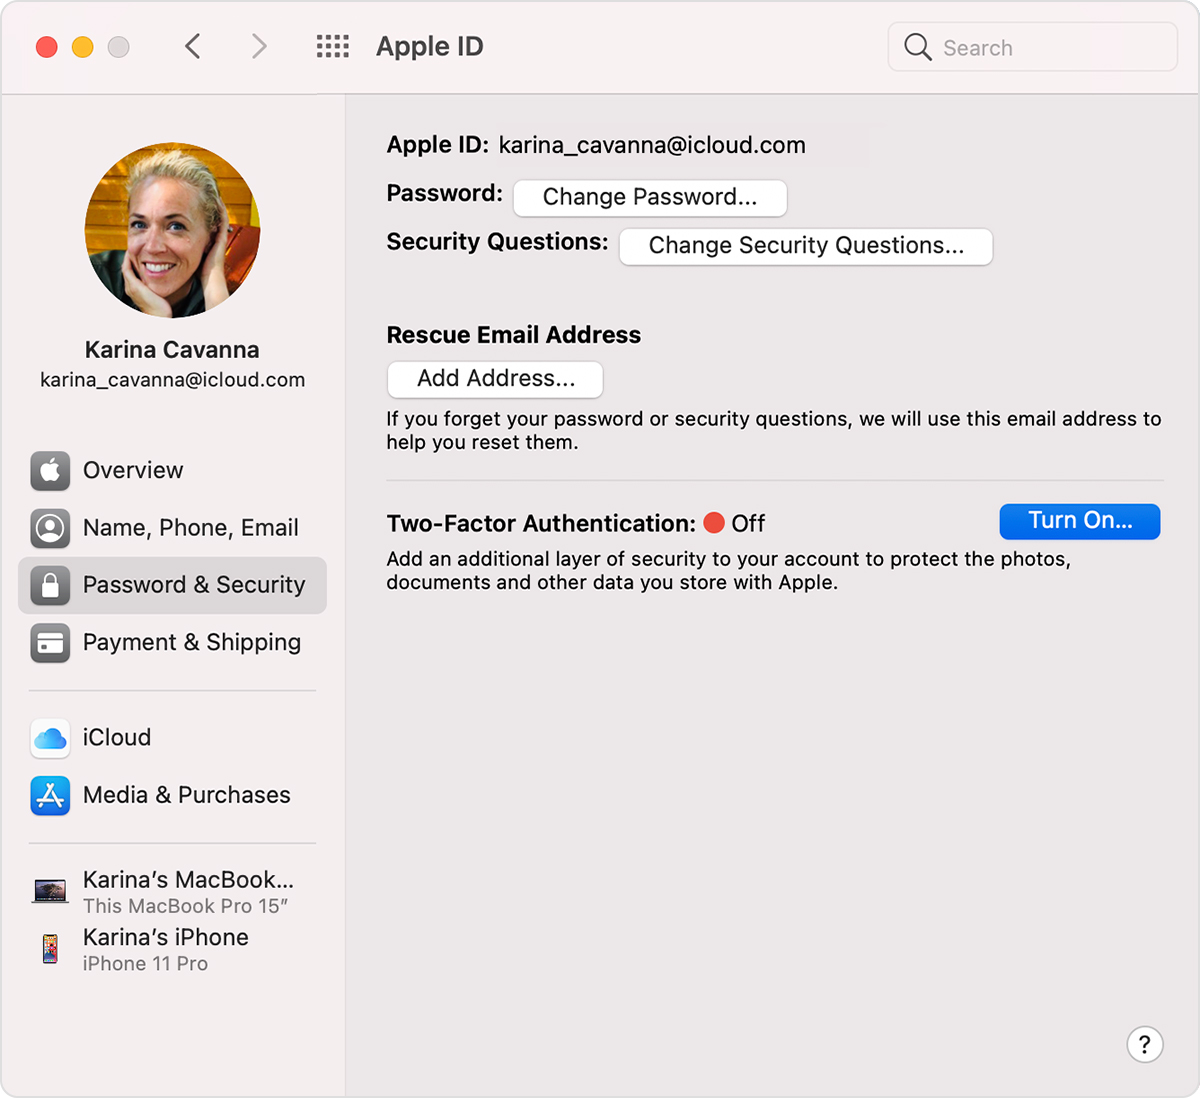
Turn on two-factor authentication on your Mac
- Choose Apple menu > System Preferences, then click Apple ID.
- Click Password & Security under your name.
- Next to Two-Factor Authentication, click Turn On.
If you’re using macOS Mojave or earlier:
- Choose Apple menu > System Preferences, then click iCloud, and select Account Details.
- Click Security.
- Click Turn On Two-Factor Authentication.
Some Apple IDs created in iOS 10.3 or macOS 10.12.4 and later are protected with two-factor authentication by default. In this case, you see that two-factor authentication is already turned on.
Upgrade to two-factor authentication on the web
- Go to appleid.apple.com, then sign in with your Apple ID.
- Answer your security questions, then tap Continue.
- You’ll see a prompt to upgrade your account security. Tap Continue.
- Click Upgrade Account Security.
- Enter the phone number where you want to receive verification codes when you sign in. You can choose to receive the codes by text message or automated phone call.
- Click Continue.
- Enter the verification code to verify your phone number and turn on two-factor authentication.
If you have an Apple ID that’s not protected by two-factor authentication, some Apple web sites might ask you to update your account.
What to remember when you use two-factor authentication
Two-factor authentication significantly improves the security of your Apple ID. After you turn it on, signing into your account will require both your password and access to your trusted devices or trusted phone number. To keep your account as secure as possible and help ensure you never lose access, there are a few simple guidelines you should follow:
- Remember your Apple ID password.
- Use a device passcode on all your devices.
- Keep your trusted phone number(s) up to date.
- Keep your trusted devices physically secure.
Manage your account
You can manage your trusted phone numbers, trusted devices, and other account information from your Apple ID account page.
Manage your trusted phone numbers
To use two-factor authentication, you need at least one trusted phone number on file where you can receive verification codes. Consider verifying an additional trusted phone number other than your own phone number. If your iPhone is your only trusted device and it is missing or damaged, you will be unable to receive verification codes required to access your account.
Update your trusted phone number on your Apple ID account page
- Go to appleid.apple.com.
- Sign in with your Apple ID.
- Go to the Security section and click Edit.
If you want to add a phone number, click Add a Trusted Phone Number and enter the phone number. Choose to verify the number with a text message or automated phone call, and click Continue. To remove a trusted phone number, click  next to the phone number you want to remove.
Update your trusted phone number through account recovery
- Go to appleid.apple.com.
- Sign in with your Apple ID.
- Select “Didn’t get a verification code?”, then select More Options.
- You’ll be redirected to iforgot.apple.com.
- Complete your account recovery request. Learn more about account recovery.
View and manage your trusted devices
You can view and manage a list of your trusted devices on iOS, macOS, and in the Devices section of your Apple ID account page.
- Go to Settings > [your name].
- Select a device from the list.
On macOS Catalina or later:
- Choose Apple menu > System Preferences.
- Select Apple ID.
- Select a device from the sidebar.
On macOS Mojave or earlier:
- Choose Apple menu > System Preferences.
- Select iCloud, then click Account Details.
- Click the Devices tab.
- Select a device from the list.
- Go to your Apple ID account page.
- Sign in with your Apple ID.
- Go to the Devices section.
The device list shows the devices that you’re currently signed in to with your Apple ID. Select a device to view device info like the model and serial number. Below that you can see other useful information, including whether or not the device is trusted and can be used to receive Apple ID verification codes.
You can also remove a trusted device by selecting Remove from Account from the device list. Removing a trusted device will ensure that it can no longer display verification codes and that access to iCloud, and other Apple services on the device, is blocked until you sign in again with two-factor authentication. If you need to find or erase your device before you remove it from your trusted device list, you can use Find My iPhone.
Generate app-specific passwords
With two-factor authentication, you need an app-specific password to sign in to your account using third-party apps or services such as email, contacts, or calendar apps not provided by Apple. Follow these steps to generate an app-specific password:
- Sign in to your Apple ID account page.
- Click Generate Password below App-Specific Passwords.
- Follow the steps on your screen.
After you generate your app-specific password, enter or paste it into the password field of the app as you would normally.
Источник
Question: Q: TURNING off TWO-FACTOR AUTHENTICATION
I shall like to turn
OFF
Posted on Jan 9, 2018 8:06 AM
Helpful answers
No such things as this link :Turn Off Two-Factor Authentication at the bottom of the email to restore your Apple ID to its previous security settings and regain control of your account. The link is active for two weeks after you enroll.
Jan 10, 2018 5:02 AM
Can I turn off two-factor authentication after I’ve turned it on?
You can’t turn off two-factor authentication for some accounts created in iOS 10.3 or macOS Sierra 10.12.4 and later. If you created your Apple ID in an earlier version of iOS or macOS, you can turn off two-factor authentication.
Keep in mind that when you turn off two-factor authentication, your account is protected only with your password and security questions.
To turn off two-factor authentication, sign in to your Apple ID account page and click Edit in the Security section. Then click Turn Off Two-Factor Authentication. After you create new security questions and verify your date of birth, two-factor authentication will be turned off. If you don’t see the option to turn off two-factor authentication on your Apple ID account page, that means you can’t turn it off.
If someone has turned on two-factor authentication for your Apple ID without your permission, you can also turn it off from the enrollment confirmation email sent to your Apple ID or rescue email address. Click Turn Off Two-Factor Authentication at the bottom of the email to restore your Apple ID to its previous security settings and regain control of your account. The link is active for two weeks after you enroll.
Jan 9, 2018 8:51 AM
There’s more to the conversation
Loading page content
Page content loaded
Can I turn off two-factor authentication after I’ve turned it on?
You can’t turn off two-factor authentication for some accounts created in iOS 10.3 or macOS Sierra 10.12.4 and later. If you created your Apple ID in an earlier version of iOS or macOS, you can turn off two-factor authentication.
Keep in mind that when you turn off two-factor authentication, your account is protected only with your password and security questions.
To turn off two-factor authentication, sign in to your Apple ID account page and click Edit in the Security section. Then click Turn Off Two-Factor Authentication. After you create new security questions and verify your date of birth, two-factor authentication will be turned off. If you don’t see the option to turn off two-factor authentication on your Apple ID account page, that means you can’t turn it off.
If someone has turned on two-factor authentication for your Apple ID without your permission, you can also turn it off from the enrollment confirmation email sent to your Apple ID or rescue email address. Click Turn Off Two-Factor Authentication at the bottom of the email to restore your Apple ID to its previous security settings and regain control of your account. The link is active for two weeks after you enroll.
Jan 9, 2018 8:51 AM
No such things as this link :Turn Off Two-Factor Authentication at the bottom of the email to restore your Apple ID to its previous security settings and regain control of your account. The link is active for two weeks after you enroll.
Jan 10, 2018 5:02 AM
That is only if someone turned it on without permission. Use the link below to turn it off.
Jan 10, 2018 11:29 AM
Question: Q: TURNING off TWO-FACTOR AUTHENTICATION More Less
Источник
Question: Q: Turn off Two-factor authentication
its 2021 and I Hate 2 factor. I haven’t had it set up this whole time but now I changed my password and BAM its on. PLEASE turn it off, or give a choice
[Re-Titled by Moderator]
Posted on Jan 25, 2021 4:25 AM
All replies
Loading page content
Page content loaded
Two Factor Authorization is a requirement for some Apple Features in Big Sur.
Jan 25, 2021 4:31 AM
I have read this a couple of times to maybe find a loophole to no avail. It does not tell me how to turn it off.
Jan 25, 2021 4:37 AM
Go to Manage my Apple ID log in and turn 2FA off
Jan 25, 2021 4:42 AM
I’ve done that as well and it doesn’t give me the option to turn it off.
Jan 25, 2021 6:35 AM
Can I turn off two-factor authentication after I’ve turned it on?
If you already use two-factor authentication, you can no longer turn it off. Certain features in the latest versions of iOS and macOS require this extra level of security, which is designed to protect your information. If you recently updated your account, you can unenroll within two weeks of enrollment. Just open your enrollment confirmation email and click the link to return to your previous security settings. Keep in mind, this makes your account less secure and means that you can’t use features that require higher security.
Jan 25, 2021 6:40 AM
I know all of this. Tell me something that isn’t in black and white on the site. I didn’t use 2 factor at all until about 0500 today.
Jan 25, 2021 7:55 AM
Nothing to add beyond what Apple has clearly stated.
Jan 26, 2021 1:38 AM
I’m in the same boat as you, basically what they are saying is they are completely removed the ability to turn off 2F and will not support hat option going forward. So anytime someone makes a change that resets it to on they are now stuck with having it forever.
Jan 26, 2021 7:20 AM
Question: Q: Turn off Two-factor authentication More Less
Источник


