- LinearLayout
- Общая информация
- Примеры
- Градиентный фон
- Меняем фон программно
- Программная анимация компоновки
- Отключаем выравнивание по базовой линии
- Разделители
- Программное создание разметки LinearLayout
- Hands-on with Material Components for Android: Buttons
- Part 4 of a series covering practical usage of Material Components for Android
- Setting up a Material Components theme for Android
- Attribute by attribute
- Basic usage 🏁
- Choosing a style 🤔
- Adding an icon 🔷
- Grouping Buttons to create a Toggle Button 👨👩👧👦
- Grouping
- Adjusting selected behavior
- Listening for selection state
- Orientation
- Theming 🎨
- Color
- Typography
- Shape
- More resources 📚
LinearLayout
Общая информация
В студии макет LinearLayout представлен двумя вариантами — Horizontal и Vertical. Макет LinearLayout выравнивает все дочерние объекты в одном направлении — вертикально или горизонтально. Направление задается при помощи атрибута ориентации android:orientation:
Все дочерние элементы помещаются в стек один за другим, так что вертикальный список компонентов будет иметь только один дочерний элемент в ряду независимо от того, насколько широким он является. Горизонтальное расположение списка будет размещать элементы в одну строку с высотой, равной высоте самого высокого дочернего элемента списка.
В этом примере используются два способа размещения элементов TextView: по горизонтали и по вертикали.

У разметки LinearLayout есть интересный атрибут android:layout_weight, который назначает индивидуальный вес для дочернего элемента. Этот атрибут определяет «важность» представления и позволяет этому элементу расширяться, чтобы заполнить любое оставшееся пространство в родительском представлении. Заданный по умолчанию вес является нулевым.
Например, если есть три текстовых поля, и двум из них объявлен вес со значением 1, в то время как другому не даётся никакого веса (0), третье текстовое поле без веса не будет расширяться и займёт область, определяемую размером текста, отображаемого этим полем. Другие два расширятся одинаково, чтобы заполнить остаток пространства, не занятого третьим полем. Если третьему полю присвоить вес 2 (вместо 0), это поле будет объявлено как «более важное», чем два других, так что третье поле получит 50% общего пространства, в то время как первые два получат по 25% общего пространства.
Также можно указать атрибут android:weightSum. Если атрибуту присвоить значение 100, то можно указывать вес дочерних элементов в удобном виде, как в процентах. Такой способ широко используется веб-мастерами при вёрстке.
Создадим простейшую разметку таким образом, чтобы дочерний элемент занимал половину родительского контейнера:

Примеры
Рассмотрим возможности LinearLayout на примерах.
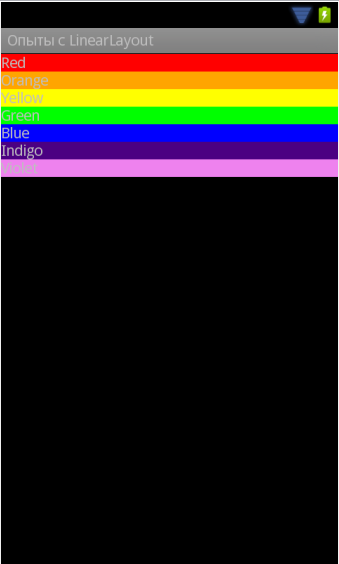
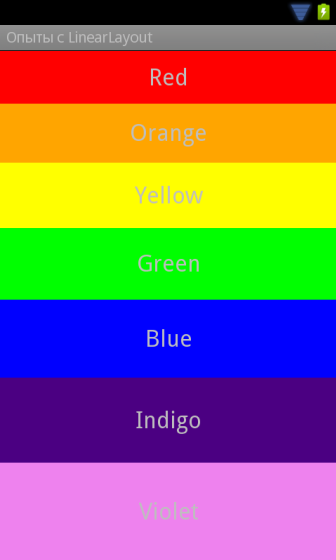
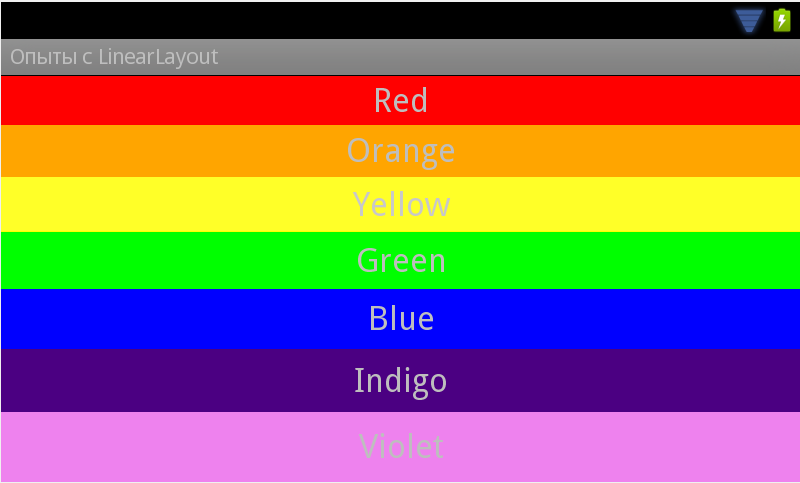
Создадим 7 текстовых меток и присвоим им цвета радуги. Расположим их друг за другом. Получим следующий результат
Отцентрируем текст в TextView при помощи свойства Gravity, установив значение Center. Аналогично поступим и с LinearLayout, чтобы выровнять по центру текстовые метки.
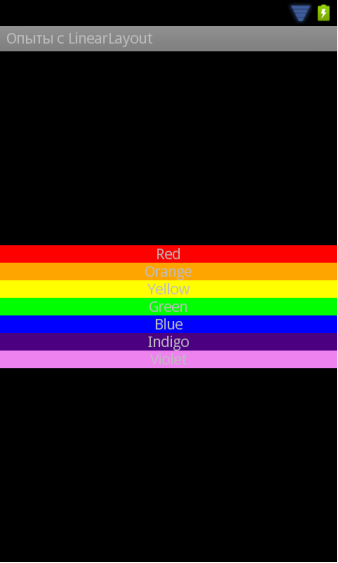
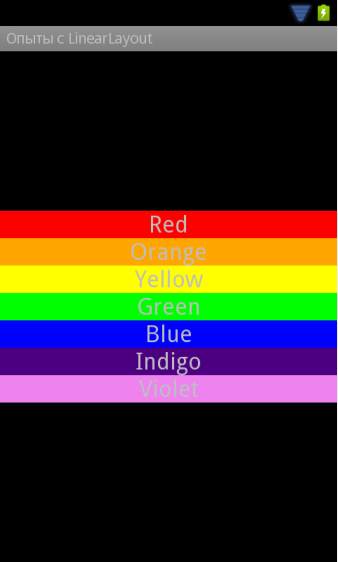
Цветные полоски получились слишком узкими. Расширим их за счет увеличения размера шрифта (TextSize) у текстовых меток.
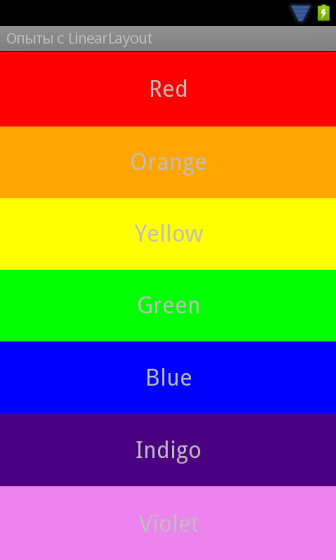
Стало чуть лучше, но все равно пропадает много свободного пространства. Совсем не хочется видеть чёрный цвет сверху и снизу. Здесь нам придёт на помощь свойство Layout weight. Так как число 7 не совсем удобное для деления, то поступим следующим образом. Пяти элементам присвоим вес 0.14, а двум — 0.15, что в сумме даст 1.0. Теперь элементы равномерно заполнят весь экран.
Если мы хотим сделать плавное увеличение высоты полоски, то вес нужно распределить таким образом: 0.08, 0.10, 0.12, 0.14, 0.16, 0.18, 0.22.
Чем хорош этот способ? Мы не привязываемся к точным размерам, а позволяем системе самой расчитывать равномерное распределение элементов по экрану. Если в Eclipse вы выберите режим Landscape, то экран будет выводиться в альбомном режиме и при этом элементы по-прежнему будет равномерно распределены.
Градиентный фон
Если вам нужен градиентный фон для LinearLayout, то создайте в папке res/drawable xml-файл, например, gradient.xml:
Далее остаётся только прописать файл в свойстве Background:

Меняем фон программно
Чтобы программно сменить фоновый цвет у LinearLayout, нужно вызвать метод setBackgroundColor(). Пример изменения фона можно найти в статье Android::Класс android.graphics.Color.
Программная анимация компоновки
Хочу показать один пример программной анимации. Не знаю, имеет ли пример практическую ценность, но для общего развития не помешает. Добавьте в шаблон LinearLayout несколько кнопок, текстовых полей и других элементов на ваше усмотрение. Далее пишем код для обработчика щелчка кнопки и вспомогательный класс для анимации:
Когда вы щелкните на кнопке, то LinearLayout будет плавно увеличиваться в размерах. Данный приём можно использовать не только к компоновке, но и к любому объекту View.
Отключаем выравнивание по базовой линии
Допустим, у вас есть следующая разметка:
Если посмотрим, что получилось, то увидим, что средняя кнопка опустилась вниз.

Строго говоря, разметка составлена не совсем правильно, используя жёстко установленные величины. Но будем считать, что такой код достался от другого программиста и заказчик не хочет его кардинально менять. Причина такого поведения кнопки в том, что по умолчанию Android пытается выравнивать элементы по некой базовой линии. А средняя кнопка имеет слишком длинный текст и она вот таким причудливым образом сместилась вниз. Можно попробовать использовать свойства gravity, но можно поступить проще. Добавьте атрибут android:baselineAligned=»false» к LinearLayout и все три кнопки будут аккуратно находиться на одной линии. Имейте в виду, может пригодится.
Разделители
Начиная с API 11, у LinearLayout появился новый атрибут android:divider, позволяющий задать графический разделитель между кнопками. Также нужно явно включить использование разделителей через атрибут android:showDividers, в котором можно указать, каким образом использовать разделители — только в середине, в начале, в конце — можно комбинировать эти значения.
Создадим в папке res/drawable файл separator.xml:
Разметка для активности:

Разделители могут оказаться полезными. В статье Grid Spacing on Android показан хороший пример на эту тему.
Допустим, мы хотим вывести в ряд три кнопки под каким-то компонентом, например, логотипом компании. Разметка может быть следующей.
Вместо @dimen/spacing_medium можете подставить 8dp, а цвета придумать свои, если будете проверять пример самостоятельно.

Видно, что напрашивается дизайн в виде сетки. Отсутствие пространства между кнопками может создать неудобства у пользователя. Добавим их. У контейнера @id/buttons_container добавим android:layout_marginTop=»@dimen/spacing_medium», а у первой и второй кнопки добавим android:layout_marginRight=»@dimen/spacing_medium» (напомню, можно использовать 8dp)

Всё отлично работает до того момента, если нам понадобится программно убрать с экрана третью кнопку. Сделать это можно через View.GONE. И что мы увидим?

Теперь вторая кнопка не выровнена по правому краю. Некрасиво. Очень плохим решением станет программный пересчёт всех величин, чтобы выровнять компоненты. Как вариант, использовать другой тип разметки, например, GridLayout. Но у него есть свои проблемы с отступами и вам будет тяжело добиться нужного результата.
Проблема красиво решается с помощью упомянутых выше разделителей. Создадим в папке res/drawable файл spacer_medium.xml:
Теперь кнопки всегда будут аккуратно выравнены по краям, независимо от их количества — две или три.
Программное создание разметки LinearLayout
В некоторых случаях может понадобиться создать LinearLayout программным способом. Сначала создаётся объект LayoutParams, на его основе создаётся LinearLayout, а позже в него добавляются дочерние компоненты.
Также программно можно управлять настройками LinearLayout через тот же объект LayoutParams. Разместите кнопку с обработчиком щелчка.
Каждый щелчок на кнопке будет увеличивать отступ на пять единиц и кнопка будет смещаться в сторону. Интересно, что если убрать TextView, то кнопка перестаёт двигаться. Причина мне неизвестна.
Источник
Hands-on with Material Components for Android: Buttons
Part 4 of a series covering practical usage of Material Components for Android

This post will be covering the features and API of Button components. To find out how to handle initial setup of Material Components for Android (including the Gradle dependency and creating an app theme), please see my original post:
Setting up a Material Components theme for Android
Attribute by attribute
Buttons are arguably the most widely-used components in any app. This is largely due to their versatility, allowing users to perform actions and make choices that ultimately guide the flow of an experience. A single line of contained text and/or an icon indicate the action a button can perform.

Material Buttons are slightly different to traditional Android buttons in that they do not include additional insets (4dp on the left/right) and have more letter-spacing, different default colors and other attributes that improve legibility and affordance amongst other components.

From a design perspective, there are three main types of buttons which are intended to offer hierarchical levels of emphasis:
- Text button (low emphasis): No container. Best used for less important actions, especially when other main content needs to be emphasised.


In addition to this, buttons can be grouped together into a fourth type: Toggle button. This allows related button actions to be horizontally arranged in a common container. The buttons themselves can be selected/deselected to indicate an active/inactive choice.

Basic usage 🏁
A MaterialButton can be included in your layout like so:
Choosing a style 🤔
As discussed in the intro section above, a variety of button types exist. These types map to styles that you can apply to a MaterialButton . There also exists a variety of sub-styles for specific use cases, such as to adjust padding for an icon. The full list of styles and their attributes can be found on GitHub. These style variants inherit from Widget.MaterialComponents.Button , each with an optional style suffix:
- Text button: *.TextButton (main), *.TextButton.Icon , *.TextButton.Snackbar , *.TextButton.Dialog , *.TextButton.Dialog.Icon , *.TextButton.Dialog.Flush
- Outlined button: *.OutlinedButton (main), *.OutlinedButton.Icon
- Contained button (unelevated): *.UnelevatedButton (main), *.UnelevatedButton.Icon
- Contained button (raised): No suffix (default, main), *.Icon
Adding an icon 🔷
An icon can be added to a button. It is displayed at the start, before the text label. In order to get the correct icon padding, it is recommended that you use a *.Icon style variant (shown above in the “Choosing a style” section).

The icon can be added in XML:
Alternatively, it can be done programmatically:
A few additional attributes exist for adjusting the icon size and position:
- iconSize : The width/height of the icon. The default value is the supplied Drawable ’s intrinsic width.

- iconGravity : The gravity of the icon. This can be set to start ( ICON_GRAVITY_START , default, at start of button), end ( ICON_GRAVITY_END , at end of button), textStart ( ICON_GRAVITY_TEXT_START , at start of centered text label) or textEnd ( ICON_GRAVITY_TEXT_END , at end of centered text label).


- iconPadding : The spacing between the icon and the text label. Typically you would not want to change this. The default value is 4dp for text buttons and 8dp for all other types.
Attributes related to icon tinting are discussed in the “Theming” section below.
Grouping Buttons to create a Toggle Button 👨👩👧👦
In order to create a toggle button, we need to add MaterialButton s as child View s to a MaterialButtonToggleGroup (a custom ViewGroup ).
Note: MaterialButtonToggleGroup was added in the 1.1.0-alpha05 release of Material Components for Android.
Grouping
This can be done in XML:
Alternatively, it can be done programmatically:
The MaterialButtonToggleGroup handles layout and adjusting of only the relevant shape corners in the row of MaterialButton s. The appearance of the MaterialButton s is determined by whichever style they each use. It is advised to use a consistent style for all children and also recommended to use the outlined button type.
Adjusting selected behavior
When added to a MaterialButtonToggleGroup , child MaterialButton s automatically become “selectable” (i.e. The android:checkable attribute is set to true).
Thus, there exists a couple of attributes for adjusting how MaterialButtonToggleGroup manages this:
- singleSelection : Determines whether or not only a single button in the group can be checked at a time. The default value is false, meaning multiple buttons can be checked/unchecked independently.

Listening for selection state
We are able to query for and adjust the current checked button(s) in a variety of ways:
We are also able to listen for checked changes by adding an OnButtonCheckedListener to a MaterialButtonToggleGroup :
Listeners can also be removed with the MaterialButtonToggleGroup#removeListener and MaterialButtonToggleGroup#clearListeners functions.
Orientation
The default arrangement of buttons within a toggle group is horizontal. However, seeing as MaterialButtonToggleGroup extends LinearLayout , it also supports vertical arrangement. This can be set programmatically or in XML:

The interesting thing to note here is the extra attributes on the child MaterialButton (s). It is recommended to set the width to match_parent and to remove the top/bottom insets from the child buttons so as to have them sit flush against each other vertically. This also, however, requires adjusting the minHeight to make up for the lack of insets.
Theming 🎨
Buttons can be themed in terms of the three Material Theming subsystems: color, typography and shape. We have already shown which styles to use in the “Choosing a style” section above. When implementing a global custom MaterialButton and MaterialButtonToggleGroup styles, reference them in your app theme with the materialButtonStyle / materialButtonOutlinedStyle and materialButtonToggleGroupStyle attributes respectively.
Color
The color of the MaterialButton background can be customized with the backgroundTint attribute. This requires a ColorStateList , meaning a for checked/enabled/disabled states is required. It defaults to colorPrimary (enabled)/ colorOnSurface (disabled) for contained buttons and transparent(unchecked)/ colorPrimary (checked) for all other types, with different opacities per state. There is also a backgroundTintMode attribute to change the tint PorterDuff.Mode , although typically you would want to keep this the same.
The color of the text label can be customized with the android:textColor attribute. This too requires a ColorStateList . It defaults to colorOnPrimary (enabled)/ colorOnSurface (disabled) for contained buttons and colorPrimary (enabled or checked)/ colorOnSurface (disabled or unchecked) for all other types, with different opacities per state.
The color of the optional icon can be customized with the iconTint attribute. This too requires a ColorStateList and the defaults are the same as those of android:textColor . As before, there is also an iconTintMode attribute.
Lastly, the color of the button touch ripple can be customized with the rippleColor attribute. It too accepts a ColorStateList and defaults to colorOnPrimary for contained buttons and colorPrimary for all other types, with different opacities per state.

Typography
The button text label will adopt the fontFamily attribute defined in your app theme.
While you would typically want to keep most aspects of the button text appearance as is, the Material Guidelines suggest we can use sentence case over the standard all caps for the text label, if desired. To achieve this, we would create a new style:
We could apply this directly to a button or in an individual button style by referencing it with the android:textAppearance attribute. Alternatively, it can be applied globally by referencing it in your app theme with the textAppearanceButton attribute.

Shape
The shape of a button background can be customized with the shapeAppearance attribute. This defaults to shapeAppearanceSmallComponent .
While not strictly shape theming, it is worth mentioning that the width of an outlined button stroke can be adjusted with the strokeWidth attribute. This defaults to 1dp.

More resources 📚
- The source code for the Playground app used in this article can be found on GitHub.
- Buttons Design Documentation
- Buttons API Documentation
- Toggle Buttons API Documentation
I hope this post has provided some insight into Material Buttons and how they can be used in your Android app(s). If you have any questions, thoughts or suggestions then I’d love to hear from you!
Источник


