- SimpleAdapter
- Используем системную разметку
- Используем собственную разметку
- ListAdapter
- Сложная разметка
- Tek Eye
- A SimpleAdapter Loads a ListView with Two Line Entries
- Define the Data
- Define the Views for Each List Entry
- Load an ArrayList with the Data and Keys via HashMaps
- Create the SimpleAdapter
- Add the ListView to Display the Data
- Link the Adapter to the List
- Full Class Code
- See Also
- Archived Comments
- Do you have a question or comment about this article?
SimpleAdapter
Конструктор класса SimpleAdapter имеет следующий вид:
Для данных в параметре data используется коллекция Map-объектов или его наследников, например, HashMap. Каждый Map содержит данные для отдельного элемента списка. Чтобы адаптер понимал, какие данные нужно вставлять в View-компоненты каждого пункта списка, мы указываем два массива from и to. В массиве from используем ключи из Map, а в массиве to – идентификаторы компонентов. Адаптер последовательно перебирает все компоненты из массива to и сопоставляет им соответствующие значения из from. Следите, чтобы в массиве to было не больше элементов, чем в from, иначе программа вызовет ошибку.
Используем системную разметку
При работе с адаптером ArrayAdapter для ListView мы использовали готовую разметку android.R.layout.simple_list_item_1, которая состоит из одного TextView. Существует другая системная разметка android.R.layout.simple_list_item_2, состоящая из двух текстовых меток с идентификаторами android.R.id.text1 и android.R.id.text2, расположенных в двух строчках. В первой метке выводится текст большим шрифтом, а во втором — маленьким.
При желании можно было наследоваться от ArrayAdapter и реализовать работу с такой разметкой. Но SimpleAdapter уже оптимизирован для работы с таким случаем, поэтому мы можем сразу использовать его.
Напишем пример, где у каждого кота будет его имя и телефон.

Мы создали два ключа Name и Tel и программно заполняем их именами котов и их телефонами. Все телефоны вымышлены, не надо звонить по ним! Коты не дают свои номера кому попало.
Используем собственную разметку
Допустим, мы хотим вывести список котов в три колонки: номер, имя кота и его телефон (Ух, ты).
Создадим отдельную разметку для каждого элемента списка:
Код для связывания адаптера со списком:
Результат будет следующим:

Изменения минимальны. Мы для каждого кота добавили порядковый номер MemberID, а в адаптере указали не системную, а собственную разметку R.layout.list_item. А также используем массив из трёх элементов.
ListAdapter
В приведённых примерах вы можете безбоязненно заменить SimpleAdapter на ListAdapter:
Это на тот случай, чтобы вы не пугались, если встретите такой код.
Сложная разметка
Разметка может быть любой и включать в себя не только текстовые метки, но и другие компоненты, такие как ImageView и CheckBox. Принцип остаётся такой же. Создаём новую разметку и связываем данные с каждым компонентом.
Создадим новую разметку (или отредактируем файл list_item.xml из предыдущего примера)
Смотрим, какие тут отличия. Теперь мы используем не только строки для имён котов, но и булево значение для флажка и целое число для значка. Поэтому, выражение HashMap заменим на более универсальный HashMap
Смотрим на результат. Я знаю только одного кота, который слушает да ест. Поэтому пометим его как накормленного по умолчанию.

Мы создали два массива, которые будут использованы для сопоставления данных и компонентов. Массив from содержит имена Map-ключей, а массив to – идентификаторы компонентов. Таким образом, в первый TextView с идентификатором R.id.textview_name будет вставлено первое значение ключа CatName и так далее. Аналогично происходит и с другими компонентами CheckBox и ImageView.
Адаптер перебирает все компоненты из массива to для каждого элемента списка и сопоставляет им значения из массива from. Получается такая таблица:
R.id.R.id.textview_name – Map.get(«CatName»)
R.id.checkbox_feed — Map.get(«IsHungry»)
R.id.imageview_cat — Map.get(«Icon»)
Тут возникает интересный вопрос, а как адаптер понимает, какой именно метод нужно вызвать для компонента, чтобы передать ему значение. К примеру, для компонента CheckBox нам нужно установить установить флажок или снять его, а не выводить текст, как для TextView.
Тут о нас уже позаботились. Адаптер смотрит, с чем имеет дело и в зависимости от типа компонента принимает решение. Вариантов немного, всего три.
Первый вариант — если компонент является TextView или его наследником, то вставляется текст. Иными словами, вызывается метод SimpleAdapter.setViewText(), который вызывает TextView.setText() и передает туда нужное значение из Map.
Второй вариант — если компонент, наследует интерфейс Checkable, то адаптер проверяет, является ли соответствующее значение из Map типа boolean. Если это действительно так, то вызывается метод Checkable.setChecked. Если значение не является типом boolean, то проверяется, является ли компонент наследником TextView. Если ответ положительный, то тогда вставляется текстовое значение из Map. В других случаях мы получим ошибку. К компонентам с интерфейсом Checkable относятся CheckBox, CheckedTextView, CompoundButton, RadioButton, Switch, ToggleButton. Вы можете сами в этом убедиться. Заменим блок CheckBox на TextView в разметке list_item.xml:
Запустим проект и увидим следующее:

К счастью, приложение не завершается с ошибкой, а просто выводит значения булевой переменной.
Третий вариант — если компонент является ImageView или его наследником, то проверяется тип данных. Если тип можно привести к типу Integer, то вызывается метод SimpleAdapter.setViewImage(ImageView v, int value), который вызывает метод ImageView.setImageResource(), т.е. подставляется идентификатор ресурса из папки drawable или mipmap. Если тип другой, то вызывается метод SimpleAdapter.setViewImage (ImageView v, String value), который пытается привести значение к int и вызвать метод ImageView.setImageResource(). Если такой вариант не проходит, то преобразует строку в объект Uri и вызывает метод ImageView.setImageURI(Uri).
Если компонент не подходит ни под один из трёх вышеперечисленных типов, то мы получим ошибку.
Продолжим опыты. Допустим, мы хотим не только установить флажок у CheckBox, но и новый текст. Так как мы уже знаем, что наследники TextView могут выводить текст, то поступим следующим образом. В наши массивы from и to добавим новые элементы:
Источник
Tek Eye
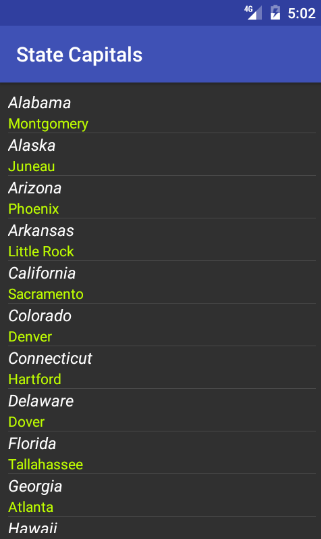
In the tutorial Add a Simple List to an App example code was given to show how to load a ListView from a string array. This article shows how each list item in a ListView can display two lines of data, in this case each list item will be an American state and its capital. The two line list example in this tutorial also applies to a ListActivity which is simply an Activity with a built in ListView.
(This Android Two Line List tutorial assumes that Android Studio is installed, a basic App can be created and run, and the code in this article can be correctly copied into Android Studio. The example code can be changed to meet your own requirements. When entering code in Studio add import statements when prompted by pressing Alt-Enter.)
A SimpleAdapter Loads a ListView with Two Line Entries
A common pattern in Android is to define a View in XML, set up the data that will be displayed in the View, then provide the code to load that data into the View. In the case of a ListView (or ListActivity) the work is done by an Adapter . For a list with single line entries an ArrayAdapter does the job, as seen in the Add a Simple List to an App example. Adding another line of data for each entry in the list requires the SimpleAdapter .
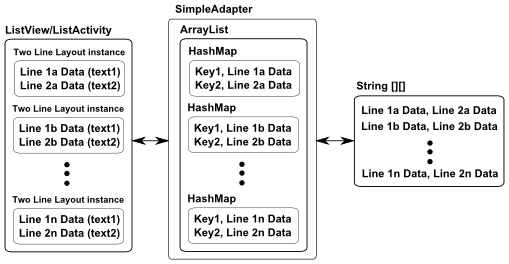
The code in this tutorial will define a two dimensional string array to hold the American States names and capitals data. Normally such arrays are read from a database or a web service. Two TextViews in a layout define the template for each two line list entry. The work of inflating the Views for each list entry and setting the values in the Views is done by a SimpleAdapter. An ArrayList and HashMap ensures the data goes into the correct TextView for each list entry. This diagram summarises what the code achieves.
For this tutorial a new project was started in Android Studio called State Capitals using an Empty Activity, all other entries for the Create New Project wizard being left at their default values.
Define the Data
Under the java folder in the Project explorer tree open the MainActivity.java file (or whatever your named it). At the bottom of the class, just before the last closing brace (curly bracket), add a two dimensional string array to define our data. Here only a few values are shown, all fifty states are in the downloadable project code.
Define the Views for Each List Entry
Each of the two lines in the list entry will be a TextView , and since a layout file needs a single root they are wrapped in a simple LinearLayout . Select the res/layout folder in the Project explorer and use the context menu (usually right-click) or File menu select New then XML and Layout XML File. Give the layout file a name, here twolines is used. The root tag is LinearLayout. With twolines.xml open in Design mode click on the screen then set orientation in the Properties list to vertical. Drop two TextViews from the Palette onto the two lines layout. The top TextView ID is changed to line_a and the bottom to line_b. Style the TextViews as required, here the top is made italic, white and size 16sp, the bottom a bright green. The two lines layout XML should resemble the following:
Load an ArrayList with the Data and Keys via HashMaps
Each entry in the ArrayList is a HashMap, the HashMap links the data to each line in the list entry via a Key. The declaration of the ArrayList at the top of the Java class is:
Imports for ArrayList and HashMap are required. After the call to setContentView the string array is looped through and a HashMap created for each pair. The keys line1 and line2 are used. Each HashMap is added to the ArrayList:
Create the SimpleAdapter
At the top of the class declare the SimpleAdapter (the import for SimpleAdapter will need to be added):
It is configured after the code that loads the list:
Notice that the keys line1 and line2 are passed in as well as the View ids line_a and line_b. Linking the data to the Views.
Add the ListView to Display the Data
Next a ListActivity or an Activity with a ListView is required. Here the default layout (called activity_main.xml) is opened and the Hello World TextView deleted. From the Containers on the Palette a ListView is dropped on to the screen. The ListView is given an ID of list and layout_width and layout_height is set to match_parent. Here is res/layout/activity_main.xml with a ListView added:
Link the Adapter to the List
The call to setAdapter completes the code before the closing brace for onCreate (the import for ListActivity will be required):
(If using a ListActivity it is simply setListAdapter(sa); instead.)
An example project is provided in two_line_listactivity.zip for importing into Android Studio. It is also available from the Android Example Projects page.
Full Class Code
Here is the full Java class listing with imports:
See Also
- Add a Simple List to an App
- Extend a two line list to three in Multi Line ListView Entries in Android.
- To read back the data from an item selected in the multi-line list see our article Read the Selection From a Multi Line ListView.
- There are more free Android Example Projects available.
- For a full list of all the articles in Tek Eye see the full site Index.
Archived Comments
SavTheCoder on May 29, 2012 at 17:14 said: Thank you for this tutorial. It’s good to finally get the painful process of adding two-lined lists, thanks to your help. Thanks again -Sav
Ron on July 13, 2012 at 22:20 said: Very nice example, clear, clean, simple and more importantly, it works! It helped me out a lot. KUDOS!
Marcel on December 9, 2012 at 16:49 said: Clear and simple tutorial, thank you!
I have just one comment to your code, when defining ArrayList and HashMap, you are breaking encapsulation. You should use it like this:
Tek Eye on December 9, 2012 at 23:30 said: Thank you. The declarations used are clear for less experienced programmers, particularly when calling the SimpleAdapter constructor, of course everyone can adapt the code to their preferred style.
Refka on April 10, 2013 at 19:30 said: thank you but how to make it dynamic with json and php!!
Tek Eye on April 11, 2013 at 8:34 said: Use json_encode in PHP to generate the string array as a json object on the website. Use URL to make a HTTP request with HttpURLConnection to get the json object (INTERNET permission must be requested) from the App. Parse the received string directly or using the Java JSON classes to generate the string array for the two line list.
Ana Maria on April 11, 2013 at 15:45 said: I would like to thank you for writing this tutorial. I am a newbie on Android and need to create and Android app for my final year project. You solved a problem that I had for 1 day now. With your help I was able to make progress in my project. The best tutorial ever.
Anjith Sasindran on October 6, 2014 at 6:50 said: Awesome tutorial man. Helped me a lot. All other tutorials are like creating a class which extends ArrayAdapter or BaseAdapter. This one is really good and simple to implement.
Tek Eye on October 6, 2014 at 9:20 said: Thank you for the comment. Enjoy your Android programming.
pratik on December 8, 2014 at 11:08 said: How to add onclicklistener in this list?
Ankit Agrawal on February 17, 2015 at 11:02 said: GREAT JOB!! Thanks.
Mick on September 23, 2015 at 21:15 said: Thank you. Have looked all over for a simple example of this. Now I see just how simple it can be, and I am confident I can get it to work in my App.
Leo C. Bergamo on July 6, 2021 at 15:14 said Hello,
I stumbled upon this article and it has above all helped me tremendously! I am new to Android/Java programming but not programming itself and I am finding what is simple in most other languages is very over complicated using Java. This article cleared up a lot of misunderstandings on my part.
Tek Eye on July 6, 2021 at 19:22 said: Thanks for the comment. I wish you success in your Android programming.
Author: Daniel S. Fowler Published: 2012-05-18 Updated: 2017-04-09


Do you have a question or comment about this article?
(Alternatively, use the email address at the bottom of the web page.)
↓markdown↓ CMS is fast and simple. Build websites quickly and publish easily. For beginner to expert.
Free Android Projects and Samples:
Источник


