- Make and receive calls on your Mac, iPad, or iPod touch
- Set up iPhone Cellular Calls
- Make and receive phone calls
- Make a call on your Mac
- Make a call on your iPad or iPod touch
- Answer a call
- Use Switch Control on your device to control another Apple device
- Use your iPhone, iPad, or iPod touch to control another device
- Use your Mac to control another device
- Stop controlling another device
- Stop controlling a Mac
- Stop controlling an iPhone, iPad, or iPod touch
- Turn off Switch Control
- Turn off Switch Control on an iPhone, iPad, or iPod touch
- Turn off Switch Control on a Mac
- Sync content between your Mac and iPhone or iPad over Wi-Fi
- Identify the ports on your Mac
- Thunderbolt 4 (USB-C)
- Thunderbolt / USB 4
- Thunderbolt 3
- USB 3
- SD card
- Ethernet
- Power
- Audio
- Thunderbolt
- Mini DisplayPort
- FireWire
- Learn more
Make and receive calls on your Mac, iPad, or iPod touch
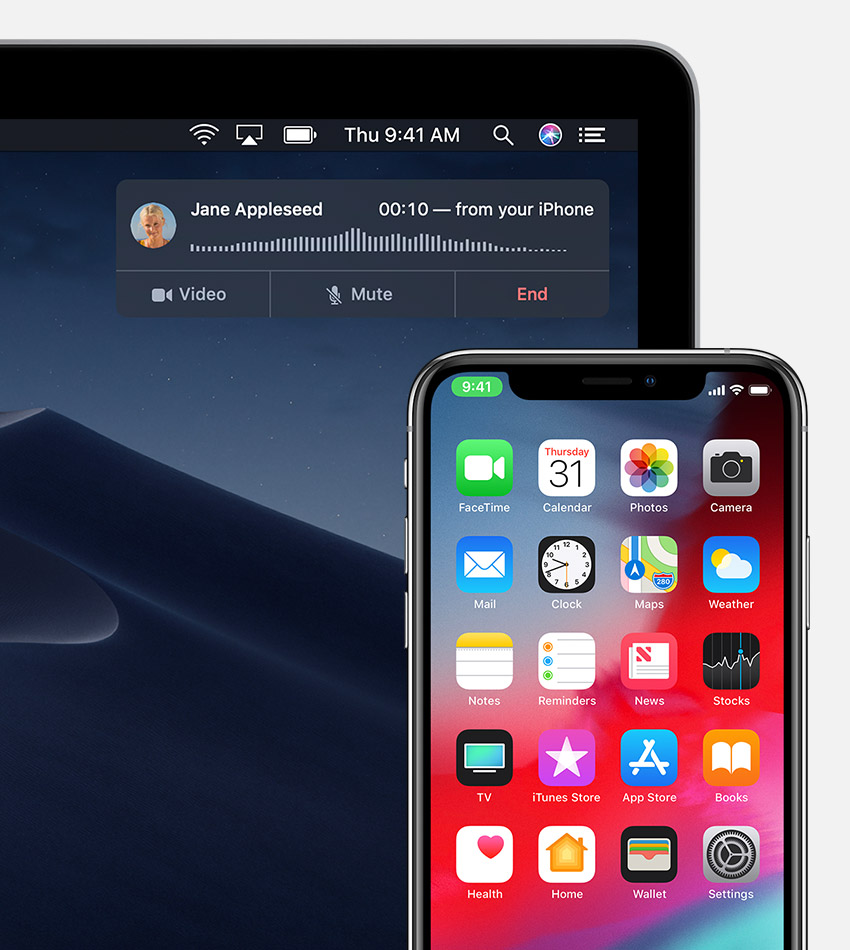
With the iPhone Cellular Calls feature, you can make and receive calls from your Mac, iPad, or iPod touch when those devices are on the same network as your iPhone.
Set up iPhone Cellular Calls
You can use iPhone Cellular Calls with any Mac, iPhone, iPad, or iPod touch that meets the Continuity system requirements. It works when your devices are near each other and set up as follows:
- Each device is signed in to iCloud with the same Apple ID.
- Each device is signed in to FaceTime with the same Apple ID.
- Each device has Wi-Fi turned on.
- Each device is connected to the same network using Wi-Fi or Ethernet.
- On your iPhone, go to Settings > Phone > Calls on Other Devices, then turn on Allow Calls on Other Devices.
- On your iPad or iPod touch, go to Settings > FaceTime, then turn on Calls from iPhone.
- On your Mac, open the FaceTime app, then choose FaceTime > Preferences. Click Settings, then select Calls From iPhone.
If your carrier supports Wi-Fi calling on other devices, you can set up those devices to make and receive calls even when your iPhone isn’t turned on or nearby. Learn about Wi-Fi calling.

Make and receive phone calls
Learn how to make and receive phone calls on your Mac, iPad, and iPod touch.
Make a call on your Mac
- Move the pointer over any phone number in Contacts, Calendar, Safari, or other app that automatically detects such data. Click the arrow in the box that outlines the phone number, then choose Call [phone number] Using iPhone.
- Or open the FaceTime app, enter a phone number in the search field, then click Audio.
Make a call on your iPad or iPod touch
- Tap a phone number in Contacts, Calendar, Safari, or other app that automatically detects such data.
- Or open the FaceTime app, tap , enter the phone number in the search field, then tap Audio.
Answer a call
- On your Mac, a notification appears when someone calls your iPhone. You can answer the call, send it to voicemail, or send the caller a message.
- On your iPad or iPod touch, slide to answer the call.
To stop getting calls on one of your devices, just turn off the Calls from iPhone setting on that device. See the setup section above for details.
Источник
Use Switch Control on your device to control another Apple device
With Use Other Devices for Switch Control, you can control your other Apple devices remotely on the same Wi-Fi network without adjusting any switch connections. This enables you to navigate your Mac or Apple TV with the same switch setup that you use to control your iPhone.
Use your iPhone, iPad, or iPod touch to control another device
- Connect your devices to the same Wi-Fi network.
- Sign in to iCloud with the same Apple ID on both devices.
- If you want to control a Mac, choose Apple menu > System Preferences on your computer.
- Select Accessibility. In the sidebar, choose Switch Control.
- Check the checkbox next to «Allow platform switching to control your computer.»
- If you haven’t already, turn on Switch Control on your iPhone, iPad, or iPod touch.
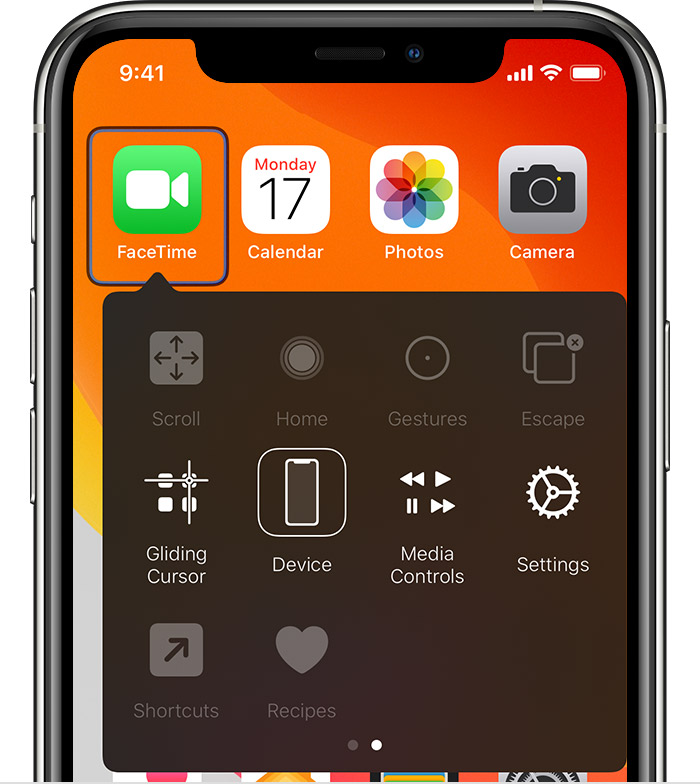
- Use your switch to navigate the Switch Control menu. Select Device.

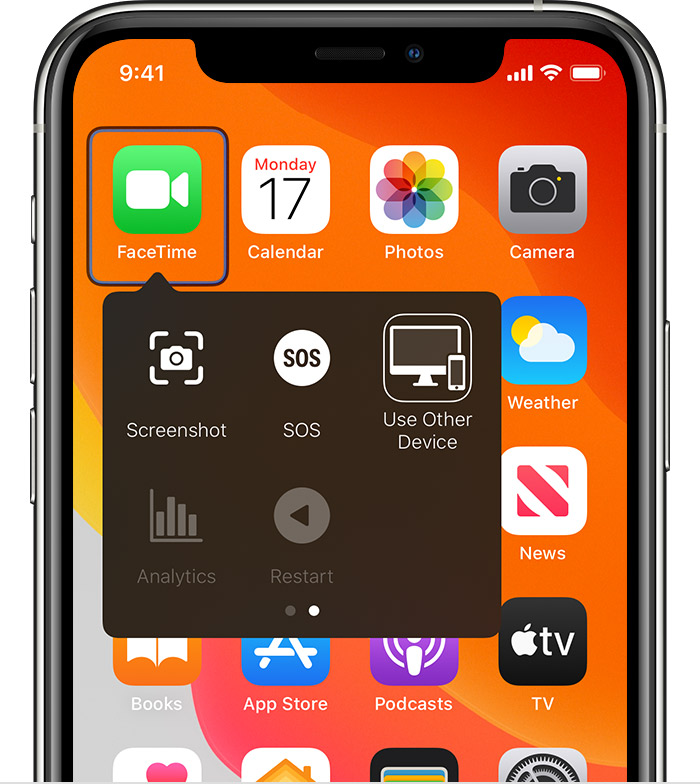
- Select Use Other Device.
- Select the device that you want to control, then select Connect. Now you can use the switch connected to your iPhone, iPad, or iPod touch to control the other device.
Use your Mac to control another device
- Connect your devices to the same Wi-Fi network.
- Sign in to iCloud with the same Apple ID on both devices.
- If you haven’t already, turn on Switch Control on your Mac.
- Use your switch to navigate the Switch Control Home panel. Choose Devices.
- Select the device that you want to control, then select Connect. Now you can use the switch connected to your Mac to control the other device.

Stop controlling another device
To stop controlling another device, press and hold your switch for ten seconds. Your switch will control the original device again.
You can also follow these steps:
Stop controlling a Mac
- Use your switch to navigate the Switch Control Home panel. Choose Devices.
- Select Disconnect. Your switch will control the original device again.
Stop controlling an iPhone, iPad, or iPod touch
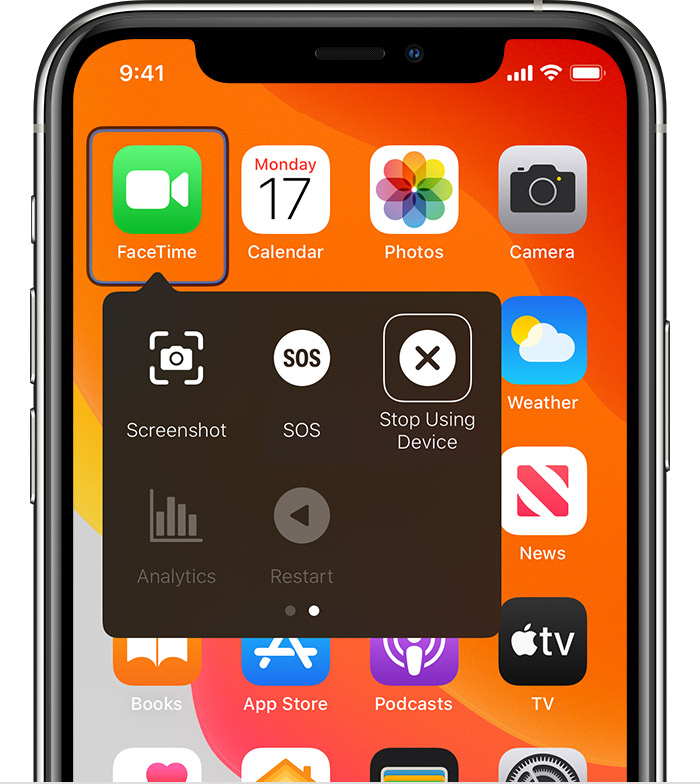
- Use your switch to navigate the Switch Control menu. Select Device.
- Select Stop Using Device. Your switch will control the original device again.
Turn off Switch Control
If you’d like to turn off Switch Control entirely, follow these steps for your device:
Turn off Switch Control on an iPhone, iPad, or iPod touch
Use your switch to navigate to Settings > Accessibility > Switch Control, and turn the setting off.
You can also triple-click the Home button or the Side button on certain models at any time to exit Switch Control.
Turn off Switch Control on a Mac
Use your switch to navigate to System Preferences > Accessibility > Switch Control, and deselect Enable Switch Control.
Источник
Sync content between your Mac and iPhone or iPad over Wi-Fi
You can sync your Mac and device when they’re connected over same Wi-Fi network. To set up Wi-Fi syncing, first connect your device to your Mac using a USB or USB-C cable. You then turn on Wi-Fi syncing and choose the settings you want. Whenever your device connects to your Mac over Wi-Fi, you can select it in the sidebar and sync it. (You can turn on automatic syncing if you want.) Your device must have iOS 5 or later or iPadOS 13 or later.
Connect your device to your Mac using a USB or USB-C cable.
In the Finder  on your Mac, select the device in the Finder sidebar.

If you connect your device to your Mac using a USB cable and can’t see the device in the Finder sidebar, see If your device doesn’t appear in the sidebar.
Click General in the button bar.

Select the “Show this [device] when on Wi-Fi” tickbox.

Use the button bar to turn on and select sync settings.
Whenever your device connects to your Mac, the device’s icon appears in the sidebar. Select the device in the Finder sidebar to view or change syncing options.
Important: If you can’t see your device in the sidebar, choose Finder > Preferences, then select the CDs, DVDs and iOS Devices tickbox.
You can choose to sync your Mac and your device automatically whenever you connect them. See Turn automatic syncing on or off on Mac.
Before disconnecting your device from your Mac, click the Eject button  in the Finder sidebar. The device icon disappears, but Wi-Fi syncing remains turned on. The icon reappears automatically the next time your Mac and device are connected to the same WI-Fi network.
Note: To restore your iPhone or iPad and revert it to its factory settings, you must connect the device to your Mac using a USB or USB-C cable.
Syncing over Wi-Fi is slower than syncing over a cable. If you connect a device to your Mac while the device is syncing over Wi-Fi, syncing continues over the cable. If you disconnect the device’s cable from the Mac while syncing, syncing stops even if Wi-Fi syncing is on. Syncing resumes when you reconnect the device using a cable or over Wi-Fi.
Источник
Identify the ports on your Mac
If you’re not sure which port to use with your external display, hard drive, camera, printer, iPhone, iPad, or other device, the port shapes and symbols in this guide should help.
Information about these and other types of Mac ports is in the specifications for your Mac:
- Choose Apple menu > About This Mac, double-click your serial number, then press Command-C to copy it.
- Go to the Tech Specs page, click the Search Tech Specs bar, press Command-V to enter your computer’s serial number, then click Search.
- Click the specs page for your Mac.
Thunderbolt 4 (USB-C)
These Mac models have Thunderbolt 4 (USB-C) ports:
You can connect external displays and other devices that connect using a Thunderbolt 4 cable, Thunderbolt 3 cable, or USB-C cable. You can also connect a USB-C charge cable to charge your notebook, or a USB-C to Lightning cable to charge your iPhone or iPad. If you have a device that doesn’t connect to this port, you can use an adapter to connect it.
Thunderbolt / USB 4
These Mac models have Thunderbolt / USB 4 ports:
You can connect a single external display and other devices that connect using either a Thunderbolt 3 cable or USB-C cable. You can also connect a USB-C charge cable to charge your notebook, or a USB-C to Lightning cable to charge your iPhone or iPad. If you have a device that doesn’t connect to this port, you can use an adapter to connect it.
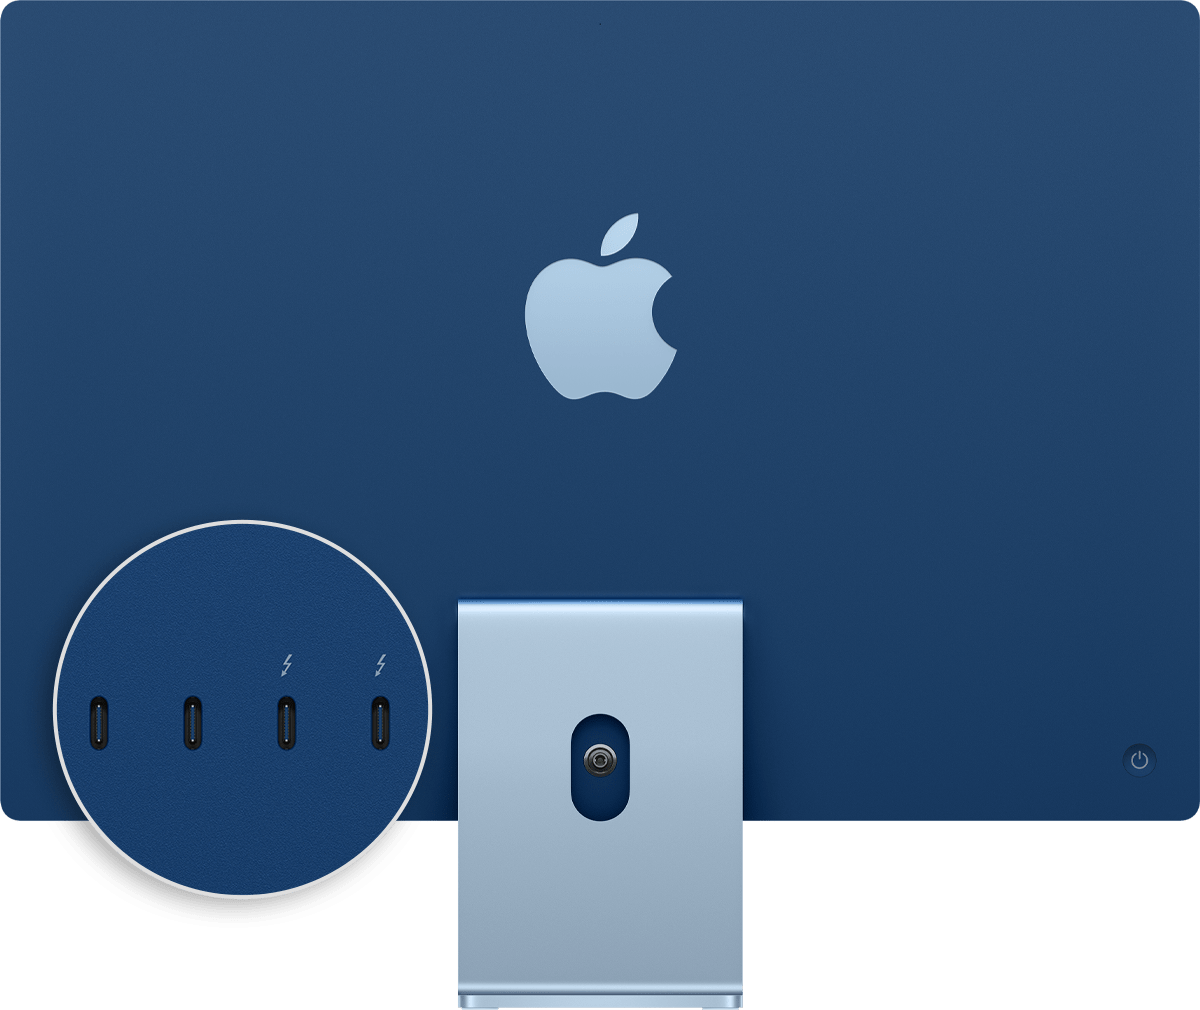
On iMac (24-inch, M1, 2021), the symbol appears above each Thunderbolt / USB 4 port. To connect a display, use either of the ports with the Thunderbolt symbol .
Thunderbolt 3
These Mac models have Thunderbolt 3 ports:
- iMac (Retina 5K, 27-inch, 2020)
- iMac (Retina 5K, 27-inch, 2019)
- iMac (Retina 4K, 21.5-inch, 2019)
- iMac (Retina 5K, 27-inch, 2017)
- iMac (Retina 4K, 21.5-inch, 2017)
- iMac (21.5-inch, 2017)
- iMac Pro
- Mac Pro (2019)
- Mac Pro (Rack, 2019)
- Mac mini (2018)
- MacBook Air (Retina, 13-inch, 2020)
- MacBook Air (Retina, 13-inch, 2019)
- MacBook Air (Retina, 13-inch, 2018)
- MacBook Pro (13-inch, 2020, Two Thunderbolt 3 ports)
- MacBook Pro (13-inch, 2020, Four Thunderbolt 3 ports)
- MacBook Pro (16-inch, 2019)
- MacBook Pro (13-inch, 2019, Two Thunderbolt 3 ports)
- MacBook Pro (15-inch, 2019)
- MacBook Pro (13-inch, 2019, Four Thunderbolt 3 ports)
- MacBook Pro (15-inch, 2018)
- MacBook Pro (13-inch, 2018, Four Thunderbolt 3 ports)
- MacBook Pro (15-inch, 2017)
- MacBook Pro (13-inch, 2017, Four Thunderbolt 3 ports)
- MacBook Pro (13-inch, 2017, Two Thunderbolt 3 ports)
- MacBook Pro (15-inch, 2016)
- MacBook Pro (13-inch, 2016, Four Thunderbolt 3 ports)
- MacBook Pro (13-inch, 2016, Two Thunderbolt 3 ports)
Use these ports with displays and other devices that connect using either a Thunderbolt 3 cable or USB-C cable. You can also connect a USB-C power adapter and cable to charge your notebook computer. If you have a device that doesn’t connect to this port, you can use an adapter to connect it.

If your Mac notebook or desktop computer has more than one port like this, each port supports Thunderbolt 3 and USB-C.
USB 3
These Mac models have USB 3 ports:
- iMac (24-inch, M1, 2021) with four ports
- MacBook (Retina, 12-inch, 2017)
- MacBook (Retina, 12-inch, Early 2016)
- MacBook (Retina, 12-inch, Early 2015)
On MacBook, use this port with displays and other devices that connect using a USB-C cable. You can also connect a USB-C power adapter and cable to charge your notebook computer. If you have a device that doesn’t connect to this port, you can use an adapter to connect it.
On iMac (four-port model only), use the USB 3 ports with external devices that connect using a USB-C cable. To connect an external display, use either of the ports with the Thunderbolt symbol .
These Mac models have an HDMI port:
- MacBook Pro introduced in 2021
- MacBook Pro introduced in 2012 through 2015
- Mac mini introduced in 2010 or later
- Mac Pro introduced in 2013 or later
Use HDMI with displays and TVs that connect using an HDMI cable.
SD card
These Mac models have an SDXC card slot:
- MacBook Pro introduced in 2021
- MacBook Pro introduced in 2011 through 2015
- Mac mini introduced in 2011 through 2014
- 13-inch MacBook Air models introduced in 2013 through 2017
- 27-inch iMac models introduced in 2010 or later
- 21.5-inch iMac models introduced in 2010 or later
Use the SD card slot with SD, SDHC, SDXC, MMC, and UHS-II media cards, such as those used by digital cameras.
Ethernet
Use Ethernet with networks and devices that connect using an Ethernet (RJ45) cable.
On some iMac models, the Ethernet port is located on the computer’s power adapter. If your power adapter doesn’t have an Ethernet port, you can use an Ethernet adapter.
Power
Use the power port on your Mac notebook to connect your computer to AC power using a USB-C to MagSafe 3 cable and USB-C power adapter, MagSafe 2 power adapter, or MagSafe power adapter. Some Mac notebooks have a dedicated charging port while others use only USB-C ports to charge.
MagSafe 2 and MagSafe power adapters are not compatible with MagSafe 3.
Audio
Use Audio-Out — or — with headphones, speakers, and other audio-output devices that connect using an audio cable that has a 3.5 mm (1/8 inch) audio jack. On 14-inch and 16-inch MacBook Pro models with Apple silicon, you can connect high-impedance headphones to the 3.5mm audio jack.
Use Audio-In with a microphone or other audio-input device that connects using an audio cable that has a 3.5 mm (1/8 inch) audio jack.
Use these ports with devices that connect using a USB-A cable. USB ports are sometimes known by the USB specification of the port, such as USB 2 or USB 3.

Thunderbolt
These Mac models have Thunderbolt or Thunderbolt 2 ports:
- MacBook Pro introduced in 2011 through 2015
- MacBook Air introduced in 2011 through 2017
- Mac mini introduced in 2011 through 2014
- iMac introduced in 2011 through 2015
- Mac Pro introduced in 2013
Use these ports with displays and other devices that connect using a Thunderbolt cable.
Thunderbolt and Thunderbolt 2 are not the same as Mini DisplayPort . They have the same shape, but use different symbols on the cable and port. However, this port does support Mini DisplayPort for video output, so you can use a Mini DisplayPort cable to connect a Mini DisplayPort display.
Mini DisplayPort
These Mac models have Mini DisplayPort:
- MacBook Pro introduced in late 2008 through 2010
- MacBook Air introduced in late 2008 through 2010
- Mac mini introduced in 2009 and 2010
- iMac introduced in 2009 and 2010
- Mac Pro introduced in 2009 through 2012
Use this port with displays that connect using a Mini DisplayPort cable.
Mini DisplayPort is not the same as Thunderbolt or Thunderbolt 2 . They have the same shape, but use different symbols on the cable and port.
FireWire
| FireWire 400 | FireWire 800 |
Use FireWire with devices that connect using a FireWire 400 or FireWire 800 cable.
Learn more
Information about products not manufactured by Apple, or independent websites not controlled or tested by Apple, is provided without recommendation or endorsement. Apple assumes no responsibility with regard to the selection, performance, or use of third-party websites or products. Apple makes no representations regarding third-party website accuracy or reliability. Contact the vendor for additional information.
Источник


