- Install Android Studio Canary on Ubuntu
- Android Studio Canary
- The IDE for Android (Canary build)
- Details for Android Studio Canary
- Enable snaps on Ubuntu and install Android Studio Canary
- Enable snapd
- Install Android Studio Canary
- How to install Android Studio on Ubuntu 20.04
- Installation of Android Studio on Ubuntu 20.04
- Method 1: Install Android Studio through the repository
- Step 1: Install Java JDK on Ubuntu 20.04
- Step 2: Add android-studio repository
- Step 3: Update the apt cache
- Step 4: Install Android Studio
- Step 5: Launch Android Studio
- Method 2: Install Android Studio through snap
- Karim Buzdar
- Install Android Studio on Ubuntu
- Android Studio
- The IDE for Android
- Details for Android Studio
- Enable snaps on Ubuntu and install Android Studio
- Enable snapd
- Install Android Studio
- How to Install Android Studio on Ubuntu?
- System Requirements for Installing Android Studio in Ubuntu
- Method 1: From The Ubuntu Software Centre
- Method 2: Using The Snap Tool
- Method 3: Using the Zip File
- Starting Android Studio
Install Android Studio Canary
on Ubuntu

Android Studio Canary
The IDE for Android (Canary build)
Android Studio provides the fastest tools for building apps on every type of Android device.
World-class code editing, debugging, performance tooling, a flexible build system, and an instant build/deploy system all allow you to focus on building unique and high quality apps.
This snap is maintained by the Snapcrafters community, and is not necessarily endorsed or officially maintained by the upstream developers.
Details for Android Studio Canary
Enable snaps on Ubuntu and install Android Studio Canary
Snaps are applications packaged with all their dependencies to run on all popular Linux distributions from a single build. They update automatically and roll back gracefully.
Snaps are discoverable and installable from the Snap Store, an app store with an audience of millions.
Enable snapd
If you’re running Ubuntu 16.04 LTS (Xenial Xerus) or later, including Ubuntu 18.04 LTS (Bionic Beaver) and Ubuntu 20.04 LTS (Focal Fossa), you don’t need to do anything. Snap is already installed and ready to go.
For versions of Ubuntu between 14.04 LTS (Trusty Tahr) and 15.10 (Wily Werewolf), as well as Ubuntu flavours that don’t include snap by default, snap can be installed from the Ubuntu Software Centre by searching for snapd.
Alternatively, snapd can be installed from the command line:
Either log out and back in again, or restart your system, to ensure snap’s paths are updated correctly.
Install Android Studio Canary
To install Android Studio Canary, simply use the following command:
Источник
How to install Android Studio on Ubuntu 20.04
Android Studio is the most widely used software for android mobile application development. Android Studio is developed by Google and it can run on different operating environments like Windows, macOS, and Linux. Most of the current popular android applications are developed on Android Studio. This tool has various built-in features that provide a stable and fast environment for developing applications.
In this article, we will show you how to install Android Studio on a Ubuntu 20.04 Linux system.
Installation of Android Studio on Ubuntu 20.04
We have two different ways to install Android Studio on an Ubuntu 20.04 system. These are as follows:
- Install android studio by adding android-studio repository
- Install android studio through snap
Method 1: Install Android Studio through the repository
Using this method, you will install the android studio on your Ubuntu 20.04 system by adding its official repository to your source list. But first, you need to make sure some prerequisites packages must be installed on your Ubuntu system. Follow the following steps to install Android Studio through the repository:
Step 1: Install Java JDK on Ubuntu 20.04
You need to install Java JDK software which is required for the android studio. So, you will install Java JDK using the following command if it is not already installed on your system:

If Java is already installed on your system then, you will skip this step to save your time.
Step 2: Add android-studio repository
Now, you will add the android studio official repository to your system. For this purpose, use the following command on the terminal:

During the installation, the prompt will display on the terminal, you will hit ‘Enter’ to continue adding its repository otherwise if you want to cancel this action then you will press ‘Ctrl – c’ to cancel adding the repository to your system.
Step 3: Update the apt cache
After successfully adding the android repository, you will update your system apt-cache using the following command:

Step 4: Install Android Studio
Now it’s time to install the android studio on your Ubuntu 20.04 system using the apt package manager. With the help of the following command you will install Android Studio with all its dependencies: Advertisement

Step 5: Launch Android Studio
After completing the installation of the Android Studio, you will launch it using the application launcher search bar. For that purpose, click on Activities which is located at the top left corner of your desktop on the Ubuntu 20.04 system. Now, type the keyword ‘Android Studio’ in the search bar. As you will see the Android studio icon in search results as follows:

Click on the android studio icon and configure the setting of the android studio on the Ubuntu 20.04 system. Select don’t import settings as follows:

It will search for available SDK components on the following screen:

Now, the Android setup wizard will start on your system. Click on Next as follows:

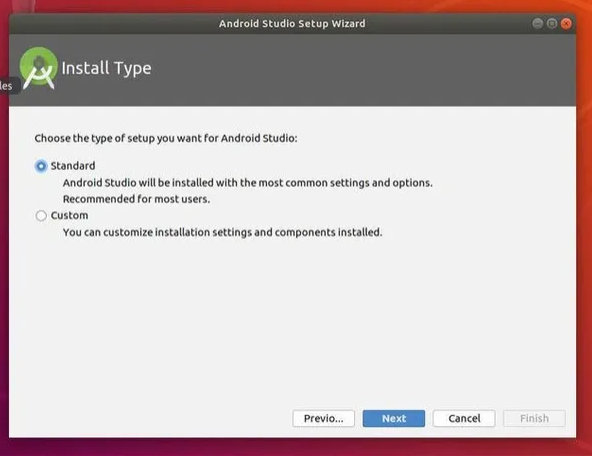
Choose the install type Standard or Custom. Choose the Standard option and click on Next button as follows:

Now, you need to select the user interface theme. Choose Light and click on Next.

You can also choose another theme for the android studio as well.

If you want to change any setting the click on the ‘Previous’ button. Otherwise, review the wizard setup settings and click on Next.

Now, formal emulator settings will display on the dialog window. Click on the Finish button.

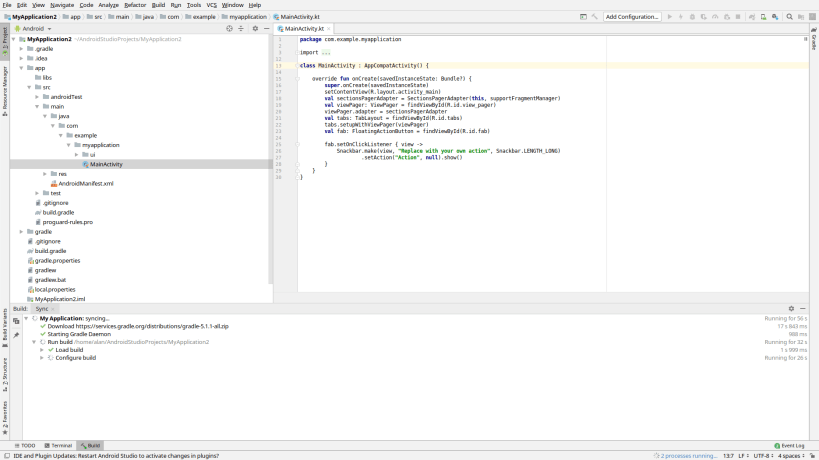
After that, the necessary components will begin to download on your system as follows:

Once the download is complete, now you will click on Finish.
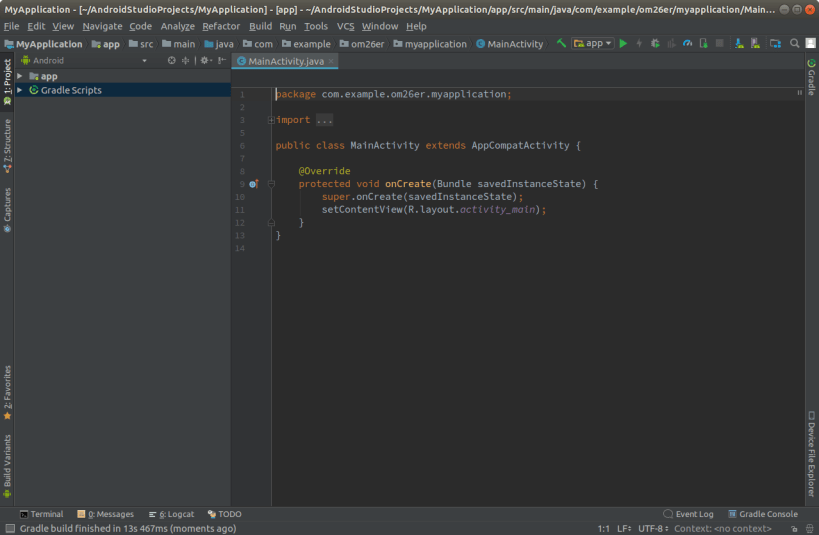
Now, the following window will display on your system from where you can use android studio on your system. Choose option Start a new android studio project to create a new application.

Congratulations! Android Studio has been installed and configured on your system Ubuntu 20.04.
Method 2: Install Android Studio through snap
You can install the android studio using snap on your Ubuntu system using the following command:
You can also install android studio using the below-mentioned command:
In this article, we implemented two different methods to install Android Studio on your Ubuntu 20.04 system. I hope you enjoyed this article. Now, you are able to install the android studio on any Ubuntu system.
Karim Buzdar
About the Author: Karim Buzdar holds a degree in telecommunication engineering and holds several sysadmin certifications. As an IT engineer and technical author, he writes for various web sites. You can reach Karim on LinkedIn
Источник
Install Android Studio
on Ubuntu
Android Studio
The IDE for Android
Android Studio provides the fastest tools for building apps on every type of Android device.
World-class code editing, debugging, performance tooling, a flexible build system, and an instant build/deploy system all allow you to focus on building unique and high quality apps.
This snap is maintained by the Snapcrafters community, and is not necessarily endorsed or officially maintained by the upstream developers.
Details for Android Studio
Enable snaps on Ubuntu and install Android Studio
Snaps are applications packaged with all their dependencies to run on all popular Linux distributions from a single build. They update automatically and roll back gracefully.
Snaps are discoverable and installable from the Snap Store, an app store with an audience of millions.
Enable snapd
If you’re running Ubuntu 16.04 LTS (Xenial Xerus) or later, including Ubuntu 18.04 LTS (Bionic Beaver) and Ubuntu 20.04 LTS (Focal Fossa), you don’t need to do anything. Snap is already installed and ready to go.
For versions of Ubuntu between 14.04 LTS (Trusty Tahr) and 15.10 (Wily Werewolf), as well as Ubuntu flavours that don’t include snap by default, snap can be installed from the Ubuntu Software Centre by searching for snapd.
Alternatively, snapd can be installed from the command line:
Either log out and back in again, or restart your system, to ensure snap’s paths are updated correctly.
Install Android Studio
To install Android Studio, simply use the following command:
Источник
How to Install Android Studio on Ubuntu?
Android Studio is a full-featured cross-platform IDE which helps us to build applications for Android device. Android Studio is based on JetBrains’ IntelliJ IDEA. This IDE includes everything we need for Android development. Android Studio build system is powered by Gradle allowing you to make multiple build variants for various devices from one project. This article will explain the way to install Android Studio on Ubuntu 18.04. We can use the same instructions for Ubuntu 16.04 and any Ubuntu-based distribution, including Kubuntu, Linux Mint, and Elementary OS.
Prerequisites: We need to be logged in as a user with sudo access. It will make our system able to install packages on our Ubuntu system.
System Requirements for Installing Android Studio in Ubuntu
These are some important specifications our machine needs to meet:
- 64-bit distribution capable of running 32-bit applications.
- GNU C Library (glibc) 2.19 or later
- Minimum of 3 GB RAM, 8 GB RAM recommended; plus 1 GB for the Android Emulator.
- Minimum disk space should be 2 GB,
- 4 GB Recommended (1.5 GB for Android SDK and emulator system image + 500 MB for IDE)
- The minimum screen resolution should be 1280×800.
Method 1: From The Ubuntu Software Centre
We can easily install Ubuntu software from Ubuntu Software Centre but desired software must exist in the software store. To install Android Studio we can visit the Ubuntu Software Centre and search for Android Studio. Once we found the software easily click on the install button. We will get a password prompt to confirm the installation process. Once the installation gets completed we will have the Android Studio icon in our application tray. Once it installed successfully, we can check the final setup section.
Method 2: Using The Snap Tool
When the snap tool is available it becomes too easy to install software packages. We do not have to modify any files or type in any scary commands. But we need to have Snap installed in our machine in the first place. We can install Snap, using the below command:
Once the installation of Snap gets successful, we can proceed to install Android Studio with the below command:
It may take some time, hence we have to wait for some minutes. It should be installed successfully, but for some reason, if it throws an error like this:
error: This revision of snap “android-studio” was published using classic confinement and thus may perform arbitrary system changes outside of the security sandbox that snaps are usually confined to, which may put your system at risk.
Then we have to add the –classic parameter to the command as shown below:
Once it installed successfully, we can check the final setup section.
Method 3: Using the Zip File
Installing Java OpenJDK
To install Android Studio we require OpenJDK version 8 or above to be installed in our system. First, we will install OpenJDK 8. The installation is very simple, we can start by updating the package index:
Now install the OpenJDK 8 package using the below command
To verify the installation we can use the below command to check the version:
The output will be something like this:
Installing Android Studio
To download and install the Android Studio snap package, we have to open our terminal using the Ctrl+Alt+T keyboard shortcut and type the below command:
When the installation gets completed, we will see the following output:
Now Android Studio has been installed on our Ubuntu desktop.
Starting Android Studio
Once the Android Studio is installed in the system using any of the above methods, we can start Android Studio through our terminal by typing android-studio in our terminal or by clicking on the Android Studio icon. When we start Android Studio for the first time, the below window will appear asking us to import Android Studio settings from a previous installation:
When we click on the OK button, the Setup Wizard window will appear. We have to click on the Next button to start the initial configuration and post-installation steps. Now option to choose the type of setup we want for Android studio will appear. We can select the “Standard” option or “Custom” option if we want to customize our Android Studio.
We can select the UI theme and the Setup Wizard on the next step. It will download and install the required SDK components. The process may take some time depending on our system and connection speed. Once the Android Studio IDE is loaded, the Welcome page will be presented:
Источник


