- Troubleshooting Android development
- Your application crashes immediately after launch
- The game crashes after a couple of seconds when playing video
- No Android device found
- Failed to re-package resources
- Unable to merge Android manifests
- Unable to convert classes into DEX format
- Unable to install APK to device
- Решение проблем при разработке под Android
- Ошибка “No Platforms Found”:
- Unity не удаётся установить ваше приложение на ваше устройство
- Ваше приложение падает сразу после запуска.
- Building DEX Failed
- Приложение падает через несколько секунд после начала проигрывания видео.
- Моя игра закрывается, когда я жму кнопку сна
- Troubleshooting Android development
- Your application crashes immediately after launch
- The game crashes after a couple of seconds when playing video
- No Android device found
- Failed to re-package resources
- Unable to merge Android manifests
- Unable to convert classes into DEX format
- Unable to install APK to device
- Android environment setup
- 1. Install Android Build Support and the Android SDK & NDK tools
- 2. Enable USB debugging on your device
- ADB debugging for Chrome OS devices
- Connecting to your Chrome OS device
- Customizing the Android SDK & NDK Tools and OpenJDK installation
- Change the OpenJDK path
- Change the Android SDK Tools path
- Change the Android NDK path
- Updating the Android SDK Target API
Troubleshooting Android development
While developing for Android using Unity, you could encounter a number of issues. Problems are often related to plug-ins A set of code created outside of Unity that creates functionality in Unity. There are two kinds of plug-ins you can use in Unity: Managed plug-ins (managed .NET assemblies created with tools like Visual Studio) and Native plug-ins (platform-specific native code libraries). More info
See in Glossary or incorrect Project settings A broad collection of settings which allow you to configure how Physics, Audio, Networking, Graphics, Input and many other areas of your project behave. More info
See in Glossary . This section outlines the most common scenarios and relavant troubleshooting advice.
Your application crashes immediately after launch
Remove any native plug-ins A platform-specific native code library that is created outside of Unity for use in Unity. Allows you can access features like OS calls and third-party code libraries that would otherwise not be available to Unity. More info
See in Glossary you have.
Use adb logcat to get the crash report from your device. Consult the official Android Developer Logcat Command-Line Tool documentation for more information.
The game crashes after a couple of seconds when playing video
Ensure Settings > Developer Options > Don’t keep activities isn’t enabled on the device.
The video player is its own activity, and therefore regular game activity will be destroyed if the video player is activated.
No Android device found
If Unity cannot find an Android device connected to the system, check the following:
Make sure that your device is actually connected to your computer — check the USB cable and the sockets.
Make sure that your device has USB Debugging enabled in the Developer options. For more details, refer to the Android SDK/NDK Setup page.
Run the adb devices command from the platform-tools directory of your Android SDK installation and check the output.
If the output list is empty and you are using Windows, you may need to install the driver for ADB An Android Debug Bridge (ADB). You can use an ADB to deploy an Android package (APK) manually after building. More info
See in Glossary devices. For more details, refer to the Android SDK/NDK Setup documentation.
If the list contains entries with the unauthorized label, you may need to authorize your computer on your device and give it permission to debug it. Check the device’s screen for the corresponding dialog.
If the list contains your device with the device label, build your Project in Unity again.
Failed to re-package resources
This error occurs when the Android Asset Packaging Tool (AAPT) fails. AAPT is used to build the intermediate Asset packages A collection of files and data from Unity projects, or elements of projects, which are compressed and stored in one file, similar to Zip files, with the .unitypackage extension. Asset packages are a handy way of sharing and re-using Unity projects and collections of assets. More info
See in Glossary during Android build. This issue is most often caused by missing resources or duplicate resources in your Android plug-ins.
Check the console message for more details — it should contain the IDs of the resources that are missing or duplicates. Fix the error in your plug-ins by either adding the missing resources/settings or removing the duplicate plug-ins.
Unable to merge Android manifests
The most likely cause for this issue is that one of your plug-ins has a manifest that is incompatible with the main Unity manifest.
Check the console message for more details on which attributes are conflicting, and fix the manifests accordingly.
See the Android Manifest documentation for more details on Android manifests.
Unable to convert classes into DEX format
The most likely cause for this issue is that you have a Java plug-in added twice. This results in duplicate classes when Unity tries to build a DEX (Dalvik Executable Format) file from all the compiled Java plug-ins. Check the console output for the list of duplicate entries, and fix the plug-ins.
If your console messages says “Too many references”, it means that the number of fields and methods exceeded the DEX limit of 64k. This usually happens when the number of plug-ins or plug-in resources is too high. Due to the way the references are generated, the limit could be hit with just a couple of large plug-ins.
There are several ways to handle this issue. One of these is by stripping the plug-ins. However, the quickest way to fix it is to switch to the Gradle build system, or export the Project and build it in Android Studio.
Unable to install APK to device
This error can be caused by:
Installing to an incompatible device.
Installing to a device running a version of Android lower than the Minimum API Level in your Player settings.
Check the console for the actual error code and output.
Источник
Решение проблем при разработке под Android
Ошибка “No Platforms Found”:
- Удалите установленный Android SDK и убедитесь, что у вас нигде не установлены ещё копии.
- Обновите Java до последней стабильной версии. Никогда не забывайте, что хоть самая последняя версия не должна конфликтовать, у пользователей в прошлом всё равно бывали проблемы.
- Скачайте свежую копию самого последнего ADT Bundle и установите его следуя инструкциям. Это должно корректно откалибровать инструменты разработки: http://developer.android.com/sdk/index.html
- Настройте Unity на работу с установленным Android SDK.
Unity не удаётся установить ваше приложение на ваше устройство
- Убедитесь, что ваш компьютер видит ваше устройство и может взаимодействовать с ним. Для деталей см. Публикация сборок.
- Проверьте консоль Unity на наличие сообщений об ошибках. Это часто помогает в определении проблемы.
Если у вас появляется ошибка “Unable to install APK, protocol failure” во время сборки, то это значит, что ваше устройство подключено через USB-порт с низким питанием (возможно порт на клавиатуре или ещё на какой-нибудь периферии). Если такое случается, то попробуйте подсоединить устройство в USB порт на самом компьютере.
Ваше приложение падает сразу после запуска.
- Убедитесь, что вы не пытаетесь использовать NativeActivity с устройствами, которые это не поддерживают.
- Попробуйте убрать все нативные плагины, что у вас есть.
- Попробуйте отключить stripping.
- Используйте adb logcat чтобы получить отчёт о крахе с вашего устройства.
Building DEX Failed
Это ошибка, которая выдаёт сообщение, вроде следующего:-
Обычно это вызвано неверной версией Java на вашем компьютере. Обновление Java до последней версии обычно решает проблему.
Приложение падает через несколько секунд после начала проигрывания видео.
Убедитесь, что Settings->Developer Options->Don’t keep activities не включено на вашем телефоне. Проигрыватель видео — это отдельное приложение и поэтому обычное игровое приложение будет закрыто, если проигрыватель видео включён.
Моя игра закрывается, когда я жму кнопку сна
Измените тег activity в файле AndroidManifest.xml так , чтобы он содержал тег android:configChanges , сделайте это таким образом, как описано здесь.
Пример тега activity может выглядеть, например, вот так:-
Источник
Troubleshooting Android development
While developing for Android using Unity, you could encounter a number of issues. Problems are often related to plug-ins or incorrect Project settings. This section outlines the most common scenarios and relavant troubleshooting advice.
Your application crashes immediately after launch
Remove any native plug-ins you have.
Use adb logcat to get the crash report from your device. Consult the official Android Developer Logcat Command-Line Tool documentation for more information.
The game crashes after a couple of seconds when playing video
Ensure Settings > Developer Options > Don’t keep activities isn’t enabled on the device.
The video player is its own activity, and therefore regular game activity will be destroyed if the video player is activated.
No Android device found
If Unity cannot find an Android device connected to the system, check the following:
Make sure that your device is actually connected to your computer — check the USB cable and the sockets.
Make sure that your device has USB Debugging enabled in the Developer options. For more details, refer to the Android SDK/NDK Setup page.
Run the adb devices command from the platform-tools directory of your Android SDK installation and check the output.
If the output list is empty and you are using Windows, you may need to install the driver for ADB devices. For more details, refer to the Android SDK/NDK Setup documentation.
If the list contains entries with the unauthorized label, you may need to authorize your computer on your device and give it permission to debug it. Check the device’s screen for the corresponding dialog.
If the list contains your device with the device label, build your Project in Unity again.
Failed to re-package resources
This error occurs when the Android Asset Packaging Tool (AAPT) fails. AAPT is used to build the intermediate Asset packages during Android build. This issue is most often caused by missing resources or duplicate resources in your Android plug-ins.
Check the console message for more details — it should contain the IDs of the resources that are missing or duplicates. Fix the error in your plug-ins by either adding the missing resources/settings or removing the duplicate plug-ins.
Unable to merge Android manifests
The most likely cause for this issue is that one of your plug-ins has a manifest that is incompatible with the main Unity manifest.
Check the console message for more details on which attributes are conflicting, and fix the manifests accordingly.
See the Android Manifest documentation for more details on Android manifests.
Unable to convert classes into DEX format
The most likely cause for this issue is that you have a Java plug-in added twice. This results in duplicate classes when Unity tries to build a DEX (Dalvik Executable Format) file from all the compiled Java plug-ins. Check the console output for the list of duplicate entries, and fix the plug-ins.
If your console messages says “Too many references”, it means that the number of fields and methods exceeded the DEX limit of 64k. This usually happens when the number of plug-ins or plug-in resources is too high. Due to the way the references are generated, the limit could be hit with just a couple of large plug-ins.
There are several ways to handle this issue. One of these is by stripping the plug-ins. However, the quickest way to fix it is to switch to the Gradle build system, or export the Project and build it in Android Studio.
Unable to install APK to device
This error can be caused by:
Installing to an incompatible device.
Installing to a device running a version of Android lower than the Minimum API Level in your Player settings.
Check the console for the actual error code and output.
Источник
Android environment setup
To build and run for Android, you must install the Unity Android Build Support platform module. You also need to install the Android Software Development Kit (SDK) and the Native Development Kit (NDK) to build and run any code on your Android device. By default, Unity installs a Java Development Kit based on OpenJDK.
Note: Unity supports Android 4.4 “KitKat” and above. See AndroidSdkVersions for details.
1. Install Android Build Support and the Android SDK & NDK tools
Use the Unity Hub to install Android Build Support and the required dependencies
See in Glossary : Android SDK & NDK tools, and OpenJDK.
 Add Android modules
You can install Android Build Support, the Android SDK & NDK tools and OpenJDK when you install the Unity Editor, or add them at a later time.
For information on adding the Android modules:
If you are using a 2018 version of Unity, see the Unity 2018.4 documentation for information on manually installing these dependencies.
2. Enable USB debugging on your device
To enable USB debugging, you must enable Developer options on your device. To do this, find the build number in your device’s Settings menu. The location of the build number varies between devices; for stock Android, it’s usually Settings > About phone > Build number. For specific information on your device and Android version, refer to your hardware manufacturer.
After you navigate to the build number using the instructions above, tap on the build number seven times. A pop-up notification saying “You are now X steps away from being a developer” appears, with “X” being a number that counts down with every additional tap. On the seventh tap, Developer options are unlocked.
Note: On Android versions prior to 4.2 (Jelly Bean), the Developer options are enabled by default.
Go to Settings > Developer options (or, if this does not work, on some devices the path is Settings > System > Developer options), and check the USB debugging checkbox. Android now enters debug mode when it is connected to a computer via USB.
Connect your device to your computer using a USB cable. If you are developing on a Windows computer, you might need to install a device-specific USB driver. See the manufacturer website for your device for additional information.
The setup process differs for Windows and macOS and is explained in detail on the Android developer website. For more information on connecting your Android device to the SDK, refer to the Run Your App section of the Android Developer documentation.
ADB debugging for Chrome OS devices
For information on how to set up your development environment for Chrome OS devices, and enable ADB An Android Debug Bridge (ADB). You can use an ADB to deploy an Android package (APK) manually after building. More info
See in Glossary debugging, see Google’s documentation on Chrome OS Developer Environments.
Connecting to your Chrome OS device
Before you can deploy to your device you need to manually connect with ADB via the device’s IP address.
To begin you need the IP address. Open up the Settings app and choose Network in the sidebar. Next click on the active network interface.
If the interface is wireless then next choose the SSID that you are connected to. In the details you will see your IP address. Make a note of it.
If you are using a wired connection your IP address will be shown on the first details page.
Now we are ready to connect. For the sake of this example let’s say that the device’s IP is 192.168.0.100. In a shell or terminal run the following command
adb connect 192.168.0.100
If the connection was successful you will see a message such as connected to 192.168.0.65:5555 . And adb devices should verify that the device is connected. List of devices attached 192.168.0.65:5555 device
From now on you may run ADB commands to target the device just as you would over a USB connection.
Note: If your device or host machine goes to sleep or loses network connectivity you may need to reconnect.
Customizing the Android SDK & NDK Tools and OpenJDK installation
Unity recommends that you use the Unity Hub to install Android SDK & NDK tools, to ensure that you receive the correct versions and configuration. Unity installs Android SDK & NDK Tools and OpenJDK respectively in the SDK, NDK and OpenJDK folders under /Unity/Hub/Editor/[EditorVersion]/Editor/Data/PlaybackEngines/AndroidPlayer/.
If you have multiple versions of Unity with the same required dependencies (be sure to check System requirements for the latest) and you want to avoid duplicating the installation of Android SDK & NDK Tools and OpenJDK, you can specify a shared location in the Unity Preferences window. To do this, go to Preferences > External tools and enter the directory paths in the SDK and NDK fields:
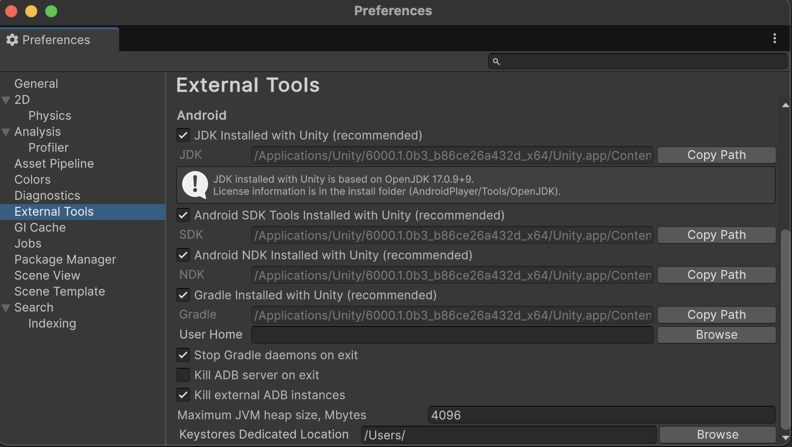 Preferences window showing external tools settings for Android
Warning: Unity does not officially support versions of the OpenJDK, SDK, or NDK other than the ones it supplies.
To change the OpenJDK, SDK Tools, or NDK that Unity uses to build Android apps:
- Open the Project.
- Open the Preferences window (Windows and Linux: Edit >Preferences; macOS: Unity >Preferences).
- In the left navigation column, select External Tools.
Change the OpenJDK path
- Uncheck JDK Installed with Unity (recommended).
- In the JDK field, enter the path to the JDK installation folder, or use the Browse button to locate it.
Change the Android SDK Tools path
- Uncheck Android SDK Tools Installed with Unity (recommended).
- In the SDK field, enter the path to the SDK installation folder, or use the Browse button to locate it.
Unity works with the most recent version of the Android SDK available at the time of the Unity version release.
Change the Android NDK path
- Uncheck Android NDK Installed with Unity (recommended).
- In the NDK field, enter the path to the NDK installation folder, or use the Browse button to locate it.
Each version of Unity requires a specific version of the Android NDK to be installed:
| Unity version | NDK version |
|---|---|
| 2018.4 LTS | r16b |
| 2019.4 LTS | r19 |
| 2020.3 LTS | r19 |
See the System requirements page for a complete list of requirements.
Updating the Android SDK Target API
Unity Hub installs the latest version of the Android SDK Target API required by Google Play.
If you need to use a more recent version, you can change the Target API from the Target API Level field in the Player Settings window (menu: Edit > Project Settings > Player, then select the Android platform). You can find the Target API Level option in the Other Settings > Identification section.
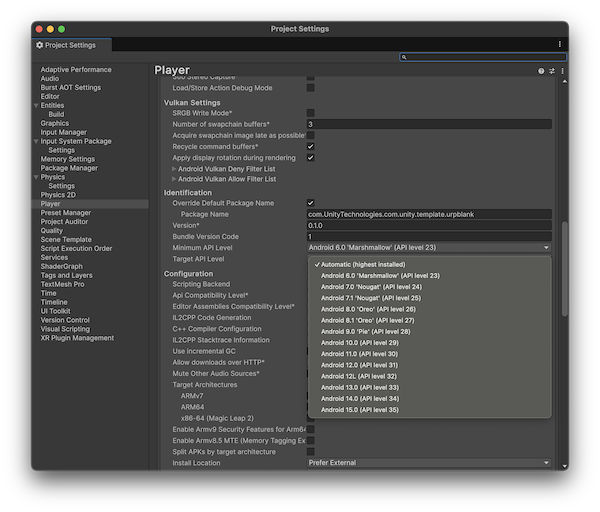 Selecting a target API for the Android SDK
After you select an option other than the default, Unity prompts you to update the Android SDK API. You can choose to either:
- Update the Android SDK
- Continue to use the highest installed version of the Android SDK
Note: If you select an older version of the Target API, the Unity Android SDK Updater will not be able to perform the update and will give you this message:
Android SDK does not include your Target SDK of (version). Please use the Android SDK Manager to install your target SDK version. Restart Unity after SDK installation for the changes to take effect.
In this case, to update the Android SDK Target API, you must use the Android sdkmanager from either Android Studio or the command line tool. Regardless of the method you chose, make sure to select the correct Android SDK folder for Unity in the Edit > Preferences > External Tools window.
On Windows, if the Unity Editor is installed in the default folder ( /Program Files/ ), you must run the sdkmanager with elevated privilege (Run as Administrator) to perform the update.
Источник


