- Тестирование приложения
- Unit Testing
- UI Testing
- Learn Unit Testing in Android by building a sample application
- Install the dependencies
- Create a sample app:
- Writing Unit Tests:
- Test Cases
- Mockito
- Annotations
- JUnit methods:
- Developing Android unit and instrumentation tests — Tutorial
- 1. Introduction into Android testing
- 1.1. Testing Android applications
- 1.2. What to test on Android applications
- 1.3. Tooling support for Android testing
- 1.4. Android project organization for tests
- 2. Android unit testing
- 2.1. Unit testing in Android
- 2.2. Required dependencies in the Gradle build file
- 2.3. Running the unit tests
- 2.3.1. Using Gradle
- 2.3.2. Using Android Studio
- 2.4. Location of test reports
- 2.5. Activating default return values for mocked methods in android.jar
- 3. Exercise: Create unit test
- 3.1. Preparation: Create Android project
- 3.2. Add JUnit dependency
- 3.3. Create test
- 3.4. Run unit tests
- 4. Writing tests to run on the Android device
- 4.1. Instrumentation tests
- 4.2. How the Android system executes tests
- 4.3. Mocking objects in Android
- 4.4. Location of instrumentation tests
- 4.5. Define dependencies and testInstrumentationRunner in the Gradle build file
- 4.6. Using the @RunWith(AndroidJUnit4.class)
- 4.7. Run the tests on Android
- 4.8. Location of test reports
- 4.9. How to replace the application for instrumentation tests
Тестирование приложения
Немного поработав в Android Studio и разобравшись в его структуре, вы, наверняка, замечали папки androidTest и test рядом с основной папкой с классами вашего проекта. Возможно, вы также слышали выражение от умных программистов, что приложение полностью покрыто тестами.
Зачем нужно тестирование и нужно ли оно вам? Если вы начинающий программист и пишете простые учебные примеры, то тесты вам не нужны. Даже если вы перешли от простых примеров к собственным разработкам средней сложности, то вполне можете обходиться без тестирования и дальше. Почему? Дело в том, что в небольших проектах вы в состоянии контролировать логику приложения. Вы можете предугадать слабые места и поправить код. Даже если вы что-то пропустили и выложили релиз в открытый доступ, то по отзывам пользователей вы можете быстро сориентироваться в проблеме и исправить ошибку.
Но всё меняется, если программа стала сложной. У вам появилось больше десятка различных экранов активностей, отдельных классов и т.д. Вы аккуратно стали разбивать код на модули, чтобы обеспечить независимость. Такой подход в обязательном порядке используется в компаниях, где каждый отвечает за свой участок кода. И тут вас подстерегает опасность. Вам доверили написать новый метод или переписать существующий метод, но вы ещё не до конца уяснили взаимодействие метода с другими кусками кода. Если метод в проекте был давно, то все уверены в его работе и фокусируются на новых задачах. Но вы сделали ошибку, например, банально опечатались и вместо плюса поставили минус — и числа стали вычитаться вместо сложения. Причём выводимые результаты могут быть вполне корректными для приложения. Поэтому при запуске приложения с неправильным методом программисты могут не заметить проблему. Проблему могут заметить позже сами пользователи, но если это приложение связано с банковским сектором, то несколько миллионов рублей, исчезнувших со счёта, не прибавит радости ни пользователю, ни руководству.
Как помогло бы тестирование. Для метода заводится проверка на сложение двух контрольных чисел, пусть будет 6 и 3. Когда группа программистов внесла свои правки в код, то запускается тестирование методов, в том числе и вашего метода. Теперь если вместо 9 (6 + 3) метод выдаст 3 (6 — 3), то тест не будет пройден. И вы будете сразу искать проблему в нужном месте.
Приблизительно так работают тесты — проверка на соответствие к ожидаемому результату.
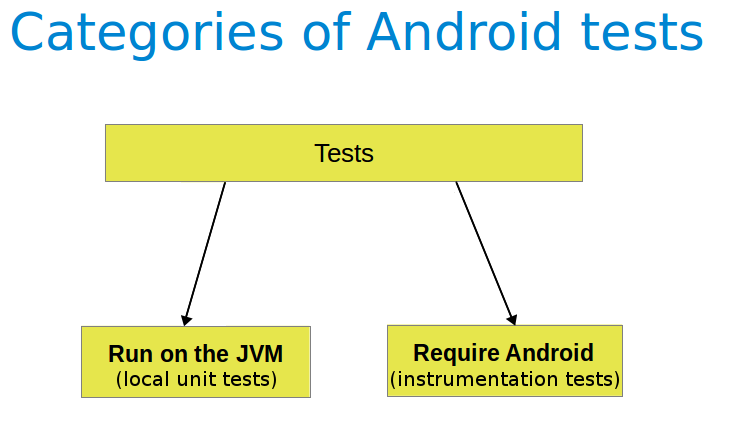
Тесты делятся на две категории — локальные (Unit Testing) и инструментальные (UI Testing).
Unit Testing
Локальные тесты проверяют работу метода, класса, компонента. Тест не зависит от Android, по сути вы проверяете код Java, который можно проверить на обычном компьютере без участия устройства или эмулятора. Например, такому варианту соответствует сложение двух чисел типа int. Подобные тесты проводят в папке Test.
Популярными инструментами для юнит-тестов являются:
В build.gradle модуля приложения имеется строка для компиляции юнит-тестов.
UI Testing
Для инструментальных тестов наличие устройства или эмулятора обязательно, так как нужно тестировать нажатие кнопки, ввод текста, прокрутку, касания и другие операции. Тесты проводят в папке androidTest.
Инструменты для тестирования:
- Espresso
- UIAutomator
- Robotium, Appium, Calabash, Robolectric
В build.gradle тесты представлены в виде строки.
Часто для удобства приложение разделяют на несколько вариантов.
В build.gradle в секцию android добавляют блок
Указав другой идентификатор для mock, вы можете устанавливать вместе две разные версии приложения на одном устройстве. Рабочая версия будет использовать настройки по умолчанию из defaultConfig.
Источник
Learn Unit Testing in Android by building a sample application

In the last article, I listed out the benefits of Unit Testing your applications. In this tutorial, we’ll take a look at how to begin Unit Testing your Android Applications.
If you haven’t checked out the previous article on why you should unit test your android app, then you must take a quick look at it before moving ahead with this one.
Let’s get started!!
Install the dependencies
Place these dependencies in your app level build.gradle file:
- Junit: It is a “Unit Testing” framework for Java Applications. It is an automation framework for Unit as well as UI Testing. It contains annotations such as @Test, @Before, @After etc.
- Mockito: Mockito mocks (or fakes) the dependencies required by the class being tested. It provides annotations such as @Mock.
Create a sample app:
Unit Tests are generally written before writing the actual application. But for the sake of explanation in this article, I am creating a sample app before writing Unit Tests.
Unit Testing is done to ensure that the developer would be unable to write low quality/erroneous code. It makes sense to write Unit Tests before writing the actual app as then you wouldn’t have a bias towards the success of your tests, you will write tests beforehand and the actual code will have to adhere to the design guidelines laid out by the test.
Now, lets create our sample app.
We’ll be creating a simple app, whose sole purpose would be to get user data from input fields and save it using in a shared preference file.
First things first, here is the code for activity_main.xml layout file:
Now, here is the code for MainActivity.java:
Now try and run the app. I should display a screen like this:

Upon entering the name, DOB and email address and clicking on save, the details will be saved to a shared preference file.
Writing Unit Tests:
Now, let’s write some Unit Tests.
We’ll be Unit Testing the following classes:
Navigate to: app/java/com(test) and expand all the folders under com(test).
Create a new java file and name it EmailValidatorTest.java
Here we will be testing our EmailValidator class. We have to come up with all the input cases we can think of. What all can the user enter in the email input field:
- Correct Input: test@gmail.com
- Email with subdomain: test@gmail.co.uk
- Without .com: test@gmail
- With extra characters: test@gmail..com
- With no username: @gmail.com
- Empty Input:
- Null value: this can occur if we initialize the string from this field to be null. It doesn’t hurt to have a test case for null check in place.
While the 1st and the 2nd test cases must pass, rest of the inputs are invalid and hence the tests must fail. Let’s write the tests for all of them:
Test Cases
2. Email with subdomain
4. With extra characters:
5. With no username:
7. Null value check:
While most of the code is self-explanatory, here are some things you might not know:
- @Test: @Test is an annotation provided by JUnit Framework for marking a method as a test case. As you can see here, each method is a test case testing the input field for a possible input. This instructs the compiler to consider the method as a test case in the test suit.
- assertTrue(): assertTrue is a method provided by Junit Framework to assert (force) the value inside it’s parentheses as TRUE. If the value inside the parentheses evaluates to be false, the test case fails.
- assertFalse(): Same as the assertTrue method except that it asserts the argument inside the parentheses to be false instead of true. If the passed parameter is true, the test case fails.
Here is the complete EmailValidatorTest.java class:
And Voila!! You have written your very first Unit Test. It is as simple as that.
Most of the apps you develop will have much more complicated functionality than this but it is the perfect place to start learning about Annotations, methods provided by the Junit framework for unit testing.
But so far, we have used only the Junit framework, now let’s dive into what Mockito does.
Mockito
Mockito is a JAVA library that is used for Unit Testing the Java applications. It is used to mock the interfaces so that dummy objects can be created and used to provide the dependencies for the class being tested.
Let’s look at how it’s done.
In our test folder (where you created EmailValidatorTest.java), create another file named SharedPreferencesHelperTest.java
We’ll be testing the SharedPreferencesHelper class now. Here is the code:
Take a look at all the mock annotations. The SharedPreferencesHelper class takes in a SharedPreference in its constructor. It needs that argument to function properly, so we create a mock/dummy instance of SharedPreferences using the @Mock annotation.
Notice that we are creating two instances of SharedPreferences, one is a normal mock and other is a broken mock. These are basically just two test cases. In the first one, the preferences work as expected and data is written to the file successfully, but, in the second mock, we are testing for the failure of writing the data.
Unsuccessful write of data on sharedPreference can occur due to various reasons such as providing the wrong key, wrong context etc.
Annotations
Here you encounter three new annotations:
- @Mock: As explained above, it creates a dummy object needed by the class to be tested to function properly.
- @Before: This annotation is used to mark any method to run before executing the test cases. Here we initialize mSharedPreferenceEntry, mMockSharedPreferencesHelper, mMockBrokenSharedPreferencesHelper.
- @RunWith: It instructs the IDE to initialize the Mockito library. An alternative to this would be writing MockitoAnnotations.initMocks( testClass ) in the @Before method.
Any un-annotated method works just as a normal method
JUnit methods:
You encounter 3 new methods provided by JUnit Framework:
- assertThat(): As is evident by the name, this method lets you create custom assertions and not just true and false values. It takes in 3 arguments. A reason/description, input value to be checked, expected actual value.
- Is(): Is method returns a Matcher to match the source object to the one provided as the parameter of is();
- equalTo(): As the name suggests, this method checks for equality between the expected and actual value.
- When(): This is a very powerful method which takes in a method call as its parameter. It takes in the method call which is to be stubbed/duplicated. Once the method stub is executed, “then()” is called.
- thenReturn(): It is called after the method stub provided in when() method has finished running. It is used to return the result of the method, if it is not void.
We have written tests to ensure that any broken shared preferences should not be able to write/read from the brokenSharedPreferencesFile. Another test case to ensure that a proper(unbroken) sharedPreferencesHelper can write to the preferences successfully.
And this is how you write Unit Tests for your android app. We have tested 2 standalone classes, SharedPreferencesHelper and EmailValidator for correctness in all the test cases.
Here is a final roadmap to create a unit test (it can be more elaborate, but for a beginner, this would suffice):
- Think of all the possible test cases.
- Create a method for each test case and annotate it with @Test
- Create a @Before method and initialize the Mockito library.
- Write your test cases using methods such as when, is, assertThat/False/True etc.
Источник
Developing Android unit and instrumentation tests — Tutorial
This tutorial describes how to write unit and instrumentation tests for your Android application. It describes how to execute these tests via Android studio and Gradle. This tutorial assumes that you are familiar with Android programming in general.
1. Introduction into Android testing
1.1. Testing Android applications
Android applications run on a variety of devices. Also the Android framework and the surrounding open source frameworks evolve at a high speed. To ensure that you application works well, it is import to write software tests. This helps you to enhance and maintain the Android application.
Unit testing for Android can be classified into:
Local unit tests — tests which can run on the JVM.
Instrumented unit tests — tests which require the Android system.
Local unit tests run much faster compared to the time required to deploy and run tests on an Android device. Prefer writing local unit tests and only run tests on Android, if you require a real Android system.
If you write local unit test and have dependencies to Android API, you need to replace them, e.g., via a mocking framework like Mockito.
1.2. What to test on Android applications
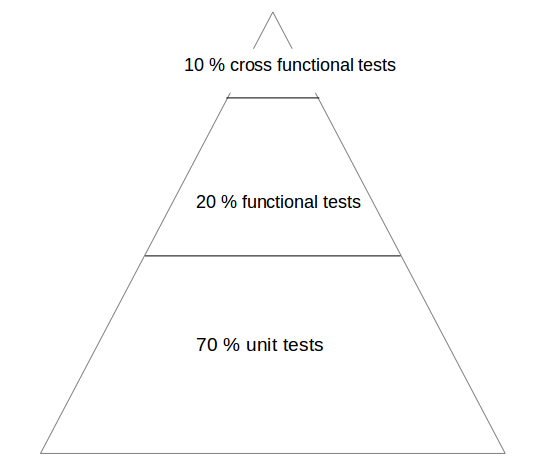
Your test should focus on the business logic of your application. A good rule of thumb is to have the following distribution of tests:
70-80 % unit tests to ensure stability of your code basis
20-30 % functional tests to ensure that the application really works
some cross functional tests if your application integrates intensively with other Application components
You should test your application at least on one device with the lowest possible configuration. In addition you should test on one device with the highest available configuration, e.g., pixel density, screen resolution to ensure that it works fine on these devices.
1.3. Tooling support for Android testing
The Android Testing Support library (ATSL) project from Google provides tooling for Android testing. For example, it ( AndroidJUnitRunner ).
If you run local unit tests, a special version of the android.jar (also known as the Android mockable jar ) is created by the tooling. This modified JAR file is provided to the unit test so that all fields, methods and classes are available. Any call to the Android mockable JAR results, by default, in an exception, but you can configure Android to return default values. See Activating default return values for mocked methods in android.jar for details.
The library provides a JUnit 4-compatible test runner ( AndroidJUnitRunner ), the Espresso test framework and the UI Automator test framework. Espresso test framework can be used to test the User Interface of your application. UI Automator allows to write cross application functional tests.
AndroidJunitRunner provides access to the instrumentation API, via the InstrumentationRegistery .
InstrumentationRegistry.getInstrumentation() , returns the Instrumentation currently running.
InstrumentationRegistry.getContext() , returns the Context of this Instrumentation’s package.
InstrumentationRegistry.getTargetContext() , returns the application Context of the target application.
InstrumentationRegistry.getArguments() , returns a copy of arguments Bundle that was passed to this Instrumentation. This is useful when you want to access the command line arguments passed to the instrumentation for your test.
It also gives access to the life cycle via the ActivityLifecycleMonitorRegistry .
1.4. Android project organization for tests
The following is the default directory structure for your application and test code:
app/src/main/java — for your source code of your main application build
app/src/test/java — for any unit test which can run on the JVM
app/src/androidTest/java — for any test which should run on an Android device
If you follow this conversion, the Android build system runs your tests on the correct target (JVM or Android device).
If you receive the following error message: «error duplicate files in path. Path in archive: LICENSE.txt» you can add the following to your app/gradle.build file.
2. Android unit testing
2.1. Unit testing in Android
A unit test verifies in isolation the functionality of a certain component. For example, assume a button in an Android activity is used to start another activity. A unit test would determine, if the corresponding intent was issued, not if the second activity was started
A unit tests for an Android application can be:
local unit test — which runs on the JVM
Android unit test — which runs on the Android runtime
If they run on the JVM, they are executed against a modified version of the android.jar Android library. In this version all final modifiers have been stripped off. This makes it easier to use mocking libraries, like Mockito.
The local unit tests of an Android project should be located in the app/src/test folder.
2.2. Required dependencies in the Gradle build file
To use JUnit tests for your Android application, you need to add it as dependency to your Gradle build file.
2.3. Running the unit tests
2.3.1. Using Gradle
Run your unit tests with the gradlew test command.
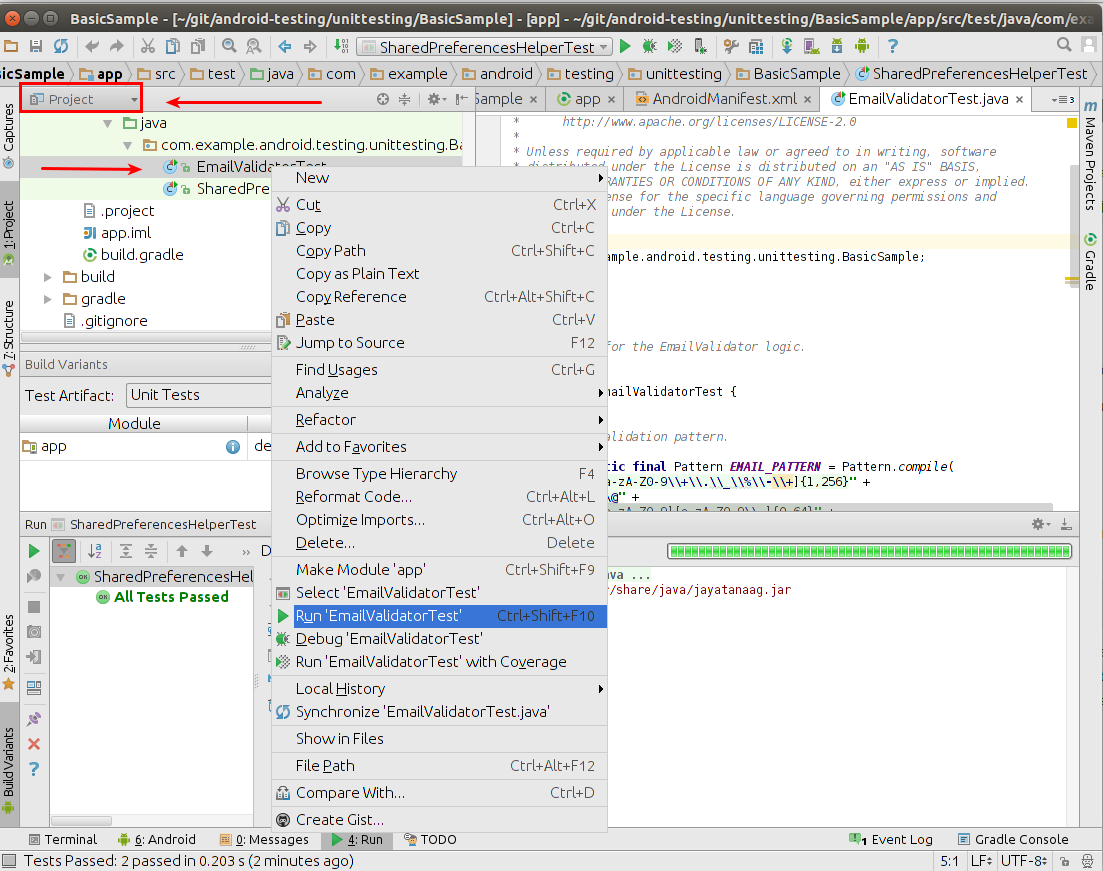
2.3.2. Using Android Studio
To run a unit test, right-click on your test class in the Project window and select Run.
2.4. Location of test reports
The Test reports are created in the app/build/reports/tests/debug/ directory. The index.html gives an overview and links to the individual test pages.
2.5. Activating default return values for mocked methods in android.jar
By default, all calls to methods in the modified android.jar file throw exceptions. This default should ensure that your unit tests only test your code and do not depend on any particular behavior of the Android platform. If you want to configure a certain behavior, you can use a mocking framework to replace these call.
You can also instruct the Gradle build system to return default values for method calls in the `android.jar`with the following configuration in your Gradle build file.
3. Exercise: Create unit test
In this exercise you learn how to create a simple JUnit4 test for an Android project.
3.1. Preparation: Create Android project
Create the Android project as described in Android temperature converter.
3.2. Add JUnit dependency
Ensure you have the dependency to Junit in your app/build.gradle file.
3.3. Create test
In your app/src/test directory create the following two test methods for the ConverterUtil class.
3.4. Run unit tests
Ensure your unit tests are correctly implemented by running test tests. They should run successfully.
4. Writing tests to run on the Android device
4.1. Instrumentation tests
The Android testing API provides hooks into the Android component and application life cycle. These hooks are called the instrumentation API and allow your tests to control the life cycle and user interaction events.
Under normal circumstances your application cannot control the life cycle events and the user drives the application. For example, if Android creates your activity the onCreate() method is called. Or if the user presses a button your corresponding code is called. Via instrumentation you can control these events via your test code. For example, your instrumentation test can start the activity. Afterwards, it can call the finish() and restart the activity to test if the instance state of the activity is correctly restored.
Instrumented unit tests are unit tests that run on Android devices and emulators instead of running on the Java virtual machine. These tests have access to the real device and its resources and are useful to unit test functionality which cannot be easily mocked by mocking frameworks. An example is a test which validates a Parcelable implementation.
An instrumentation-based test class allows you to send key events (or touch events) to the application under test.
With user interface testing framework like Espresso, the developer rarely has to use the instrumentation API directly.
4.2. How the Android system executes tests
The InstrumentationTestRunner is the base test runner for Android tests. This test runner starts and loads the test methods. Via the instrumentation API it communicates with the Android system. If you start a test for an Android application, the Android system kills any process of the application under test and then loads a new instance. It does not start the application, this is the responsibility of the test methods. The test method controls the life cycle of the components of the application.
The test runner also calls the onCreate() method of the application and activity under test during its initialization.
4.3. Mocking objects in Android
The mocking framework Mockito can also be used for instrumentation tests. This allows you to replace parts of the Android system which are not interesting for the test. The Android framework provided in the past specialized mocking classes but these are not necessary anymore.
4.4. Location of instrumentation tests
As described in Android project organization for tests the unit tests of an Android project should be located in the app/src/androidTest/java folder.
4.5. Define dependencies and testInstrumentationRunner in the Gradle build file
To use JUnit tests for your Android application you need to add the dependency to JUnit to your Gradle build file. You also need to specify android.support.test.runner.AndroidJUnitRunner as testInstrumentationRunner in the build file.
4.6. Using the @RunWith(AndroidJUnit4.class)
It is also recommended annotating the test with the @RunWith(AndroidJUnit4.class) annotation. AndroidJUnit4 extends JUnit4, so if you use pure Junit4 syntax and ActivityTestRule it is not required. But you need it, if you want to run, i.e., Espresso tests with ActivityTestRule and JUnit4.
4.7. Run the tests on Android
Run your local unit tests via Gradle with the gradlew connectedCheck command.
To run your local unit tests via Android Studio, right-click on your test class in the Project window and select Run.
4.8. Location of test reports
The test reports are created in the app/build/reports/androidTests/connected/ directory. The index.html gives an overview and links to the individual test pages.
4.9. How to replace the application for instrumentation tests
You can replace the application class for the instrumentation tests by overriding the AndroidJUnitRunner and its newApplication method.
Источник


