- Обновляем проекты Unity Android для совместимости с архитектурой ARM64
- Google предложил разработчикам обновить приложения для совместимости с архитектурой ARM64 в срок до 1 августа 2019 года, если они не соответствуют этим требованиям
- Найдем и включим поддержку ARM64 в Unity
- Если в проекте используется Vuforia, ее также требуется обновить
- Unity 64 bit android
- Preparing your Android Unity game for Google’s 64-bit requirements
- 1. Download and Setup Android NDK
- 2. Make sure you have the right SDK platforms installed
- 3. Build Settings
- Final Notes:
- Android environment setup
- 1. Install Android Build Support and the Android SDK & NDK tools
- 2. Enable USB debugging on your device
- ADB debugging for Chrome OS devices
- Connecting to your Chrome OS device
- Customizing the Android SDK & NDK Tools and OpenJDK installation
- Change the OpenJDK path
- Change the Android SDK Tools path
- Change the Android NDK path
- Updating the Android SDK Target API
Обновляем проекты Unity Android для совместимости с архитектурой ARM64
Google предложил разработчикам обновить приложения для совместимости с архитектурой ARM64 в срок до 1 августа 2019 года, если они не соответствуют этим требованиям
Найдем и включим поддержку ARM64 в Unity
Для включения, откроем настройки File — Build Settings, далее — Player Settings для платформы Android. В открывшемся инспекторе, видим на вкладке Other settings раздел Configuration.

Обратите внимание! Опция Scripting Backend должна быть установлена в IL2CPP. И после включения этой опции потребуется иметь установленный NDK Android, если он не установлен!
Скачиваем последнюю стабильную версию, прописываем пути к ней — и «упс», самая новая версия NDK для Unity почему-то не подошла!

Не тратьте время, как это сделал я, на скачивание последней стабильной версии с номером 20. Размер этого пакета около 2Gb. Начинайте качать версию r16b (64-bit).
Скачать именно эту, требуемую версию NDK Android r16b (64-bit) для Windows
можно здесь.
После, естественно, распаковать, положить в надежное доступное место и при сборке билда указать путь к этому месту. Или же, сразу прописать этот путь в главных настройках Unity, там есть такое поле для прописывания пути к NDK, а меню называется внешние компоненты (External Tools).
В результате, в опции Target Architectures должен стать активным флажок ARM64. До этих манипуляций флажок был неактивным:

Если в проекте используется Vuforia, ее также требуется обновить
Проекты с использованием Vuforia — ранние версии 64x не поддерживали. Однако, начиная с версии 8.1 Vuforia поддерживает 64-х разрядность.
Лучше всего обновляться непосредственно из Unity. Для этого, идем в меню Window — Vuforia Configuration (Ctrl-Shift-V) — и в инспекторе смотрим на самый верх — если доступно обновление и версия Vuforia не самая новая, то будет доступна ссылка на скачивание — именно она позволяет загружать исполняемый файл обновления.
Второй способ для проверки обновления — можно открыть меню Help — Vuforia Engine — Check for Updates. И если есть обновление, то оно будет предложено к скачиванию.
После скачивания, распакуйте. Внутри должен быть исполняемый файл примерно с таким именем UnitySetup-Vuforia-AR-Support-for-Editor-2018.4-2019.1.exe. Отличаться может версия вашего редактора.
Далее, обратите внимание на правильность действий при запуске этого обновления:
- Принять лицензионное соглашение
- Если Unity редактор открыт, то будет предложено его закрыть
- Выбрать путь к редактору Unity и нажать Update
Причем, если у вас установлен Unity Hub, то путь возможно будет выглядеть как то так: «C:\Program Files\Unity\Hub\Editor\2018.4.3f1\».
Будьте повнимательней с путями и все получится. Когда я указывал путь до той папки, где непосредственно лежит Unity.exe то получал ошибку: «Не могу найти Unity.exe». Правильный путь указывается только до названия версии редактора!
Еще одни грабли могут быть тут. Возможно, вы сами найдете на сайте Вуфории ссылку на Vuforia SDK Engine 8.3: developer.vuforia.com/downloads. Но, здесь скачиваются zip архивы с исходниками SDK, и автоматически установить это в Unity не получится. Не используйте этот архив! Скачивайте файл обновления только по ссылке в редакторе.
Все рекомендации относятся к обновлению Vuforia если у вас установлена Windows. Если же у вас Mac, то отличий немного, разве что в написании путей к папке с редактором Unity. И конечно, выбирайте версии пакетов под свою платформу правильно.
На этом все, спасибо аудитории, надеюсь статья кому-то поможет.
Источник
Unity 64 bit android
The move to a 64-bit Android world is imminent, and we at Unity believe that it’s a good thing! We added support for Android 64-bit with Unity 2018.2, and we have now backported it to Unity 2017.4. Read on to get more details on Google’s 64-bit requirement, ARM 64-bit advantages, and Android App Bundle support in Unity.
The 64-bit architecture isn’t new in the Android world with Lollipop (v5.0) in 2014 being the first to support. While Android Pie (v9.0) still supports 32 and 64-bit, it’s the first version allowing for building 64-bit only systems. ARM’s data shows that more than 80% of devices shipping today are 64 & 32-bit capable.
Google provided detailed information and timelines to be ready for the 64-bit requirement confirming that starting 1st of August 2019, all new apps and app updates that include native code are required to provide 64-bit versions in addition to 32-bit versions when publishing to Google Play. Note that Google Play gives an extension for existing games that use Unity 5.6.6 or older until August 2021, but starting August 1, 2021, Google Play will stop serving apps without 64-bit versions on 64-bit capable devices. Go read the details on Google’s Developers Blog.
ARM 64-bit offers several advantages like enhanced security, better performance, larger addressable memory, greater numeric precision, and a richer instruction set.
We added support for Android 64-bit in Unity 2018.2, and in the spirit of Long Term Support (LTS) we have now backported it to Unity 2017.4 which will be supported until March 2020, so you can stay on the most stable version of Unity while taking advantage of 64-bit benefits and comply with Google Play store in August 2019. You can get ARM 64-bit now, starting with Unity 2017.4.16f1.
We’ve heard concerns from you about the increased size of your APK when it includes both the 32 & 64-bit binaries, or the added complexity to generate multiple APKs.
To solve this, Unity 2018.3 has support for Android App Bundle, which is a new upload format that includes all of the compiled code and resources of your app, but defers APK generation and signing to Google Play.
We’ve also backported App Bundle support to Unity 2017.4 LTS, available starting with version 2017.4.17.
For more information about 64-bit capable devices, check out ARM’s white paper “64-bit Computing for Mobile” and watch Droidcon SF 2018 session by David Whaley “Moving with the Android ecosystem towards a 64-bit r-Evolution”.
While we added support for Android ARM 64-bit, we also reviewed the usage of Android x86. Limited x86 Android devices were introduced to the market which has resulted in minimal adoption of Unity’s x86 Android support. Android x86 support will be deprecated in 2019.2 and removed entirely in Unity 2019.3. Support for Android x86 will continue in Unity 2018 and 2018 LTS for the remainder of their life cycle.
Источник
Preparing your Android Unity game for Google’s 64-bit requirements

Jul 8, 2019 · 4 min read

Why do you have to make your Unity Android game 64-bit compatible?
1) Because Google requires it by August 2019 (next month).
2) Users on 64-bit devices should see a performance boost (as IL2CPP scripting compiled ahead of time and not at run-time).
Starting in August 2019:
All new apps and app updates that include native code are required to provide 64-bit versions in addition to 32-bit versions when publishing to Google Play.
Extension: Google Play will continue to accept 32-bit only updates to existing games that use Unity 5.6.x or older until August 2021.
Starting in August 2021:
Google Play will stop serving apps without 64-bit versions on 64-bit capable devices, meaning they will no longer be available in the Play Store on those devices.
This will include games built with Unity 5.6.x or older.
1. Download and Setup Android NDK
The Android NDK (Native Development Kit) used to be optional but we’ll need it to build 64-bit Android apps.

In your Unity editor, go to Edit > Preferences > External Tools > Android > NDK > Click “Download”.
I tried to d ownload the NDK via Android studio but Unity wants a specific version so it’s best to download from within Unity’s editor. The NDK version used at the time of writing is version 16b.
After downloading the zip file, you can save it to a preferred location. I saved it to my D: because I have a lot more space there. Just make sure you know where to copy the path (e.g. D:\android-ndk-r16b) so you can set it in your Unity Editor > Edit > Preferences > External Tools > Android > NDK
2. Make sure you have the right SDK platforms installed
Google announced in this blog post that new applications will be required to have a target API level of 28 (Android 9.0) beginning in August 2019. Existing apps have till November 2019 to upgrade to API level 28.
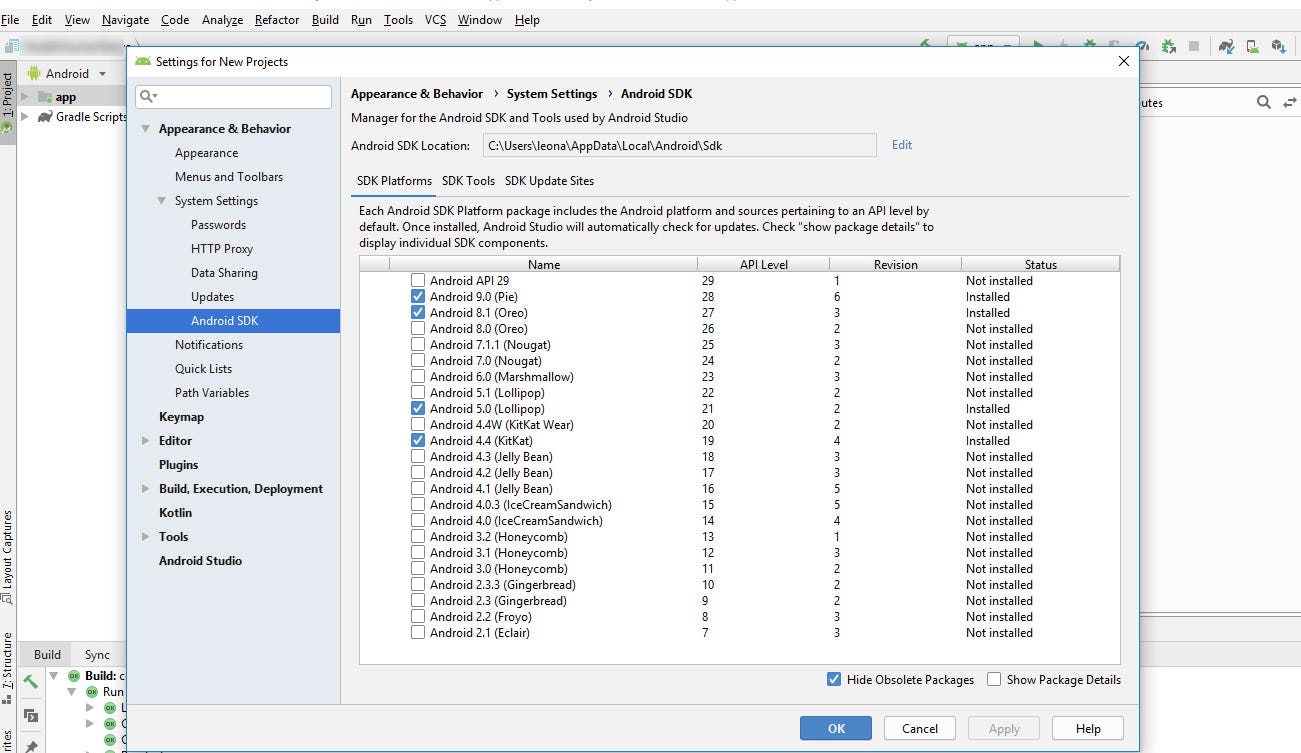
Go to Android Studio > Tools > SDK Manager; Make sure you have Android 9.0 installed.
3. Build Settings
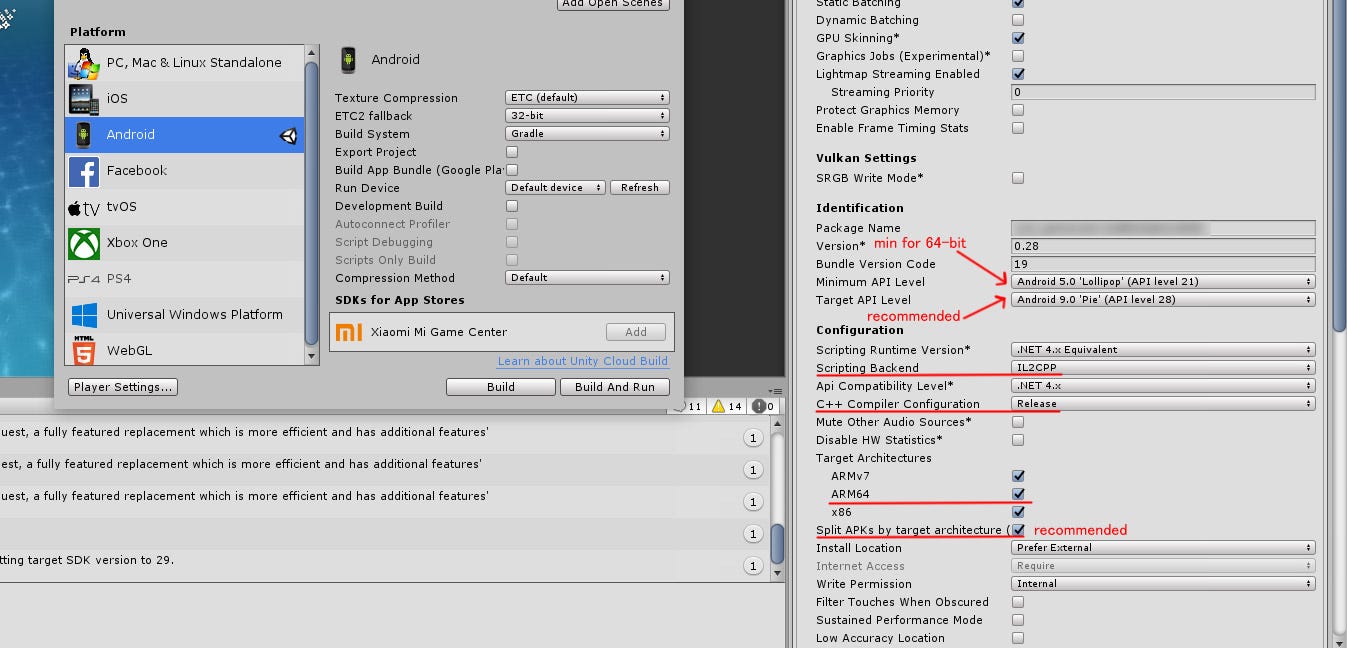
Scripting Backend — Change Mono to IL2CPP (which stands for “ Intermediate Language To C++”). This is where the NDK we installed earlier comes into play.
Target Architectures — Make sure ARM64 is checked. This option only becomes selectable once you have set the scripting backend to IL2CPP.
Android App Bundles (optional) — I updated my Unity to 2018.3 to test out Android App bundles. There are probably a few reasons why you might not want to use this just yet:
1) Android App Bundles (.aab) are only for Google Play. If you’re distributing to other Android stores, you’ll need uncheck “Build App Bundle” (in the Build Settings window) and choose “Split APKs by target architecture” (under Other Settings).
2) The App Bundle takes longer to build. The app bundle also doesn’t have any advantages for Unity apps beyond reducing the APK size by separating out the resources needed for different CPU architecture so “Split APKs by target architecture” achieves the same results.
Split APKs by target architecture (optional) — I saved about 13 MB on my APK file size using this option instead of FAT APK (all architectures supported in a single APK file).
Minimum SDK Level — API level 21 (Android 5.0 Lollipop) is where 64-bit support was introduced. However, setting this minimum API level excluded about 10.2% of active Android phones and 13% of Android tablets (something to consider). *Edit: thanks to dm.bondarev for pointing out that we can leave the Min SDK level lower than 21; 32-bit devices will just get the 32-bit APKs.
Target SDK Level — Set target API level of 28 (Android 9.0).
Changing the Target API Level to “Automatic (Highest Installed)” will set target Sdk version in your manifest to the latest SDK Platform you have installed within your Android SDK (in our case, API level 28).
If your target SDK level is lower than that of the user’s phone’s, they will receive a security warning when installing your app.
Final Notes:
I had some problems trying to install the new 64-bit APK on my device. I had to do a manual uninstall of the game app (Phone > Settings > Apps > Your App > Uninstall); then reinstall my game to get it to install correctly.
Источник
Android environment setup
To build and run for Android, you must install the Unity Android Build Support platform module. You also need to install the Android Software Development Kit (SDK) and the Native Development Kit (NDK) to build and run any code on your Android device. By default, Unity installs a Java Development Kit based on OpenJDK.
Note: Unity supports Android 4.4 “KitKat” and above. See AndroidSdkVersions for details.
1. Install Android Build Support and the Android SDK & NDK tools
Use the Unity Hub to install Android Build Support and the required dependencies
See in Glossary : Android SDK & NDK tools, and OpenJDK.
 Add Android modules
You can install Android Build Support, the Android SDK & NDK tools and OpenJDK when you install the Unity Editor, or add them at a later time.
For information on adding the Android modules:
If you are using a 2018 version of Unity, see the Unity 2018.4 documentation for information on manually installing these dependencies.
2. Enable USB debugging on your device
To enable USB debugging, you must enable Developer options on your device. To do this, find the build number in your device’s Settings menu. The location of the build number varies between devices; for stock Android, it’s usually Settings > About phone > Build number. For specific information on your device and Android version, refer to your hardware manufacturer.
After you navigate to the build number using the instructions above, tap on the build number seven times. A pop-up notification saying “You are now X steps away from being a developer” appears, with “X” being a number that counts down with every additional tap. On the seventh tap, Developer options are unlocked.
Note: On Android versions prior to 4.2 (Jelly Bean), the Developer options are enabled by default.
Go to Settings > Developer options (or, if this does not work, on some devices the path is Settings > System > Developer options), and check the USB debugging checkbox. Android now enters debug mode when it is connected to a computer via USB.
Connect your device to your computer using a USB cable. If you are developing on a Windows computer, you might need to install a device-specific USB driver. See the manufacturer website for your device for additional information.
The setup process differs for Windows and macOS and is explained in detail on the Android developer website. For more information on connecting your Android device to the SDK, refer to the Run Your App section of the Android Developer documentation.
ADB debugging for Chrome OS devices
For information on how to set up your development environment for Chrome OS devices, and enable ADB An Android Debug Bridge (ADB). You can use an ADB to deploy an Android package (APK) manually after building. More info
See in Glossary debugging, see Google’s documentation on Chrome OS Developer Environments.
Connecting to your Chrome OS device
Before you can deploy to your device you need to manually connect with ADB via the device’s IP address.
To begin you need the IP address. Open up the Settings app and choose Network in the sidebar. Next click on the active network interface.
If the interface is wireless then next choose the SSID that you are connected to. In the details you will see your IP address. Make a note of it.
If you are using a wired connection your IP address will be shown on the first details page.
Now we are ready to connect. For the sake of this example let’s say that the device’s IP is 192.168.0.100. In a shell or terminal run the following command
adb connect 192.168.0.100
If the connection was successful you will see a message such as connected to 192.168.0.65:5555 . And adb devices should verify that the device is connected. List of devices attached 192.168.0.65:5555 device
From now on you may run ADB commands to target the device just as you would over a USB connection.
Note: If your device or host machine goes to sleep or loses network connectivity you may need to reconnect.
Customizing the Android SDK & NDK Tools and OpenJDK installation
Unity recommends that you use the Unity Hub to install Android SDK & NDK tools, to ensure that you receive the correct versions and configuration. Unity installs Android SDK & NDK Tools and OpenJDK respectively in the SDK, NDK and OpenJDK folders under /Unity/Hub/Editor/[EditorVersion]/Editor/Data/PlaybackEngines/AndroidPlayer/.
If you have multiple versions of Unity with the same required dependencies (be sure to check System requirements for the latest) and you want to avoid duplicating the installation of Android SDK & NDK Tools and OpenJDK, you can specify a shared location in the Unity Preferences window. To do this, go to Preferences > External tools and enter the directory paths in the SDK and NDK fields:
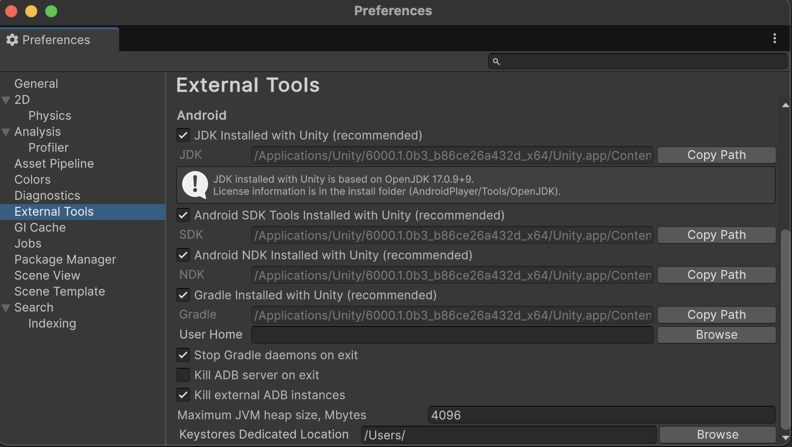 Preferences window showing external tools settings for Android
Warning: Unity does not officially support versions of the OpenJDK, SDK, or NDK other than the ones it supplies.
To change the OpenJDK, SDK Tools, or NDK that Unity uses to build Android apps:
- Open the Project.
- Open the Preferences window (Windows and Linux: Edit >Preferences; macOS: Unity >Preferences).
- In the left navigation column, select External Tools.
Change the OpenJDK path
- Uncheck JDK Installed with Unity (recommended).
- In the JDK field, enter the path to the JDK installation folder, or use the Browse button to locate it.
Change the Android SDK Tools path
- Uncheck Android SDK Tools Installed with Unity (recommended).
- In the SDK field, enter the path to the SDK installation folder, or use the Browse button to locate it.
Unity works with the most recent version of the Android SDK available at the time of the Unity version release.
Change the Android NDK path
- Uncheck Android NDK Installed with Unity (recommended).
- In the NDK field, enter the path to the NDK installation folder, or use the Browse button to locate it.
Each version of Unity requires a specific version of the Android NDK to be installed:
| Unity version | NDK version |
|---|---|
| 2018.4 LTS | r16b |
| 2019.4 LTS | r19 |
| 2020.3 LTS | r19 |
See the System requirements page for a complete list of requirements.
Updating the Android SDK Target API
Unity Hub installs the latest version of the Android SDK Target API required by Google Play.
If you need to use a more recent version, you can change the Target API from the Target API Level field in the Player Settings window (menu: Edit > Project Settings > Player, then select the Android platform). You can find the Target API Level option in the Other Settings > Identification section.
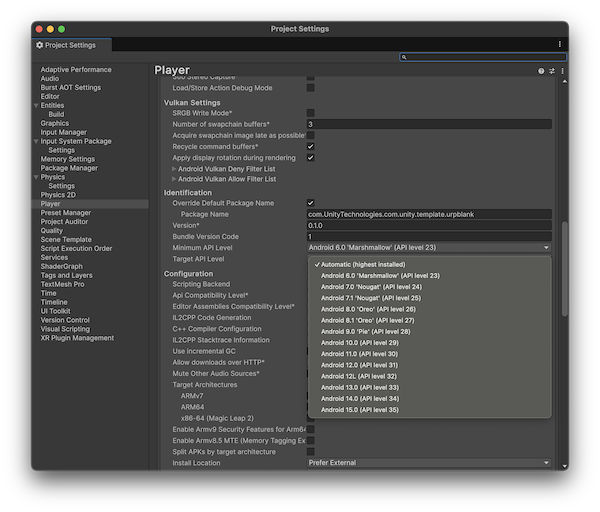 Selecting a target API for the Android SDK
After you select an option other than the default, Unity prompts you to update the Android SDK API. You can choose to either:
- Update the Android SDK
- Continue to use the highest installed version of the Android SDK
Note: If you select an older version of the Target API, the Unity Android SDK Updater will not be able to perform the update and will give you this message:
Android SDK does not include your Target SDK of (version). Please use the Android SDK Manager to install your target SDK version. Restart Unity after SDK installation for the changes to take effect.
In this case, to update the Android SDK Target API, you must use the Android sdkmanager from either Android Studio or the command line tool. Regardless of the method you chose, make sure to select the correct Android SDK folder for Unity in the Edit > Preferences > External Tools window.
On Windows, if the Unity Editor is installed in the default folder ( /Program Files/ ), you must run the sdkmanager with elevated privilege (Run as Administrator) to perform the update.
Источник


