- Android
- Environment setup
- Building your app
- Scripting
- Optimization
- Troubleshooting and bug reports
- Texture compression
- Movie/Video playback
- Known video compatibility issues
- Android environment setup
- 1. Install Android Build Support and the Android SDK & NDK tools
- 2. Enable USB debugging on your device
- ADB debugging for Chrome OS devices
- Connecting to your Chrome OS device
- Customizing the Android SDK & NDK Tools and OpenJDK installation
- Change the OpenJDK path
- Change the Android SDK Tools path
- Change the Android NDK path
- Updating the Android SDK Target API
- Профилируем Unity проект с Android Studio
- Требования
- Настройка Unity проекта
- Настройки в Build Settings
- Настройки в Player Settings
- Подготовка Gradle проекта
- libil2cpp.so
- libunity.so
- Профилирование
- Известные особенности
- Unity специфика
Android
This section of the User Manual contains documentation on developing for the Android platform,
Environment setup
Before you can run code on your Android device or an Android emulator, you must set up Unity to support Android development. See Android environment setup.
If you don’t install one or more necessary components during initial setup, Unity prompts you to download missing components when you try to build a Project for Android.
Building your app
Unity lets you configure build and runtime settings for your app. See Building apps for Android.
If you have a Unity Pro subscription, you can customize the splash screen that displays when the game launches. See Customizing an Android splash screen.
Scripting
Unity provides scripting APIs that allow you to access input data and other settings from Android devices. See Android scripting.
You can use plug-ins A set of code created outside of Unity that creates functionality in Unity. There are two kinds of plug-ins you can use in Unity: Managed plug-ins (managed .NET assemblies created with tools like Visual Studio) and Native plug-ins (platform-specific native code libraries). More info
See in Glossary to call Android functions written in C/ C++ directly from C# scripts A piece of code that allows you to create your own Components, trigger game events, modify Component properties over time and respond to user input in any way you like. More info
See in Glossary . You can also call Java functions indirectly. See Building and using plug-ins for Android.
Optimization
Unity includes support for occlusion culling A feature that disables rendering of objects when they are not currently seen by the camera because they are obscured (occluded) by other objects. More info
See in Glossary , which disables rendering The process of drawing graphics to the screen (or to a render texture). By default, the main camera in Unity renders its view to the screen. More info
See in Glossary of objects when they’re not currently seen by the camera A component which creates an image of a particular viewpoint in your scene. The output is either drawn to the screen or captured as a texture. More info
See in Glossary because they’re obscured (occluded) by other objects. This is a valuable optimization method for mobile platforms. See Occlusion culling.
Troubleshooting and bug reports
The Android troubleshooting guide helps you discover the cause of bugs as quickly as possible. If, after consulting the guide, you suspect the problem is being caused by Unity, file a bug report following the Unity bug reporting guidelines.
Texture compression
Ericsson Texture Compression 3D Graphics hardware requires Textures to be compressed in specialized formats which are optimized for fast Texture sampling. More info
See in Glossary (ETC) is the standard texture compression A method of storing data that reduces the amount of storage space it requires. See Texture Compression, Animation Compression, Audio Compression, Build Compression.
See in Glossary format on Android.
ETC1 is supported on all current Android devices, but it does not support textures that have an alpha channel. ETC2 is supported on all Android devices that support OpenGL ES 3.0. It provides improved quality for RGB textures, and also supports textures with an alpha channel.
By default, Unity uses ETC1 for compressed RGB textures and ETC2 for compressed RGBA textures. If ETC2 is not supported by an Android device, the texture is decompressed at run time. This has an impact on memory usage, and also affects rendering speed.
DXT, PVRTC, ATC, and ASTC are all support textures with an alpha channel. These formats also support higher compression rates and/or better image quality, but they are only supported on a subset of Android devices.
It is possible to create separate Android distribution archives (.apk) for each of these formats and let the Android Market’s filtering system select the correct archives for different devices.
Movie/Video playback
We recommend you use the Video Player to play video files. This supersedes the earlier Movie Texture feature.
Known video compatibility issues
Not all devices support resolutions greater than 640 × 360. Runtime checks verify device support and don’t play the movie if there’s a failure.
For Android Lollipop (5.0 and 5.1.1) and above, you can use any resolution or number of audio channels, provided the target device supports them.
Unity supports playback from asset bundles for uncompressed bundles, read directly from disk.
Playback support for compressed asset bundles is available for Android 9 and later.
Format compatibility issues are reported in the adb logcat output and are always prefixed with AndroidVideoMedia .
Watch for device-specific error messages located near the error messages in Unity: they’re not available to the engine, but often explain what the compatibility issue is.
Источник
Android environment setup
To build and run for Android, you must install the Unity Android Build Support platform module. You also need to install the Android Software Development Kit (SDK) and the Native Development Kit (NDK) to build and run any code on your Android device. By default, Unity installs a Java Development Kit based on OpenJDK.
Note: Unity supports Android 4.4 “KitKat” and above. See AndroidSdkVersions for details.
1. Install Android Build Support and the Android SDK & NDK tools
Use the Unity Hub to install Android Build Support and the required dependencies
See in Glossary : Android SDK & NDK tools, and OpenJDK.
 Add Android modules
You can install Android Build Support, the Android SDK & NDK tools and OpenJDK when you install the Unity Editor, or add them at a later time.
For information on adding the Android modules:
If you are using a 2018 version of Unity, see the Unity 2018.4 documentation for information on manually installing these dependencies.
2. Enable USB debugging on your device
To enable USB debugging, you must enable Developer options on your device. To do this, find the build number in your device’s Settings menu. The location of the build number varies between devices; for stock Android, it’s usually Settings > About phone > Build number. For specific information on your device and Android version, refer to your hardware manufacturer.
After you navigate to the build number using the instructions above, tap on the build number seven times. A pop-up notification saying “You are now X steps away from being a developer” appears, with “X” being a number that counts down with every additional tap. On the seventh tap, Developer options are unlocked.
Note: On Android versions prior to 4.2 (Jelly Bean), the Developer options are enabled by default.
Go to Settings > Developer options (or, if this does not work, on some devices the path is Settings > System > Developer options), and check the USB debugging checkbox. Android now enters debug mode when it is connected to a computer via USB.
Connect your device to your computer using a USB cable. If you are developing on a Windows computer, you might need to install a device-specific USB driver. See the manufacturer website for your device for additional information.
The setup process differs for Windows and macOS and is explained in detail on the Android developer website. For more information on connecting your Android device to the SDK, refer to the Run Your App section of the Android Developer documentation.
ADB debugging for Chrome OS devices
For information on how to set up your development environment for Chrome OS devices, and enable ADB An Android Debug Bridge (ADB). You can use an ADB to deploy an Android package (APK) manually after building. More info
See in Glossary debugging, see Google’s documentation on Chrome OS Developer Environments.
Connecting to your Chrome OS device
Before you can deploy to your device you need to manually connect with ADB via the device’s IP address.
To begin you need the IP address. Open up the Settings app and choose Network in the sidebar. Next click on the active network interface.
If the interface is wireless then next choose the SSID that you are connected to. In the details you will see your IP address. Make a note of it.
If you are using a wired connection your IP address will be shown on the first details page.
Now we are ready to connect. For the sake of this example let’s say that the device’s IP is 192.168.0.100. In a shell or terminal run the following command
adb connect 192.168.0.100
If the connection was successful you will see a message such as connected to 192.168.0.65:5555 . And adb devices should verify that the device is connected. List of devices attached 192.168.0.65:5555 device
From now on you may run ADB commands to target the device just as you would over a USB connection.
Note: If your device or host machine goes to sleep or loses network connectivity you may need to reconnect.
Customizing the Android SDK & NDK Tools and OpenJDK installation
Unity recommends that you use the Unity Hub to install Android SDK & NDK tools, to ensure that you receive the correct versions and configuration. Unity installs Android SDK & NDK Tools and OpenJDK respectively in the SDK, NDK and OpenJDK folders under /Unity/Hub/Editor/[EditorVersion]/Editor/Data/PlaybackEngines/AndroidPlayer/.
If you have multiple versions of Unity with the same required dependencies (be sure to check System requirements for the latest) and you want to avoid duplicating the installation of Android SDK & NDK Tools and OpenJDK, you can specify a shared location in the Unity Preferences window. To do this, go to Preferences > External tools and enter the directory paths in the SDK and NDK fields:
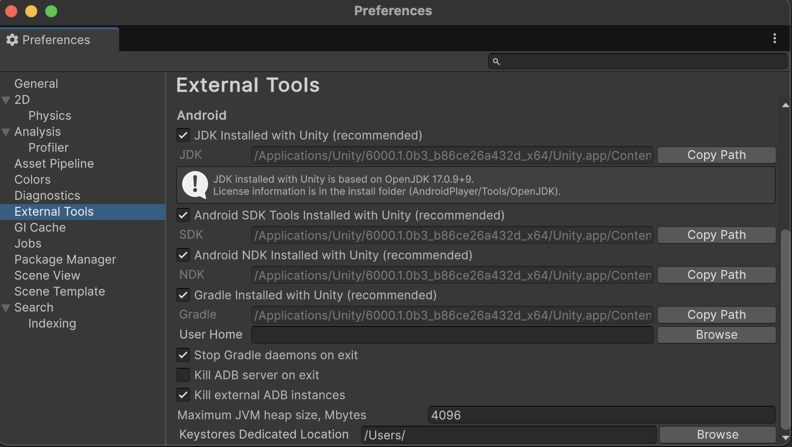 Preferences window showing external tools settings for Android
Warning: Unity does not officially support versions of the OpenJDK, SDK, or NDK other than the ones it supplies.
To change the OpenJDK, SDK Tools, or NDK that Unity uses to build Android apps:
- Open the Project.
- Open the Preferences window (Windows and Linux: Edit >Preferences; macOS: Unity >Preferences).
- In the left navigation column, select External Tools.
Change the OpenJDK path
- Uncheck JDK Installed with Unity (recommended).
- In the JDK field, enter the path to the JDK installation folder, or use the Browse button to locate it.
Change the Android SDK Tools path
- Uncheck Android SDK Tools Installed with Unity (recommended).
- In the SDK field, enter the path to the SDK installation folder, or use the Browse button to locate it.
Unity works with the most recent version of the Android SDK available at the time of the Unity version release.
Change the Android NDK path
- Uncheck Android NDK Installed with Unity (recommended).
- In the NDK field, enter the path to the NDK installation folder, or use the Browse button to locate it.
Each version of Unity requires a specific version of the Android NDK to be installed:
| Unity version | NDK version |
|---|---|
| 2018.4 LTS | r16b |
| 2019.4 LTS | r19 |
| 2020.3 LTS | r19 |
See the System requirements page for a complete list of requirements.
Updating the Android SDK Target API
Unity Hub installs the latest version of the Android SDK Target API required by Google Play.
If you need to use a more recent version, you can change the Target API from the Target API Level field in the Player Settings window (menu: Edit > Project Settings > Player, then select the Android platform). You can find the Target API Level option in the Other Settings > Identification section.
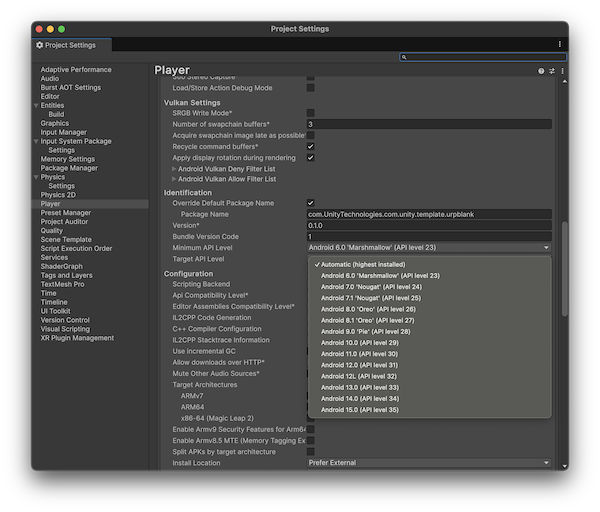 Selecting a target API for the Android SDK
After you select an option other than the default, Unity prompts you to update the Android SDK API. You can choose to either:
- Update the Android SDK
- Continue to use the highest installed version of the Android SDK
Note: If you select an older version of the Target API, the Unity Android SDK Updater will not be able to perform the update and will give you this message:
Android SDK does not include your Target SDK of (version). Please use the Android SDK Manager to install your target SDK version. Restart Unity after SDK installation for the changes to take effect.
In this case, to update the Android SDK Target API, you must use the Android sdkmanager from either Android Studio or the command line tool. Regardless of the method you chose, make sure to select the correct Android SDK folder for Unity in the Edit > Preferences > External Tools window.
On Windows, if the Unity Editor is installed in the default folder ( /Program Files/ ), you must run the sdkmanager with elevated privilege (Run as Administrator) to perform the update.
Источник
Профилируем Unity проект с Android Studio
Требования
Для полноценного профилирования приложения вам потребуется телефон с Android 8 или новее (API 27). По опыту, профилирование с Android-ами более старых версий несёт больше приключений, чем пользы. По этой причине я рекомендую обзавестись полной линейкой Nexus устройств, так как они имеют старое железо и последние обновления Android-а.
Настройка Unity проекта
Для получения результата, вам придётся настроить Unity проект определённым образом.
Настройки в Build Settings
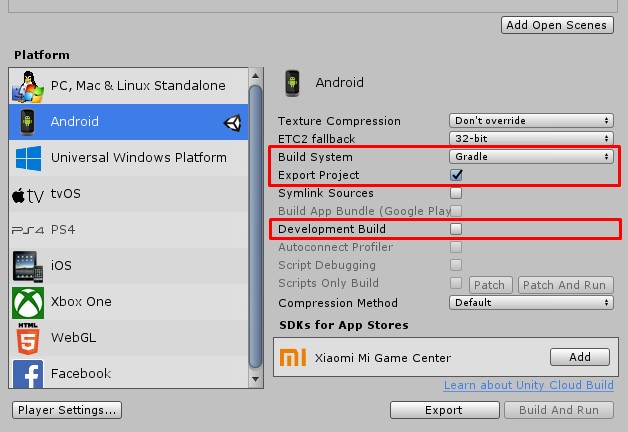
- В первую очередь, вы должны переключить Build System в “Gradle” и поставить галочку напротив “Export Project”. Таким образом мы получим готовый Android Studio проект, который мы и будем в дальнейшем профилировать. Профилирование готового APK тоже возможна, но более ограничена и требует больше подготовки
- Режим “Development Build” желательно выключить, так как таким образом получаемые тайминги в профайлере будут максимально близки к реальным
Настройки в Player Settings
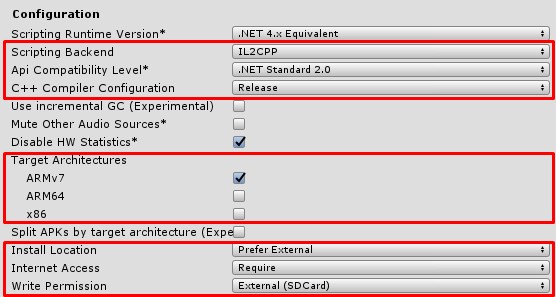
- Установите Scripting Backend в IL2CPP. Если оставить Mono, то при нативном профилировании мы увидим много функций Mono, без информации как они соотносятся с C# кодом.
- Опция ‘C++ Compiler Configuration’ для Android ни на что не влияет (в Unity 2018.3). Можете поставить её в ‘Release’, возможно в будущих версиях Unity Android toolchain эта настройка будет влиять на настройки компилятора.
- Желательно ограничить ‘Target Architecture’ до ARMv7. Так вы сэкономите на времени компиляции и по опыту множество архитектур иногда вводит Android Studio в ступор.
- Также стоит установить ряд дополнительных настроек:
- Install Location — ‘Prefer external’
- Internet Access — ‘Require’
- Write Permission — ‘External (SDCard)’
Android Studio и другие профайлеры используют simpleperf для сбора статистики, и ему потребуется доступ к карте памяти для записи временных файлов.
Подготовка Gradle проекта
После того, как вы установили все настройки, соберите Unity проект. Вы должны получить папку с Gradle проектом. 
Unity по умолчанию собирает проект из расчёта, что вы планируете собирать из него финальный APK. Потому вся отладочная информацию из него удалена, но к счастью её можно вернуть. Для этого вам нужно подменить libil2cpp.so и libunity.so на версии с отладочной информацией.
libil2cpp.so
libunity.so
Это файл, который содержит low-level часть Unity Player. Так как мы делаем Release сборку, то Unity положила вам в проект файл без отладочной информации. Вам нужно подменить libunity.so на файл с символами.
- Пойдите в папку, где у вас установлена Unity
- Перейдите в папку «\Data\PlaybackEngines\AndroidPlayer\Variations\il2cpp\Development\Libs\armeabi-v7a\»
- Возьмите от туда файл libunity.so, и замените файл в вашем проекте, который лежит в папке ‘\src\main\jniLibs\armeabi-v7a’
Профилирование
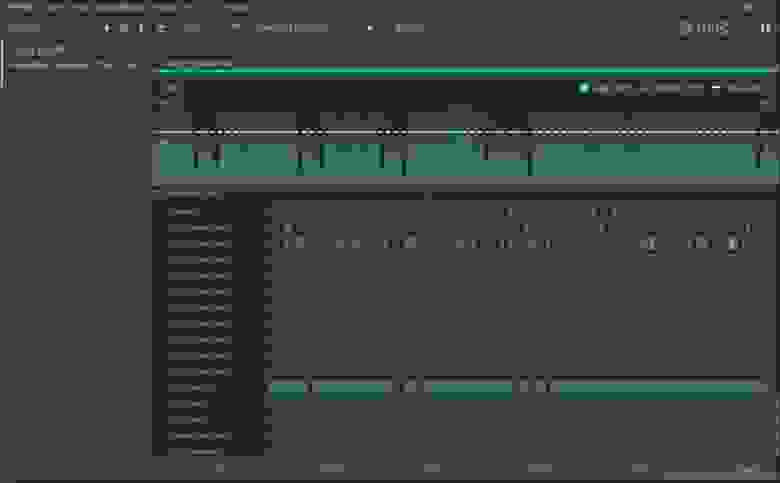
Теперь вы можете начать профилировать в Android Studio, достаточно нажать кнопку запуска профайлера.

Android Studio запустит приложение и начнётся сессия профилирования

По умолчанию, Android Studio показывается графики, но не производит сэмплирование данных. Для запуска процесса, вам нужно кликнуть на треке CPU, чтобы профайлер переключится на вид CPU. При этом сверху окна появится дропдаун и кнопка ‘Record’.
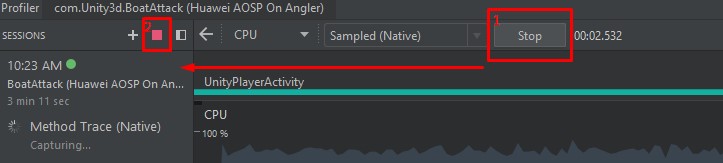
Выберите Sampled ‘Native’ (В Android Studio 3.3 — C/C++ Native), и нажмите кнопку ‘Record’.
Так как запись производится на диск устройства, по опыту лучше не записывать более 5-8 секунд, многие устройства будут фейлится и на меньшем кол-ве данных (список проверенных устройств смотрите в конце статьи).
Для получения результата нажмите ‘Stop’ и потом красный квадрат, чтобы прервать сессию. Сложно понять задумку авторов, но если вы не остановите запись полностью, то профайлер не всегда начинает анализ полученных данных и ваш отрезок с данным уедет в далёкие дали.
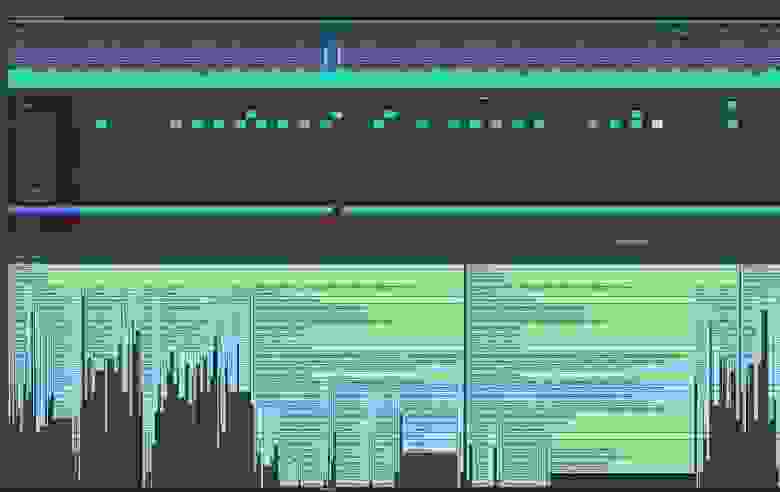
После этого остаётся только немного подождать, через 30-50 секунд профайлер выдаст вам результат. Если всё настроено верно, вы получите capture со всем именами функций
Известные особенности
Unity специфика
- Главный поток Unity называется UnityMain, но вы можете увидеть множество UnityMain при профилировании. Это пользовательские потоки, которые вы создаете внутри C# кода. По умолчанию они получают такое же имя. Главный поток Unity обычно легко отличить, так как он будет самый нагруженный.
- Графический поток называется UnityGfxWorkerW
- Потоки Unity Job системы называются Worker Thread
- К сожалению некоторые wait-функции, которые применяет Unity (futex-ы), Android Studio показывает и считает не как wait-time, а как активность.
- Когда вы будете смотреть call graph в Top Down view, вам придётся пройти через множество уровней Java-вызовом, к сожалению отфильтровать в Android Studio это никак нельзя.

Источник


