- Troubleshooting Android development
- Your application crashes immediately after launch
- The game crashes after a couple of seconds when playing video
- No Android device found
- Failed to re-package resources
- Unable to merge Android manifests
- Unable to convert classes into DEX format
- Unable to install APK to device
- Android environment setup
- 1. Download the Android SDK
- 1a. Install the Android SDK using the command line tools
- 1b. Install the SDK using Android Studio
- 2. Enable USB debugging on your device
- 3. Configure the Android SDK path in Unity
- 4. Download and set up the Android NDK
- Using an alternate Java Development Kit
Troubleshooting Android development
While developing for Android using Unity, you could encounter a number of issues. Problems are often related to plug-ins or incorrect Project settings. This section outlines the most common scenarios and relavant troubleshooting advice.
Your application crashes immediately after launch
Remove any native plug-ins you have.
Use adb logcat to get the crash report from your device. Consult the official Android Developer Logcat Command-Line Tool documentation for more information.
The game crashes after a couple of seconds when playing video
Ensure Settings > Developer Options > Don’t keep activities isn’t enabled on the device.
The video player is its own activity, and therefore regular game activity will be destroyed if the video player is activated.
No Android device found
If Unity cannot find an Android device connected to the system, check the following:
Make sure that your device is actually connected to your computer — check the USB cable and the sockets.
Make sure that your device has USB Debugging enabled in the Developer options. For more details, refer to the Android SDK/NDK Setup page.
Run the adb devices command from the platform-tools directory of your Android SDK installation and check the output.
If the output list is empty and you are using Windows, you may need to install the driver for ADB devices. For more details, refer to the Android SDK/NDK Setup documentation.
If the list contains entries with the unauthorized label, you may need to authorize your computer on your device and give it permission to debug it. Check the device’s screen for the corresponding dialog.
If the list contains your device with the device label, build your Project in Unity again.
Failed to re-package resources
This error occurs when the Android Asset Packaging Tool (AAPT) fails. AAPT is used to build the intermediate Asset packages during Android build. This issue is most often caused by missing resources or duplicate resources in your Android plug-ins.
Check the console message for more details — it should contain the IDs of the resources that are missing or duplicates. Fix the error in your plug-ins by either adding the missing resources/settings or removing the duplicate plug-ins.
Unable to merge Android manifests
The most likely cause for this issue is that one of your plug-ins has a manifest that is incompatible with the main Unity manifest.
Check the console message for more details on which attributes are conflicting, and fix the manifests accordingly.
See the Android Manifest documentation for more details on Android manifests.
Unable to convert classes into DEX format
The most likely cause for this issue is that you have a Java plug-in added twice. This results in duplicate classes when Unity tries to build a DEX (Dalvik Executable Format) file from all the compiled Java plug-ins. Check the console output for the list of duplicate entries, and fix the plug-ins.
If your console messages says “Too many references”, it means that the number of fields and methods exceeded the DEX limit of 64k. This usually happens when the number of plug-ins or plug-in resources is too high. Due to the way the references are generated, the limit could be hit with just a couple of large plug-ins.
There are several ways to handle this issue. One of these is by stripping the plug-ins. However, the quickest way to fix it is to switch to the Gradle build system, or export the Project and build it in Android Studio.
Unable to install APK to device
This error can be caused by:
Installing to an incompatible device.
Installing to a device running a version of Android lower than the Minimum API Level in your Player settings.
Check the console for the actual error code and output.
Источник
Troubleshooting Android development
While developing for Android using Unity, you could encounter a number of issues. Problems are often related to plug-ins A set of code created outside of Unity that creates functionality in Unity. There are two kinds of plug-ins you can use in Unity: Managed plug-ins (managed .NET assemblies created with tools like Visual Studio) and Native plug-ins (platform-specific native code libraries). More info
See in Glossary or incorrect Project settings A broad collection of settings which allow you to configure how Physics, Audio, Networking, Graphics, Input and many other areas of your project behave. More info
See in Glossary . This section outlines the most common scenarios and relavant troubleshooting advice.
Your application crashes immediately after launch
Remove any native plug-ins A platform-specific native code library that is created outside of Unity for use in Unity. Allows you can access features like OS calls and third-party code libraries that would otherwise not be available to Unity. More info
See in Glossary you have.
Use adb logcat to get the crash report from your device. Consult the official Android Developer Logcat Command-Line Tool documentation for more information.
The game crashes after a couple of seconds when playing video
Ensure Settings > Developer Options > Don’t keep activities isn’t enabled on the device.
The video player is its own activity, and therefore regular game activity will be destroyed if the video player is activated.
No Android device found
If Unity cannot find an Android device connected to the system, check the following:
Make sure that your device is actually connected to your computer — check the USB cable and the sockets.
Make sure that your device has USB Debugging enabled in the Developer options. For more details, refer to the Android SDK/NDK Setup page.
Run the adb devices command from the platform-tools directory of your Android SDK installation and check the output.
If the output list is empty and you are using Windows, you may need to install the driver for ADB An Android Debug Bridge (ADB). You can use an ADB to deploy an Android package (APK) manually after building. More info
See in Glossary devices. For more details, refer to the Android SDK/NDK Setup documentation.
If the list contains entries with the unauthorized label, you may need to authorize your computer on your device and give it permission to debug it. Check the device’s screen for the corresponding dialog.
If the list contains your device with the device label, build your Project in Unity again.
Failed to re-package resources
This error occurs when the Android Asset Packaging Tool (AAPT) fails. AAPT is used to build the intermediate Asset packages A collection of files and data from Unity projects, or elements of projects, which are compressed and stored in one file, similar to Zip files, with the .unitypackage extension. Asset packages are a handy way of sharing and re-using Unity projects and collections of assets. More info
See in Glossary during Android build. This issue is most often caused by missing resources or duplicate resources in your Android plug-ins.
Check the console message for more details — it should contain the IDs of the resources that are missing or duplicates. Fix the error in your plug-ins by either adding the missing resources/settings or removing the duplicate plug-ins.
Unable to merge Android manifests
The most likely cause for this issue is that one of your plug-ins has a manifest that is incompatible with the main Unity manifest.
Check the console message for more details on which attributes are conflicting, and fix the manifests accordingly.
See the Android Manifest documentation for more details on Android manifests.
Unable to convert classes into DEX format
The most likely cause for this issue is that you have a Java plug-in added twice. This results in duplicate classes when Unity tries to build a DEX (Dalvik Executable Format) file from all the compiled Java plug-ins. Check the console output for the list of duplicate entries, and fix the plug-ins.
If your console messages says “Too many references”, it means that the number of fields and methods exceeded the DEX limit of 64k. This usually happens when the number of plug-ins or plug-in resources is too high. Due to the way the references are generated, the limit could be hit with just a couple of large plug-ins.
There are several ways to handle this issue. One of these is by stripping the plug-ins. However, the quickest way to fix it is to switch to the Gradle build system, or export the Project and build it in Android Studio.
Unable to install APK to device
This error can be caused by:
Installing to an incompatible device.
Installing to a device running a version of Android lower than the Minimum API Level in your Player settings.
Check the console for the actual error code and output.
Источник
Android environment setup
Whether you’re building an Android application in Unity or programming it from scratch, you must set up the Android Software Development Kit (SDK) before you can build and run any code on your Android device. By default, Unity installs a Java Development Kit based on OpenJDK.
1. Download the Android SDK
You can install the Android SDK using command line tools or through Android Studio. Android Studio provides an easy to use GUI based tool but installs additional software on your computer. Using the command line tools is a smaller download and does not install additional software, but it can be more challenging to use.
1a. Install the Android SDK using the command line tools
Install or unpack the Android SDK. After installing, open the Android SDK Manager and add at least one Android SDK Platform, the Platform Tools, the Build Tools, and the USB drivers if you’re using Windows.
To install an Android platform SDK and the associated tools:
Unzip the tools folder to a location on your hard drive.
Open a command-prompt window.
Navigate to the bin folder in the location where you unzipped the tools folder:
install folder > tools > bin
Use the sdkmanager command line tool to retrieve the list of packages that you can install. The installable packages include the Platform SDKs, Build Tools, Platform tools, and other tools.
Select a version of the Platform SDK to install. Platform SDKs take the following form in the list: platforms;android-xx. The xx indicates the SDK level. The larger the number, the newer the package. Typically, you can install the latest available version. However, there might be cases where Google has released a new version of the SDK that causes errors when you build your Unity Project. In that case, you must uninstall the SDK and install an earlier version. The general format of the command for package installation is sdkmanager
. You can install the corresponding Platform Tools and Build Tools at the same time.
Example: sdkmanager “platform-tools” “platforms;android–27” “build-tools;27.0.3”
- If you are running on Windows, install the USB device drivers:
This installs the SDK to a directory named platforms in the same directory you unzipped the tools folder to.
c: \platforms
1b. Install the SDK using Android Studio
Install Android studio from the Android developer portal. The Android developer portal provides detailed installation instructions.
Note: Android Studio provides some ease of use benefits, but it is not fully tested for compatibility with Unity installs. If you encounter errors, Unity recommends using the command line method.
When installing the Android platform SDK and other tools, you can typically install the latest available version. There might be cases in which Google has released a new version of the SDK that causes errors when you build your Unity Project. In that case, uninstall the SDK and install an earlier version.
Install the associated Platform and Build tools at the same time. If you are running on Windows, install the USB device drivers.
2. Enable USB debugging on your device
To enable USB debugging, you must first enable Developer options on your device. To do this, find the build number in your device’s Settings menu. The location of the build number varies between devices; for stock Android, it’s usually in Settings > About phone > Build number. For specific information on your device and Android version, refer to your hardware manufacturer.
After you navigate to the build number using the instructions above, tap on the build number seven times. A pop-up notification saying “You are now X steps away from being a developer” appears, with “X” being a number that counts down with every additional tap. On the seventh tap, Developer options are unlocked.
Note: On Android versions prior to 4.2 (Jelly Bean), the Developer options are enabled by default.
Go to Settings > Developer options, then enable USB debugging. Android now enters debug mode when it is connected to a computer via USB.
Connect your device to your computer using a USB cable. If you are developing on a Windows computer, you might need to install the device-specific USB driver. See the manufacture website for your device for additional information.
The setup process differs for Windows and macOS and is explained in detail on the Android developer website. For more information on connecting your Android device to the SDK, refer to the Running Your App section of the Android Developer documentation.
3. Configure the Android SDK path in Unity
The first time you create a Project for Android (or if Unity later fails to locate the SDK), Unity asks you to locate the folder in which you installed the Android SDK.
If you installed the SDK using the sdkmanager, you can find the folder in \platforms .
If you installed the SDK when you installed Android Studio, you can find the location in the Android Studio SDK Manager. To open the SDK Manager from Android Studio, go to Tools > Android > SDK Manager or select SDK Manager in the toolbar.
To change the location of the Android SDK, in the Unity menu bar go to Unity > Preferences > External Tools.
4. Download and set up the Android NDK
If you are using the IL2CPP A Unity-developed scripting back-end which you can use as an alternative to Mono when building Projects for some platforms. More info
See in Glossary scripting backend A framework that powers scripting in Unity. Unity supports three different scripting backends depending on target platform: Mono, .NET and IL2CPP. Universal Windows Platform, however, supports only two: .NET and IL2CPP. More info
See in Glossary for Android, you need the Android Native Development Kit (NDK). It contains the toolchains (such as compiler and linker) needed to build the necessary libraries and produce the output package (APK). If you are not targeting the IL2CPP backend, you can skip this step.
Download Android NDK version r16b (64-bit) from the NDK Downloads web page. Extract the android-ndk-r16b folder to a directory on your computer and note the location.
The first time you build a Project for Android using IL2CPP, Unity asks you to locate the folder in which you installed the Android NDK. Select the root folder of your NDK installation. To change the location of the Android NDK, in the Unity Editor, navigate to the menu: Unity > Preferences to display the Unity Preferences dialog box. Here, click External Tools.
Using an alternate Java Development Kit
Unity recommends that you use the JDK installed with the Android build tools, to ensure that you receive the correct version and configuration.
If you have manually installed the JDK and do not want to duplicate the installation, you can specify the location in the Unity Preferences window. To do this, go to Preferences > External tools and enter the directory path in the JDK field:
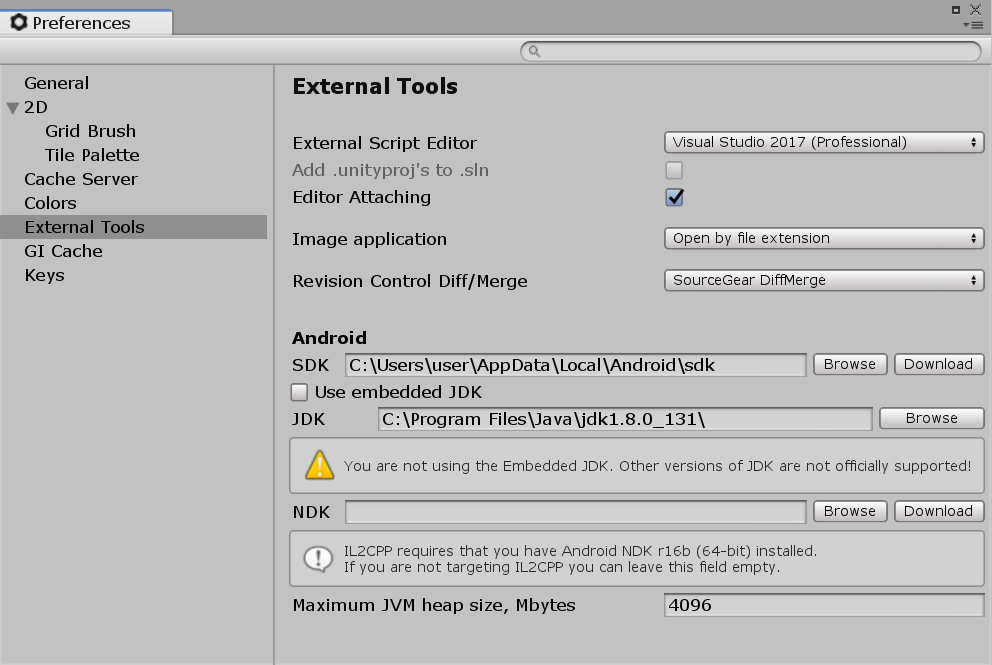 Preferences for Android external tools
Warning: The Android tools do not support JDK 9 or later; an alternate JDK must be version 8. Unity does not officially support versions of the JDK other than the one embedded in the Android Build Tools.
To change the JDK that Unity uses to build Android apps:
Open the Project.
In the left navigation column, select External Tools.
Uncheck JDK Installed with Unity (recommended).
In the JDK field enter the path to the JDK or use the Browse button to locate it.
2018–11–21 Page amended with editorial review
Did you find this page useful? Please give it a rating:
Источник


