- Building apps for Android
- Configuring Build Settings
- ETC2 fallback
- Minification
- Build system
- Exporting the Project
- Build or Build and Run
- Android environment setup
- 1. Install Android Build Support and the Android SDK & NDK tools
- 2. Enable USB debugging on your device
- Customizing the Android SDK & NDK Tools and OpenJDK installation
- Change the OpenJDK path
- Change the Android SDK Tools path
- Change the Android NDK path
Building apps for Android
There are two locations to configure settings that affect how your app is built:
- Player settings — Allows you to configure runtime settings for the app. For more information on Player settings, see Player settings for the Android platform.
- Build settings — Allows you to configure build system parameters and build the app.
The output package includes an APK, and an APK expansion file (OBB) if the Split Application Binary option is selected in the Player settings. For more information on OBB files, see OBB Support.
To optimize for download and installation size, enable the Split APKs by target architecture option in the Player settings. The Split APKs by target architecture option produces one set of APKs and OBBs for each device architecture selected in the Target Architecture list in the Player settings. You can upload this set of APKs (and OBBs, if enabled) to the Google Play, or other, store instead of a FAT APK in which all of the selected architectures are included into a single APK. For more information on this feature, see Multiple APK support on the Android Developer website.
Configuring Build Settings
To configure and build apps for Android, access the Build Settings window (File > Build Settings). In Platform, select Android.
To set Android as your default build platform, click the Switch Platform button.
After you specify your build settings, click the Build The process of compiling your project into a format that is ready to run on a specific platform or platforms. More info
See in Glossary button to create your build. To build the app, click Build And Run to create and run your build on the platform you have specified.
| Setting | Function |
|---|---|
| Texture Compression A method of storing data that reduces the amount of storage space it requires. See Texture Compression, Animation Compression, Audio Compression, Build Compression. See in Glossary | The Unity Android build system supports the following texture compression 3D Graphics hardware requires Textures to be compressed in specialized formats which are optimized for fast Texture sampling. More info See in Glossary format options: Use Player Settings, DXT (Tegra), PVRTC (PowerVR), ETC (default), ETC2 (GLES 3.0), and ASTC. This setting can also be changed from a script or using the command-line switch ‘-setDefaultPlatformTextureFormat’. For advice on using these formats, have a look at the texture compression format overview. |
| ETC2 fallback | 32-bit, 16-bit, and 32-bit, half resolution. |
| Build System | |
| Internal (deprecated) — Generate the output package (APK) using the internal Unity build process, based on Android SDK utilities. Selecting Internal hides the Export Project checkbox. | |
| Gradle — Generate the output package (APK) using the Gradle build system. Supports direct Build and Run and exporting the Project to a directory. This is the default Build System for Unity. | |
| Export Project | Export the Project as a Gradle project that you can import into Android Studio. |
| Build AppBundle (Google Play) | Build an Android App Bundle for distribution on Google Play. Selecting this option also lets you configure the Warn about App Bundle Size option in the Player settings Settings that let you set various player-specific options for the final game built by Unity. More info See in Glossary . |
| Run Device | A drop-down list of attached devices on which you can test your build. If you connect a new device or you don’t see an attached device in the list, click the Refresh button to reload the list. |
| Development Build | A development build includes debug symbols and enables the Profiler A window that helps you to optimize your game. It shows how much time is spent in the various areas of your game. For example, it can report the percentage of time spent rendering, animating, or in your game logic. More info See in Glossary . Selecting Development Build allows you to select the Autoconnect Profiler, Script Debugging, and Scripts A piece of code that allows you to create your own Components, trigger game events, modify Component properties over time and respond to user input in any way you like. More info See in Glossary Only Build options. |
| Autoconnect Profiler | Allows the Profiler to automatically connect to the build. Selectable when the Development Build option is selected. For more information on the Profiler, see Profiler Overview. |
| Script Debugging | Allow script debuggers to attach to the Player remotely. Enabled when the Development Build option is selected. |
| Scripts Only Build | Check this option to build just the scripts in the current Project. Enabled when the Development Build option is selected. |
| Compression Method | Compress the data in your Project at build time. Choose between the following methods: |
| Default — The default compression is ZIP, which gives slightly better compression results than LZ4 and LZ4HC, but data is slower to decompress. | |
| LZ4 — A fast compression format that is useful for development builds. Using LZ4 compression can significantly improve loading time of games/apps built with Unity. For more information, see BuildOptions.CompressWithLz4. | |
| LZ4HC — A high compression variant of LZ4 that is slower to build but produces better results for release builds. Using LZ4HC compression can significantly improve loading time of games/apps built with Unity. For more information, see BuildOptions.CompressWithLz4HC. | |
| SDKs for App Stores | Select which third party app stores to integrate with. To include an integration, click Add next to an App Store name. The Unity Package Manager automatically downloads and includes the relevant integration package. |
ETC2 fallback
For Android devices that don’t support ETC2 (which don’t support GL ES3), you can override the default ETC2 texture decompression by choosing from 32-bit, 16-bit, or 32-bit with half the resolution formats.
This option allows you to choose between the uncompressed image quality and the amount of memory the uncompressed texture occupies. 32-bit RGBA texture is the highest quality format, and takes twice the required disk space as the 16-bit format, but a texture in 16-bit might lose some valuable color information. 32-bit half-resolution reduces the memory requirement further, but the texture is likely to become blurry.
Minification
You can use ProGuard minification to decrease the size of the application and improve performance. To enable this ProGuard minification:
- Open the Player Settings window (menu: Edit > Project Settings > Player), and select Android.
- In the Publishing Settings section, under Minify, select ProGuard for either release builds, debug builds, or both.
Note: ProGuard might strip out important code that your app needs, so use these options carefully.
To generate a custom proguard.txt file, enable the User ProGuard File setting in the Publishing Settings section of the Player Settings. This immediately generates the proguard.txt file in your Project’s Assets/Plugins/Android/ folder.
To learn more about ProGuard, see the ProGuard manual.
Build system
Unity supports two Android build systems: Gradle An Android build system that automates several build processes. This automation means that many common build errors are less likely to occur. More info
See in Glossary and Internal.
The steps involved with building for Android are:
Preparing and building the Unity Assets.
Processing the plug-ins A set of code created outside of Unity that creates functionality in Unity. There are two kinds of plug-ins you can use in Unity: Managed plug-ins (managed .NET assemblies created with tools like Visual Studio) and Native plug-ins (platform-specific native code libraries). More info
See in Glossary .
Splitting the resources into the parts that go to the APK and the OBB, if Split Application Binary is selected.
Building the Android resources using the AAPT utility (internal build only.)
Generating the Android manifest.
Merging the library manifests into the Android manifest (internal build only.)
Compiling the Java code into the Dalvik Executable format (DEX) (internal build only.)
Building the IL2CPP A Unity-developed scripting back-end which you can use as an alternative to Mono when building projects for some platforms. More info
See in Glossary library, if IL2CPP Scripting Backend is selected.
Building and optimizing the APK and OBB packages.
Gradle build system
The Gradle build system uses Gradle to build an APK or export a Project in Gradle format, which can then be imported to Android Studio. When you select this build system, Unity goes through the same steps as the Internal build system excluding resource compilation with AAPT, merging manifests, and running DEX. Unity then generates the build.gradle file (along with the other required configuration files) and invokes the Gradle executable, passing it the task name and the working directory. Finally, the APK is built by Gradle.
Internal build system
The Internal build system creates an APK using the Android SDK utilities to build and optimize the APK and OBB packages. For more information about OBB files, see OBB Support.
Exporting the Project
If you need more control over the build pipeline, or to make changes that Unity does not normally allow (for example, fine tuning the manifest files that are automatically generated by Unity), you can export your Project and import it into Android Studio. Exporting a Project is only available when you have selected Gradle as your Build System.
To export the Project:
- From the Build System drop-down menu, select Gradle.
- Check the Export Project checkbox. When Export Project is checked, the Build button is relabeled Export and the Build And Run button is disabled.
- Click the Export button and select a destination folder for the project.
When the export finishes, open Android Studio and import your project. For more information on importing projects to Android Studio, see the Migrate to Android Studio section of the Android Developer documentation.
Build or Build and Run
The Build Settings window offers two options: Build and Build and Run. Using either option saves the output packages (APK and OBB, if enabled) to the path that you select. You can publish these packages to the Google Play Store, or install them on your device manually with the help of Android Debug Bridge (ADB). For further information about installing apps manually, see the Run your app section of the Android Developer documentation. For information on ADB An Android Debug Bridge (ADB). You can use an ADB to deploy an Android package (APK) manually after building. More info
See in Glossary commands, see the Android Debug Bridge section of the Android Developer documentation.
Selecting Build and Run saves the output packages to the file path you specify, while also installing your app on the Android device connected to your computer.
If the Split Application Binary option is enabled, the OBB file is pushed to the correct location on your device. If Development Build A development build includes debug symbols and enables the Profiler. More info
See in Glossary is checked, Unity also sets up a Profiler tunnel and enables CheckJNI. After that, the app is launched. The Split Application Binary setting is located in the Publishing Settings section of the Player settings.
Tip: Specify the output path for the packages and then use the Ctrl+B (Windows) or Cmd+B (macOS) keyboard shortcut to Build and Run using the saved output path.
2018–11–19 Page amended
Updated functionality in 5.5
Updated the Build Settings Configuration options
Updated the Build Settings Texture Compression options
Источник
Android environment setup
To build and run for Android, you must install the Unity Android Build Support platform module. You also need to install the Android Software Development Kit (SDK) and the Native Development Kit (NDK) to build and run any code on your Android device. By default, Unity installs a Java Development Kit based on OpenJDK.
Note: Unity supports Android 4.4 “KitKat” and above. See AndroidSdkVersions for details.
1. Install Android Build Support and the Android SDK & NDK tools
Use the Unity Hub to install Android Build Support and the required dependencies: Android SDK & NDK tools, and OpenJDK.
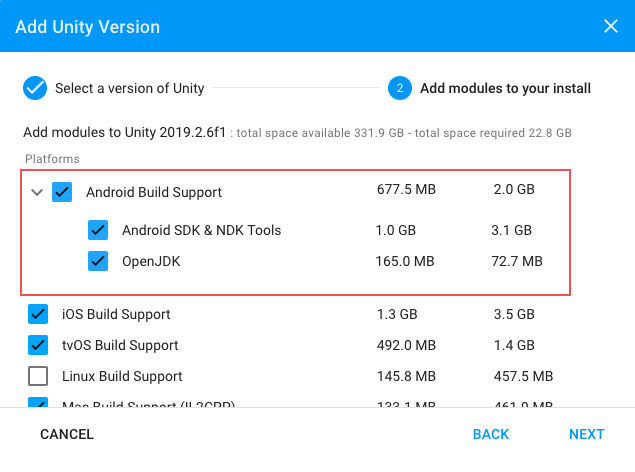 Add Android modules
You can install Android Build Support, the Android SDK & NDK tools and OpenJDK when you install the Unity Editor, or add them at a later time.
For information on adding the Android modules:
Note: If you’re using Unity on macOS 10.15 (Catalina) and you don’t install Android tools through the Unity Hub, your operating system’s default security settings will prevent the Android NDK binaries being executed. You must either change these security settings, or download a signed Android NDK (r16b) from the Android developer website.
If you are using a 2018 version of Unity, see the Unity 2018.4 documentation for information on manually installing these dependencies.
2. Enable USB debugging on your device
To enable USB debugging, you must enable Developer options on your device. To do this, find the build number in your device’s Settings menu. The location of the build number varies between devices; for stock Android, it’s usually Settings > About phone > Build number. For specific information on your device and Android version, refer to your hardware manufacturer.
After you navigate to the build number using the instructions above, tap on the build number seven times. A pop-up notification saying “You are now X steps away from being a developer” appears, with “X” being a number that counts down with every additional tap. On the seventh tap, Developer options are unlocked.
Note: On Android versions prior to 4.2 (Jelly Bean), the Developer options are enabled by default.
Go to Settings > Developer options (or, if this does not work, on some devices the path is Settings > System > Developer options), and check the USB debugging checkbox. Android now enters debug mode when it is connected to a computer via USB.
Connect your device to your computer using a USB cable. If you are developing on a Windows computer, you might need to install a device-specific USB driver. See the manufacturer website for your device for additional information.
The setup process differs for Windows and macOS and is explained in detail on the Android developer website. For more information on connecting your Android device to the SDK, refer to the Run Your App section of the Android Developer documentation.
Customizing the Android SDK & NDK Tools and OpenJDK installation
Unity recommends that you use the Unity Hub to install Android SDK & NDK tools, to ensure that you receive the correct versions and configuration. Unity installs Android SDK & NDK Tools and OpenJDK respectively in the SDK, NDK and OpenJDK folders under /Unity/Hub/Editor/[EditorVersion]/Editor/Data/PlaybackEngines/AndroidPlayer/.
If you have multiple versions of Unity with the same required dependencies (be sure to check System requirements for the latest) and you want to avoid duplicating the installation of Android SDK & NDK Tools and OpenJDK, you can specify a shared location in the Unity Preferences window. To do this, go to Preferences > External tools and enter the directory paths in the SDK and NDK fields:
 Preferences window showing external tools settings for Android
Warning: Unity does not officially support versions of the OpenJDK, SDK, or NDK other than the ones it supplies.
To change the OpenJDK, SDK Tools, or NDK that Unity uses to build Android apps:
- Open the Project.
- Open the Preferences window (Windows and Linux: Edit >Preferences; macOS: Unity >Preferences).
- In the left navigation column, select External Tools.
Change the OpenJDK path
- Uncheck JDK Installed with Unity (recommended).
- In the JDK field, enter the path to the JDK installation folder, or use the Browse button to locate it.
Change the Android SDK Tools path
- Uncheck Android SDK Tools Installed with Unity (recommended).
- In the SDK field, enter the path to the SDK installation folder, or use the Browse button to locate it.
Unity works with the most recent version of the Android SDK available at the time of the Unity version release.
Change the Android NDK path
- Uncheck Android NDK Installed with Unity (recommended).
- In the NDK field, enter the path to the NDK installation folder, or use the Browse button to locate it.
Each version of Unity requires a specific version of the Android NDK to be installed:
| Unity version | NDK version |
|---|---|
| 2017.4 LTS | r13d |
| 2018.4 LTS | r16b |
| 2019.1 | r16b |
| 2019.2 | r16b |
| 2019.3 | r19 |
See the System requirements page for a complete list of requirements.
Источник


