Building your macOS application
For macOS applications, there are platform-specific requirements that change the build process. Also, some digital distribution services that can host macOS applications have different requirements. For example, the Mac App Store doesn’t require you to notarize your application because the upload process includes similar content validation to notarization. If you are targeting a specific digital distribution service with your build, check the documentation for that Digital distribution service first to check if the requirements differ.
Target architecture
Before you build an application for macOS, be aware of the chipset differences between Apple devices. Some Apple devices use Intel chipsets and others use Apple silicon. You can use Unity to create both architecture-specific builds and builds that target both Intel and Apple silicon. The available target architectures are:
- Intel 64-bit: Creates a macOS build for Apple devices that use Intel chipsets.
- Apple silicon: Creates a macOS build for Apple devices that use Apple silicon architecture.
- Intel 64-bit + Apple silicon: Creates a macOS build that works on both Intel chipsets and Apple silicon. Note: This results in a build that is larger than the individual architecture-specific builds. This impacts overall application size.
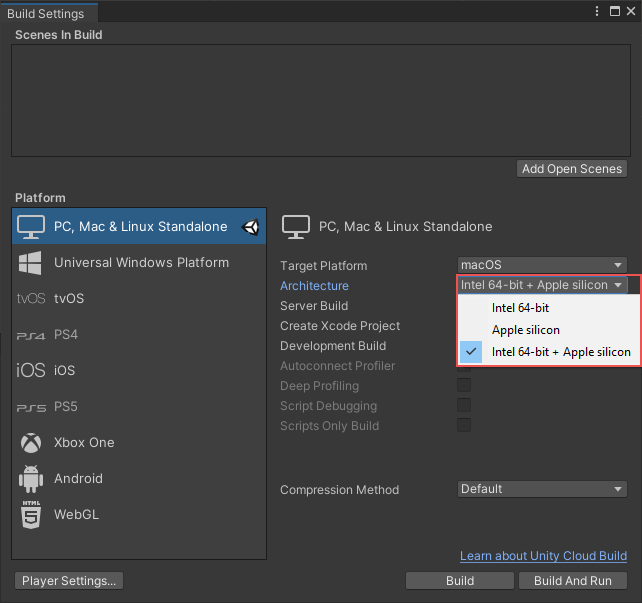 The Build Settings window showing the options in the Architecture drop-down.
Building
To build your Unity application:
- Open the Build Settings window (menu: File >Build Settings).
- In the Platforms list, select PC, Mac & Linux Standalone.
- Set Target Platform to macOS. If macOS isn’t an option, add the Mac Build Support module to your Unity Editor install. For information on how to install modules, see Adding modules to the Unity Editor.
- Set Architecture to the architecture type you want Unity to build your application for. For more information about target architecture for macOS, see Target architecture.
- If you want to create an Xcode project for your application, enable Create Xcode Project.
- Click Build.
Information property list file
macOS applications require an information property list file called Info.plist that contains metadata and configuration information for the application. The file is organized as a list of key-value pairs. For more information about information property list files, see About Information Property List Files. For more information about the Info.plist in particular, see About Info.plist Keys and Values.
When Unity builds your application, it creates the Info.plist file. Unity stores this file at ApplicationName.app > Contents > Info.plist. Unity displays required Info.plist configuration properties in the Player Settings Settings that let you set various player-specific options for the final game built by Unity. More info
See in Glossary window that you can set before building the application. These properties are in the Other Settings > Mac App Store Options section.
There are additional keys that you can add to your Info.plist file. To add them, build the application and use a text editor to edit the file. For information about the available keys, see About Info.plist Keys and Values.
Entitlements
macOS applications require entitlements to specify permissions and restrictions that allow or prevent your application from taking specific actions. At a minimum, your application must include entitlements that result in a Hardened Runtime. These entitlements protect your application from code injection, hijacking of dynamically linked libraries, and memory tampering.
To define entitlements, macOS applications use an xml file with the .entitlements file extension. macOS applications then use the code signing process to bind the entitlements to an application.
If your application uses plug-ins A set of code created outside of Unity that creates functionality in Unity. There are two kinds of plug-ins you can use in Unity: Managed plug-ins (managed .NET assemblies created with tools like Visual Studio) and Native plug-ins (platform-specific native code libraries). More info
See in Glossary that perform macOS platform-specific actions, you might need to add entitlements to allow those actions. For more information on what actions require entitlements, see Apple Developer Entitlements.
Code signing
A code signature summarizes the content of an application at the time when the developer creates the code signature. Apple devices use an application’s code signature to detect changes made since the developer created the code signature. This guarantees the integrity of applications and safeguards against tampering. If an application doesn’t have a code signature, the device warns the end user before they open the application. The process of creating a code signature for an application is called code signing. For more information about the technical details of code signing, see macOS Code Signing in Depth.
Unity automatically code signs any application it builds for macOS, regardless of the platform you develop on. This guards against tampering and allows your application to run without warnings, but doesn’t identify you as the developer. This is sufficient to run the application, but to not to notarize it. Norarization requires you to sign the application with a developer or organization ID. When you sign an application with an ID, the digital signature includes a fingerprint of your application as well as a cryptographic signature that identifies you as the developer. Unity doesn’t sign the code it builds with cryptographic information. To do this, you need to sign the code either manually or using Xcode.
Depending on which method of notarization you use, the steps you perform to code sign an application changes. So, for information about how to code sign your application, see Notarizing your macOS application.
Notarization
A valid code signature guarantees the integrity of an application, but it doesn’t guarantee that the application itself isn’t malicious. Notarization is the process Apple uses to validate that Developer ID-signed applications don’t contain malicious content. If Apple doesn’t detect malicious content, it adds a digital tag to the application which indicates that the application is fit for distribution on Apple devices. The results of notarization are also available online for gatekeeping processes to access. Apple keeps an audit trail of applications distributed using your Developer ID. If your ID is exposed, you can use this trail to revoke the execution rights of unauthorized versions of your application. For more information about noratization, see Notarizing macOS Software Before Distribution.
Digital distribution services often require you to notarize your application before you can distribute the application on their platform. However, some digital distribution services, such as the Mac App Store include similar content validation to notarization. This means that you don’t need to notarize your application to distribute it on certain platforms. For more information about digital distribution-specific information, see Digital distribution services for macOS applications.
To notarize your application to run on macOS 10.15 or later, you must first code sign your application with a Developer ID. If you don’t notarize your application, the device warns the end user before they open the application. You don’t need to notarize an application for distribution through the Mac App Store because the submission process includes similar content validation.
Depending on which platform you develop on, the available notarization methods differ. For information about how to notarize your application, see Notarizing your macOS application.
Источник
Расширение редактора Unity через Editor Window, Scriptable Object и Custom Editor
Всем привет! Меня зовут Гриша, и я основатель CGDevs. Сегодня хочется поговорить про расширения редактора и рассказать про один из моих проектов, который я решил выложить в OpenSource.
Юнити — прекрасный инструмент, но в нём есть небольшая проблема. Новичку, чтобы сделать простую комнату (коробку с окнами), необходимо либо осваивать 3д моделирование, либо пытаться что-то собрать из квадов. Недавно стал полностью бесплатным ProBuilder, но это так же упрощённый пакет 3д моделирования. Хотелось простой инструмент, который позволит быстро создавать окружения вроде комнат со окнами и правильными UV при этом. Достаточно давно я разработал один плагин для Unity, который позволяет быстро прототипировать окружения вроде квартир и комнат с помощью 2д чертежа, и сейчас решил выложить его в OpenSource. На его примере мы разберём, каким образом можно расширять редактор и какие инструменты для этого существуют. Если вам интересно – добро пожаловать под кат. Ссылка на проект в конце, как всегда, прилагается.

Unity3d обладает достаточно широким инструментарием для расширения возможностей редактора. Благодаря таким классам, как EditorWindow, а также функционалу Custom Inspector, Property Drawer и TreeView (+ скоро должны появиться UIElements) поверх юнити легко надстраивать свои фреймворки разной степени сложности.
Сегодня мы поговорим про один из подходов, который я использовал при разработке своего решения и про пару интересных задач, с которыми пришлось столкнуться.
В основе решения лежит использование трёх классов, таких как EditorWindow (все дополнительные окна), ScriptableObject (хранение данных) и CustomEditor (дополнительный функционал инспектора для Scriptable Object).
При разработке расширений редактора важно стараться придерживаться принципа, что расширением будут пользоваться Unity разработчики, поэтому интерфейсы должны быть понятными, нативными и вписанными в воркфлоу Unity.
Поговорим про интересные задачи.
Для того, чтобы нам прототипировать что-то, в первую очередь нам надо научиться рисовать чертежи, из которых мы будем генерировать наше окружение. Для этого нам необходимо специальное окно EditorWindow, в котором мы будем отображать все чертежи. В принципе можно было бы рисовать и в SceneView, но изначальная идея заключалось в том, что при доработке решения может захотеться открывать несколько чертежей одновременно. В целом в юнити создать отдельное окно — это достаточно простая задача. Об этом можно почитать в мануалах Unity. А вот чертёжная сетка – задача поинтереснее. На эту тему есть несколько проблем.
В Юнити несколько стилей, которые влияют на расцветку окон
Дело в том, что большинство использующих Pro версию Unity используют тёмную тему, а во бесплатной версии доступна только светлая. Тем не менее, цвета, которые используются в редакторе чертежей, не должны сливаться с фоном. Тут можно придумать два решения. Сложное – сделать свою версию стилей, проверять её и изменять палитру под версию юнити. И простое — залить фон окна определённым цветом. При разработке было решено использовать простой путь. Пример того, как это можно сделать — вызвать в OnGUI методе такой код.
В сущности мы просто отрисовали текстуру цвета BgColor во всё окно.
Отрисовка и перемещение сетки
Вот тут открылось сразу несколько проблем. Первое, необходимо было ввести свою систему координат. Дело в том, что для корректной и удобной работы нам надо пересчитывать GUI координаты окна в координаты грида. Для этого были реализованы два метода преобразования (в сущности, это две расписанные TRS матрицы)
где _ParentWindow — это окно в котором мы собираемся рисовать сетку, _Offset — текущая позиция грида, а _Zoom — степень приближения.
Во-вторых, для отрисовки линий нам потребуется метод Handles.DrawLine. Класс Handles имеет внутри себя много полезных методов для отрисовки простой графики в окнах редактора, инспекторе или SceneView. На момент разработки плагина (Unity 5.5) Handles.DrawLine – аллоцировало память и в целом работало достаточно медленно. По этой причине количество возможных линий для отрисовки было ограничено константой CELLS_IN_LINE_COUNT , а также сделан “LOD level” при зуме, чтобы добиться приемлемого fps в редакторе.
Для грида почти всё готово. Его движение описывается очень просто. _Offset – это в сущности нынешняя позиция «камеры».
В самом проекте можно ознакомиться с кодом окна в общем и посмотреть, каким образом на окно можно добавить кнопки.
Едем дальше. Помимо отдельного окна для отрисовки чертежей нам надо как-то хранить сами чертежи. Для этого отлично подходит внутренний механизм сериализации Unity – Scriptable Object. По сути, он позволяет хранить описанные классы в виде ассетов в проекте, что очень удобно и нативно для многих юнити разработчиков. Для примера, часть класса Apartment, которая отвечает за хранение информации о планировке в целом
В редакторе он выглядит в текущей версии так:
Тут, конечно, уже применён CustomEditor, но тем не менее можно заметить, что такие параметры, как _Dimensions, Height, IsGenerateOutside, OutsideMaterial и PlanImage отображаются в редакторе.
Все публичные поля и поля, помеченные [SerializeField] – сериализуются (то есть сохраняются в файле в данном случае). Это сильно помогает при необходимости сохранять чертежи, но при работе со ScriptableObject, да и всеми ресурсами редактора необходимо помнить, что лучше для сохранения состояния файлов вызывать метод AssetDatabase.SaveAssets(). Иначе изменения не сохранятся. Если вы только руками не сохраните проект.
Теперь частично разберём класс ApartmentCustomInspector, и то как он работает.
CustomEditor – это очень мощный инструмент, позволяющий решать элегантно множество типовых задач по расширению редактора. В паре с ScriptableObject он позволяет делать простые, удобные и понятные расширения редактора. Этот класс немного сложнее простого добавления кнопок, так как в исходном классе можно заметить, что сериализуется поле [SerializeField] private List _Rooms. Отображение его в инспекторе, во-первых, ни к чему, во-вторых – это может вести к непредвиденным багам и состояниям чертежа. За отрисовку инспектора отвечает метод OnInspectorGUI, и, если вам необходимо просто добавить кнопки, то вы можете вызвать в нём метод DrawDefaultInspector() и все поля будут отрисованы.
Тут же вручную отрисовываются необходимые поля и кнопки. Класс EditorGUILayout в себе имеет много реализаций для самых разных видов полей, поддерживаемых юнити. Но отрисовка кнопок в Unity реализована в классе GUILayout. Как в данном случае работает обработка нажатия кнопок. OnInspectorGUI – отрабатывает на каждое событие пользовательского ввода мышью (перемещение мыши, нажатие клавиш мыши внутри окна редактора и т.п.) Если пользователь сделал клик мышью в баундинг боксе кнопки, то метод возвращает true и отрабатывают методы, которые находятся внутри описанного вами if’a. Для примера:
При нажатии на кнопку Generate Mesh вызывается статический метод, отвечающий за генерацию меша конкретной планировки.
Кроме этих базовых механизмов, используемых при расширении редактора Unity, хотелось бы отдельно отметить очень простой и очень удобный инструмент, про который почему-то многие забывают – Selection. Selection – это статический класс, позволяющий вам выделять в инспекторе и ProjectView необходимые объекты.
Для того, чтобы выбрать какой-то объект, вам просто необходимо написать Selection.activeObject = MyAwesomeUnityObject. И самое прекрасное, что он работает со ScriptableObject. В данном проекте он отвечает за выбор чертежа и комнат в окне с чертежами.
Спасибо за внимание! Надеюсь, статья и проект будут полезны вам, и вы почерпнёте для себя что-то новое в одном из подходов расширения редактора Unity. И как всегда – ссылка на GitHub проект, где можно посмотреть проект целиком. Он пока немного сыроват, но тем не менее уже позволяет делать планировки в 2д просто и быстро.
Источник


