- Codeless IAP
- Implementing Codeless IAP
- Adding IAP Buttons to your Scene
- Populating Products in the IAP Catalog
- Automatically initializing UnityPurchasing
- Purchase fulfillment
- Extended functionality
- Exporting to an app store
- Google Play
- Apple iTunes
- Restore Button
- IAP Listeners
- Restoring Transactions
- Добавление внутриигровых покупок в Unity 3D
- Как встроить внутриигровые покупки в Unity
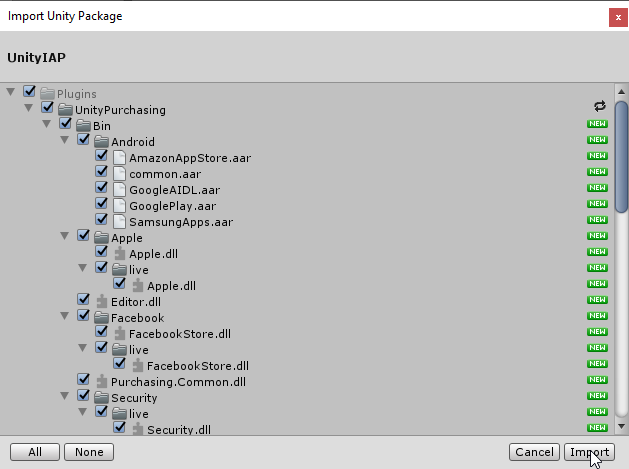
- Импорт плагина.
- Создание покупок.
- Создание и настройка кнопок для покупок.
Codeless IAP
Codeless IAP is the easiest way to implement in-app purchases in your Unity app. The Unity Editor offers an interface for configuring basic IAP integration using minimal script writing.
Codeless IAP handles the actual IAP transaction without requiring any code. Implementing Codeless IAP is a two-step process using the Editor:
The Unity Purchasing system configures the Products you populate in the catalog at run time. When players select an IAP Button, it initiates the purchase flow for the associated Product.
Note: You still need to use scripting to define how players access their newly purchased content. For more information, see the Purchase fulfillment section below.
Implementing Codeless IAP
Before starting, install the latest Unity IAP SDK. See documentation on Setting up Unity IAP for more information.
Adding IAP Buttons to your Scene
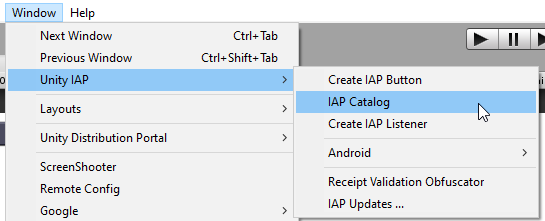
To add an IAP Button to your Scene, in the Unity Editor, select Window > Unity IAP > Create IAP Button.
Creating a Codeless IAP Button in the Unity Editor
Populating Products in the IAP Catalog
Open the IAP Catalog GUI one of two ways:
- Select Window > Unity IAP > IAP Catalog.
- Or, with your IAP Button selected, locate its IAP Button (Script) component in the Inspector A Unity window that displays information about the currently selected GameObject, asset or project settings, allowing you to inspect and edit the values. More info
See in Glossary , then click IAP Catalog….
 Accessing the IAP Catalog GUI through an IAP Button script component
Next, use the GUI to define the following attributes for each Product in your catalog.
- A Product ID with which to communicate to app stores (note that you can override this ID with unique store-specific IDs through the Advanced option).
- A Product Type (Consumable, Non-Consumable, or Subscription).
 Populating Product information in the IAP Catalog GUI
Note: The IAP Catalog GUI provides additional tools for configuring your Products. Before exporting a catalog for upload to its respective store, you must populate description and pricing information as well. For detailed information on these settings, see documentation on Defining Products.
Automatically initializing UnityPurchasing
The IAP SDK must initialize in order for in-app purchasing to work. This occurs automatically when the first instance of a Codeless IAP Button or IAP Listener loads at run time. However, you may need to initialize the SDK before an IAP Button or IAP Listener appears in your game (for example, serving an IAP Promo offer after application launch). In these cases, check Automatically initialize UnityPurchasing (recommended) at the bottom of the IAP Catalog window. This ensures that UnityPurchasing initializes immediately when the application starts, and eliminates dependencies
See in Glossary on the codeless instances’ lifecycles.
 Enabling auto-initialization for the SDK through the IAP Catalog GUI
In order to work, your catalog must contain at least one Product.
Note: You can use auto-initialize together with IAP Buttons or Listeners. In this case, the SDK initializes when the game starts instead of when the first instance of an IAP Button or Listener loads in the Scene A Scene contains the environments and menus of your game. Think of each unique Scene file as a unique level. In each Scene, you place your environments, obstacles, and decorations, essentially designing and building your game in pieces. More info
See in Glossary . However, you should not enable auto-initialize if you also initialize manually in a script, as this may cause errors.
Purchase fulfillment
When your catalog contains at least one Product, you can define IAP Button behavior when the purchase completes or fails.
- Select your IAP Button in the Scene view An interactive view into the world you are creating. You use the Scene View to select and position scenery, characters, cameras, lights, and all other types of Game Object. More info
See in Glossary , then locate its IAP Button (Script) component in the Inspector. - Select the Product to link to the IAP Button from the Product ID drop-down list.

- Create your own function that provides purchase fulfillment, or import an Asset that does this (see code sample, below).
- Apply your purchase fulfilment script to a GameObject The fundamental object in Unity scenes, which can represent characters, props, scenery, cameras, waypoints, and more. A GameObject’s functionality is defined by the Components attached to it. More info
See in Glossary as a component. - Return to the IAP Button (Script) component in the Inspector, and click the plus (+) button to add a function to the On Purchase Complete (Product) list.
- Drag the GameObject with the purchase fulfillment script onto the On Purchase Complete (Product) event field (illustrated below), then select your function from the dropdown menu.


Fulfillment script code sample:
Run your game to test the IAP Button.
Extended functionality
Exporting to an app store
In order for purchases to function, you must configure your catalog on the corresponding app store. To do so, you can export your Product Catalog as a CSV file to Google Play, or as an XML file through Apple’s Application Loader to the iTunes Store.
Google Play
To export your Product Catalog for Google Play:
- In the IAP Catalog window (Window > Unity IAP > IAP Catalog), ensure that each Product has the following defined:
* ID
* Type
* Title and Description
* Price or Pricing Template ID - Scroll down, and select App Store Export.
- Select Google Play CSV.
- Choose a location in which to save the CSV file.
For complete guidance on uploading your exported catalog to Google Play, see the Google in-app billing documentation on the Android Developers website.
Apple iTunes
To export your Product Catalog for Apple iTunes:
- In the IAP Catalog window (Window >Unity IAP >IAP Catalog), ensure that each Product has the following defined:
* ID
* Type
* Title and Description
* Price Tier and Screenshot path
* Apple SKU (found in iTunes Connect)
* Apple Team ID (found on Apple’s developer website) - Scroll down, and select App Store Export.
- Select Apple XML Delivery.
- Choose a location in which to save the XML file.
For complete guidance on importing through Apple’s Application Loader, see the Application Loader documentation on the iTunes Connect website.
Restore Button
Some app stores, including iTunes, require apps to have a Restore button. Codeless IAP provides an easy way to implement a restore button in your app.
To add a Restore button:
- Add an IAP Button to your Scene (Window >Unity IAP >Create IAP Button).
- With your IAP Button selected, locate its IAP Button (Script) component in the Inspector, then select Restore from the Button Type drop-down menu (most of the component’s other fields will disappear from the Inspector view).
When a user selects this button at run time, the button calls the purchase restoration API for the current store. This functionality works on the iOS Apple’s mobile operating system. More info
See in Glossary App Store, the Mac App Store, the Windows Store, Samsung Apps, and the Cloud Moolah app store. You may want to hide the Restore button on other platforms.
If the restore succeeds, Unity IAP Abbreviation of Unity In App Purchase
See in Glossary invokes the On Purchase Complete (Product) function on the IAP Button associated with that Product.
For more information, see the documentation on Restoring purchases.
IAP Listeners
Codeless IAP dispatches successful and failed purchase events to an active IAP Button component in the hierarchy. However, there may be times when it is difficult or undesirable to have an active IAP Button when handling a successful purchase. For example, if a purchase is interrupted before completing, Unity IAP attempts to process the purchase again the next time it is initialized. You may want this to happen immediately after the app launches, in which case an IAP Button wouldn’t make sense. Codeless IAP includes the IAP Listener component precisely for these cases. An active IAP Listener in the Scene hierarchy receives any purchase events that cannot be dispatched to an IAP Button.
To add an IAP Listener:
- In the Unity Editor, select Window > Unity IAP > Create IAP Listener.
- Follow the steps for writing a purchase fulfillment script as a GameObject component.
- Select the IAP Listener in the Scene and locate its IAP Listener (Script) component in the Inspector, then click the plus (+) button to add a function to the On Purchase Complete (Product) list.
- Drag the GameObject with the purchase fulfillment script onto the event field in the component’s Inspector, then select your function from the dropdown menu.

Источник
Restoring Transactions
When a user reinstalls your application they should be granted any Non-Consumable or renewable Subscription products they already own. App stores maintain a permanent record of each user’s Non-Consumable and renewable Subscription products which Unity IAP can retrieve. Non-renewing subscriptions on Apple platforms cannot be restored. If you use non-renewing subscription products on Apple platforms, it is up to you to keep a record of the active subscriptions and sync the subscription between devices.
On platforms that support it (e.g. Google Play and Universal Windows Applications) Unity IAP automatically restores any products the user owns during the first initialization following reinstallation; the ProcessPurchase method of your IStoreListener will be called for each owned item.
On Apple platforms users must enter their password to retrieve previous transactions so your application must provide users with a button letting them do so. During this process the ProcessPurchase method of your IStoreListener will be invoked for any items the user already owns.
Did you find this page useful? Please give it a rating:
Thanks for rating this page!
What kind of problem would you like to report?
Is something described here not working as you expect it to? It might be a Known Issue. Please check with the Issue Tracker at issuetracker.unity3d.com.
Thanks for letting us know! This page has been marked for review based on your feedback.
If you have time, you can provide more information to help us fix the problem faster.
You’ve told us this page needs code samples. If you’d like to help us further, you could provide a code sample, or tell us about what kind of code sample you’d like to see:
You’ve told us there are code samples on this page which don’t work. If you know how to fix it, or have something better we could use instead, please let us know:
You’ve told us there is information missing from this page. Please tell us more about what’s missing:
You’ve told us there is incorrect information on this page. If you know what we should change to make it correct, please tell us:
You’ve told us this page has unclear or confusing information. Please tell us more about what you found unclear or confusing, or let us know how we could make it clearer:
You’ve told us there is a spelling or grammar error on this page. Please tell us what’s wrong:
You’ve told us this page has a problem. Please tell us more about what’s wrong:
Thanks for helping to make the Unity documentation better!
Источник
Добавление внутриигровых покупок в Unity 3D
IAP (In App Purshases) -игровые покупки один из наиболее популярных способов монетизации мобильных приложений. Существует 3 типа покупок: расходуемые, не расходуемые и подписки. Первые два типа понятно из названия, что они могут расходоваться (различные монеты, кристаллы или другая игровая валюта) и приобретаться снова, а другие приобретаются однажды и остаются навсегда(такие, как отключение рекламы, уникальный скин или другой контент). Подписки-это предоставление различного контента за оплату на определенный срок с возможностью постоянно продлевать.
Как встроить внутриигровые покупки в Unity
В этом уроке рассмотрим пошаговый процесс как добавить покупки в Unity3D для приложений под Android и iOS. Начиная с версии Unity 5 появилась поддержка внутриигровых покупок без сторонних плагинов. И на данный момент можно легко внедрить их в игру практически без программирования.
Импорт плагина.
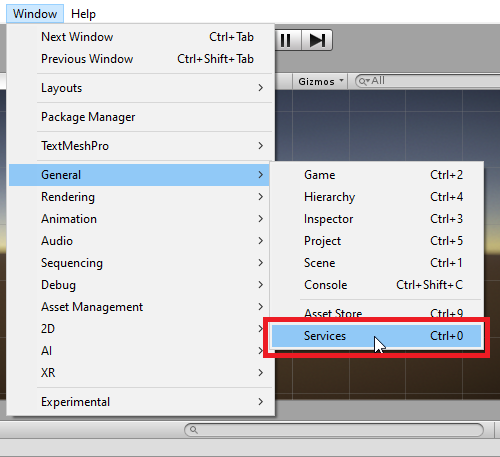
Открываем вкладку Services она находится в меню Window>General>Services.
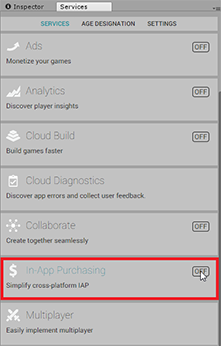
В появившемся окне нажимаем на раздел In-App Purchasing. Далее нажимаем переключатель или жмем по кнопке Enable
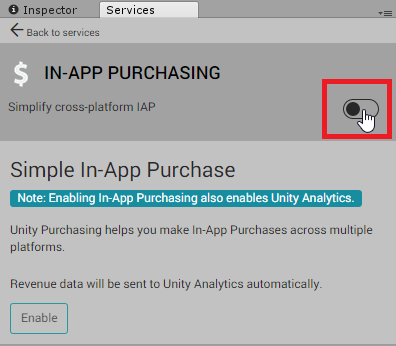
Щёлкаем по кнопке импорт, чтобы загрузить файлы плагина в проект.

Для того чтобы покупки отражались в Unity Analitics необходимо вставить API ключ приложения из Google Play. Получить его можно в консоли разработчика гугл во вкладке Монетизация->Настройка монетизации (если вы используете старую версию консоли Инструменты разработки->Службы и API).
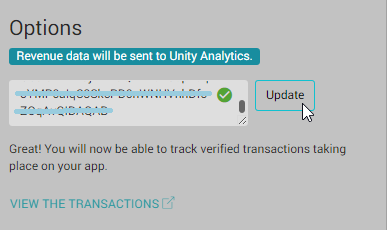
Если Unity выдает ошибку: Please enter the key in a valid format, то попробуйте выключить аналитику в Uniyty сервисах и включить заново, затем открыть ее в браузере нажав кнопку Go to dashboard.
Создание покупок.
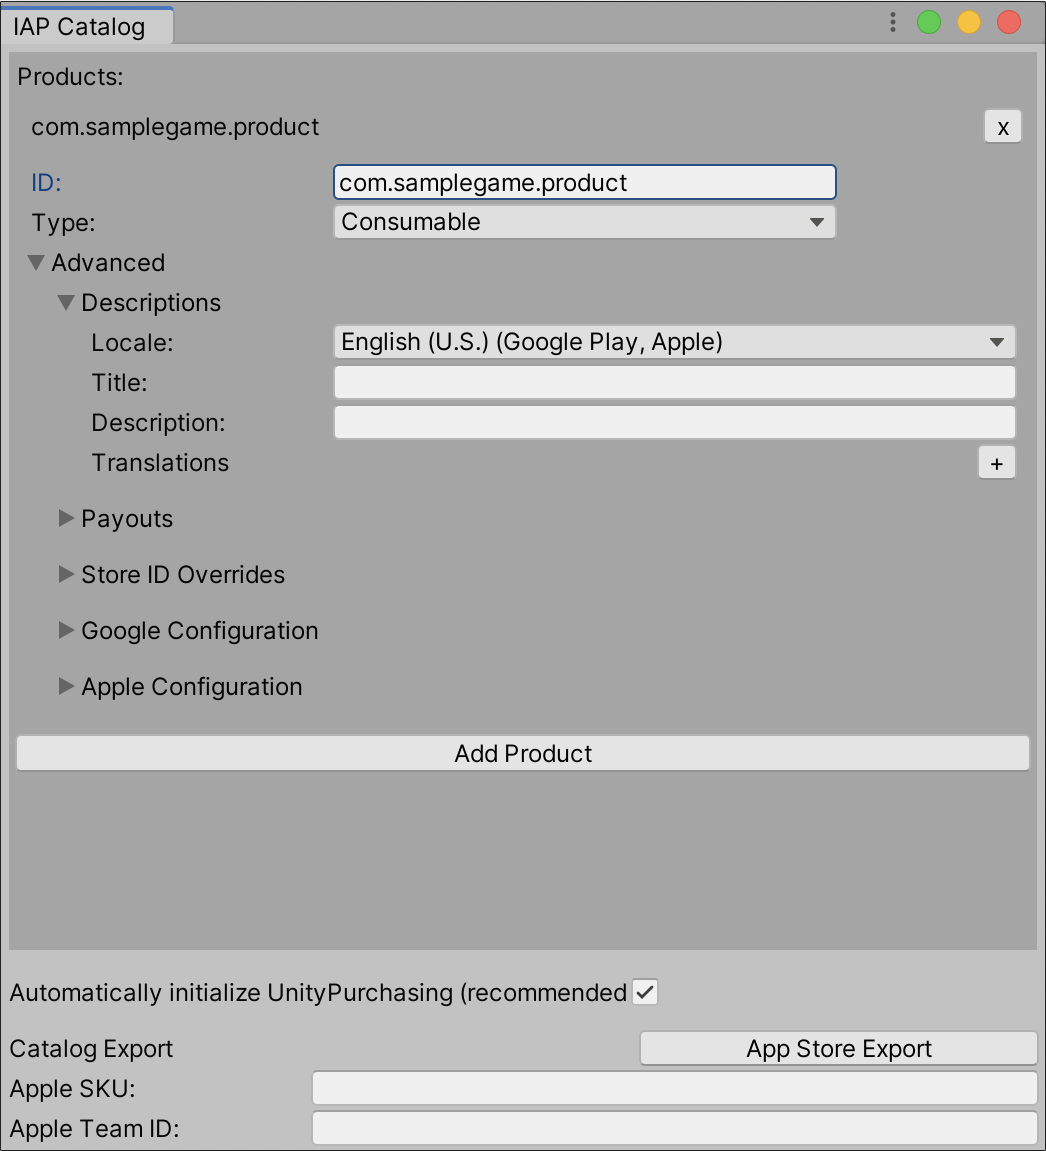
Далее нужно зайти в каталог покупок Window->Unity IAP->IAP Catalog для создания идентификаторов покупок.
В окне IAP Catalog для создания покупки нажимаем кнопку Add Product и вводим ID и выбираем тип покупки. Это может быть consumable, non consumable или Subscription(расходуемые, не расходуемые и подписка).
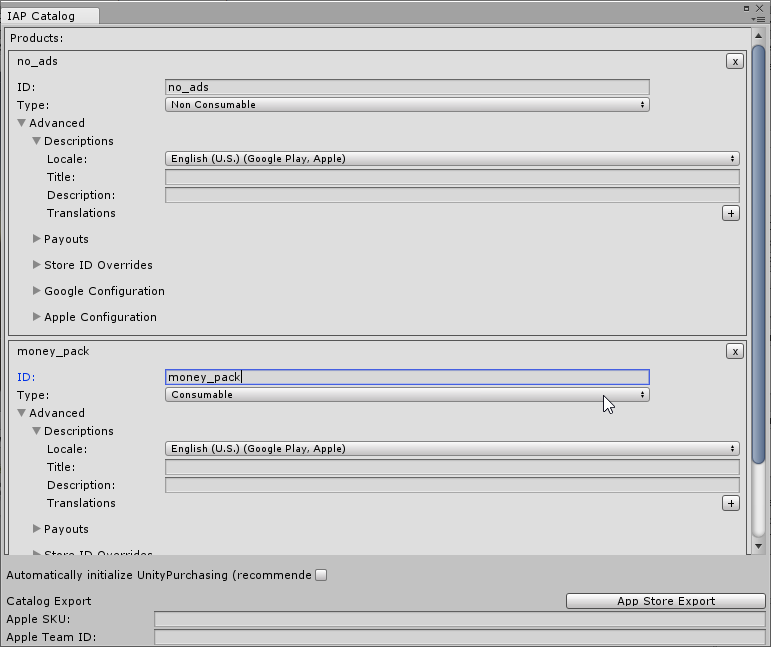
ID покупки для AppStore должен иметь уникальный идентификатор и не повторять уже используемые в других ваших приложениях. Поэтому лучше давать названия не no_ads, а my_game_name_no_ads.
Так же не забудьте добавить покупки с такими же идентификаторами в консоли разработчика AppStore и GooglePlay.
Создание и настройка кнопок для покупок.
Перейдем непосредственно к созданию и настройке самих кнопок для инапов. Создадим интерфейс окна с различными покупками на Canvas-е.
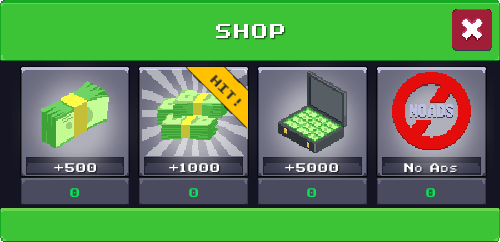
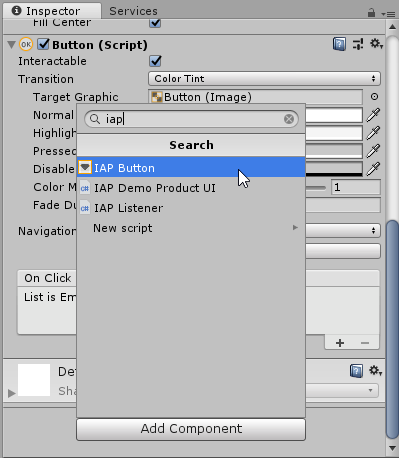
На каждую кнопку добавляем компонент IAP Button.
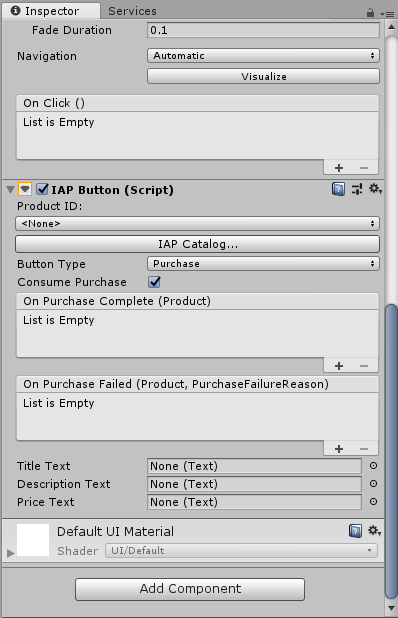
В поле Product ID: выбираем id покупки из тех, что до этого создали. Если это не расходуемая покупка, то снимаем флажок с Consume Purchase. Button Type имеет два значения. Оставляем Purchase, а Restore используется для восстановления покупок на iOS. В поле On Purchase Complete нажимаем на +, чтобы добавить действие выполняемое после успешной процедуры покупки.
Кнопка Restore для восстановления покупок на iOS должна присутствовать в приложении. Иначе вы не пройдете модерацию в AppStore.
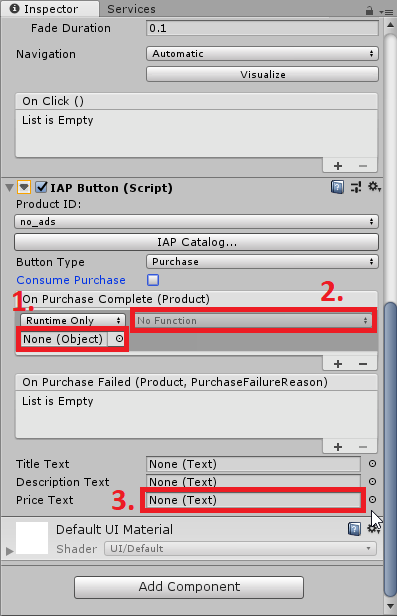
Далее смотрим на скриншот ниже и выполняем следующие действия:
- 1. Сюда перетягиваем GameObject на котором находится ваш скрипт. В нём нужно прописать действия осуществляемые при покупке.
- 2. В этом списке выбираем нужную функцию из вашего скрипта.
- 3. Здесь вы можете указать объект с компонентом Text в котором будет отображаться цена за покупку из консоли GooglePlay и AppStore в валюте той страны, где находится пользователь.
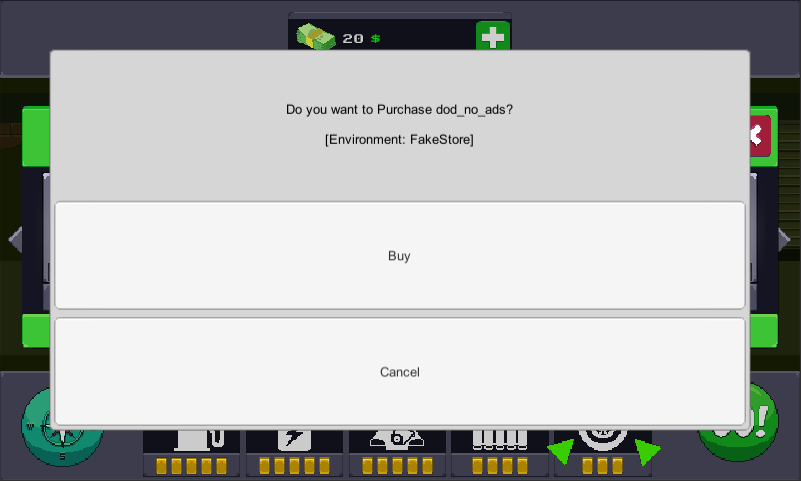
Теперь можете запустить игру в редакторе и протестировать покупку. При нажатии на кнопку выйдет вот такое окно.
Смотреть подробный видео урок по интеграции Покупок в Unity3D:
На этом всё. Если у вас есть какие-то вопросы или вы заметили не точность, то пишите в комментарии. Всем больших внутриигровых продаж. Рекомендую также почитать статью про способы монетизации мобильной игры. Спасибо за внимание!:)
Источник


