Проблема с библиотекой SerialPort
Пытаюсь написать приложение (авиаприборы) для андроида в среде UNITY.
Опыта программирования на СИ-подобных языках — нет.
Немного пишу на Ассемблере для AVR-микроконтроллеров — представление о программировании в целом есть.
Задача:
В COM-Port андроид-устройства поступают бинарные данные
( Посылаю из микроконтроллера пакеты данных с телеметрией, в собственном протоколе. )
Пакеты разделены временными паузами.
На данный момент это два чередующихся пакета. ( В дальнейшем пакетов будет больше )
Каждый пакет имеет двухбайтовый заголовок.
Требуется по приходу пакета, сравнивать CRC, определять тип пакета, расшифровывать данные и выводить на дисплей.
До этого писал ( пытался ) в VisualStudio — там вопросов не возникло с приемом данных ( библиотеки работают )
Но VisualStudio скорей всего не очень подходит для работы с графикой..
В дальнейшем к данным будут привязаны 3D объекты (авиаприборы) — по этому и была выбрана среда UNITY.
Но в Unity проблема с библиотеками работающими с ком-портом. (кастрированная библа Serial-Port’а)
Данные приходится опрашивать вручную..
Хочется, что функция вызывалась по приходу каждого пакета.
На зарубежных форумах пишут, что нужно подключать сторонние либы либо отказываться от юнити.
Полез в сеть искать либы:
Нашел какую то либу от erdemkosk
но ни как не пойму как ее подключить и использовать.
никакой инструкции нет, и опыта нет — и я в тупике
библа тут https://github.com/erdemkosk/U. ortUtility
Потом установил библу Ardity ( ранее назывался SerialCommUnity )
установил, попробовал собрать по примеру, который прилагается в «Setup Guide»
Все работает, все замечательно, НО:
1) данные расшифровываются юникодом, а мне этого не надо — мне бы в HEX
2) программа ждет символов «переноса каретки» (CR+LF) а в моем случае нет таких символов, у меня максимум что есть временная пауза между пакетами, и довольно длительная, в будущем ее может и не стать — я планировал отслеживать сообщения по заголовку пакета.
Ardity (покопавшись нашел внутри нужный скрипт) позволяет читать компорт в хекс-виде и с временным разделителем между сообщениями, но запустить программу с данным кодом я не смог.
Инструкций снова нет, примеров в сети я не нашел и снова в тупике..
Других бесплатных библиотек я не нашел.
Есть платные, есть дорогие и не очень..
Ест платная версия Unity.
Но нигде нет гарантий, что там будет то что мне надо..
А если и будет, то не факт что я быстро с этим разберусь..
Источник
Unity serial port android
Copy raw contents
Unity Android Serial Finder
A simple API designed to simplify the communication between Unity 3D and Arduino Compatible Boards.
The basis of this API is that both Arduino and Unity projects share a Handshake code, it is a simple way to connect to Arduino Devices without knowing previously the Serial Port (e.g. «COM3»). It can also be used to give different «names» per Arduino Board.
The Library also handles a thread for continous reading/writing from the SerialPort (in Unity Net 2.0).
Download the directory from this Github Page and follow the steps on bellow (for each Arduino and Unity 3D).
- Copy the files inside the folder SerialFinder _ Arduino to your Arduino Code’s Folder, for example called «mySketch».
- Then inside your «/mySketch/» directory you must have the following files:
- SerialFinder.cpp
- SerialFinder.h
- keywords.txt
- In your sketch’s main code include the library, using:
- Copy the file Arduino.cs from SerialFinder _ Unity to your project assets folder. That’s all 🙂
- Create a SerialFinder variable that is global:
- The Handshake Code is defined in the Constructor, in this example it’s «CODE» :
- Another way to initialize the SerialFinder is define an Input Handshake and an Output Handshake, this way the Arduino will only respond to specific Unity Programs:
- Inside the loop method we will respond for the first Handshake request, calling the method findMe():
A good aproach is to extend the class Arduino (this already extends a MonoBehavior):
The Unity Plugin provides few ways to open a connection:
- Simple Connection: The first one is the most simple, where you don’t really defines a HandShake. Instead, it opens a direct Serial Connetion and Handles the Thread for input/output data:
- Single Handshake: this way Unity will send a default handshake to arduino and what to a set response:
- Double Handshake: this way Unity sends a code to the Arduino and waits a specific response.
In the case you only want to know if a port is connected and also responds to specified handshaks use one of the methods bellow, both will return «COM#» where # is the Port Number, or null if there is no device connected:
Read Data From Serial
As an extension of the Arduino class, the main connection class can implement the
Write Data to Serial
- (Feb 2015) — Main Classes created for Arduino
- (April 2016) — Implementation of simple connection Method
- Implement Write Method on Unity — Arduino.cs
- Test on Linux OS
- Test on Mac OS
Under MIT License
Copyright (c) 2015-2016 Lucas Cassiano
Permission is hereby granted, free of charge, to any person obtaining a copy of this software and associated documentation files (the «Software»), to deal in the Software without restriction, including without limitation the rights to use, copy, modify, merge, publish, distribute, sublicense, and/or sell copies of the Software, and to permit persons to whom the Software is furnished to do so, subject to the following conditions:
The above copyright notice and this permission notice shall be included in all copies or substantial portions of the Software.
THE SOFTWARE IS PROVIDED «AS IS», WITHOUT WARRANTY OF ANY KIND, EXPRESS OR IMPLIED, INCLUDING BUT NOT LIMITED TO THE WARRANTIES OF MERCHANTABILITY, FITNESS FOR A PARTICULAR PURPOSE AND NONINFRINGEMENT. IN NO EVENT SHALL THE AUTHORS OR COPYRIGHT HOLDERS BE LIABLE FOR ANY CLAIM, DAMAGES OR OTHER LIABILITY, WHETHER IN AN ACTION OF CONTRACT, TORT OR OTHERWISE, ARISING FROM, OUT OF OR IN CONNECTION WITH THE SOFTWARE OR THE USE OR OTHER DEALINGS IN THE SOFTWARE.
Источник
Unity serial port android
Unity Android Serial Finder
A simple API designed to simplify the communication between Unity 3D and Arduino Compatible Boards.
The basis of this API is that both Arduino and Unity projects share a Handshake code, it is a simple way to connect to Arduino Devices without knowing previously the Serial Port (e.g. «COM3»). It can also be used to give different «names» per Arduino Board.
The Library also handles a thread for continous reading/writing from the SerialPort (in Unity Net 2.0).
Download the directory from this Github Page and follow the steps on bellow (for each Arduino and Unity 3D).
- Copy the files inside the folder SerialFinder _ Arduino to your Arduino Code’s Folder, for example called «mySketch».
- Then inside your «/mySketch/» directory you must have the following files:
- SerialFinder.cpp
- SerialFinder.h
- keywords.txt
- In your sketch’s main code include the library, using:
- Copy the file Arduino.cs from SerialFinder _ Unity to your project assets folder. That’s all 🙂
- Create a SerialFinder variable that is global:
- The Handshake Code is defined in the Constructor, in this example it’s «CODE» :
- Another way to initialize the SerialFinder is define an Input Handshake and an Output Handshake, this way the Arduino will only respond to specific Unity Programs:
- Inside the loop method we will respond for the first Handshake request, calling the method findMe():
A good aproach is to extend the class Arduino (this already extends a MonoBehavior):
The Unity Plugin provides few ways to open a connection:
- Simple Connection: The first one is the most simple, where you don’t really defines a HandShake. Instead, it opens a direct Serial Connetion and Handles the Thread for input/output data:
- Single Handshake: this way Unity will send a default handshake to arduino and what to a set response:
- Double Handshake: this way Unity sends a code to the Arduino and waits a specific response.
In the case you only want to know if a port is connected and also responds to specified handshaks use one of the methods bellow, both will return «COM#» where # is the Port Number, or null if there is no device connected:
Read Data From Serial
As an extension of the Arduino class, the main connection class can implement the
Write Data to Serial
- (Feb 2015) — Main Classes created for Arduino
- (April 2016) — Implementation of simple connection Method
- Implement Write Method on Unity — Arduino.cs
- Test on Linux OS
- Test on Mac OS
Under MIT License
Copyright (c) 2015-2016 Lucas Cassiano
Permission is hereby granted, free of charge, to any person obtaining a copy of this software and associated documentation files (the «Software»), to deal in the Software without restriction, including without limitation the rights to use, copy, modify, merge, publish, distribute, sublicense, and/or sell copies of the Software, and to permit persons to whom the Software is furnished to do so, subject to the following conditions:
The above copyright notice and this permission notice shall be included in all copies or substantial portions of the Software.
THE SOFTWARE IS PROVIDED «AS IS», WITHOUT WARRANTY OF ANY KIND, EXPRESS OR IMPLIED, INCLUDING BUT NOT LIMITED TO THE WARRANTIES OF MERCHANTABILITY, FITNESS FOR A PARTICULAR PURPOSE AND NONINFRINGEMENT. IN NO EVENT SHALL THE AUTHORS OR COPYRIGHT HOLDERS BE LIABLE FOR ANY CLAIM, DAMAGES OR OTHER LIABILITY, WHETHER IN AN ACTION OF CONTRACT, TORT OR OTHERWISE, ARISING FROM, OUT OF OR IN CONNECTION WITH THE SOFTWARE OR THE USE OR OTHER DEALINGS IN THE SOFTWARE.
About
Unity Arduino Serial Port Finder Library to make easy a Serial connection between Unity Desktop Apps and Arduino Compatible Boards
Источник
How to integrate Arduino with Unity
In this tutorial you will learn how Unity and Arduino can communicate using the serial port. This tutorial requires both C# and Arduino scripts; the labels Unity and Arduino will be used to avoid confusion.
The topic of connecting Arduino to Unity is further expanded in Asynchronous Serial Communication, where you can also download the entire Unity package.
Step 0: Configuring…
The communication between Arduino and the PC is mediated using the serial port. This method is the default one to upload sketches, so we’ll be using it also to exchange messages with Unity. If this is the first time you are doing it, you’ll need to follow these extra steps.
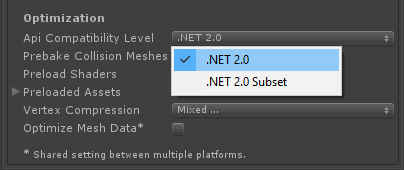 Unity The class SerialPort is the one that mediates such communication in C#. However, Unity doesn’t usually include the necessary libraries to use it. To compensate for this, we need to force Unity to include the full .NET 2.0 library in its executables:
- Go on Edit | Player Settings to open the PlayerSettings in the inspector;
- From Optimization, look for Api Compatibility Level and select .NET 2.0.
Arduino Arduino doesn’t come with a sophisticated library for the serial port. While C# has all the expected functions to send strings, Arduino simply doesn’t. This is very frustrating and is often a strong limitation for beginners. To compensate this, I’ll be using Steven Cogswell‘s ArduinoSerialCommand library. Follow these steps to install it:
- Download the entire repository by clicking “Download ZIP” from its GIT page;
- Extract the ZIP file and place its content in C:\Users\ \Documents\Arduino\SerialCommand\ (make sure that folder contains the SerialCommand.cpp file);
- Restart the Arduino IDE.
Step 1: Opening…
Unity To initialise the serial port in C#, we need its address (or port) and speed (also called baud rate).
While the baud rate is determined by the Arduino code, we cannot chose the name for the serial port. It is automatically assigned by the OS depending on which device and port you are using.
Arduino Now that SerialCommand has been installed, we can use it in our sketch. The library allows to specify commands that can be received on the serial port. For this toy example, we want to define a command called “PING”. When we receive such string from Unity, we’ll send a “PONG” back. Let’s start by defining the command; its code will be stored in the pingHandler function.
The 9600 used to initialise the serial port represents its baud rate. This value must match the one used in the C# script.
Step 2: Writing…
Unity Writing a string to the serial port in C# is relatively easy.
If there is a problem, WriteLine will throw a IOException (read more here). We flush the stream to make sure the data it sent to the Arduino, without any buffering. Following our toy protocol, we should send a “PING” to Arduino.
Arduino As discussed before, the SerialCommand library takes care of reading strings from the serial port for us. To do this, we need to update the loop function.
The function readSerial is the one where the magic happens; it reads strings from the serial port and invokes the right handler. If it receives a “PING”, it will execute pingHandler :
This will write “PONG” on the serial port. You can also use Serial.println to send data from Arduino to Unity at any time.
Step 3: Reading…
Unity Reading from the serial port is theoretically as easy as writing, since C# offers a very intuitive stream.ReadLine() function.
However, there’s a catch. How long do you want to wait for before considering the read failed? If you are waiting indefinitely for Arduino to send data, this might block the execution of your program. Reading from the serial port is, essentially, a system call and can introduce lag. A lot of lag. To avoid this, we should do very quick reads alternated by quick waits. In order to implement an asynchronous waiting mechanism, we have to use coroutines.
Which can be invoked like this:
The code below starts the AsynchronousReadFromArduino coroutine, passing three arguments. The first one is a function (created on the spot) which get the string read from Arduino and logs it. The second one is a callback if the reading fails, and the third one is the timeout (10 seconds).
Arduino There are cases in which you might want to send parameters from Unity to Arduino. Let’s do this with an echo function.
We can use the function next to get the next argument provided on the serial command. For instance, if we send from Unity “ECHO message”, “message” will be the first parameter. If next returns NULL , it means there are no more parameters.
Step 4: Communicating…
Now that all the pieces are here, you just have to implement your own communication protocol. Arduinos are usually used as sensors, constantly sending updates to Unity. If this is your case, you should not make the mistake of doing something like this:
Is very likely that this will overflow the serial port buffer, causing either a crash or a severe lag. What you should do instead is creating a protocol in which Arduino is sending data only when is queried by a “PING” from Unity. This ensures data is always fresh and minimises lags.
Downloads
This article presented a simple, yet effective way to connect Arduino with Unity. The necessary files are available for download on Patreon, in two versions:
- Basic Version: The Unity and Arduino code presented in this tutorial.
- Advanced Version: A complete library to fully integrate Unity and Arduino which users thread for an efficient two-ways asynchronous communication. This solution is discussed in the post titled Asynchronous Serial Communication.
Conclusion
Last year at GDC a guy approached me and asked my opinion about UNIDUINO, an extension to connect Arduino with Unity. It was only after I said something on the line of “I would never pay so much to use it” that he introduced himself as the creator. Despite this not-so-great start, our conversation highlighted an important issue when it comes to development: how much time are you willing to invest into something? Many software developers have little to no experience with hardware, and they rather spend €32 than a week of headaches to connect Unity to Arduino. To mis quote Mike Bithell during his talk at Develop Brighton a couple of years ago, some developers have “more money than time“, If you are going to use an Arduino for your project, you definitely need to invest some money in it. But if you think paying for an extension is out of your budget, this tutorial is definitely here to help. Despite not providing the full range of functions of UNIDUINO, it is surely a good starting point which will suit the majority of applications.
How to start with Arduino
The most annoying part of working with hardware is that you’ll constantly need new components to build things. If you are new to Arduino, my advice is to start with the Arduino Starter Kit . It has a lot (I mean… a lot!) of components and it comes with some great instructions. If you have a little bit more experience, you might want to buy the components you need separately. In this case, the Arduino Uno is the “default” option you should go for.
If you have already experience with hardware, I advise you to start using Teensy 3.1 instead. It’s a micro-controller fully compatible with the Arduino IDE. It’s compact and more powerful, although it usually doesn’t come with pins. There’s also a Teensy 3.1 Starter Kit which comes with a very bright Color LCD screen. I also suggest a book I particularly liked: 30 Arduino Projects for the Evil Genius . I got it few years ago and it helped me to understand how to use all the most common components.
💖 Support this blog
This websites exists thanks to the contribution of patrons on Patreon. If you think these posts have either helped or inspired you, please consider supporting this blog.
Источник


