- How to unlock your iPhone for use with a different carrier
- Contact your carrier
- If you have a SIM card from a carrier other than your current carrier
- If you don’t have another SIM card to use
- Get help
- If you forgot your iPhone passcode
- Step 1: Make sure that you have a computer (Mac or PC)
- Step 2: Turn off your iPhone
- Step 3: Put your iPhone in recovery mode
- Step 4: Restore your iPhone
- Need more help?
- Единственный законный способ разблокировать iPhone
- How to Unlock iPhone with iTunes
- Part 1: How to Unlock iPhone with iTunes
- Part 2: How to Unlock iPhone without iTunes/Passcode
- Conclusion
How to unlock your iPhone for use with a different carrier
Unlocking your iPhone means that you can use it with different carriers.
Your iPhone might be locked to your carrier. Unlocking your iPhone means that you can use it with different carriers. To contact your carrier and unlock your iPhone, use these steps.
If you don’t want to switch carriers and your device is locked because you forgot the passcode, then you don’t need to use the steps in this article. Learn how to reset your passcode.
Apple can’t unlock your iPhone for use with a different carrier. Only your carrier can unlock your iPhone.
Contact your carrier
- Only your carrier can unlock your iPhone. Contact your carrier and request an unlock. Your account might need to meet requirements for unlocking. After you submit the request, it might take a few days to complete. Contact your carrier to check the status of your unlock request.
- After your carrier confirms that they unlocked your iPhone, follow the steps below.
If you have a SIM card from a carrier other than your current carrier
Use these steps to finish unlocking your iPhone:
- Remove your SIM card.
- Insert the new SIM card. Your device will activate.
If you don’t have another SIM card to use
Use these steps to finish unlocking your iPhone:
Get help
You might see this message on your computer or on your iPhone: «The SIM card inserted in this iPhone does not appear to be supported. Only compatible SIM cards from a supported carrier may be used to activate iPhone. Please insert the SIM card that came with your iPhone or visit a supported carrier store.»
If you see this message on your device with iOS 14, use these steps:
- Go to Settings > General, and tap About.
- Under Carrier Lock, you should see a message that says «No SIM restrictions.» If you don’t see that message, contact your carrier.
If your device is on iOS 13 or earlier, use these steps:
- Contact your carrier to make sure that they applied the unlock in their system.
- Restore your iPhone to factory settings.
- Restore your iPhone from a backup.
Источник
If you forgot your iPhone passcode
Forgot your iPhone passcode? Learn how to get your iPhone into recovery mode so you can erase it and set it up again.
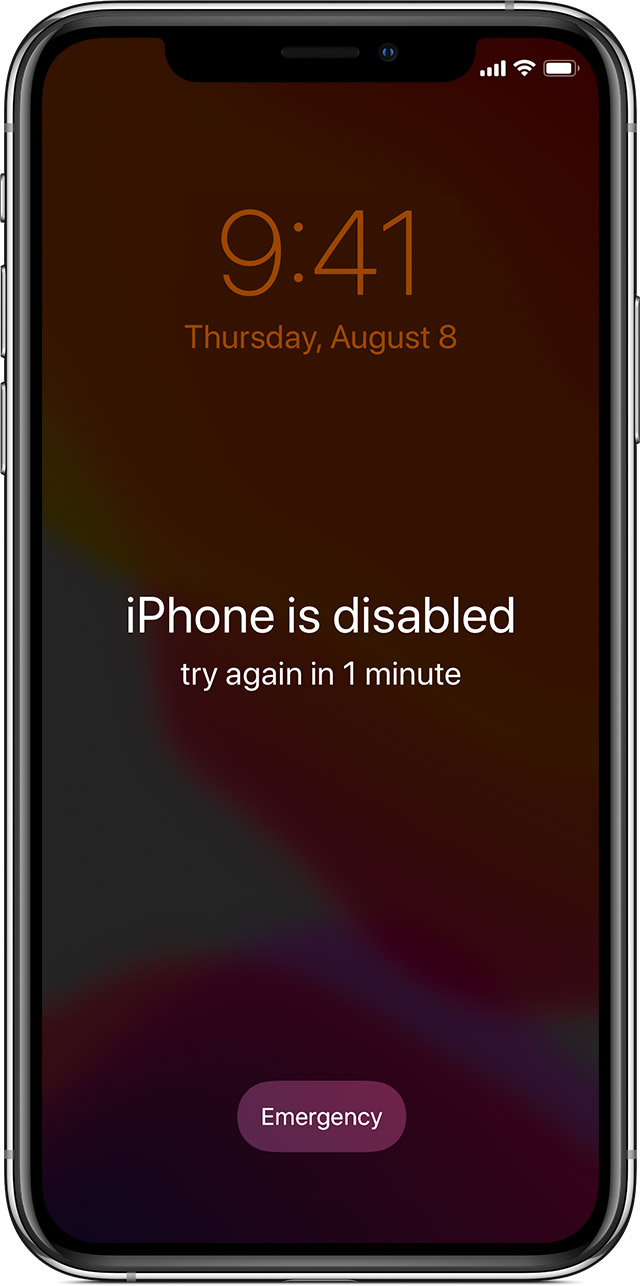
If you enter the wrong passcode on your iPhone Lock Screen too many times, an alert lets you know that your iPhone is disabled. If you can’t remember your passcode when you try again, you need to use a computer to put your iPhone in recovery mode. This process deletes your data and settings, including your passcode, giving you access to set up your iPhone again.
After you erase your iPhone, you can restore your data and settings from backup. If you didn’t back up your iPhone, you can set it up as a new device and then download any data that you have in iCloud.
![]()
Step 1: Make sure that you have a computer (Mac or PC)
This process requires a Mac or PC. If you’re using a PC, make sure that it has Windows 8 or later, and that iTunes is installed. You also need the cable that came with your iPhone, or another compatible cable, to connect your iPhone to the computer.
If you don’t have a computer and you can’t borrow one, you need to go to an Apple Retail Store or Apple Authorized Service Provider for help.

Step 2: Turn off your iPhone
- Unplug your iPhone from the computer if it’s connected.
- Turn off your iPhone using the method for your iPhone model:
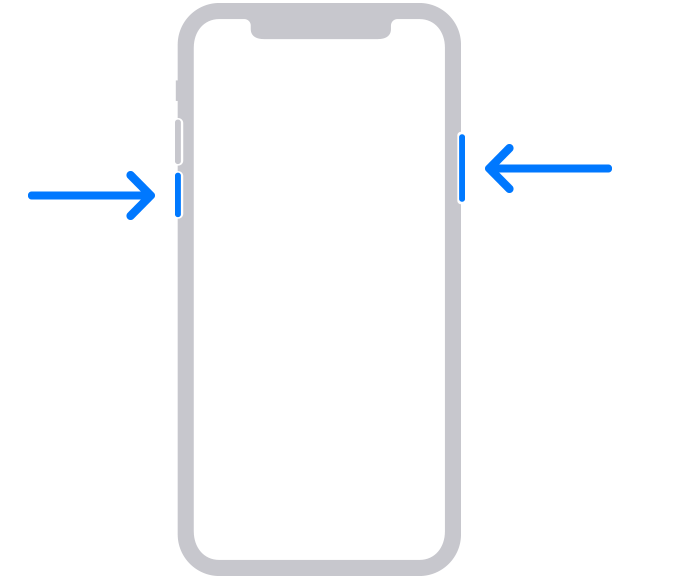
- iPhone X or later, iPhone SE (2nd generation), iPhone 8, and iPhone 8 Plus: Press and hold both the Side button and the Volume down button until the power off slider appears.

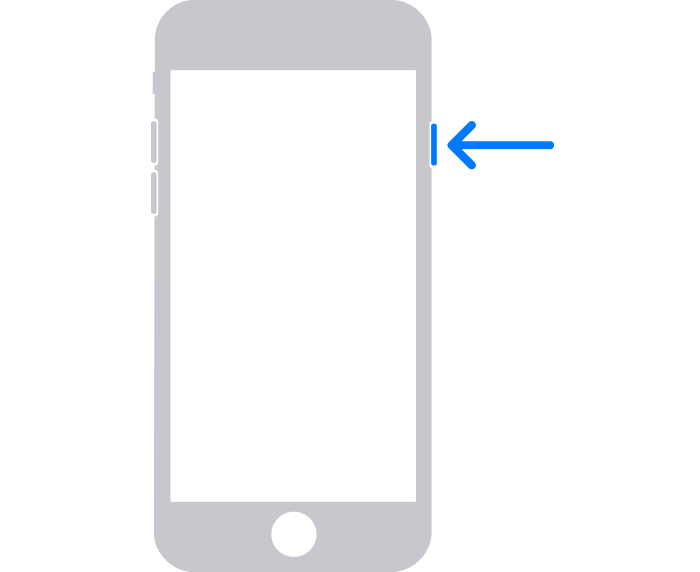
- iPhone 7 and iPhone 7 Plus: Press and hold the Side button until the power off slider appears.
- iPhone SE (1st generation), and iPhone 6s and earlier: Press and hold the Side (or Top) button until the power off slider appears.
- iPhone X or later, iPhone SE (2nd generation), iPhone 8, and iPhone 8 Plus: Press and hold both the Side button and the Volume down button until the power off slider appears.
- Drag the slider to turn off your iPhone, then wait a minute to make sure that it turns off completely.

Step 3: Put your iPhone in recovery mode
- Get ready by finding the button on your iPhone that you’ll need to hold in the next step:
- iPhone X or later, iPhone SE (2nd generation), iPhone 8, and iPhone 8 Plus use the Side button.
- iPhone 7 and iPhone 7 Plus use the Volume down button.
- iPhone SE (1st generation), and iPhone 6s and earlier use the Home button.
- Press and hold the correct button for your iPhone while immediately connecting your iPhone to the computer. Don’t let go of the button.
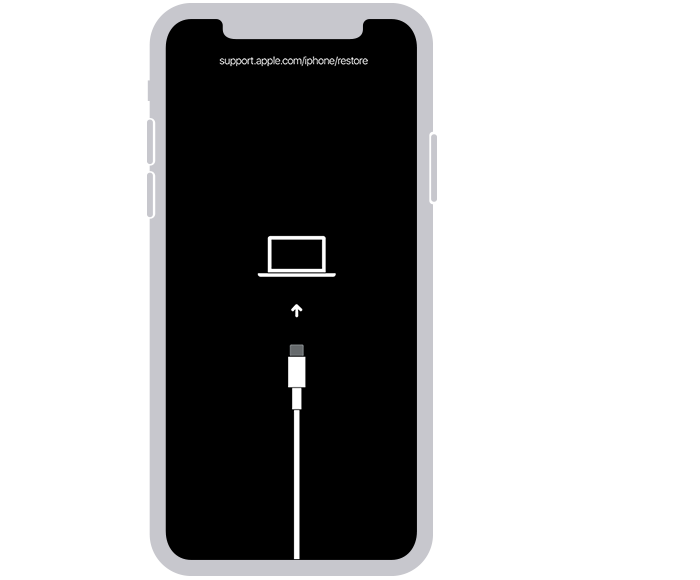
- Keep holding the button until you see the recovery mode screen on your iPhone, then let go.
If you see the passcode screen, you need to turn off your iPhone and start again.
If you can’t get your iPhone to show the recovery mode screen and you need help, contact Apple Support.
Step 4: Restore your iPhone
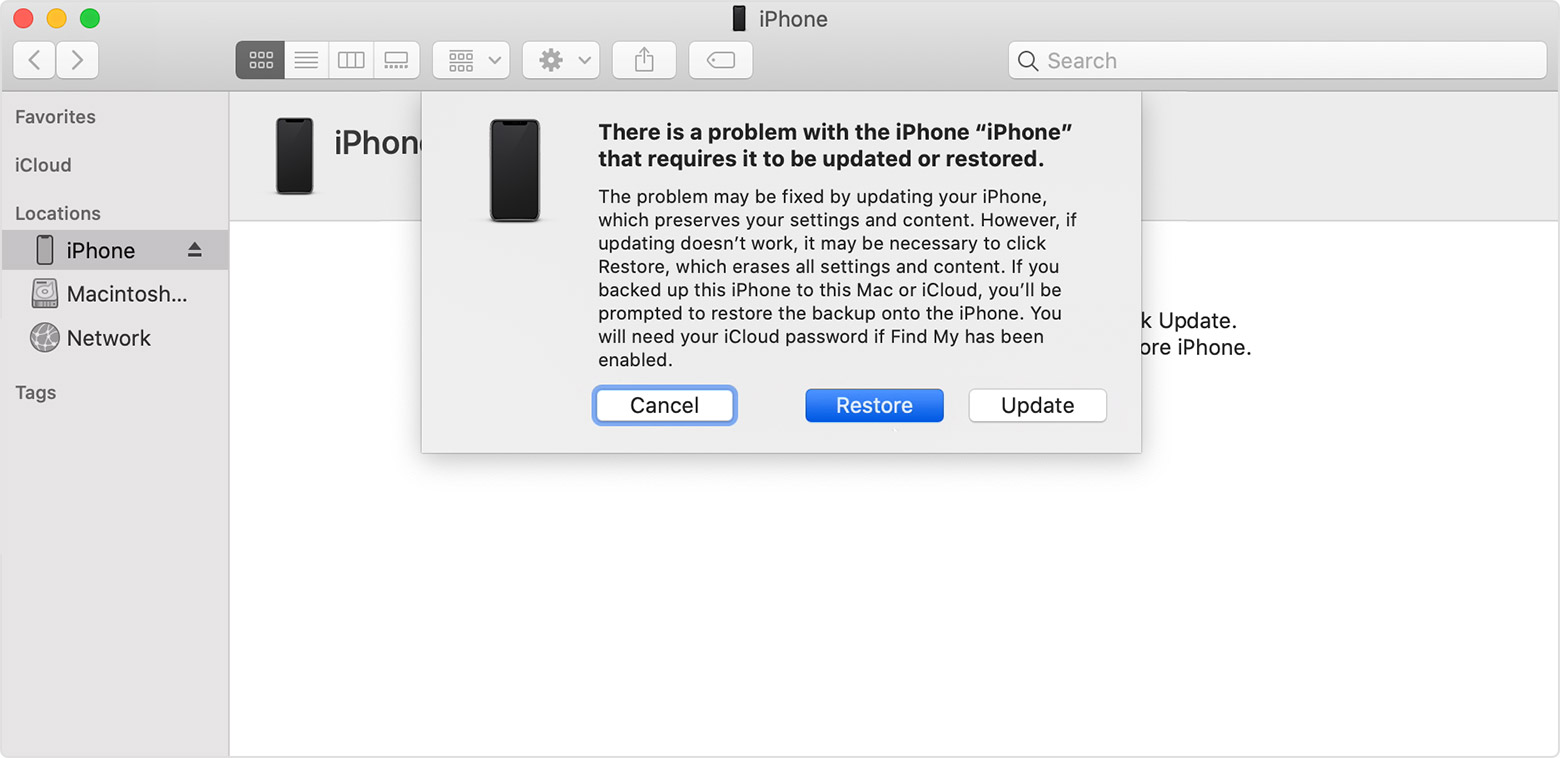
- Locate your iPhone in the Finder or in iTunes on the computer that it’s connected to. (Learn how to find your connected iPhone.)
- Choose Restore when you see the option to Restore or Update. Your computer downloads software for your iPhone and begins the restore process. If the download takes more than 15 minutes and your device exits the recovery mode screen, let the download finish, then turn off your iPhone and start again.
- Wait for the process to finish.
- Disconnect your iPhone from the computer, then set up and use your iPhone.
Need more help?
If you can’t complete any of these steps, if you’re still prompted for a passcode, or if you need any other assistance, contact Apple Support.
Источник
Единственный законный способ разблокировать iPhone
На сегодняшний день владельцы продуктов от “Apple” все чаще и чаще стыкаются с проблемой на счет разблокировки iPhone. Существует множество подходов решения данной проблемы, но зачастую пытаются разблокировать аккаунт, прошить телефон или же просто сбросить настройки устройства. Данный тип блокировки называется блокировка ID или блокировка iCloud.

Для чего же нам нужна блокировка устройства? Ответ простой: для того, что бы уберечь телефон от кражи или же распостранением персональной информации в случаи потери телефона. С помощью блокировки данных и телефона, число краж айфонов значительно уменьшилась, ведь нет смысла воровать заблокированый телефон, а чтобы продать телефон на запчасти нужно потратить больше времени и усилий.
Блокировка подразумевает следующие ситуации:
- Вы забыли пароль разблокировки девайса;
- На экране отображается сообщение об утере или кражи телефона;
- Вы не знаете Apple ID.
Существует несколько способов снять блокировку. Первое – это снятие блокировки с помощью приложения iTunes.
Достаточно просто перейти в раздел «Настройки», найти свой девайс и перейти к его обзору, и затем перейти на вкладку «Восстановить».
Достаточно воспользоваться ссылкой https://www.icloud.com/#find; и ввести пароль и ID, после входа на сайт. Следующее, вам необходимо удостовериться, что система ищет Ваш девайс. После этого нажмите кнопку «Стереть» и Ваш телефон разблокирован.

Если же вы являетесь владельцем продукта от “Apple” и при этом не знаете ID, и при включении устройство требует ввести старый логин и пароль (почту и пароль под звездочками), необходимо , в первую очередь, найти чек и следовать следующим инструкциям:
- Попробуйте вспомнить хотя бы начальные буквы или слова логина почты. Возможно, телефон покажет логин в полном виде и домен, на котором она зарегистрирована. Следом, с помощью этой почты, Вы сможете заказать сброс пароля через официальный сайт Apple ID.
- Если же, Вам не удалось вспомнить логин почты, перейдете по ссылке, но учтите, что Вам следует указать Вашу фамилию, имя и отчество, а также дату рождения.
- Будьте готовы отвечать на контрольные вопросы, которые задавались при регистрации Apple ID. С их помощью, Вам удастся ускорить процесс разблокирования телефона, и Вы сможете ускорить работу службы поддержки Apple.
- Регистрация Apple также проходит по номеру телефона. Поэтому, если Ваш указанный номер еще функционирует, он может стать одним из главных инструментов быстрой разблокировки устройства.
- Если все-таки у Вас возникли сложности при самостоятельной разблокировки телефона, советуем Вам обратиться в службу поддержки, в которую Вы сможете позвонить по номеру 88005556734. Работники кол центра постараются как можно быстро решить Вашу проблему, но при условии наличия максимально достоверной информации. Поэтому, отвечайте на вопросы честно, чтобы избежать проблем и задержек в процессе. Также необходимо помнить, что вся информация передается в службу безопасности, где ее анализируют и проверяют. В службе безопасности Вас попросят еще раз ответить на контрольные вопросы при регистрации, предоставить Вашу личную информацию и сопутствующую информацию, которая поспособствует быстрому решению данной проблемы.
- И самое грустное, что может случиться в процессе решения проблемы, это предоставление чека, который подтвердит, что покупку совершали именно Вы, и что покупка принадлежит именно Вам.
С помощью чека, служба сможет сделать запрос в магазин, который подтвердит достоверность информации. В чеке указана информация дату совершения покупки, персональная информация покупателя, страна, в которую поставлялся продукт и точное местонахождение магазина. Вся эта информация также подается в базу данных, и если эта информация не совпадает указанной, значит чек поддельный, и он, соответственно отсеивается. Если чек поддельный, служба в праве отказать Вам в помощи и предоставит Вам официальный отказ или же попросит предоставить иные документы, подтверждающие покупку.
Если же чек оказался настоящим, тогда можем Вас поздравить! В таком случае, блокировка на сервере будет удалена, и Вам также предоставят инструкцию как правильно прошить телефон, сбросить настройки и сбросить пароль.
Перечень требований товарного чека:
Бывают случаи, когда чек по каким-то причинам может быть нечитабельным. Например, он выгорел под воздействием солнечных лучей или же Вы на него что-то пролили. В таких случаях, рекомендуем обратиться к продавцу, который сможет предоставить оригинал чека.
- Наличие необходимой информации.
В чеке должна быть информация о магазине, сайте, локации, а также должен быть номер аппарата. Иными словами ⸺ серийный номер. Не путайте серийный номер устройства с кодом IMEI. Если в чеке не указан серийный номер, Вы сможете написать его от руки в чек.
Если же Вам удалось добыть «правильный» чек, далее Вам необходимо сфотографировать только чек. На фотографии не должно быть посторонних предметов, и информация на фотографии должна быть читабельной, поэтому обратите внимание на качество и освещение.
Затем, фотографии поместите на рабочий стол, что бы во время звонка Вы смогли максимально быстро отправить фотографии в службу.
Собрав всю необходимую информацию, обращаемся в службу поддержки по номеру, указанному выше и просим разблокировать телефон по чеку.
Служба поддержки еще раз попросит Вас выполнить следующие шаги:
- Адрес электронной почты, куда необходимо отправить файлы;
- Потом служба поддержки отправляет ссылку, по которой необходимо перейти и ввести Apple ID и пароль;
- Выбираете необходимые файлы, то есть фотографии чеков;
- В момент получения фотографий чека, служба начинает анализировать чек и проверять его по базе на достоверность информации;
- Следующее, оператор предложит Вам ожидать ответа сроком от 2 до 5 дней;
- Далее, развитие событий имеет 2 варианта: либо вы получаете отказ, либо получаете письмо с разрешением;
- Если же Вы получили письмо с разрешением, Вам остается только прошить устройство.
Подведя итоги, просим Вас обратить мелочи на следующие моменты:
- Не имеет смысла подделывать чек, ведь служба может проверить его достоверность через базу данных
- Во избежании сложностей при поисках оригинала чека, рекомендуем покупать гаджеты в крупных сетях магазинов.
- Не нужно рассказывать работнику службы поддержки, где Вы взяли чек, его все равно будет проверять спецслужба.
- Если у Вас нету чека, скажите сразу об этом оператору, что ускорит процесс разблокирования гаджета.
- Не рекомендуем звонить с одного и того же устройства несколько раз в службу поддержки.
Источник
How to Unlock iPhone with iTunes
by Anna Sherry Updated on 2020-12-21 / Update for Unlock iPhone
With so many passwords, lock codes to remember, it is not shocking to forget passwords at times. So, if you ever come across such situations and lose your password or get locked out of your iPhone for some reasons, then what are your chances of unlocking the iPhone with iTunes? Well, when this question pops up, you mustn’t get panicked for any reason. We are here to guide you through the process to fix this issue.
In this article, we are explaining you two ways to unlock your iPhone effectively.
Part 1: How to Unlock iPhone with iTunes
This solution is effective, when you have synced your iPhone with iTunes. In this method the iTunes backup will be used to restore your iPhone, once the device has been unlocked. As we have already discussed, this process would result in data loss and you need to reconfigure your device settings after unlocking it.
Here is the detailed guide as how to unlock iPhone with iTunes.
- Update your iTunes to the latest version and then launch it ASAP on your computer. Once iTunes is running connect your iPhone through a lightning cable.
- Choose the device icon from the top left in iTunes interface. Click on ‘Summary’ later and then press the ‘Restore iPhone’. For confirming your selection, hit the ‘Restore’ button again.
- iTunes will wipe off your device while installing the latest iOS and restore your iPhone to its factory settings. All you need is set up the iPhone again as a new one after restarting it.

Tips: The above method only works for the devices which have been synced to iTunes. If your iPhone have never synced to iTunes, I suggest you to try Tenorshare 4uKey to unlock iPhone without iTunes and passcode.
Part 2: How to Unlock iPhone without iTunes/Passcode
If you are in the lookout for an alternative way for how to unlock a disabled iPhone with iTunes, you can always pick Tenorshare 4uKey. This amazing software is a perfect iTunes alternative that doesn’t require a passcode for unlocking the iPhone. Whether your iPhone screen got broken, you have entered more than allowed limit of wrong passcode attempts or forgot it at the very first place, 4uKey can resolve the issue within no time. It can remove Face ID, Touch ID or a 4 to 6 digit passcode without much hassle. The latest iOS version is compatible with this software.


Here is a video guide for Tenorshare 4uKey to explain how to unlock iPhone without using iTunes.
After installing and launching the program, you need to connect your iPhone to your PC. Leave a moment to get the iPhone detected by 4uKey and then tap the ‘Start’ button.
Now, you need to press the ‘Download’ button for getting the iOS firmware updated on your iPhone.
Hit the ‘Start Unlock’ button afterwards. It will remove the passcode from your iPhone, once the iOS firmware is downloaded on your computer. The entire process will take a while to accomplish.
Now, your iPhone is just like a fresh one that you have bought sans any data or settings. You can set it up with fresh set of Face ID, passcode, and Touch ID and restore it using your iTunes or iCloud backup.
Conclusion
You learned about unlocking the iPhone with iTunes. We also shared information with you on how you can unlock your iPhone without the need of iTunes. We agree with the fact that using iTunes can be a little complex and result in error anytime and therefore; the aforementioned alternative can help you a lot. We hope you guys loved reading this post and got the desired results. At the end, we really suggest you to back up iOS data regularly with a third party tool—Tenorshare iCareFone. It can backup all your data to local computer without iTunes or iCloud.
Источник


