- How to unlock your iPhone for use with a different carrier
- Contact your carrier
- If you have a SIM card from a carrier other than your current carrier
- If you don’t have another SIM card to use
- Get help
- If you forgot your iPhone passcode
- Step 1: Make sure that you have a computer (Mac or PC)
- Step 2: Turn off your iPhone
- Step 3: Put your iPhone in recovery mode
- Step 4: Restore your iPhone
- Need more help?
- Unlock your iPhone with Apple Watch when you’re wearing a face mask or sunglasses
- What you need
- How to set up Unlock with Apple Watch
- How to unlock your iPhone with your Apple Watch
- If you didn’t mean to unlock your iPhone
- Using USB accessories with iOS and iPadOS
- Unlock your device
- Allow access to USB accessories
- Activation Lock for iPhone, iPad, and iPod touch
- Here’s how it works
- If your device is lost or stolen
- If you forget your Apple ID or password
- Check for Activation Lock before you buy a device from someone else
- Before you give away your device or send it in for service
How to unlock your iPhone for use with a different carrier
Unlocking your iPhone means that you can use it with different carriers.
Your iPhone might be locked to your carrier. Unlocking your iPhone means that you can use it with different carriers. To contact your carrier and unlock your iPhone, use these steps.
If you don’t want to switch carriers and your device is locked because you forgot the passcode, then you don’t need to use the steps in this article. Learn how to reset your passcode.
Apple can’t unlock your iPhone for use with a different carrier. Only your carrier can unlock your iPhone.
Contact your carrier
- Only your carrier can unlock your iPhone. Contact your carrier and request an unlock. Your account might need to meet requirements for unlocking. After you submit the request, it might take a few days to complete. Contact your carrier to check the status of your unlock request.
- After your carrier confirms that they unlocked your iPhone, follow the steps below.
If you have a SIM card from a carrier other than your current carrier
Use these steps to finish unlocking your iPhone:
- Remove your SIM card.
- Insert the new SIM card. Your device will activate.
If you don’t have another SIM card to use
Use these steps to finish unlocking your iPhone:
Get help
You might see this message on your computer or on your iPhone: «The SIM card inserted in this iPhone does not appear to be supported. Only compatible SIM cards from a supported carrier may be used to activate iPhone. Please insert the SIM card that came with your iPhone or visit a supported carrier store.»
If you see this message on your device with iOS 14, use these steps:
- Go to Settings > General, and tap About.
- Under Carrier Lock, you should see a message that says «No SIM restrictions.» If you don’t see that message, contact your carrier.
If your device is on iOS 13 or earlier, use these steps:
- Contact your carrier to make sure that they applied the unlock in their system.
- Restore your iPhone to factory settings.
- Restore your iPhone from a backup.
Источник
If you forgot your iPhone passcode
Forgot your iPhone passcode? Learn how to get your iPhone into recovery mode so you can erase it and set it up again.
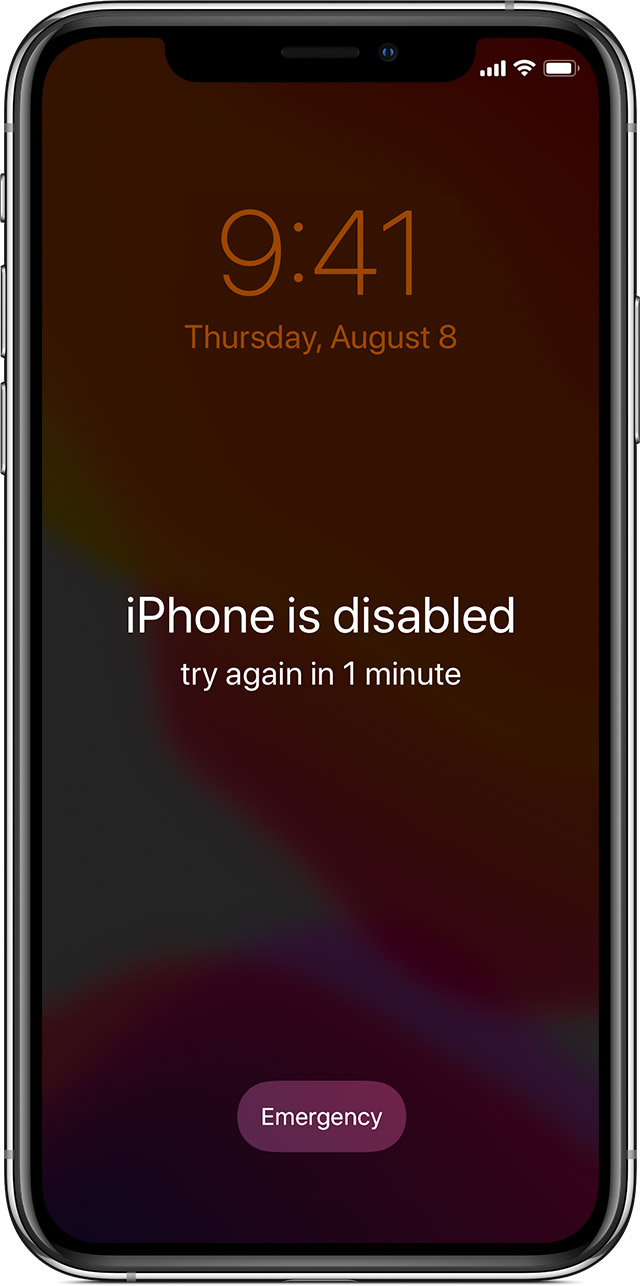
If you enter the wrong passcode on your iPhone Lock Screen too many times, an alert lets you know that your iPhone is disabled. If you can’t remember your passcode when you try again, you need to use a computer to put your iPhone in recovery mode. This process deletes your data and settings, including your passcode, giving you access to set up your iPhone again.
After you erase your iPhone, you can restore your data and settings from backup. If you didn’t back up your iPhone, you can set it up as a new device and then download any data that you have in iCloud.
![]()
Step 1: Make sure that you have a computer (Mac or PC)
This process requires a Mac or PC. If you’re using a PC, make sure that it has Windows 8 or later, and that iTunes is installed. You also need the cable that came with your iPhone, or another compatible cable, to connect your iPhone to the computer.
If you don’t have a computer and you can’t borrow one, you need to go to an Apple Retail Store or Apple Authorized Service Provider for help.

Step 2: Turn off your iPhone
- Unplug your iPhone from the computer if it’s connected.
- Turn off your iPhone using the method for your iPhone model:
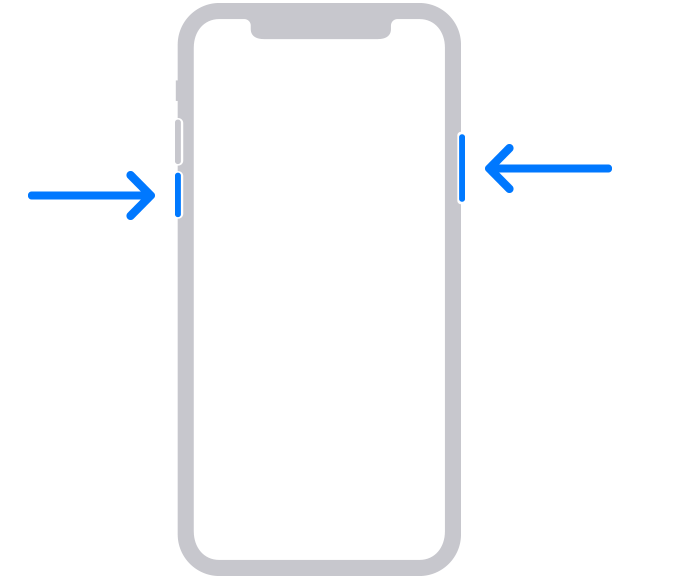
- iPhone X or later, iPhone SE (2nd generation), iPhone 8, and iPhone 8 Plus: Press and hold both the Side button and the Volume down button until the power off slider appears.

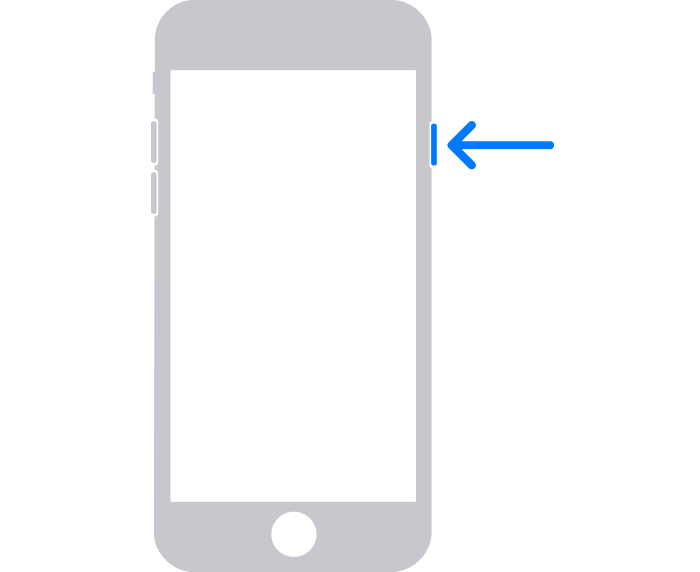
- iPhone 7 and iPhone 7 Plus: Press and hold the Side button until the power off slider appears.
- iPhone SE (1st generation), and iPhone 6s and earlier: Press and hold the Side (or Top) button until the power off slider appears.
- iPhone X or later, iPhone SE (2nd generation), iPhone 8, and iPhone 8 Plus: Press and hold both the Side button and the Volume down button until the power off slider appears.
- Drag the slider to turn off your iPhone, then wait a minute to make sure that it turns off completely.

Step 3: Put your iPhone in recovery mode
- Get ready by finding the button on your iPhone that you’ll need to hold in the next step:
- iPhone X or later, iPhone SE (2nd generation), iPhone 8, and iPhone 8 Plus use the Side button.
- iPhone 7 and iPhone 7 Plus use the Volume down button.
- iPhone SE (1st generation), and iPhone 6s and earlier use the Home button.
- Press and hold the correct button for your iPhone while immediately connecting your iPhone to the computer. Don’t let go of the button.
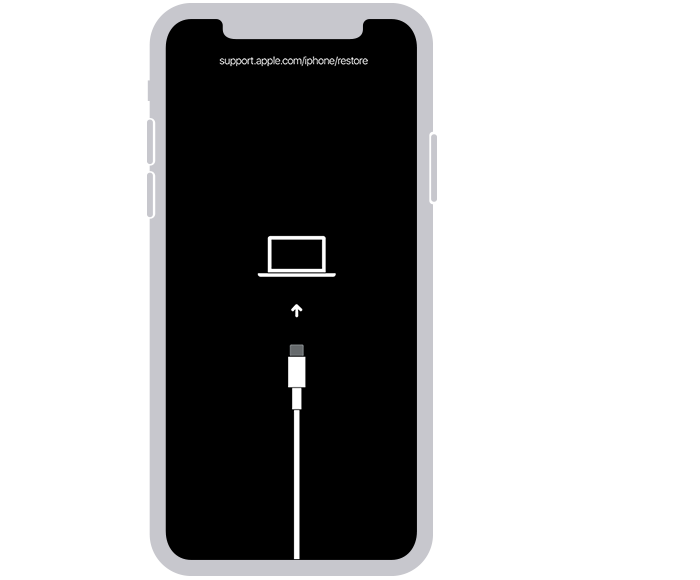
- Keep holding the button until you see the recovery mode screen on your iPhone, then let go.
If you see the passcode screen, you need to turn off your iPhone and start again.
If you can’t get your iPhone to show the recovery mode screen and you need help, contact Apple Support.
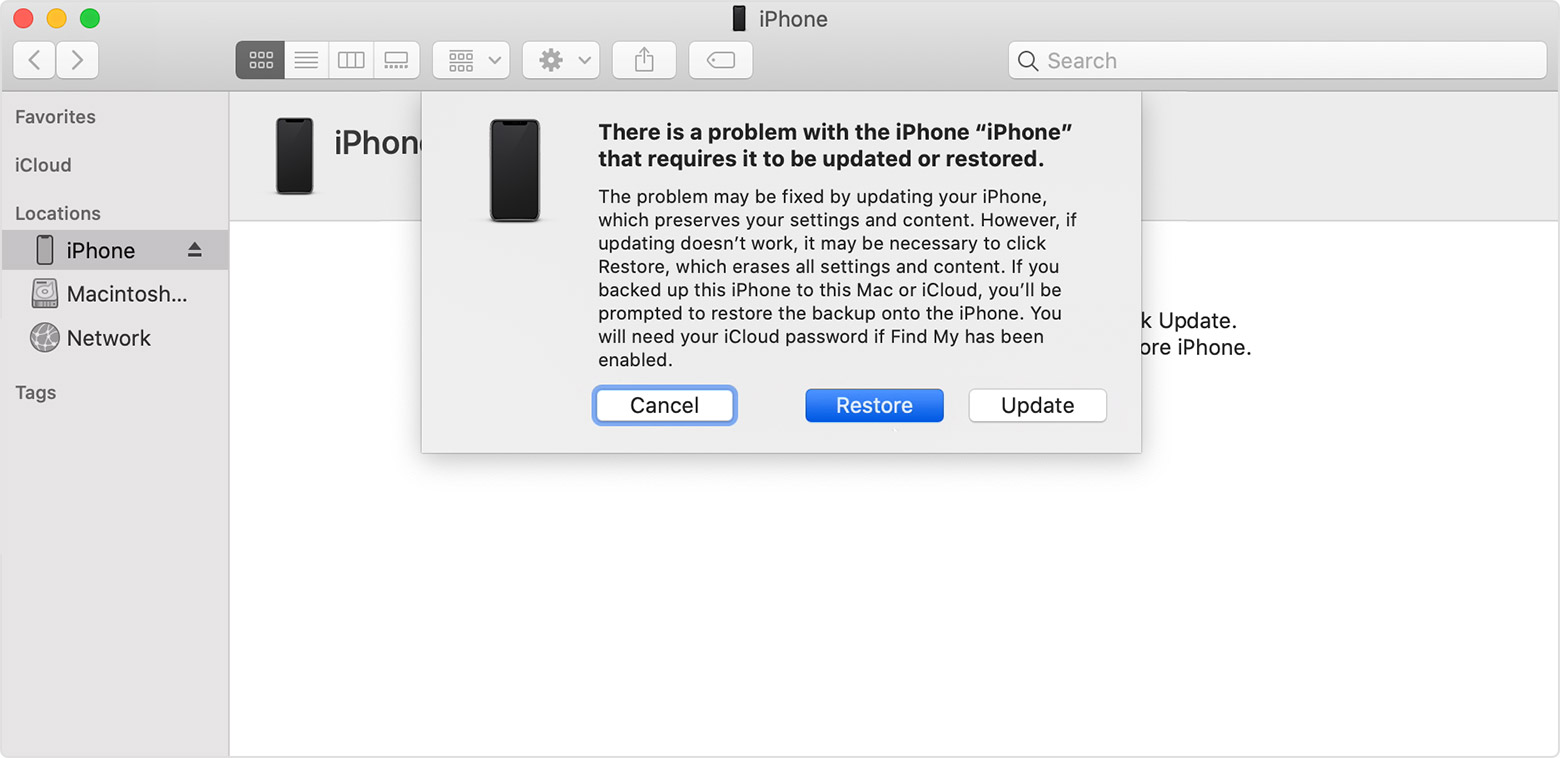
Step 4: Restore your iPhone
- Locate your iPhone in the Finder or in iTunes on the computer that it’s connected to. (Learn how to find your connected iPhone.)
- Choose Restore when you see the option to Restore or Update. Your computer downloads software for your iPhone and begins the restore process. If the download takes more than 15 minutes and your device exits the recovery mode screen, let the download finish, then turn off your iPhone and start again.
- Wait for the process to finish.
- Disconnect your iPhone from the computer, then set up and use your iPhone.
Need more help?
If you can’t complete any of these steps, if you’re still prompted for a passcode, or if you need any other assistance, contact Apple Support.
Источник
Unlock your iPhone with Apple Watch when you’re wearing a face mask or sunglasses
When you’re wearing a mask or sunglasses and your Apple Watch, you can simply raise and glance at your iPhone to unlock it. Learn how to set up and use the feature.
What you need
Unlocking your iPhone with your Apple Watch requires these devices:
- An iPhone that uses Face ID (iPhone X or later) and has iOS 14.5 or later
- An Apple Watch Series 3 or later with watchOS 7.4 or later
The feature also has these requirements:
- Your Apple Watch needs to be paired with your iPhone.
- Your iPhone and Apple Watch need to have Wi-Fi and Bluetooth turned on. (You don’t need to be connected to a Wi-Fi network.)
- Your Apple Watch needs to have a passcode, and wrist detection must be turned on.
- Your Apple Watch needs to be on your wrist and unlocked.
- You need to be wearing a mask that covers your mouth and nose, or sunglasses or ski goggles that cover your eyes.

How to set up Unlock with Apple Watch
- Open the Settings app on your iPhone.
- Tap Face ID & Passcode, then type your passcode.
- Scroll down to Unlock with Apple Watch, then turn on the feature next to your watch’s name. If your watch doesn’t have wrist detection enabled, you’re asked to turn it on.
How to unlock your iPhone with your Apple Watch
- Make sure that you’re wearing a mask, sunglasses, or ski goggles and that your Apple Watch is on your wrist and unlocked.
- Wake your iPhone by raising it or tapping its screen.
- Glance at your iPhone to unlock it. Then you can swipe up from the bottom of your iPhone screen to begin using it.
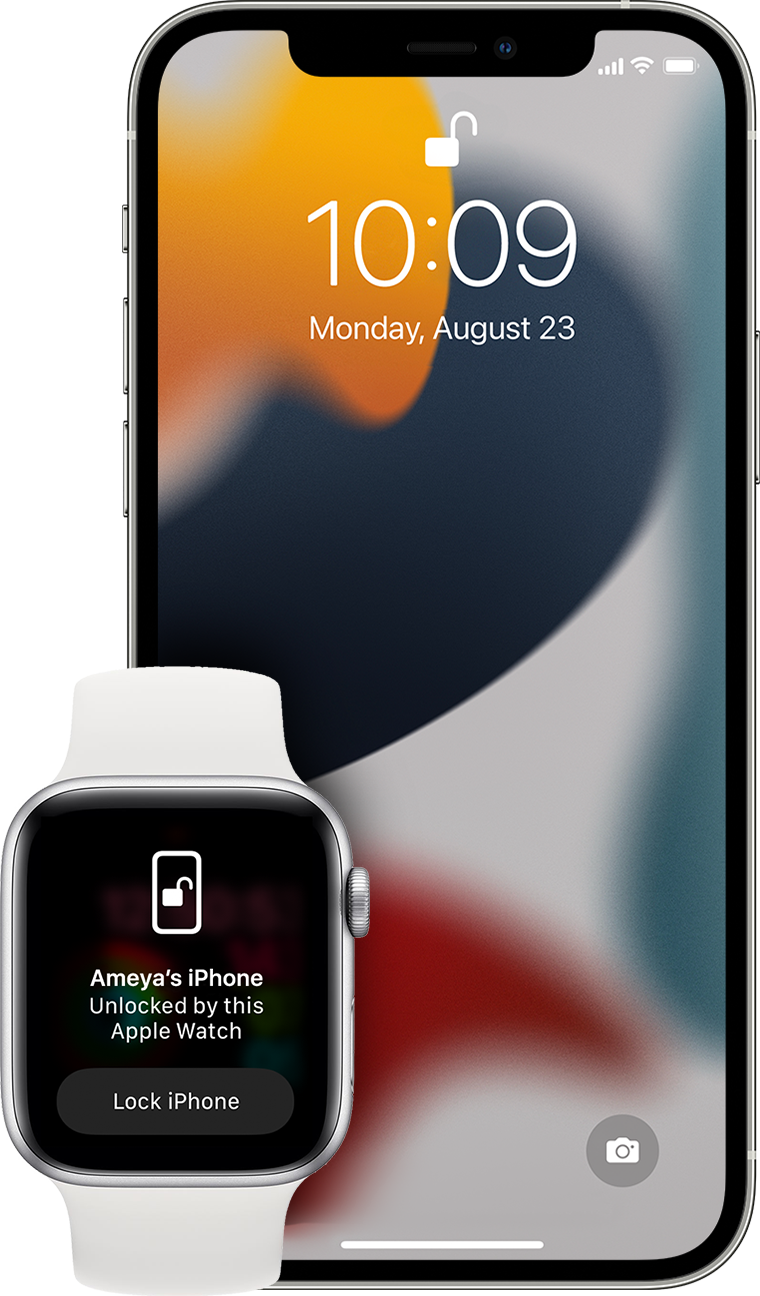
If you didn’t mean to unlock your iPhone
When your Apple Watch unlocks your iPhone successfully, your watch gives haptic feedback and shows an alert. If you didn’t mean to unlock your iPhone, tap the Lock iPhone button on your Apple Watch screen.
The next time you unlock your iPhone after tapping this button, your iPhone requires that you type your passcode.
Источник
Using USB accessories with iOS and iPadOS
You might need to unlock your passcode-protected iPhone, iPad, or iPod touch to connect it to a Mac, PC, or a USB accessory.
Unlock your device
Starting with iOS and iPadOS, if you use USB accessories with your iPhone, iPad, or iPod touch, or if you connect your device to a Mac or PC, you might need to unlock your device for it to recognize and use the accessory. Your accessory then remains connected, even if your device is subsequently locked.
If you don’t first unlock your password-protected iOS or iPadOS device—or you haven’t unlocked and connected it to a USB accessory within the past hour—your iOS or iPadOS device won’t communicate with the accessory or computer, and in some cases, it might not charge. You might also see an alert asking you to unlock your device to use accessories.
If the USB accessory is still not recognized after you unlock your device, disconnect your device from the accessory, unlock your device, and then reconnect the accessory.
Your iPhone, iPad, or iPod touch charges as usual when it’s connected to a USB power adapter.
Allow access to USB accessories
You can allow your iOS or iPadOS device to always access USB accessories, for example, if you use a USB assistive device to enter your passcode on your locked iPhone. Many assistive devices will automatically turn on the setting to allow USB devices the first time they’re connected.
If you don’t connect to USB accessories regularly, you might need to turn on this setting manually.
In Settings, go to Face ID & Passcode or Touch ID & Passcode, and turn on USB Accessories under Allow Access When Locked.
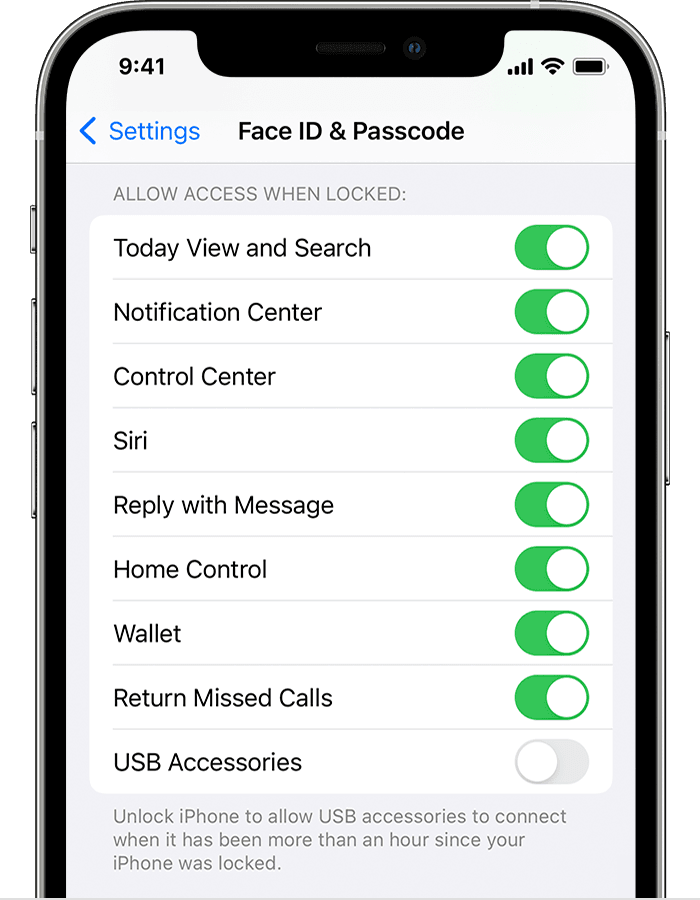
When the USB Accessories setting is off, as in the image above, you might need to unlock your iOS or iPadOS device to connect USB accessories.
Administrators can control the USB Accessories setting on supervised iOS or iPadOS devices using Apple Configurator or mobile device management.
Information about products not manufactured by Apple, or independent websites not controlled or tested by Apple, is provided without recommendation or endorsement. Apple assumes no responsibility with regard to the selection, performance, or use of third-party websites or products. Apple makes no representations regarding third-party website accuracy or reliability. Contact the vendor for additional information.
Источник
Activation Lock for iPhone, iPad, and iPod touch
Find My includes Activation Lock—a feature that’s designed to prevent anyone else from using your iPhone, iPad, or iPod touch, if it’s ever lost or stolen. Activation Lock turns on automatically when you turn on Find My on your device.
Activation Lock helps you keep your device secure, even if it’s in the wrong hands, and can improve your chances of recovering it. Even if you erase your device remotely, Activation Lock can continue to deter anyone from reactivating your device without your permission. All you need to do is keep Find My turned on, and remember your Apple ID and password.
With watchOS 2 and later, you can use Activation Lock to protect your Apple Watch. And with macOS Catalina or later and Mac computers that have the Apple T2 Security Chip or Apple silicon you can use Activation Lock to protect your Mac, too.
Here’s how it works
Each time an iPhone, iPad, iPod touch, Apple Watch, or Mac computer that has an Apple T2 security chip or Apple silicon is activated or recovered, the device contacts Apple to check whether Activation Lock is turned on.
Activation Lock turns on automatically when you set up Find My.* After it’s turned on, Apple securely stores your Apple ID on its activation servers and links it to your device. Your Apple ID password or device passcode is required before anyone can turn off Find My, erase your device, or reactivate and use your device.
If your device is lost or stolen
If you ever misplace your device—whether it’s lost or you think it might have been stolen—you should immediately use Mark As Lost in the Find My app.
Mark As Lost locks your screen with a passcode and lets you display a custom message with your phone number to help you get it back. You can also remotely erase your device if needed. Your custom message continues to display even after the device is erased.
While Activation Lock works in the background to make it more difficult for someone to use or sell your missing device, Lost Mode clearly shows anyone who finds your device that it still belongs to you and can’t be reactivated without your password.
If you forget your Apple ID or password
Your Apple ID is the account that you use to sign in to all Apple services. Usually, your Apple ID is your email address. If you forget it, we can help you find your Apple ID.
If you can’t find your Apple ID or reset your password, you’ll lose access to your account and might be unable to use or reactivate your device. To help prevent this, visit your Apple ID account page periodically to review and update your account information.
Check for Activation Lock before you buy a device from someone else
Before you buy an iPhone, iPad, or iPod touch, from someone other than Apple or an Apple Authorized Reseller, make sure that the device is erased and no longer linked to the previous owner’s account.
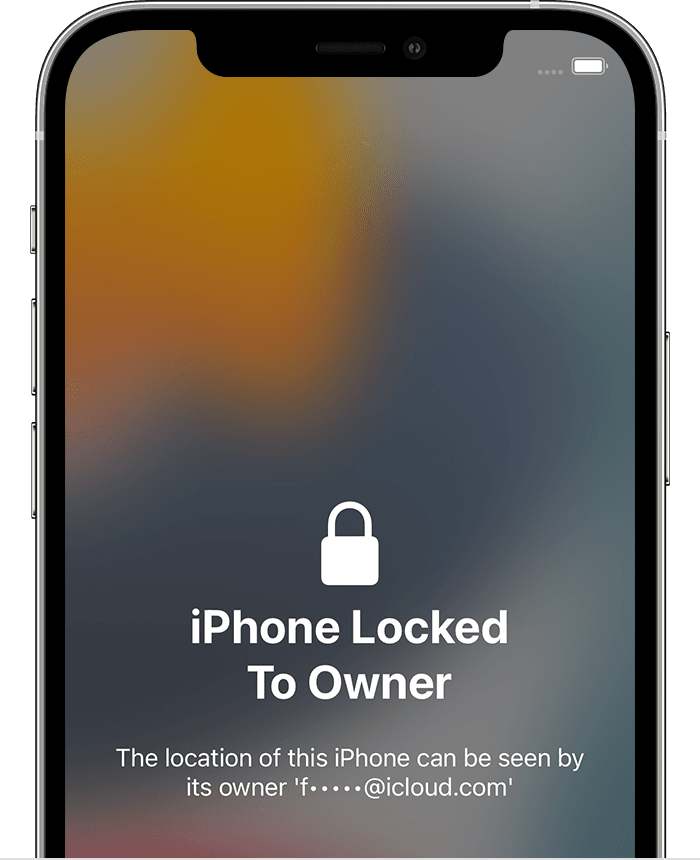
On a device with iOS or iPadOS 15 or later that is protected by Activation Lock, you see an «iPhone Locked to Owner» screen when you turn on or wake the device. Don’t take ownership of any used iPhone, iPad, or iPod touch if it’s protected by Activation Lock.
If you don’t see that screen, follow these steps to check if the device is ready to use:
- Turn on and unlock the device.
- If the passcode Lock Screen or the Home Screen appears, the device hasn’t been erased. Ask the seller to follow the steps below to completely erase the device. Don’t take ownership of any used iPhone, iPad, or iPod touch until it’s been erased.
- Begin the device setup process.
- If you’re asked for the previous owner’s Apple ID and password, the device is still linked to their account. Hand the device back to the seller and ask them to enter their password. If the previous owner isn’t present, contact them as soon as possible and ask them to use a browser to remove the device from their account. Don’t take ownership of any used iPhone, iPad, or iPod touch until it has been removed from the previous owner’s account.
A device is ready for you to use when you see the Hello screen.
Before you give away your device or send it in for service
Make sure that you turn off Find My on your device before you give it away or send it in for repair. Otherwise, your device is locked and anyone that you give the device to can’t use it normally and Apple technicians can’t perform service repairs. Just sign out of iCloud and then erase all content and settings. This completely erases your device, removes it from your Apple ID, and turns off Find My.
Источник


