- How to unlock your iPhone for use with a different carrier
- Contact your carrier
- If you have a SIM card from a carrier other than your current carrier
- If you don’t have another SIM card to use
- Get help
- If you forgot your iPhone passcode
- Step 1: Make sure that you have a computer (Mac or PC)
- Step 2: Turn off your iPhone
- Step 3: Put your iPhone in recovery mode
- Step 4: Restore your iPhone
- Need more help?
- How to Unlock iPhone with iTunes
- Part 1: How to Unlock iPhone with iTunes
- Part 2: How to Unlock iPhone without iTunes/Passcode
- Conclusion
- Getting Message «iPhone Locked Connect To iTunes»? Let’s Fix It Out!
- Method 1. Unlock the device with iTunes
- Method 2. Factory reset the locked iPhone via iCloud
- Method 3. Remove old devices from iTunes
- Method 4. Try Recovery Mode
- Method 5. Deauthorize computers for authorizing new computer
- Method 6. iPhone Locked Connect to iTunes Fix without iTunes – LockWiper
- Benefits of Using LockWiper
- Steps on iPhone Locked Connect to iTunes Fix without iTunes:
- Conclusion
How to unlock your iPhone for use with a different carrier
Unlocking your iPhone means that you can use it with different carriers.
Your iPhone might be locked to your carrier. Unlocking your iPhone means that you can use it with different carriers. To contact your carrier and unlock your iPhone, use these steps.
If you don’t want to switch carriers and your device is locked because you forgot the passcode, then you don’t need to use the steps in this article. Learn how to reset your passcode.
Apple can’t unlock your iPhone for use with a different carrier. Only your carrier can unlock your iPhone.
Contact your carrier
- Only your carrier can unlock your iPhone. Contact your carrier and request an unlock. Your account might need to meet requirements for unlocking. After you submit the request, it might take a few days to complete. Contact your carrier to check the status of your unlock request.
- After your carrier confirms that they unlocked your iPhone, follow the steps below.
If you have a SIM card from a carrier other than your current carrier
Use these steps to finish unlocking your iPhone:
- Remove your SIM card.
- Insert the new SIM card. Your device will activate.
If you don’t have another SIM card to use
Use these steps to finish unlocking your iPhone:
Get help
You might see this message on your computer or on your iPhone: «The SIM card inserted in this iPhone does not appear to be supported. Only compatible SIM cards from a supported carrier may be used to activate iPhone. Please insert the SIM card that came with your iPhone or visit a supported carrier store.»
If you see this message on your device with iOS 14, use these steps:
- Go to Settings > General, and tap About.
- Under Carrier Lock, you should see a message that says «No SIM restrictions.» If you don’t see that message, contact your carrier.
If your device is on iOS 13 or earlier, use these steps:
- Contact your carrier to make sure that they applied the unlock in their system.
- Restore your iPhone to factory settings.
- Restore your iPhone from a backup.
Источник
If you forgot your iPhone passcode
Forgot your iPhone passcode? Learn how to get your iPhone into recovery mode so you can erase it and set it up again.
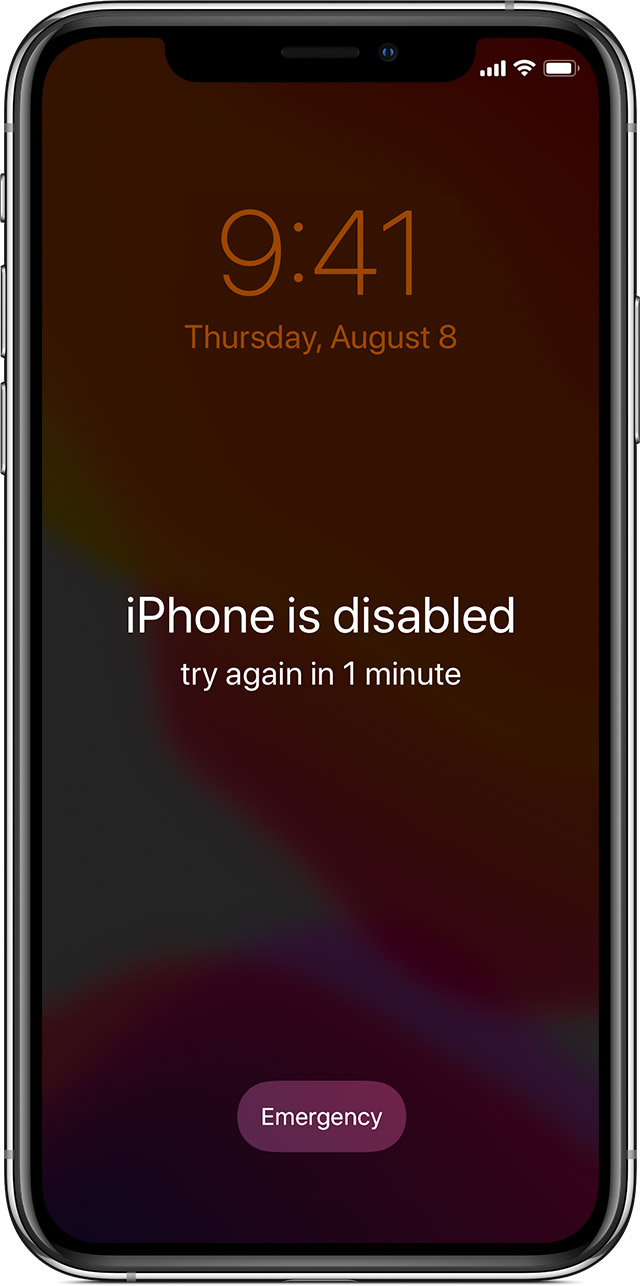
If you enter the wrong passcode on your iPhone Lock Screen too many times, an alert lets you know that your iPhone is disabled. If you can’t remember your passcode when you try again, you need to use a computer to put your iPhone in recovery mode. This process deletes your data and settings, including your passcode, giving you access to set up your iPhone again.
After you erase your iPhone, you can restore your data and settings from backup. If you didn’t back up your iPhone, you can set it up as a new device and then download any data that you have in iCloud.
![]()
Step 1: Make sure that you have a computer (Mac or PC)
This process requires a Mac or PC. If you’re using a PC, make sure that it has Windows 8 or later, and that iTunes is installed. You also need the cable that came with your iPhone, or another compatible cable, to connect your iPhone to the computer.
If you don’t have a computer and you can’t borrow one, you need to go to an Apple Retail Store or Apple Authorized Service Provider for help.

Step 2: Turn off your iPhone
- Unplug your iPhone from the computer if it’s connected.
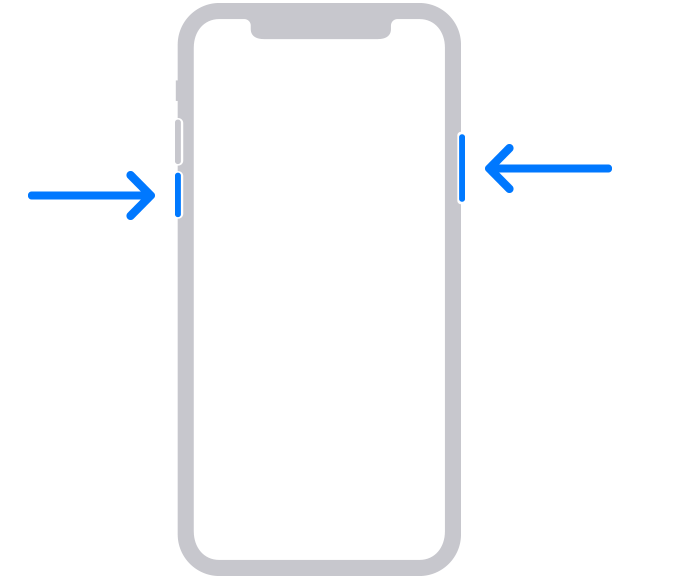
- Turn off your iPhone using the method for your iPhone model:
- iPhone X or later, iPhone SE (2nd generation), iPhone 8, and iPhone 8 Plus: Press and hold both the Side button and the Volume down button until the power off slider appears.

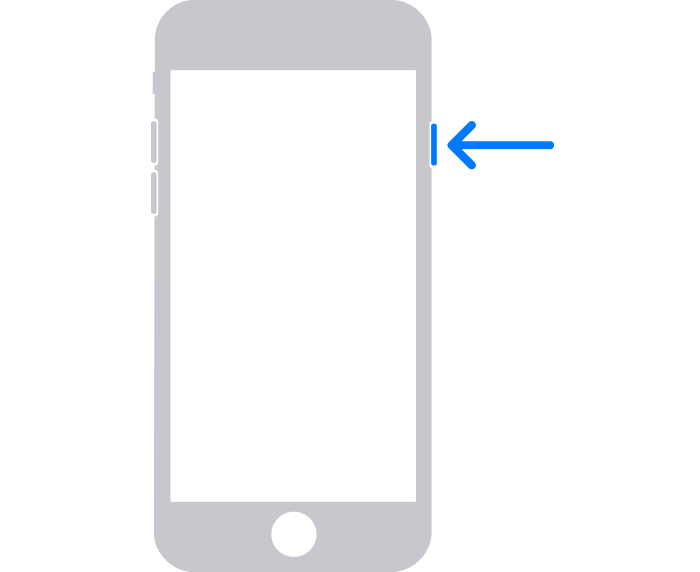
- iPhone 7 and iPhone 7 Plus: Press and hold the Side button until the power off slider appears.
- iPhone SE (1st generation), and iPhone 6s and earlier: Press and hold the Side (or Top) button until the power off slider appears.
- iPhone X or later, iPhone SE (2nd generation), iPhone 8, and iPhone 8 Plus: Press and hold both the Side button and the Volume down button until the power off slider appears.
- Drag the slider to turn off your iPhone, then wait a minute to make sure that it turns off completely.

Step 3: Put your iPhone in recovery mode
- Get ready by finding the button on your iPhone that you’ll need to hold in the next step:
- iPhone X or later, iPhone SE (2nd generation), iPhone 8, and iPhone 8 Plus use the Side button.
- iPhone 7 and iPhone 7 Plus use the Volume down button.
- iPhone SE (1st generation), and iPhone 6s and earlier use the Home button.
- Press and hold the correct button for your iPhone while immediately connecting your iPhone to the computer. Don’t let go of the button.
- Keep holding the button until you see the recovery mode screen on your iPhone, then let go.
If you see the passcode screen, you need to turn off your iPhone and start again.
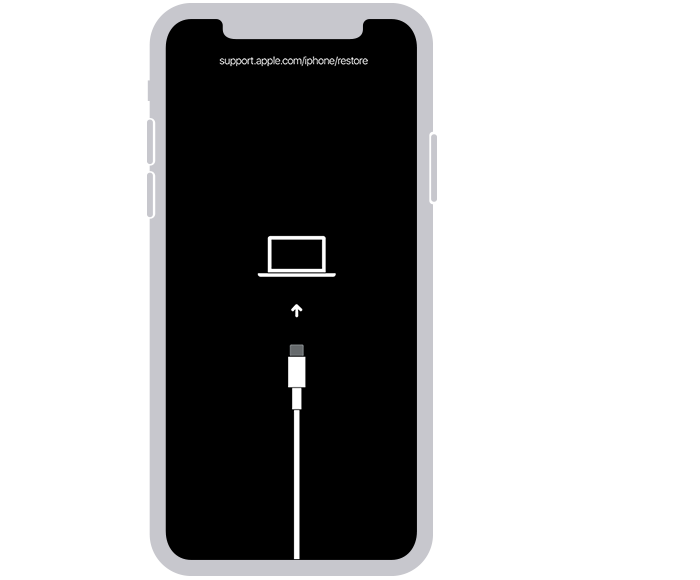
If you can’t get your iPhone to show the recovery mode screen and you need help, contact Apple Support.
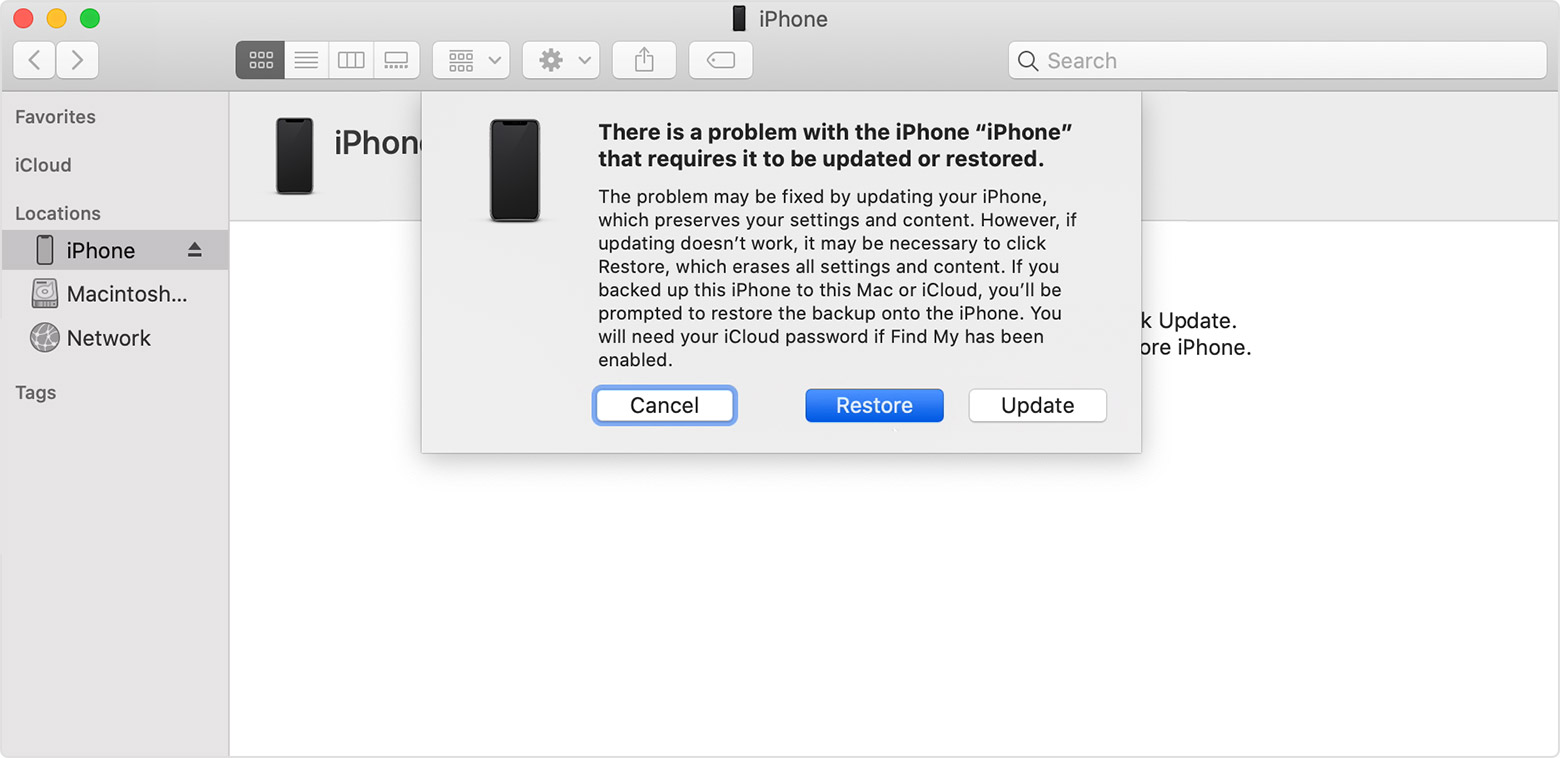
Step 4: Restore your iPhone
- Locate your iPhone in the Finder or in iTunes on the computer that it’s connected to. (Learn how to find your connected iPhone.)
- Choose Restore when you see the option to Restore or Update. Your computer downloads software for your iPhone and begins the restore process. If the download takes more than 15 minutes and your device exits the recovery mode screen, let the download finish, then turn off your iPhone and start again.
- Wait for the process to finish.
- Disconnect your iPhone from the computer, then set up and use your iPhone.
Need more help?
If you can’t complete any of these steps, if you’re still prompted for a passcode, or if you need any other assistance, contact Apple Support.
Источник
How to Unlock iPhone with iTunes
by Anna Sherry Updated on 2020-12-21 / Update for Unlock iPhone
With so many passwords, lock codes to remember, it is not shocking to forget passwords at times. So, if you ever come across such situations and lose your password or get locked out of your iPhone for some reasons, then what are your chances of unlocking the iPhone with iTunes? Well, when this question pops up, you mustn’t get panicked for any reason. We are here to guide you through the process to fix this issue.
In this article, we are explaining you two ways to unlock your iPhone effectively.
Part 1: How to Unlock iPhone with iTunes
This solution is effective, when you have synced your iPhone with iTunes. In this method the iTunes backup will be used to restore your iPhone, once the device has been unlocked. As we have already discussed, this process would result in data loss and you need to reconfigure your device settings after unlocking it.
Here is the detailed guide as how to unlock iPhone with iTunes.
- Update your iTunes to the latest version and then launch it ASAP on your computer. Once iTunes is running connect your iPhone through a lightning cable.
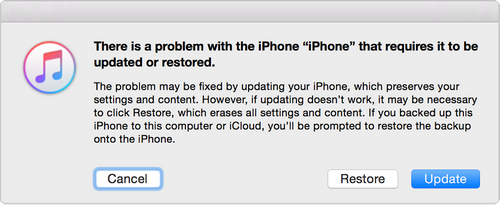
- Choose the device icon from the top left in iTunes interface. Click on ‘Summary’ later and then press the ‘Restore iPhone’. For confirming your selection, hit the ‘Restore’ button again.
- iTunes will wipe off your device while installing the latest iOS and restore your iPhone to its factory settings. All you need is set up the iPhone again as a new one after restarting it.

Tips: The above method only works for the devices which have been synced to iTunes. If your iPhone have never synced to iTunes, I suggest you to try Tenorshare 4uKey to unlock iPhone without iTunes and passcode.
Part 2: How to Unlock iPhone without iTunes/Passcode
If you are in the lookout for an alternative way for how to unlock a disabled iPhone with iTunes, you can always pick Tenorshare 4uKey. This amazing software is a perfect iTunes alternative that doesn’t require a passcode for unlocking the iPhone. Whether your iPhone screen got broken, you have entered more than allowed limit of wrong passcode attempts or forgot it at the very first place, 4uKey can resolve the issue within no time. It can remove Face ID, Touch ID or a 4 to 6 digit passcode without much hassle. The latest iOS version is compatible with this software.


Here is a video guide for Tenorshare 4uKey to explain how to unlock iPhone without using iTunes.
After installing and launching the program, you need to connect your iPhone to your PC. Leave a moment to get the iPhone detected by 4uKey and then tap the ‘Start’ button.
Now, you need to press the ‘Download’ button for getting the iOS firmware updated on your iPhone.
Hit the ‘Start Unlock’ button afterwards. It will remove the passcode from your iPhone, once the iOS firmware is downloaded on your computer. The entire process will take a while to accomplish.
Now, your iPhone is just like a fresh one that you have bought sans any data or settings. You can set it up with fresh set of Face ID, passcode, and Touch ID and restore it using your iTunes or iCloud backup.
Conclusion
You learned about unlocking the iPhone with iTunes. We also shared information with you on how you can unlock your iPhone without the need of iTunes. We agree with the fact that using iTunes can be a little complex and result in error anytime and therefore; the aforementioned alternative can help you a lot. We hope you guys loved reading this post and got the desired results. At the end, we really suggest you to back up iOS data regularly with a third party tool—Tenorshare iCareFone. It can backup all your data to local computer without iTunes or iCloud.
Источник
Getting Message «iPhone Locked Connect To iTunes»? Let’s Fix It Out!
home_icon Created with Sketch.
Home > Unlock iPhone > Getting Message «iPhone Locked Connect To iTunes»? Let’s Fix It Out!
![]()
April 25, 2019 (Updated: September 24, 2021)
If you are using an iPhone, it can be very frustrating when you can’t connect iTunes to a locked iPhone. The solutions depend on what kind of circumstances you are under, such as the iPhone is disabled, or you forgot the passcode and cannot unlock it, or you have unlocked the iPhone, but iTunes still ask you to unlock the iPhone when you connect it with iTunes. Check on this article for all the solutions to these circumstances.
- Method 1. Unlock the device with iTunes
- Method 2. Factory reset the locked iPhone via iCloud
- Method 3. Remove old devices from iTunes
- Method 4. Try Recovery Mode
- Method 5. Deauthorize computers for authorizing new computer
- Method 6. iPhone Locked Connect to iTunes Fix without iTunes – LockWiper

Method 1. Unlock the device with iTunes
For fixing connect iTunes to a locked iPhone problem, if you remember the iPhone passcode and have backed it up recently, you can simply unlock the device with iTunes though it requires a restore:
Step 1: Connect the locked iPhone with the computer that you have synced the iPhone with before with a USB cable and launch iTunes
Step 2: Choose “Sync” in iTunes and enter the proper passcode when requested to unlock the device, this backs up the iPhone to the computer
Step 3: Choose “Restore” to restore the iPhone from the most recent backup.
Note: If you haven’t synced your locked iPhone with iTunes before or the locked iPhone has enabled Find My iPhone, then method 1 is not going to work.
Method 2. Factory reset the locked iPhone via iCloud
If you just simply forgot the passcode to unlock the locked iPhone which can’t therefore connect to iTunes, then factory reset the locked iPhone via iCloud and remove its passcode. Here is how to do this:
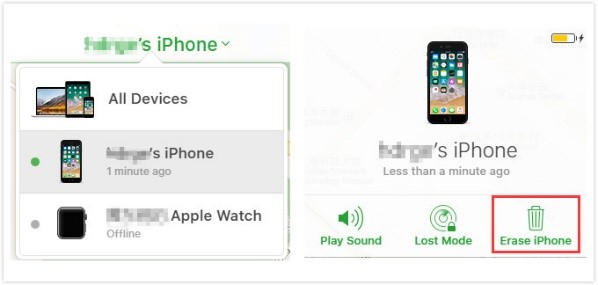
Step 1: Grab another device and go to icloud.com/find. Visit Find My iPhone feature and click on the «DEVICE» option.
Step 2: Choose the locked iPhone from the devices list. Click on “Erase iPhone”. The locked iPhone will be erased alongside the passcode you forgot.
Step 3: You can restore your last backup from iCloud. You will be able to reset the passcode on the locked iPhone.
Method 3. Remove old devices from iTunes
The problem locked iPhone connect to iTunes can be caused by the iTunes that you are trying to connect the iPhone. If you have 5 devices on the “Device” section of iTunes, then this time when you connect another iPhone to the iTunes, you will be limited for the iTunes connection as you have reached the device limit in one computer. In this case, you can erase one of the device that’s least used. Check on how to do this:
Step 1: Launch iTunes on your computer and click “account” in the menu bar, from the drop-down menu, select “View My Account”.
Step 2: From the Account Information screen, click “Manage Devices”.
Step 3: Click “Remove” next to the device name you would like to erase from iTunes.
Step 4: When this is finished, restart iTunes to check if you can connect the iPhone with iTunes.
Method 4. Try Recovery Mode
If you have never synced your iPhone with iTunes before, you can try to restore your iPhone via Recovery Mode for fixing locked iPhone connect to iTunes issue.
Step 1: Close iTunes and connect your iPhone to your computer via USB cable and then open iTunes.
Step 2: Force restart the device. Press the Volume Down and Side buttons of your iPhone simultaneously and hold them until you see connection notification on iTunes.
Step 3: Click on the Update option on iTunes, and it will now reinstall the firmware without erasing your data. The download process will take some time. Wait until its completed and then set up the device afterwards.
Method 5. Deauthorize computers for authorizing new computer
This is maybe caused by that you have logged in your Apple ID on too many different computers. You can have iTunes on multiple computers, however your library will be unique to each computer. In this case, you may need to deauthorize one of the computers that you don’t use anymore. Here are the steps:
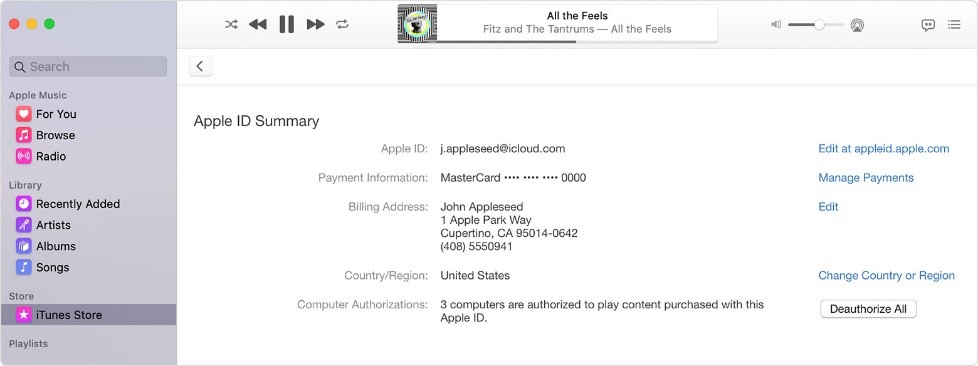
Step 1: For Mac, open the Music app, Apple TV app, or Apple Books app. On a PC, open iTunes for Windows.
Step 2: On the menu of iTunes, choose Account > Authorizations > Deauthorize This Computer.
Step 3: Sign in with your Apple ID. On the “Account” information page, scroll to the “Apple ID Summary” section, where you can see the computers that you’ve authorized with your Apple ID.
Step 4: Choose “Deauthorize” to remove the computer you would like to deauthorize.
Method 6. iPhone Locked Connect to iTunes Fix without iTunes – LockWiper
Method 6: iPhone Locked Connect to iTunes Fix without iTunes – LockWiper
If you haven’t synced your locked iPhone with iTunes, haven’t enabled Find My iPhone, or even the Recovery Mode does not work for you as this issue happens a lot, you may find it annoying to fix locked iPhone connect to iTunes problems. Well, if you have tried the methods above and still can’t solve the issue, try iMyFone LockWiper which can easily remove the locking mechanism on your iPhone without necessarily syncing or doing it via iTunes.
iMyFone LockWiper can help you solve the “iPhone Locked Connect to iTunes” Problem quickly and efficiently. Before we look into the detailed procedure, it is a good idea to look at what you stand to benefit when you use iMyFone LockWiper software program.
Benefits of Using LockWiper
Steps on iPhone Locked Connect to iTunes Fix without iTunes:
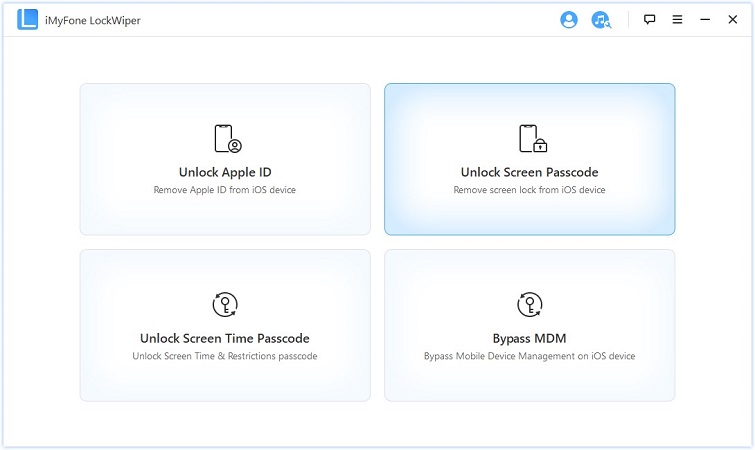
Step 1: Launch iMyFone LockWiper on your computer. choose «Unlock Screen Passcode» mode.
Step 2: Click “Start” to begin, and make sure that your iPhone is connected to your computer during the whole process. Be aware that all the data will be erased after passcode remove.

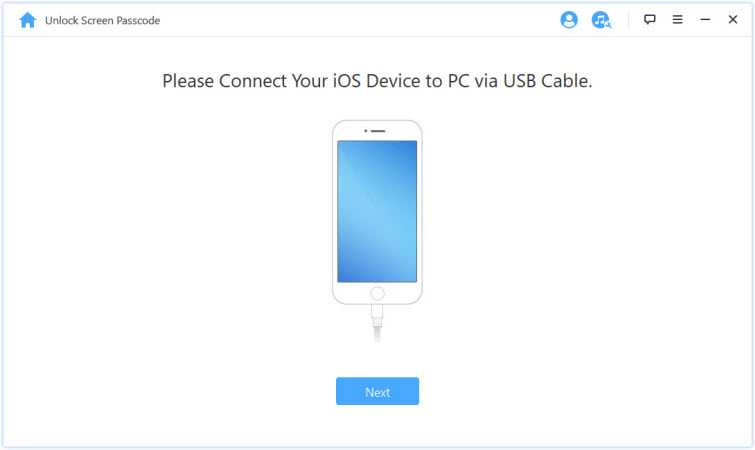
Step 3: Connect your iPhone to the computer using a suitable USB cable, then click «Next».
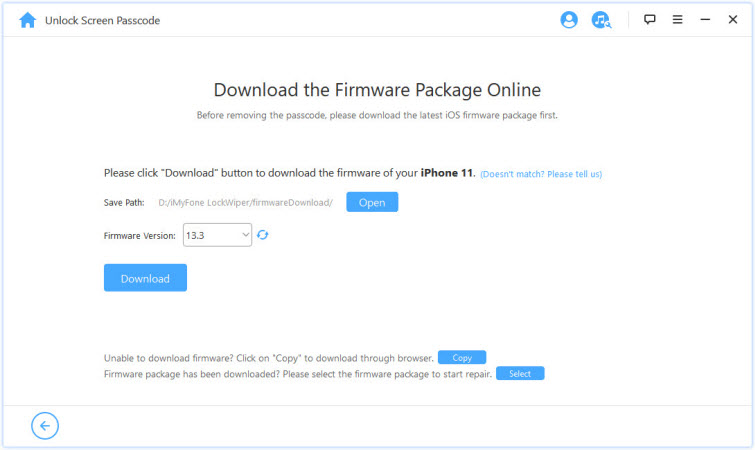
Step 4: The program will automatically detect the model of your device. Click “Download” to download the Firmware Package.
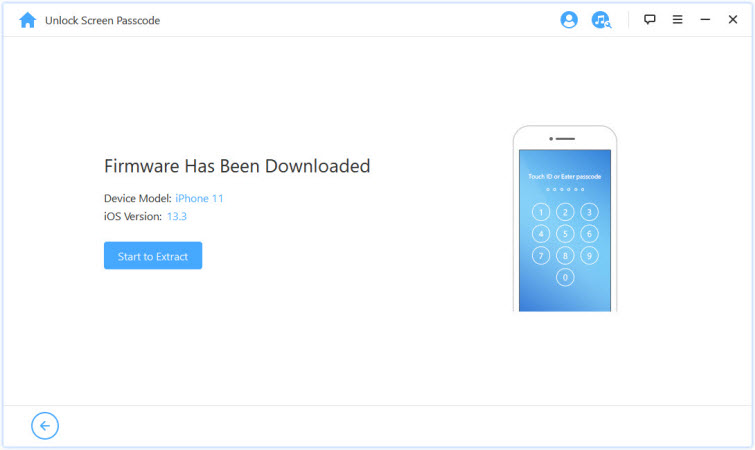
Step 5: When the Firmware Package was downloaded, click «Start to Extract» and wait for it to complete.
Step 6: Click «Start Unlock» to begin the process.

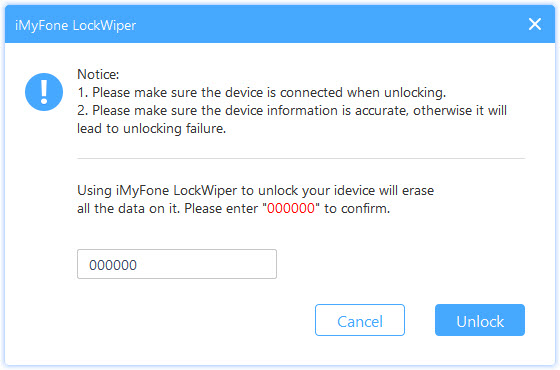
Step 7: Read the notice and confirm it by enter «000000» into the box and click «Unlock» to get started. Your device will enter Recovery mode automatically.
Wait for a few minutes as the lock is being removed. Once complete, you will get a notification. You will have successfully unlock your screen passcode and you can continue using your iPhone once again.
Conclusion
If you experience challenges on how to unlock your iPhone or iPad or stuck in iPhone locked connect to iTunes issue, iMyFone LockWiper is the solution to your problems. It is a powerful iPhone unlocking software that is highly recommended by tech experts across the globe. You no longer have to ask for unskilled technicians who may mess your iPhone up more instead of fixing it. Simply download and install iMyFone LockWiper on your computer and fix the issues like a pro.
Источник


