- Packaging Android Projects
- Taking a look at packaging your final Android project.
- Essential Setup
- 1. Packaging Your Project
- 2. Deploying A Packaged Project to Device
- Packaging App Bundles
- Android Quick Start
- Setting up for development for the Android platform.
- 1 — Android Development Prerequisites
- 2 — Creating Your Project
- 3 — Setting Up Unreal Editor for Android
- 4 — Configuring Editor and PIE for Mobile Previews
- 5 — Launching on an Android Device
- 6 — Packaging Android Builds
- 7 — On Your Own
Packaging Android Projects
Taking a look at packaging your final Android project.
In order to understand and use the content on this page, make sure you are familiar with the following topics:
In the following How-To we will take a look how to package your Unreal Engine 4 (UE4) project for deployment to an Android device. The Android packaging process in UE4 is simple to use and outputs several convenient files for installing and uninstalling your project from phones for testing.
Essential Setup
Before we begin, you will need to fulfill the following requirements and project setup:
You will need Android Studio set up on your computer. See Setting up Android SDK and NDK .
Your Android device must have Development Mode and USB Debugging enabled. See Setting Up Your Android Device For Development .
You will need to configure your Project Settings for Android and accept the Android SDK license agreement. See the Android Quickstart Guide .
If you have not already created a project, create one using the Third-Person Template, with Target Hardware set to Mobile/Tablet and quality set to Scalable 3D or 2D.
1. Packaging Your Project
In this section we will package the project as a .APK file.
We are currently packaging in Development because we are testing this game, but when your game is complete, you can package it in Shipping by hovering over the Build Configurations option in the Package Project menu.
In the File menu, go to Package Project > Android and select the Texture format you want to package. For this example, we will choose Android ETC2 as it is supported by all devices.
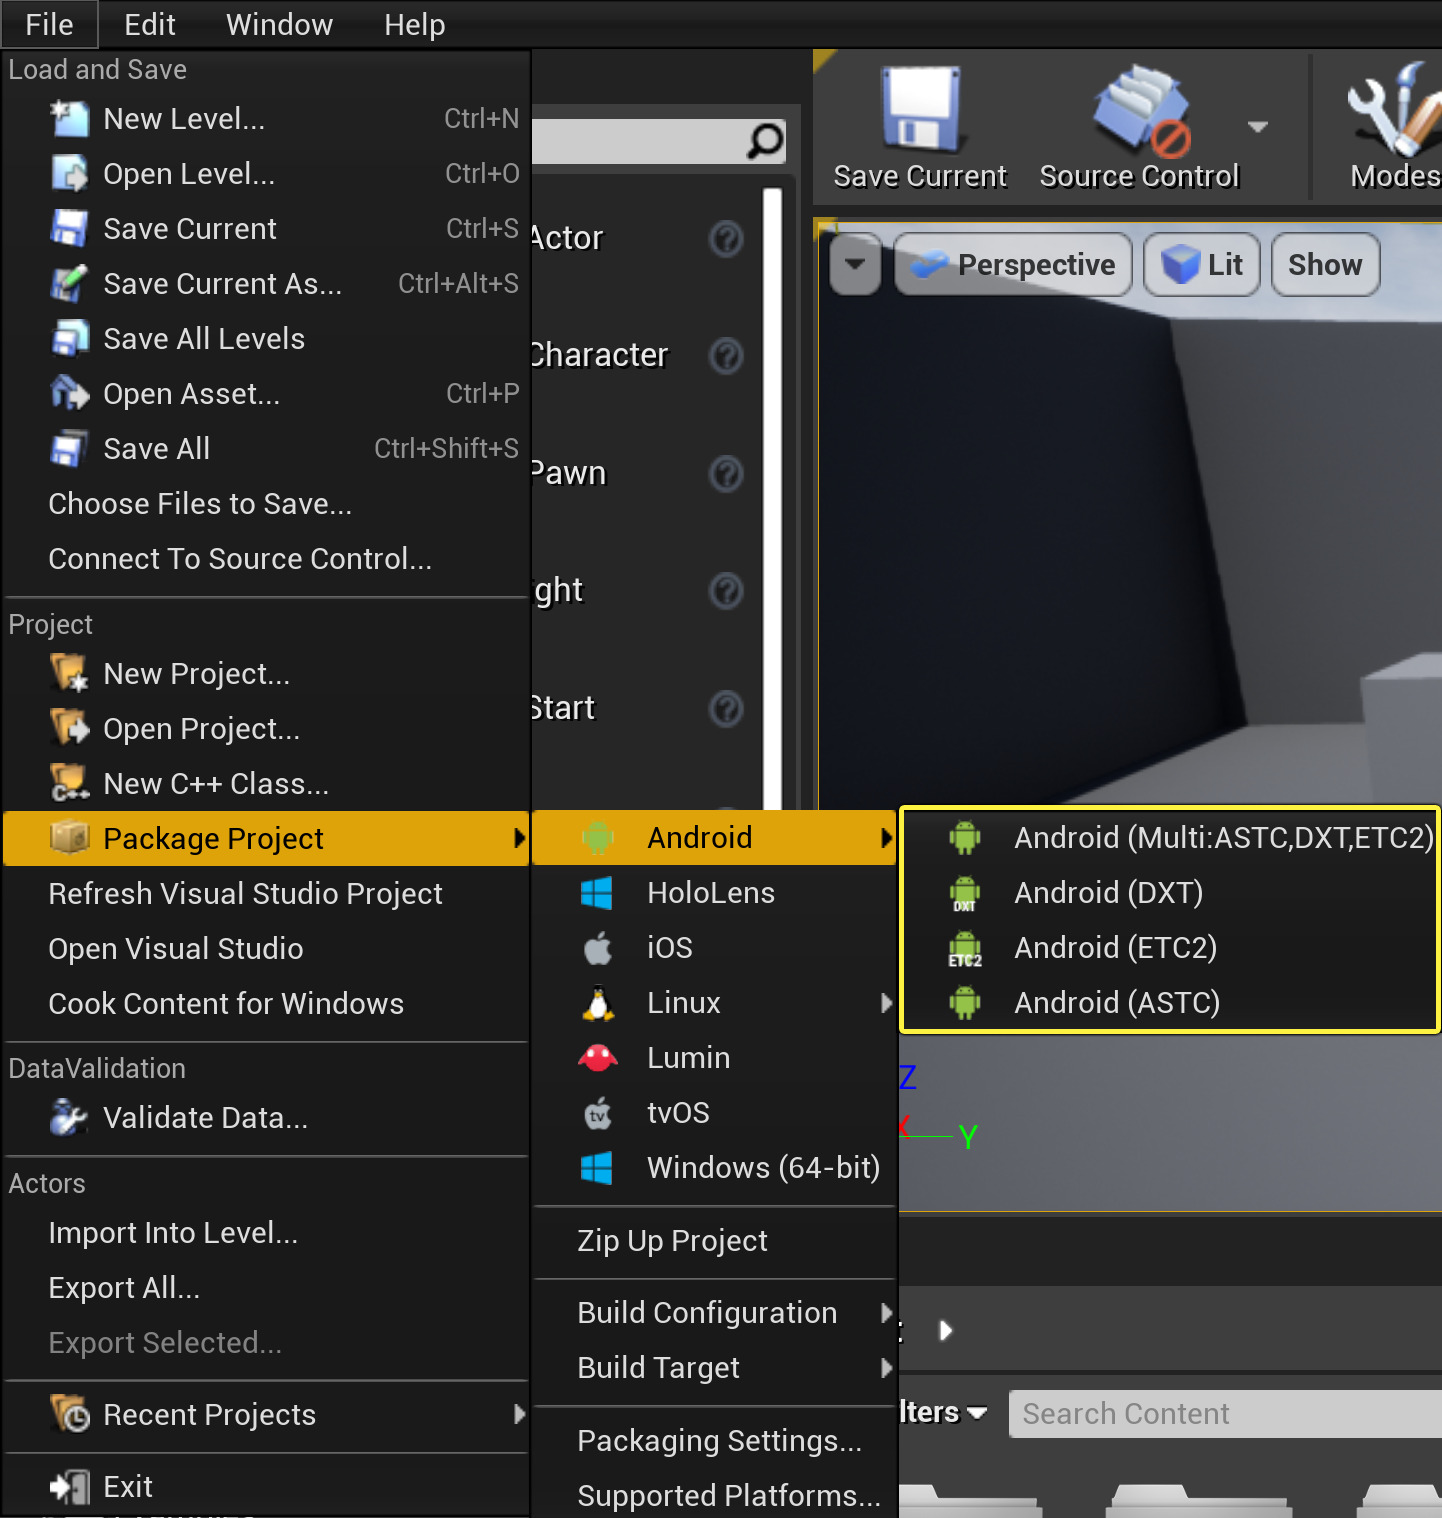


Click to enlarge image.
Different devices support different Texture formats depending on the hardware they run on. See, Android Development Reference for a detailed breakdown of the various formats.
Format
Description
ETC2
Supported by all OpenGL 3.x class devices and supports alpha compression.
DXT
Supported by Nvidia Tegra GPUs and supports alpha compression.
ASTC
Latest Texture compression format allowing more quality control by specifying block size and supports alpha compression. Available on some devices at this point.
If you are using an older version of Unreal Engine to support an existing project, you will also have access to the following legacy Texture formats.
Format
Description
ETC1
Supported by all Android based devices but cannot compress alpha textures (they are stored uncompressed). Recommend using an RGB and a separate alpha texture if need alpha to get better compression.
ETC1a
Uses ETC1 for non-alpha textures and ETC2 for alpha texture. If the device does not support ETC2, alpha textures will be uncompressed into RGBA at runtime. This format can be used on both ETC1 and ETC2 devices, but ETC1 for non-alpha textures may not be as high-quality as ETC2.
ATC
Supported by Qualcomm Adreno GPUs and supports alpha compression.
PVRTC
Supported by PowerVR GPUs and supports alpha compression.
You will be prompted for a location to save your packaged game, which should default to your project folder. Create a new folder and call it AndroidBuilds.


Click to enlarge image.
While your project is being packaged a packaging message will appear in the bottom right corner showing the progress of the packing.

Once packaging is successful, a Packaging Complete message will appear in the bottom right of the editor.

Navigate to the folder you created in step two. There will be a new folder named specifically for the texture type you selected when packaging. In this example, the folder is named Android_ETC2.


Click to enlarge image.
2. Deploying A Packaged Project to Device
Now that we have packaged your project as a .APK, this section will instruct you on how to deploy your build to a device.
Plug your Android device into your PC with a USB cable. If prompted, allow your PC to change files.
Open up the Android_ETC2 folder and then Double-click on the Install_[ProjectName]_Development.bat batch file to install the project on your Android device.

Click to enlarge image.
If you do not have your device plugged in via USB, running the .BAT file will do nothing.
Plug your Android device into your PC with a USB cable. If prompted, allow your PC to change files.
Open up the Android_ETC2 folder and then Double-click on the Install_[ProjectName]_Development_armv7-es3.command file to install the project on your Android device.
If you do not have your device plugged in via USB, running the .command file will do nothing.
Plug your Android device into your PC with a USB cable. If prompted, allow your PC to change files.
Open the Android_ETC2 folder, where you’ll find the files that were created during the packaging process.

You should see the Installation and Uninstallation shell scripts (.sh) along with the Android Application Package (.apk) that contains all of the files you need to install the project onto any Android device that supports the ETC1 compression scheme.
Now, open up the terminal from this folder’s location by right-clicking inside of the folder and selecting Open in Terminal.

Enter ./Install_LinuxAndroidProject_Development-arm64.es2.sh into the terminal to install the project onto your Android device.

Click to enlarge image.
If you’re having trouble running the shell script, try entering adb devices into the terminal to verify that your device is connected to your computer.
During the installation process, the shell script should flush the following output to your terminal
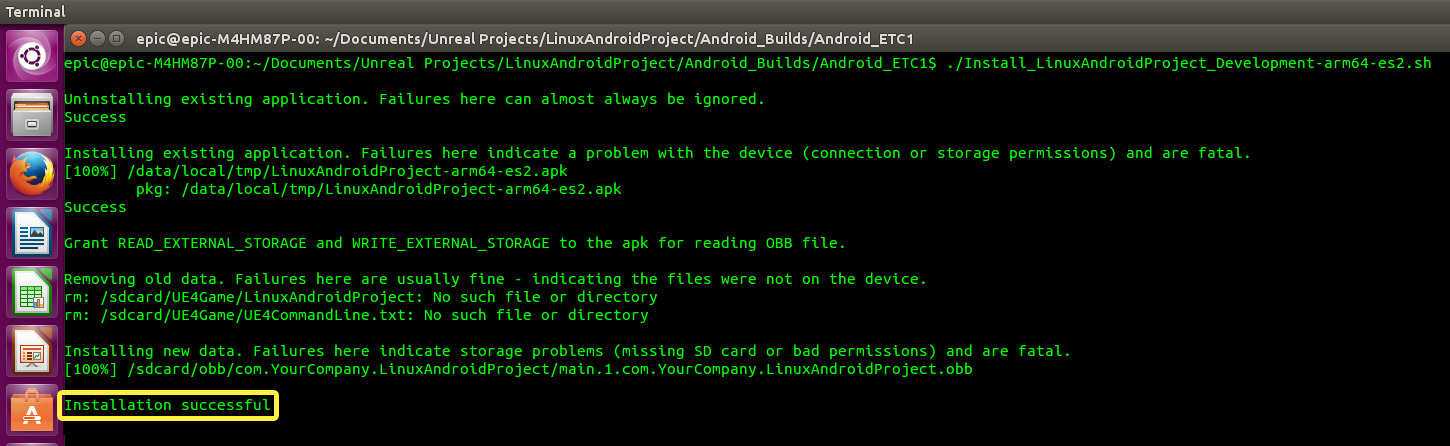
Click to enlarge image.
When the shell script has completed the installation process, you should see an Installation successful message.
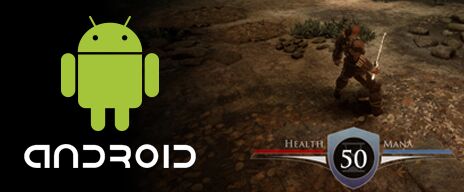
When you have completed this How-To, your project should appear on your Android device per the following image:

In addition, you will have packaged .APK files and accompanying helpers to deploy them to other devices for testing.
Packaging App Bundles
Android App Bundles are a distribution format offered by Google as an alternative to packaging .apks. Instead of creating different .apks for different subsets of devices, you can create a single Android App Bundle build (.aab) and upload it to the Google Play Store. The store’s dynamic distribution system then uses the contents of the App Bundle to generate a .apk optimized for the user’s specific device when they download the application.
In addition to greatly condensing the work involved in maintaining builds on the Google Play Store, App Bundle builds can distribute .apks with up to 150 MB instead of the previous limit of 100 MB. This limit applies to the final .apk and not the App Bundle used to generate it.
To create an App Bundle Build, open your Project Settings and navigate to the Platforms > Android section. In the App Bundles section, enable Generate Bundle (AAB).

Now when you package a project for Android, you will generate a .aab file to upload to Google Play. You will also generate a universal .apk for testing purposes.
As a limitation of the Google Play Store, Android App Bundles can not be distributed with .obb files.
The other settings available for configuring App Bundle builds enable you to fine-tune the degree of sensitivity that the App Bundle will use in generating the final .apks for your project.
Generate Universal APK from Bundle
Enabling this setting will allow the App Bundle to generate a universal .apk file for end-users, which can be run on any kind of device. This does not affect the universal .apk that is generated for testing on your machine.
Enable ABI Split
The App Bundle will generate separate .apks based on the Application Binary Interface used by the user’s CPU. For example: arm64-v8a, x86, x86_64.
Enable language split
The App Bundle will generate separate .apks based on the user’s language. Only strings localized for the user will be downloaded.
Enable density split
The App Bundle will generate separate .apks based on image resolution and DPI. Only icons and splash screens compatible with the user’s device will be downloaded.
As an example, if you enabled ABI split but disabled language split, the .aab would tailor the final APK to a user’s device based on the compatible ABI for their device, but every user would receive resources for all languages regardless of their device or language settings.
The default settings will result in the smallest possible size for the final .apk, while disabling these settings will result in larger .apks.
For information on how to upload either .apks or .aabs to the Google Play Store, refer to our guide on Shipping with Android .
Источник
Android Quick Start
Setting up for development for the Android platform.
This Quick Start Guide will walk you through all of the essentials for setting up Unreal Engine 4 (UE4) for Android game development, including the following topics:
Setting up your test device and computer for Android game development.
Configuring new projects for mobile development.
Setting up Unreal Editor for packaging Android builds.
Setting the editor to preview with mobile rendering feature levels.
Testing your project on-device from the editor.
Packaging a standalone build of your project.
When you have completed this guide, you will be prepared to take an Android project from initial setup to testing and packaging.
1 — Android Development Prerequisites
In order to create and deploy an Android project, you will need to install several Android development prerequisites included with Unreal Engine and ensure that your device is ready for testing.
Follow the guide in Setting Up Android SDK and NDK for Unreal to install Android Studio and set up the required SDK components for Android development in Unreal.
On the device that you want to use for testing, open the Settings and enable Developer Mode.
Locate Developer Options in your device’s Settings, then enable USB Debugging.
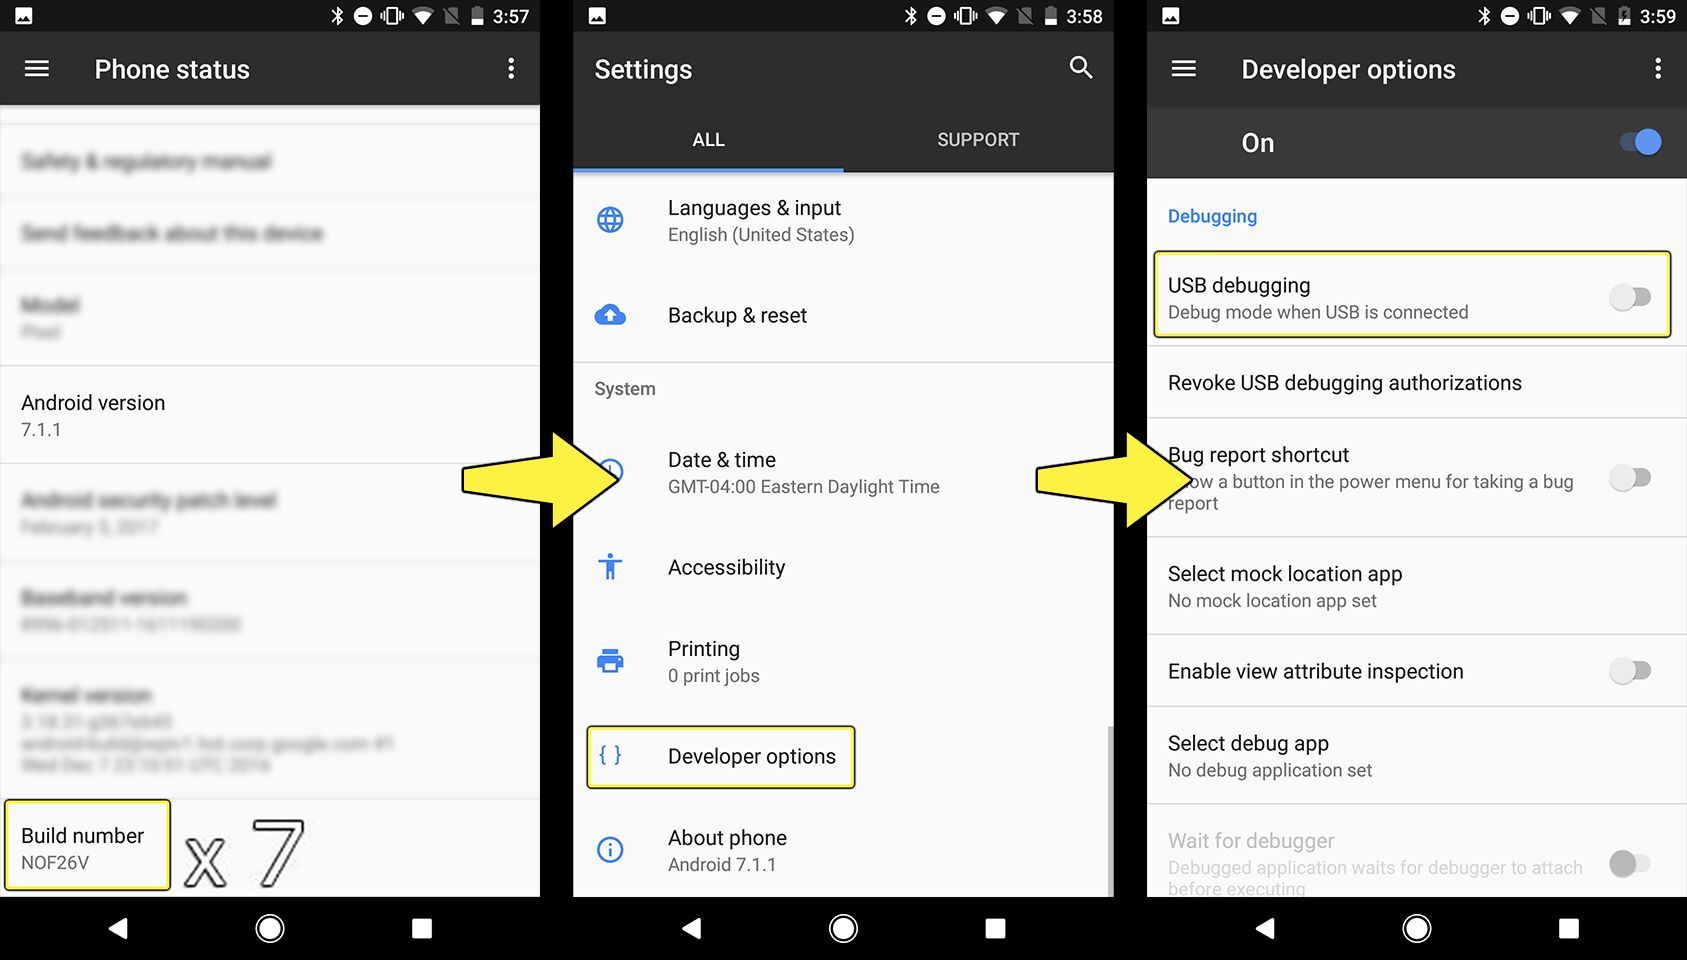
Click to enlarge image.
Plug your device into your computer, then allow your computer to access your device’s data.
Permit your computer to install any needed drivers for your device.
Once you have completed these steps, you will be ready to develop new Android projects.
For more details about device setup, refer to our guide on Setting up Your Android Device for Development .
For information about installing additional Android SDKs for specific devices and features, refer to Installing Additional Android SDK .
2 — Creating Your Project
In the following section we will be creating a new UE4 project that willВ use the Blueprint Third Person template to show how quickly you can get a UE4 project running on an Android device.
Launch Unreal Editor. In the Unreal Project Browser, use the following settings to create a new project:
Project Category: Games
Template: Top Down
Target Hardware: Mobile/Tablet
Quality Level: Scalable 3D or 2D
Name your project AndroidQuickStart and click the Create Project button to finish creating the project.
Choosing Mobile/Tablet for your target hardware and Scalable 3D or 2D for your target quality level will ensure that your project accounts for the user interface and hardware limitations of mobile devices.
3 — Setting Up Unreal Editor for Android
Next, we need to make sure our Project Settings in Unreal Editor are configured for Android APK builds.
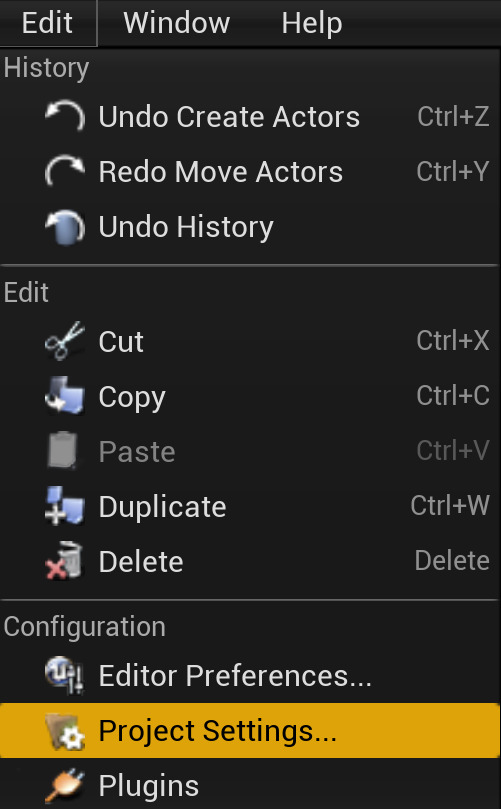
Click Edit > Project Settings to bring up the Project Settings window.
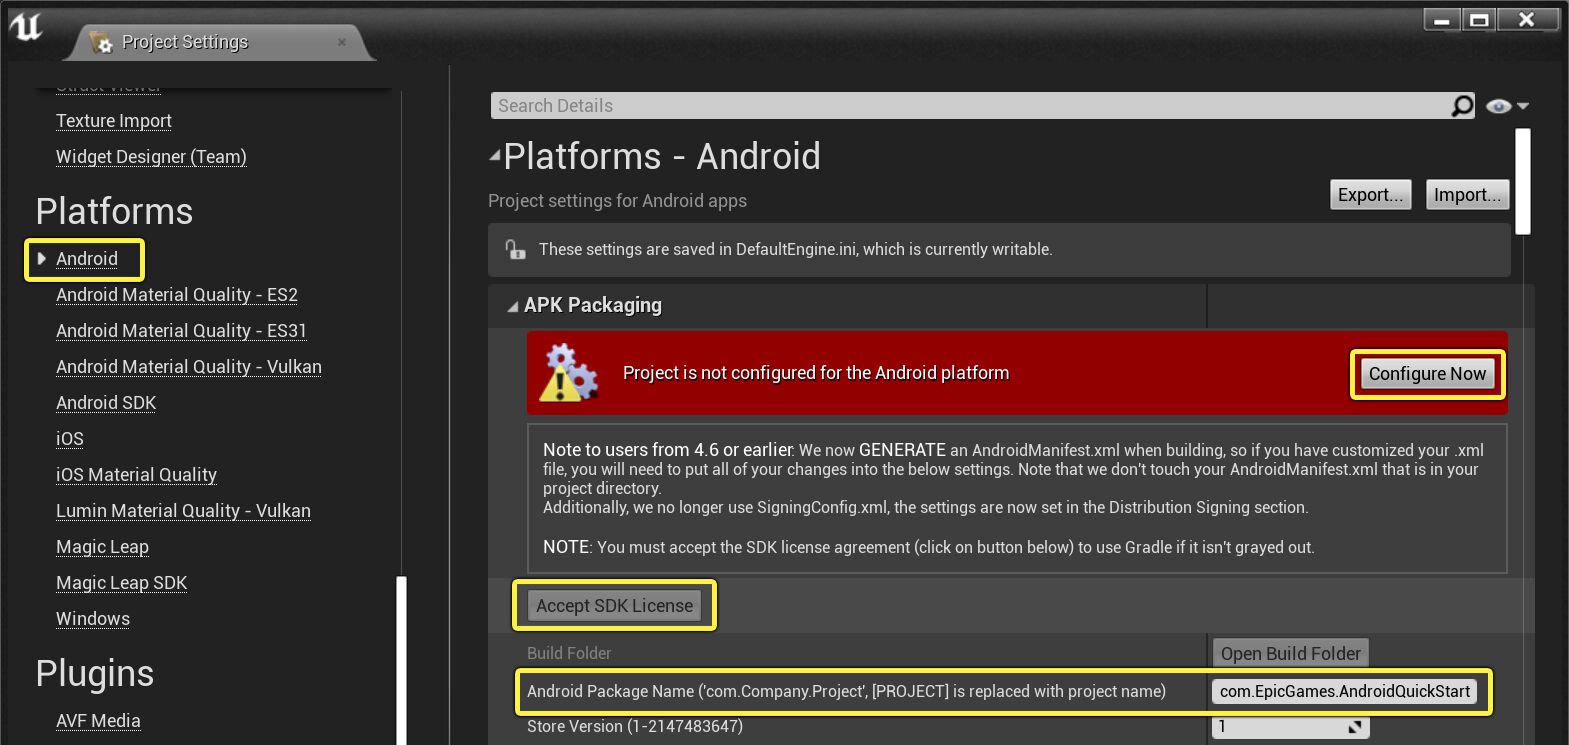
Inside of the Project Settings window, navigate to Platforms > Android.
Under APK Packaging, there will be a warning that reads «Project is not configured for the Android platform». Click the Configure Now button to automatically set up your project to write the required platform files.
Fill in the Android Package Name with an appropriate company and project name. In our instance we use com.EpicGames.AndroidQuickStart.
If the Accept SDK License button is enabled, click it in order to accept Android’s SDK license agreement. If you have previously accepted this agreement, then you will not need to complete this step.
Your project will now be enabled to create Android builds and launch on an Android device.
4 — Configuring Editor and PIE for Mobile Previews
You can set Unreal Editor’s Play-In-Editor (PIE) mode to provide a preview of how your game will look in the Mobile renderer.
In the Toolbar, click Settings > Preview Rendering Level, then select one of the available rendering levels for Android.
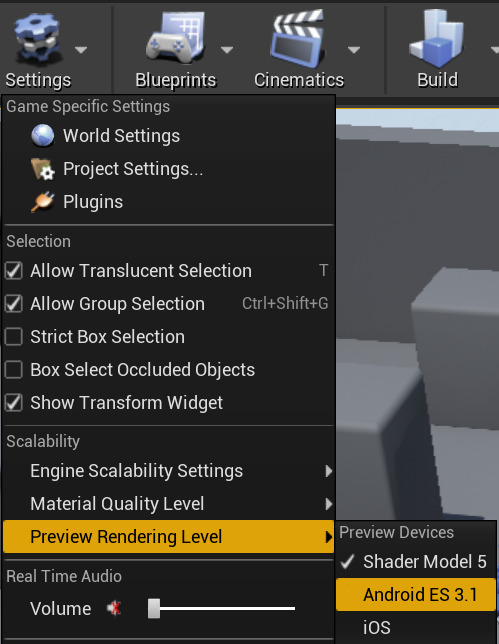
Click to enlarge image.
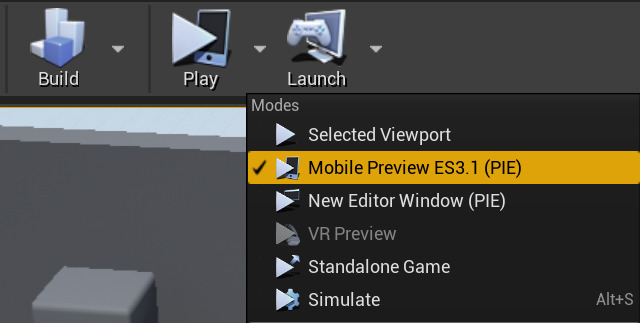
Click the dropdown next to the Play button in the Toolbar. Choose one of the available Mobile Preview modes corresponding to the rendering level you selected.
The editor will now display your game in a way that is visually consistent with your target renderer. Additionally, when you press the PIE button, your game will launch in a standalone window set to a standard mobile aspect ratio and configured to emulate a touchscreen using your mouse. These settings will not affect packaging for mobile devices, but they will ensure that you have an accurate preview when working in the editor.
Refer to the Mobile Previewer reference for more information about how you can configure the Mobile Previewer.
5 — Launching on an Android Device
To test your current level on an Android-based device, you will need to do the following:
First need to make sure you have the level you want to test open. From this example, we will be using the ThirdPersonExampleMap level from the Blueprint based project that was created in the last step.
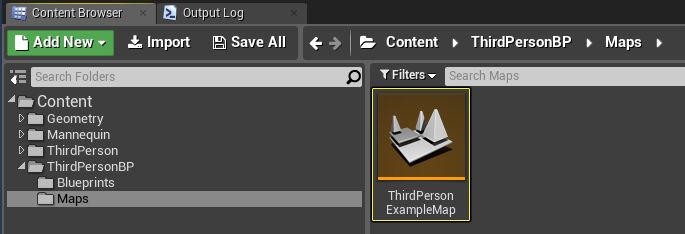
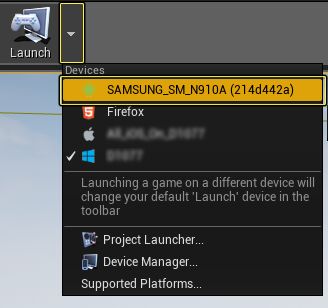
With the ThirdPersonExampleMap now open go to the Main Toolbar and next to the Launch icon click on the small triangle that displays more options.

From the Launch menu under the Devices section select your Android device from the list by clicking on it.
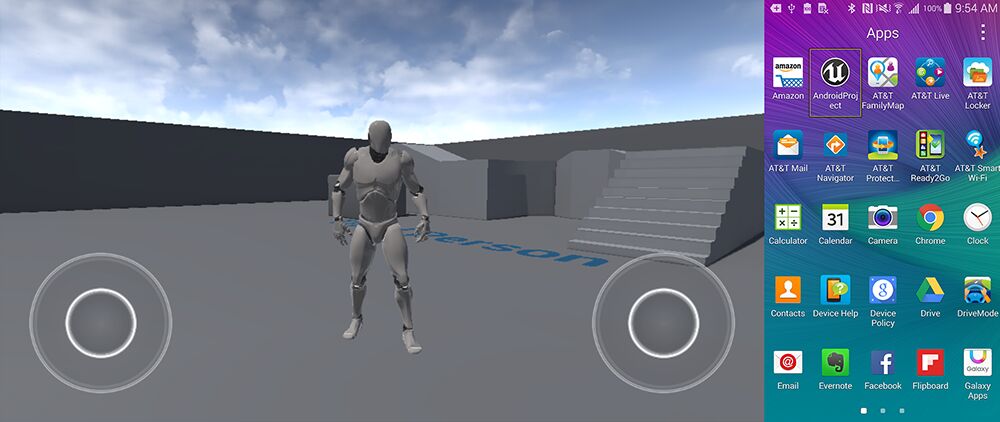
While your level is being launched on your device, the progress will be displayed in the bottom right-hand corner of the screen like in the following image.

When the deployment has finished, the project should automatically startВ running on your Android device. If the project fails toВ automaticallyВ start, you can start it by finding the App on your device and tapping on it to launch it.
Click to enlarge image.
6 — Packaging Android Builds
The above steps provide a way to package and immediately launch a project on device. To package a standalone APK for distribution and testing, follow these steps:
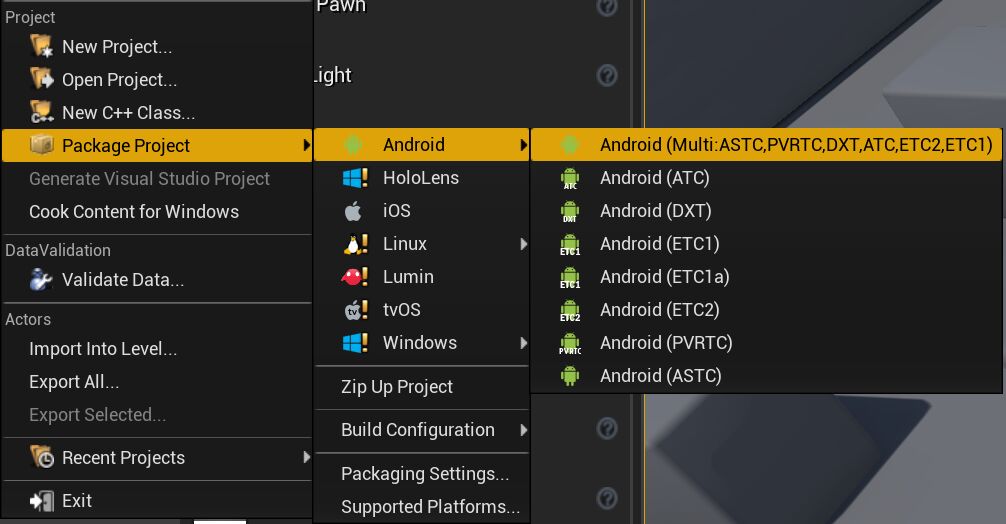
Click File > Package Project > Android > Android (Multi:ASTC,PVRTC,DXT,ATC,ETC2,ETC1).
Click to enlarge image.
When the Package Project dialogue appears, choose the directory where you want to save it. Here we save it in AndroidQuickStart/Build.
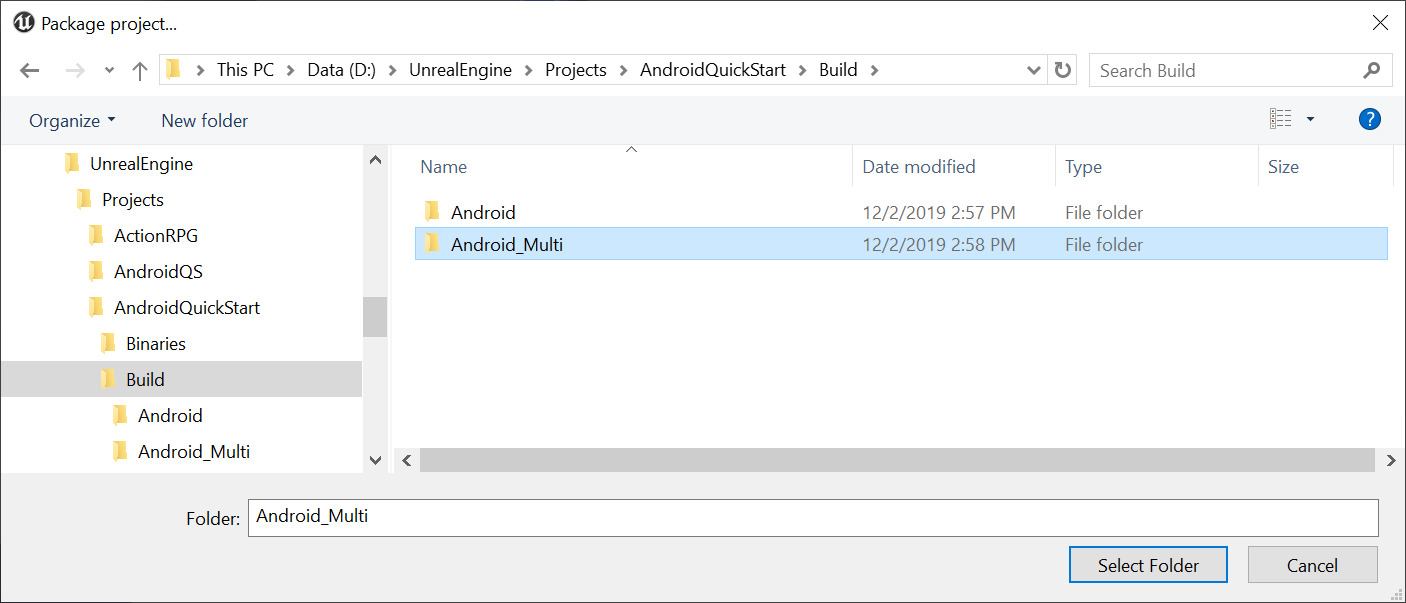
Click to enlarge image.
Click Select Folder and Unreal Editor will begin packaging your project. Wait for it to finish packaging.
If you navigate to the folder where you output your build, the folder will contain the APK and OBB files necessary to install your game on an Android device. There are also a pair of .bat files that you can use to automatically install or uninstall your build to a connected device.

Click to enlarge image.
For more detailed information on configuring the Packaging settings for Android builds, refer to the Packaging Android Projects reference page.
7 — On Your Own
With what you have learned in this Quick Start you are now prepared to package and distribute your UE4 projects to general Android devices. You should expand on UE4’s provided templates by creating new gameplay and levels in order to create fully functional mobile game. Depending on your project’s needs and the devices that you are specificially targeting, further configuration will be required in order to optimize your builds. The following links will provide you with more information for taking the next steps in building your projects:
Android Development Reference — General reference information for Android developers in UE4.
Android SDK Requirements — Reference for SDK and OS requirements to use specific versions of UE4.
Android Device Compatibility — Information about supported devices for the current version of UE4.
Android Debugging — How-to guide for debugging Android projects on-device.
Mobile Rendering — Information about Mobile-specific rendering features.
Mobile Services — Information about implementing online services and notifications.
Shipping with Android — Guidelines about preparing your game for distribution.
Источник


