- Shipping With Android
- Getting your UE4 powered game setup on the Google Play store.
- Google Play Console
- Google Play Store Listing
- Google Play Store APK Size
- Google Play Console API Changes
- Project SDK Override
- Android SDK Version
- Shipping with Multiple Expansion Files
- Android Quick Start
- Setting up for development for the Android platform.
- 1 — Android Development Prerequisites
- 2 — Creating Your Project
- 3 — Setting Up Unreal Editor for Android
- 4 — Configuring Editor and PIE for Mobile Previews
- 5 — Launching on an Android Device
- 6 — Packaging Android Builds
- 7 — On Your Own
Shipping With Android
Getting your UE4 powered game setup on the Google Play store.
Once you have completed building your Unreal Engine 4 (UE4) powered mobile project, the next step is getting it ready to be distributed through the Google Play store. In the following document, we will take a look at some of the various items that could cause issues when getting your UE4 project on the Google Play store.
The Google Play store changes its look, layout, and workflows on a regular basis without any prior notification. Because of this, some of the information in this guide might be in a different location, use a different name or been removed completely. Make sure to check the official Google Play Store help pages should you not be able to find the information you are looking for, or if the information you found is out of date.
Google Play Console
The Google Play Console is the web portal that is used to upload, manage and release your UE4 project on the Google Play Store. From the Google Play Console, you can do a wide range of tasks, like configuring your project for release to running automated tests. You can track how you are acquiring new users or how well your UE4 project is performing across a wide range of Android capable hardware.
Google Play Store Listing
Before your project can be displayed and downloaded from the Google Play Store, you will need to first fill out all of the various sections that have a grayed out checkmark box in theВ DashboardВ section of the Google Play Console.

Make sure to read each section carefully and provide the needed information and files.
Once you have successfully completed a section the grayed out checkmark box will change to green like in the following image:

Once each of the required sections in the Dashboard has a green checkmark next to it, your application is then ready to be reviewed by Google for release on the Google Play Store.
Google Play Store APK Size
The Google Play Store has a size limit of 100 MB for any APK that is uploaded. If your application requires more data than can fit in the 100 MB limit, you will have to place the rest of the content into an Opaque binary blob(OBB)file. The maximum size for an OBB is 2 GB. Once you have uploaded your UE4 APK to the Google Play Console, it can take at least 45 minutes or more until you will be able to push the APK into Alpha, Beta or Release. Because of this, it is common practice to complete App Releases section first and then fill out the rest of the needed information.
Google Play Console API Changes
Google Play will require that new apps target at least Android 8.0 (API level 26) from August 1, 2018, and that app updates target Android 8.0 from November 1, 2018. UE4 version 4.21 or newer will take this into account but any project made with previous versions of UE4 will have to be updated to accommodate for this new change.
This new change will require that your UE4 project ask the user for permissions to utilize certain features of the OS, like writing a save file to disk, when it is time to do so. In the past, the user was asked to grant all needed permissions when the application was first to run. В To help you manage the requesting of permission in UE4, versionВ 4.21 (and later),В you will need to use the Android Runtime PermissionВ Plugin that can be found in the Android section of the Plugins menu.

Click for full image.
Project SDK Override
The Project SDK Override enablesВ you to change, on a per project basis, which version of the Android SDK’s are used to compile your project. You can find these options by going to Project Settings > Android > Project SDK Override.

Click for full image.
Android Setting
Description
SDK API Level
Controls the Java API used to compile the Java portion of the engine code.
NDK API Level
Controls the compiler toolchain that the C++ code complies with. This may restrict the version of Android your native code will be compatible with.
Leaving the fields blank will use the global Android SDK project settings.
Android SDK Version
The AndroidВ Minimum SDK VersionВ input helps determine the minimum OS version that your app can be installed on. The Target SDK Version informs the Android OS of the expected behavior of the API. If you are not sure which SDK Version is used with which Android OS, check out the Codenames, Tags, and Build Numbers page for more information.

Click for full image.
Setting
Description
Minimum SDK Version
This controls the minimum OS version that an app can be installed on. This is also used by the Google Play Store to filter which devices your application is seen by in the store.
Target SDK Version
This informs the Android OS of the expected behavior of the API. В Setting this to a particular API level is a promise that your code will work with the features and changes introduced by that Android release.
If you have a project that is using an older version of UE4 and you want to ship to Google Play store, you will need to set your Target SDK to 26. This will still allow your app to run on older devices that might not have Android SDK 26 as long as the Minimum SDK Version is sufficient.
Shipping with Multiple Expansion Files
The Unreal Engine automatically packages the contents of the Content folder into separate OBB expansion files when you package your project for Android. When publishing an application to the Google Play Store that uses multiple OBB files, follow the steps below to ensure that your OBBs are uploaded correctly alongside your project’s APK:
Start a new Alpha track by pressing the Create Release button.
Press the Browse Files button to upload your APKs. You should upload your Arm7 first, then your Arm64 second.
Once the upload is complete, press the Plus icon located next to the word REMOVE to add your OBB file.

From the OBB Menu, click the drop-down next to the No Expansion File option and from the displayed list, select the Upload a New File option.

Using the displayed dialog box, navigate to the OBB that matches the APK store version and press the Okay button.
If you are not sure what APK store version you should use, you can open your BAT files with a text editor to see which version your project is using.
Once the OBB has been uploaded, you will see it in the Use Expansion File box. Press the Save buitton.

When uploading an OBB file output with UE version 4.22 or earlier, you may receive a warning indicating that the file you have uploaded is identical to an earlier one, as in the above image. This can occur if the OBB file that you are using has the same size in bytes as an OBB from a previous build that you have uploaded. However, the OBBs are not actually identical, and if you select earlier OBBs then it will result in errors when attempting to run the application. Ignore this warning and upload the OBBs output with your build as normal.
If you are using UE version 4.23 or later, this issue is resolved and the upload dialogue will not erroneously report OBBs as being identical.
Repeat the above steps for any additional OBB files you might have.
Источник
Android Quick Start
Setting up for development for the Android platform.

This Quick Start Guide will walk you through all of the essentials for setting up Unreal Engine 4 (UE4) for Android game development, including the following topics:
Setting up your test device and computer for Android game development.
Configuring new projects for mobile development.
Setting up Unreal Editor for packaging Android builds.
Setting the editor to preview with mobile rendering feature levels.
Testing your project on-device from the editor.
Packaging a standalone build of your project.
When you have completed this guide, you will be prepared to take an Android project from initial setup to testing and packaging.
1 — Android Development Prerequisites
In order to create and deploy an Android project, you will need to install several Android development prerequisites included with Unreal Engine and ensure that your device is ready for testing.
Follow the guide in Setting Up Android SDK and NDK for Unreal to install Android Studio and set up the required SDK components for Android development in Unreal.
On the device that you want to use for testing, open the Settings and enable Developer Mode.
Locate Developer Options in your device’s Settings, then enable USB Debugging.
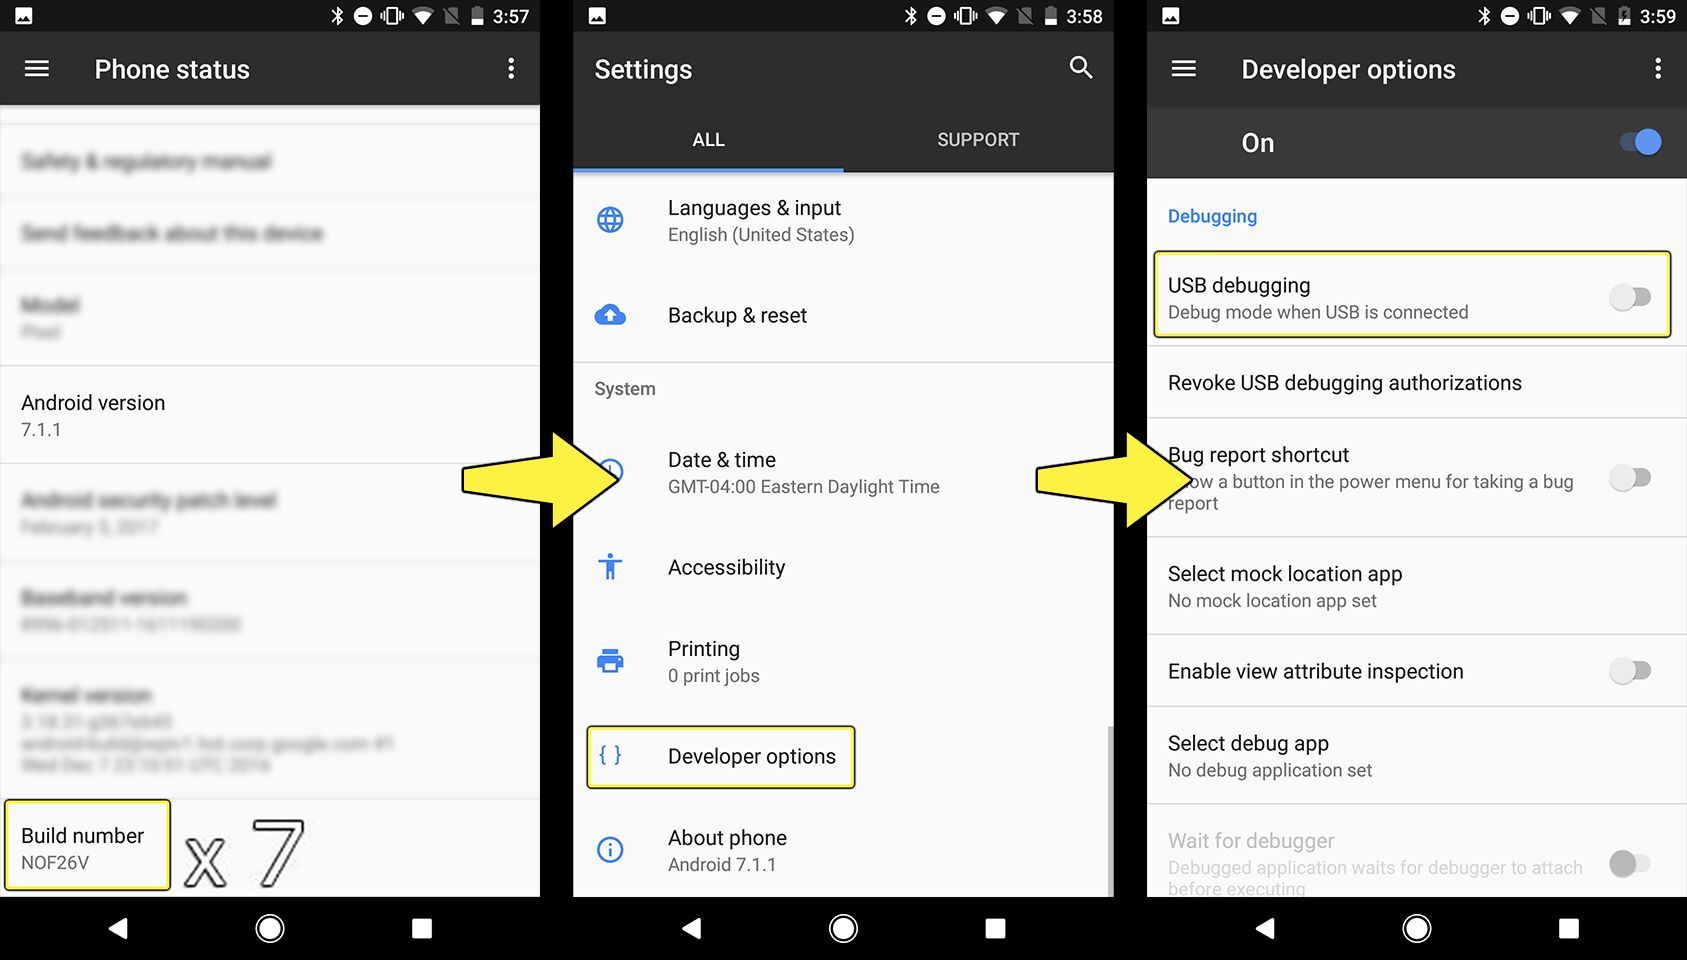
Click to enlarge image.
Plug your device into your computer, then allow your computer to access your device’s data.
Permit your computer to install any needed drivers for your device.
Once you have completed these steps, you will be ready to develop new Android projects.
For more details about device setup, refer to our guide on Setting up Your Android Device for Development .
For information about installing additional Android SDKs for specific devices and features, refer to Installing Additional Android SDK .
2 — Creating Your Project
In the following section we will be creating a new UE4 project that willВ use the Blueprint Third Person template to show how quickly you can get a UE4 project running on an Android device.
Launch Unreal Editor. In the Unreal Project Browser, use the following settings to create a new project:
Project Category: Games
Template: Top Down
Target Hardware: Mobile/Tablet
Quality Level: Scalable 3D or 2D
Name your project AndroidQuickStart and click the Create Project button to finish creating the project.
Choosing Mobile/Tablet for your target hardware and Scalable 3D or 2D for your target quality level will ensure that your project accounts for the user interface and hardware limitations of mobile devices.
3 — Setting Up Unreal Editor for Android
Next, we need to make sure our Project Settings in Unreal Editor are configured for Android APK builds.
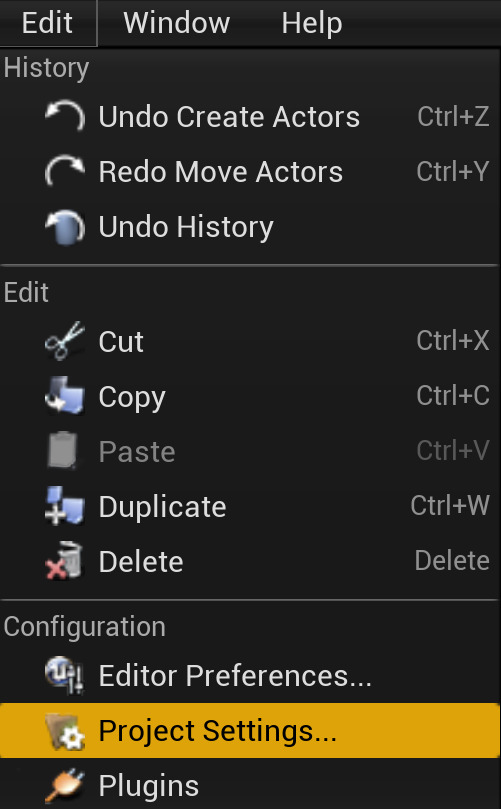
Click Edit > Project Settings to bring up the Project Settings window.
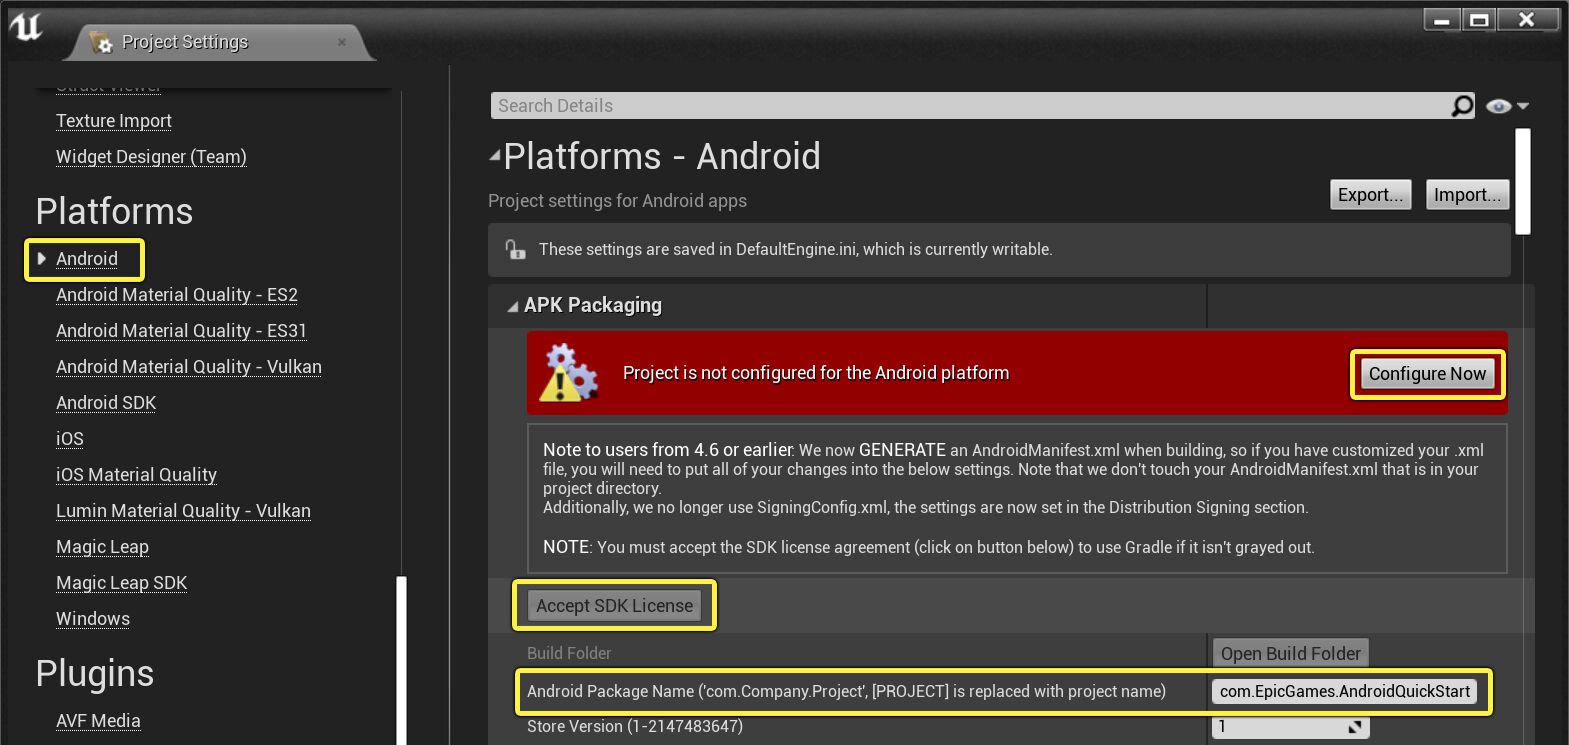
Inside of the Project Settings window, navigate to Platforms > Android.
Under APK Packaging, there will be a warning that reads «Project is not configured for the Android platform». Click the Configure Now button to automatically set up your project to write the required platform files.
Fill in the Android Package Name with an appropriate company and project name. In our instance we use com.EpicGames.AndroidQuickStart.
If the Accept SDK License button is enabled, click it in order to accept Android’s SDK license agreement. If you have previously accepted this agreement, then you will not need to complete this step.
Your project will now be enabled to create Android builds and launch on an Android device.
4 — Configuring Editor and PIE for Mobile Previews
You can set Unreal Editor’s Play-In-Editor (PIE) mode to provide a preview of how your game will look in the Mobile renderer.
In the Toolbar, click Settings > Preview Rendering Level, then select one of the available rendering levels for Android.
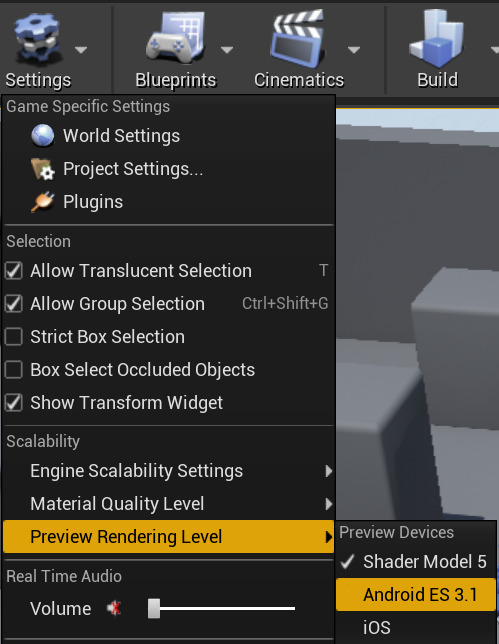
Click to enlarge image.
Click the dropdown next to the Play button in the Toolbar. Choose one of the available Mobile Preview modes corresponding to the rendering level you selected.
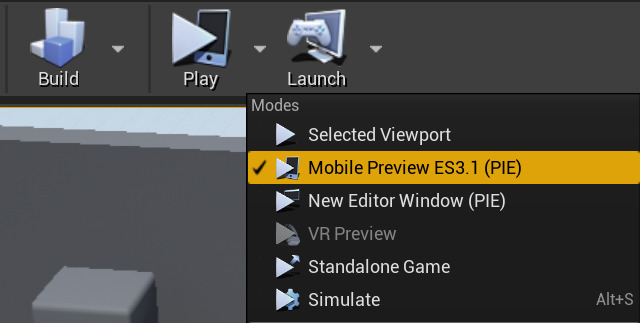
The editor will now display your game in a way that is visually consistent with your target renderer. Additionally, when you press the PIE button, your game will launch in a standalone window set to a standard mobile aspect ratio and configured to emulate a touchscreen using your mouse. These settings will not affect packaging for mobile devices, but they will ensure that you have an accurate preview when working in the editor.
Refer to the Mobile Previewer reference for more information about how you can configure the Mobile Previewer.
5 — Launching on an Android Device
To test your current level on an Android-based device, you will need to do the following:
First need to make sure you have the level you want to test open. From this example, we will be using the ThirdPersonExampleMap level from the Blueprint based project that was created in the last step.
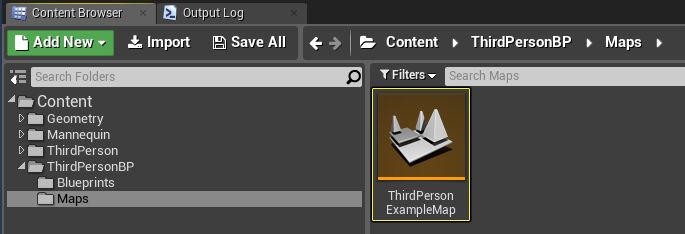
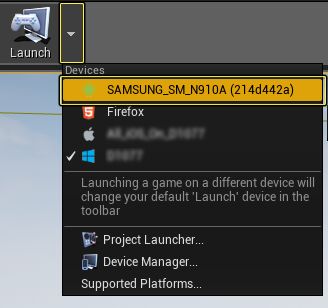
With the ThirdPersonExampleMap now open go to the Main Toolbar and next to the Launch icon click on the small triangle that displays more options.

From the Launch menu under the Devices section select your Android device from the list by clicking on it.
While your level is being launched on your device, the progress will be displayed in the bottom right-hand corner of the screen like in the following image.

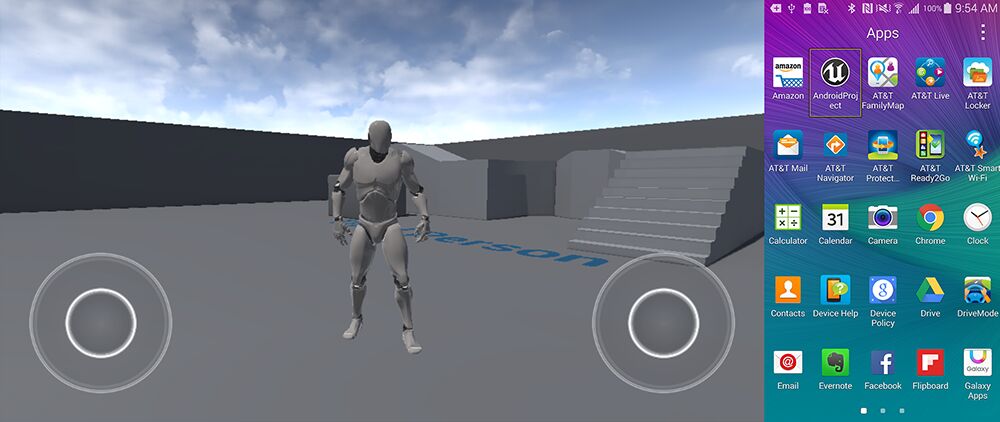
When the deployment has finished, the project should automatically startВ running on your Android device. If the project fails toВ automaticallyВ start, you can start it by finding the App on your device and tapping on it to launch it.
Click to enlarge image.
6 — Packaging Android Builds
The above steps provide a way to package and immediately launch a project on device. To package a standalone APK for distribution and testing, follow these steps:
Click File > Package Project > Android > Android (Multi:ASTC,PVRTC,DXT,ATC,ETC2,ETC1).
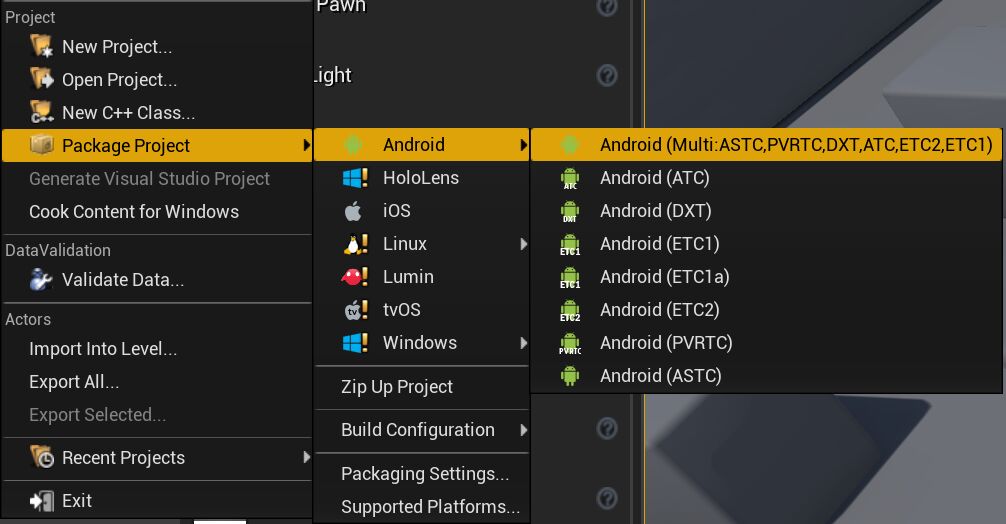
Click to enlarge image.
When the Package Project dialogue appears, choose the directory where you want to save it. Here we save it in AndroidQuickStart/Build.
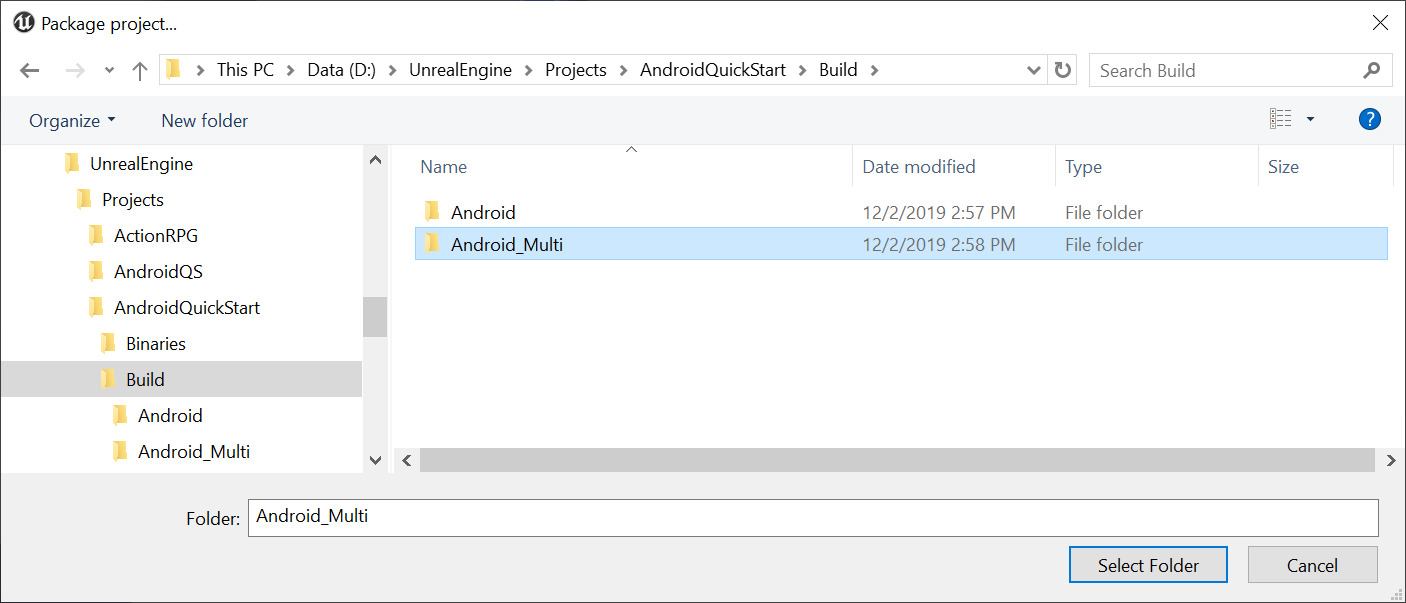
Click to enlarge image.
Click Select Folder and Unreal Editor will begin packaging your project. Wait for it to finish packaging.
If you navigate to the folder where you output your build, the folder will contain the APK and OBB files necessary to install your game on an Android device. There are also a pair of .bat files that you can use to automatically install or uninstall your build to a connected device.

Click to enlarge image.
For more detailed information on configuring the Packaging settings for Android builds, refer to the Packaging Android Projects reference page.
7 — On Your Own
With what you have learned in this Quick Start you are now prepared to package and distribute your UE4 projects to general Android devices. You should expand on UE4’s provided templates by creating new gameplay and levels in order to create fully functional mobile game. Depending on your project’s needs and the devices that you are specificially targeting, further configuration will be required in order to optimize your builds. The following links will provide you with more information for taking the next steps in building your projects:
Android Development Reference — General reference information for Android developers in UE4.
Android SDK Requirements — Reference for SDK and OS requirements to use specific versions of UE4.
Android Device Compatibility — Information about supported devices for the current version of UE4.
Android Debugging — How-to guide for debugging Android projects on-device.
Mobile Rendering — Information about Mobile-specific rendering features.
Mobile Services — Information about implementing online services and notifications.
Shipping with Android — Guidelines about preparing your game for distribution.
Источник


