- Packaging Android Projects
- Taking a look at packaging your final Android project.
- Essential Setup
- 1. Packaging Your Project
- 2. Deploying A Packaged Project to Device
- Packaging App Bundles
- Shipping With Android
- Getting your UE4 powered game setup on the Google Play store.
- Google Play Console
- Google Play Store Listing
- Google Play Store APK Size
- Google Play Console API Changes
- Project SDK Override
- Android SDK Version
- Shipping with Multiple Expansion Files
Packaging Android Projects
Taking a look at packaging your final Android project.
In order to understand and use the content on this page, make sure you are familiar with the following topics:
In the following How-To we will take a look how to package your Unreal Engine 4 (UE4) project for deployment to an Android device. The Android packaging process in UE4 is simple to use and outputs several convenient files for installing and uninstalling your project from phones for testing.
Essential Setup
Before we begin, you will need to fulfill the following requirements and project setup:
You will need Android Studio set up on your computer. See Setting up Android SDK and NDK .
Your Android device must have Development Mode and USB Debugging enabled. See Setting Up Your Android Device For Development .
You will need to configure your Project Settings for Android and accept the Android SDK license agreement. See the Android Quickstart Guide .
If you have not already created a project, create one using the Third-Person Template, with Target Hardware set to Mobile/Tablet and quality set to Scalable 3D or 2D.
1. Packaging Your Project
In this section we will package the project as a .APK file.
We are currently packaging in Development because we are testing this game, but when your game is complete, you can package it in Shipping by hovering over the Build Configurations option in the Package Project menu.
In the File menu, go to Package Project > Android and select the Texture format you want to package. For this example, we will choose Android ETC2 as it is supported by all devices.
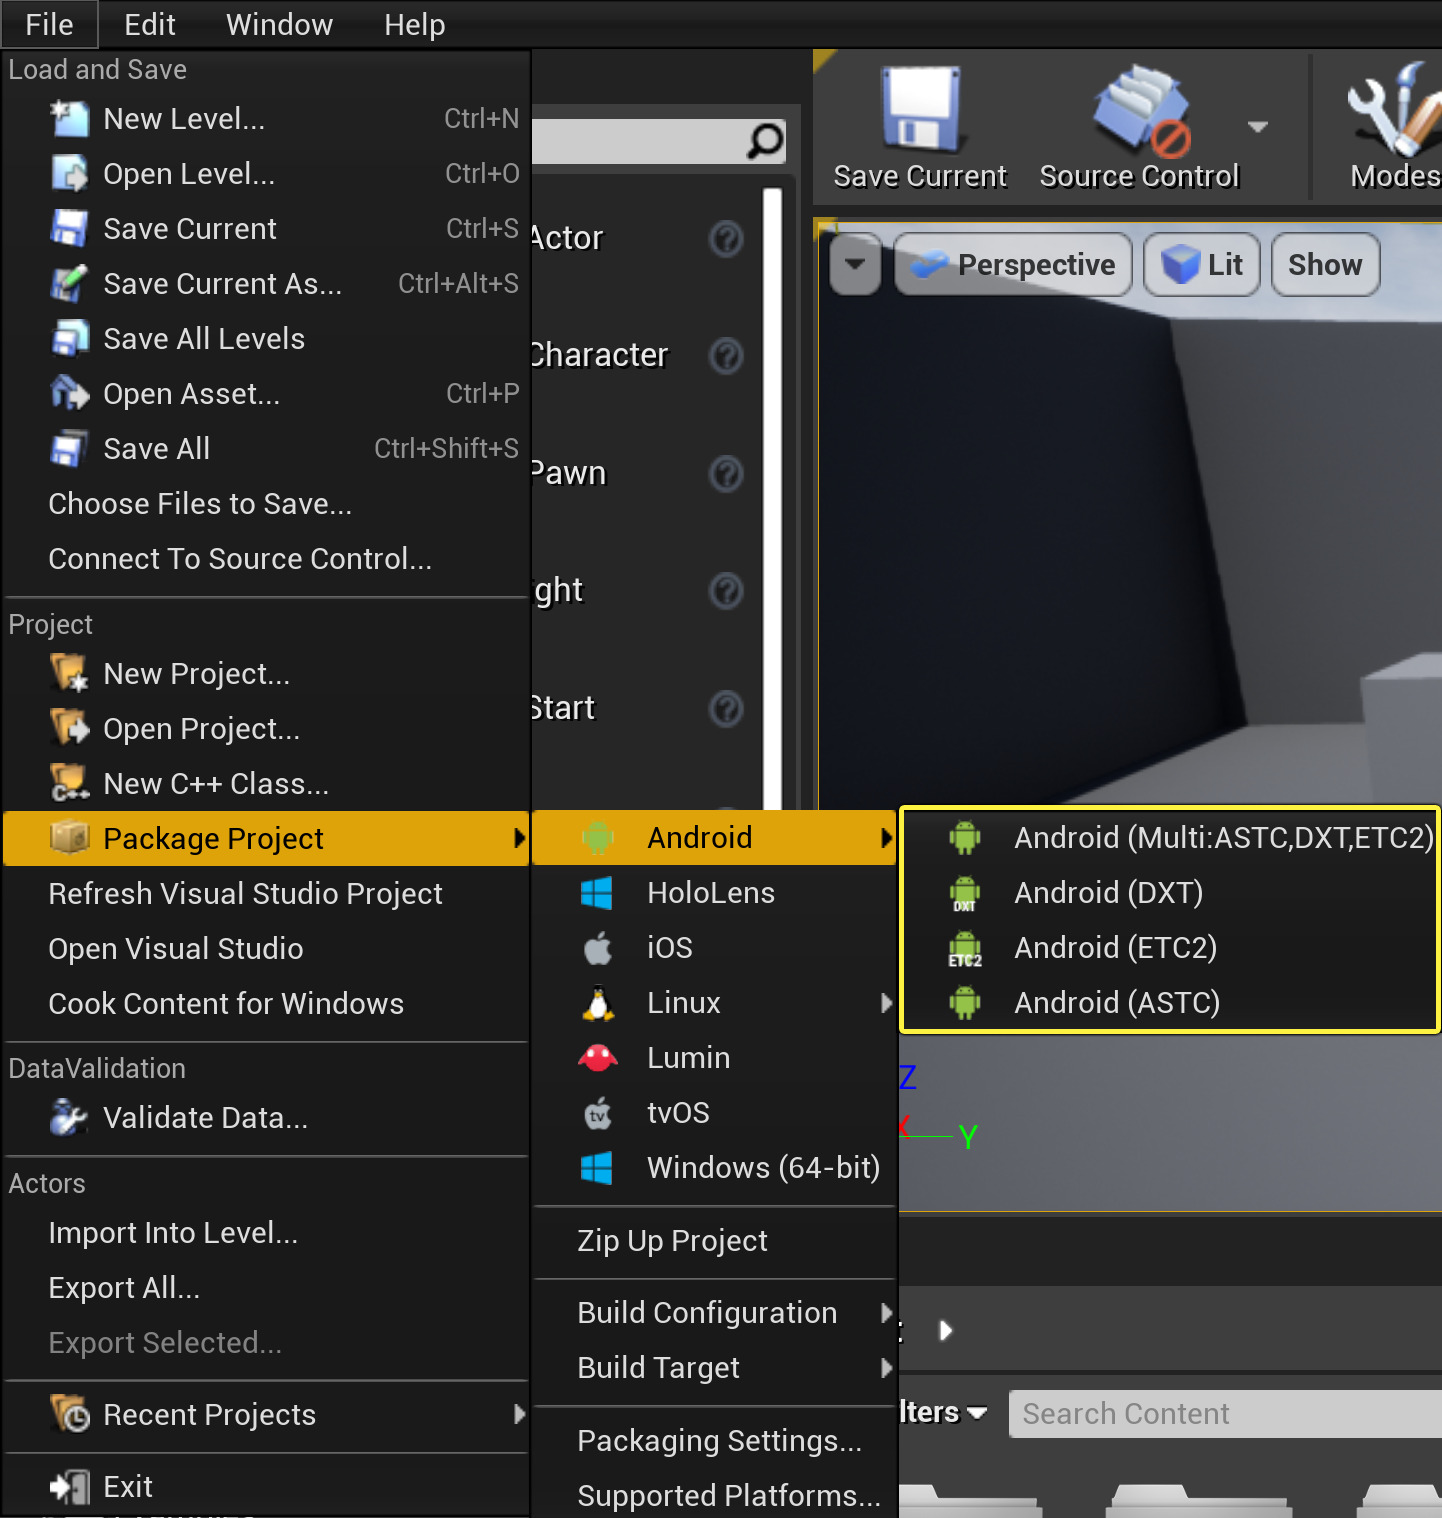


Click to enlarge image.
Different devices support different Texture formats depending on the hardware they run on. See, Android Development Reference for a detailed breakdown of the various formats.
Format
Description
ETC2
Supported by all OpenGL 3.x class devices and supports alpha compression.
DXT
Supported by Nvidia Tegra GPUs and supports alpha compression.
ASTC
Latest Texture compression format allowing more quality control by specifying block size and supports alpha compression. Available on some devices at this point.
If you are using an older version of Unreal Engine to support an existing project, you will also have access to the following legacy Texture formats.
Format
Description
ETC1
Supported by all Android based devices but cannot compress alpha textures (they are stored uncompressed). Recommend using an RGB and a separate alpha texture if need alpha to get better compression.
ETC1a
Uses ETC1 for non-alpha textures and ETC2 for alpha texture. If the device does not support ETC2, alpha textures will be uncompressed into RGBA at runtime. This format can be used on both ETC1 and ETC2 devices, but ETC1 for non-alpha textures may not be as high-quality as ETC2.
ATC
Supported by Qualcomm Adreno GPUs and supports alpha compression.
PVRTC
Supported by PowerVR GPUs and supports alpha compression.
You will be prompted for a location to save your packaged game, which should default to your project folder. Create a new folder and call it AndroidBuilds.


Click to enlarge image.
While your project is being packaged a packaging message will appear in the bottom right corner showing the progress of the packing.

Once packaging is successful, a Packaging Complete message will appear in the bottom right of the editor.

Navigate to the folder you created in step two. There will be a new folder named specifically for the texture type you selected when packaging. In this example, the folder is named Android_ETC2.


Click to enlarge image.
2. Deploying A Packaged Project to Device
Now that we have packaged your project as a .APK, this section will instruct you on how to deploy your build to a device.
Plug your Android device into your PC with a USB cable. If prompted, allow your PC to change files.
Open up the Android_ETC2 folder and then Double-click on the Install_[ProjectName]_Development.bat batch file to install the project on your Android device.

Click to enlarge image.
If you do not have your device plugged in via USB, running the .BAT file will do nothing.
Plug your Android device into your PC with a USB cable. If prompted, allow your PC to change files.
Open up the Android_ETC2 folder and then Double-click on the Install_[ProjectName]_Development_armv7-es3.command file to install the project on your Android device.
If you do not have your device plugged in via USB, running the .command file will do nothing.
Plug your Android device into your PC with a USB cable. If prompted, allow your PC to change files.
Open the Android_ETC2 folder, where you’ll find the files that were created during the packaging process.

You should see the Installation and Uninstallation shell scripts (.sh) along with the Android Application Package (.apk) that contains all of the files you need to install the project onto any Android device that supports the ETC1 compression scheme.
Now, open up the terminal from this folder’s location by right-clicking inside of the folder and selecting Open in Terminal.

Enter ./Install_LinuxAndroidProject_Development-arm64.es2.sh into the terminal to install the project onto your Android device.

Click to enlarge image.
If you’re having trouble running the shell script, try entering adb devices into the terminal to verify that your device is connected to your computer.
During the installation process, the shell script should flush the following output to your terminal
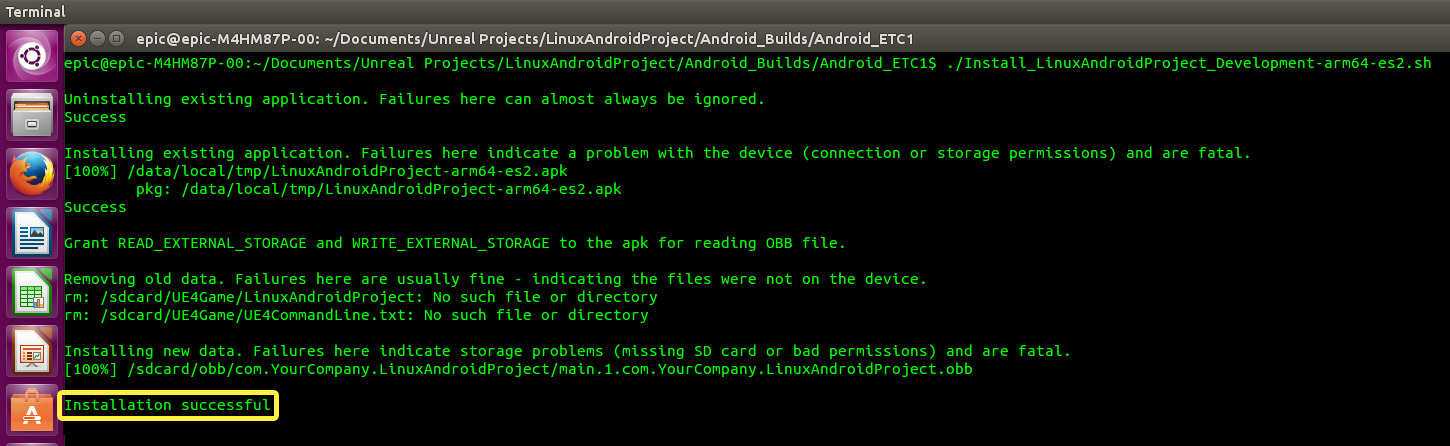
Click to enlarge image.
When the shell script has completed the installation process, you should see an Installation successful message.
When you have completed this How-To, your project should appear on your Android device per the following image:

In addition, you will have packaged .APK files and accompanying helpers to deploy them to other devices for testing.
Packaging App Bundles
Android App Bundles are a distribution format offered by Google as an alternative to packaging .apks. Instead of creating different .apks for different subsets of devices, you can create a single Android App Bundle build (.aab) and upload it to the Google Play Store. The store’s dynamic distribution system then uses the contents of the App Bundle to generate a .apk optimized for the user’s specific device when they download the application.
In addition to greatly condensing the work involved in maintaining builds on the Google Play Store, App Bundle builds can distribute .apks with up to 150 MB instead of the previous limit of 100 MB. This limit applies to the final .apk and not the App Bundle used to generate it.
To create an App Bundle Build, open your Project Settings and navigate to the Platforms > Android section. In the App Bundles section, enable Generate Bundle (AAB).

Now when you package a project for Android, you will generate a .aab file to upload to Google Play. You will also generate a universal .apk for testing purposes.
As a limitation of the Google Play Store, Android App Bundles can not be distributed with .obb files.
The other settings available for configuring App Bundle builds enable you to fine-tune the degree of sensitivity that the App Bundle will use in generating the final .apks for your project.
Generate Universal APK from Bundle
Enabling this setting will allow the App Bundle to generate a universal .apk file for end-users, which can be run on any kind of device. This does not affect the universal .apk that is generated for testing on your machine.
Enable ABI Split
The App Bundle will generate separate .apks based on the Application Binary Interface used by the user’s CPU. For example: arm64-v8a, x86, x86_64.
Enable language split
The App Bundle will generate separate .apks based on the user’s language. Only strings localized for the user will be downloaded.
Enable density split
The App Bundle will generate separate .apks based on image resolution and DPI. Only icons and splash screens compatible with the user’s device will be downloaded.
As an example, if you enabled ABI split but disabled language split, the .aab would tailor the final APK to a user’s device based on the compatible ABI for their device, but every user would receive resources for all languages regardless of their device or language settings.
The default settings will result in the smallest possible size for the final .apk, while disabling these settings will result in larger .apks.
For information on how to upload either .apks or .aabs to the Google Play Store, refer to our guide on Shipping with Android .
Источник
Shipping With Android
Getting your UE4 powered game setup on the Google Play store.
Once you have completed building your Unreal Engine 4 (UE4) powered mobile project, the next step is getting it ready to be distributed through the Google Play store. In the following document, we will take a look at some of the various items that could cause issues when getting your UE4 project on the Google Play store.
The Google Play store changes its look, layout, and workflows on a regular basis without any prior notification. Because of this, some of the information in this guide might be in a different location, use a different name or been removed completely. Make sure to check the official Google Play Store help pages should you not be able to find the information you are looking for, or if the information you found is out of date.
Google Play Console
The Google Play Console is the web portal that is used to upload, manage and release your UE4 project on the Google Play Store. From the Google Play Console, you can do a wide range of tasks, like configuring your project for release to running automated tests. You can track how you are acquiring new users or how well your UE4 project is performing across a wide range of Android capable hardware.
Google Play Store Listing
Before your project can be displayed and downloaded from the Google Play Store, you will need to first fill out all of the various sections that have a grayed out checkmark box in theВ DashboardВ section of the Google Play Console.

Make sure to read each section carefully and provide the needed information and files.
Once you have successfully completed a section the grayed out checkmark box will change to green like in the following image:

Once each of the required sections in the Dashboard has a green checkmark next to it, your application is then ready to be reviewed by Google for release on the Google Play Store.
Google Play Store APK Size
The Google Play Store has a size limit of 100 MB for any APK that is uploaded. If your application requires more data than can fit in the 100 MB limit, you will have to place the rest of the content into an Opaque binary blob(OBB)file. The maximum size for an OBB is 2 GB. Once you have uploaded your UE4 APK to the Google Play Console, it can take at least 45 minutes or more until you will be able to push the APK into Alpha, Beta or Release. Because of this, it is common practice to complete App Releases section first and then fill out the rest of the needed information.
Google Play Console API Changes
Google Play will require that new apps target at least Android 8.0 (API level 26) from August 1, 2018, and that app updates target Android 8.0 from November 1, 2018. UE4 version 4.21 or newer will take this into account but any project made with previous versions of UE4 will have to be updated to accommodate for this new change.
This new change will require that your UE4 project ask the user for permissions to utilize certain features of the OS, like writing a save file to disk, when it is time to do so. In the past, the user was asked to grant all needed permissions when the application was first to run. В To help you manage the requesting of permission in UE4, versionВ 4.21 (and later),В you will need to use the Android Runtime PermissionВ Plugin that can be found in the Android section of the Plugins menu.

Click for full image.
Project SDK Override
The Project SDK Override enablesВ you to change, on a per project basis, which version of the Android SDK’s are used to compile your project. You can find these options by going to Project Settings > Android > Project SDK Override.

Click for full image.
Android Setting
Description
SDK API Level
Controls the Java API used to compile the Java portion of the engine code.
NDK API Level
Controls the compiler toolchain that the C++ code complies with. This may restrict the version of Android your native code will be compatible with.
Leaving the fields blank will use the global Android SDK project settings.
Android SDK Version
The AndroidВ Minimum SDK VersionВ input helps determine the minimum OS version that your app can be installed on. The Target SDK Version informs the Android OS of the expected behavior of the API. If you are not sure which SDK Version is used with which Android OS, check out the Codenames, Tags, and Build Numbers page for more information.

Click for full image.
Setting
Description
Minimum SDK Version
This controls the minimum OS version that an app can be installed on. This is also used by the Google Play Store to filter which devices your application is seen by in the store.
Target SDK Version
This informs the Android OS of the expected behavior of the API. В Setting this to a particular API level is a promise that your code will work with the features and changes introduced by that Android release.
If you have a project that is using an older version of UE4 and you want to ship to Google Play store, you will need to set your Target SDK to 26. This will still allow your app to run on older devices that might not have Android SDK 26 as long as the Minimum SDK Version is sufficient.
Shipping with Multiple Expansion Files
The Unreal Engine automatically packages the contents of the Content folder into separate OBB expansion files when you package your project for Android. When publishing an application to the Google Play Store that uses multiple OBB files, follow the steps below to ensure that your OBBs are uploaded correctly alongside your project’s APK:
Start a new Alpha track by pressing the Create Release button.
Press the Browse Files button to upload your APKs. You should upload your Arm7 first, then your Arm64 second.
Once the upload is complete, press the Plus icon located next to the word REMOVE to add your OBB file.

From the OBB Menu, click the drop-down next to the No Expansion File option and from the displayed list, select the Upload a New File option.

Using the displayed dialog box, navigate to the OBB that matches the APK store version and press the Okay button.
If you are not sure what APK store version you should use, you can open your BAT files with a text editor to see which version your project is using.
Once the OBB has been uploaded, you will see it in the Use Expansion File box. Press the Save buitton.

When uploading an OBB file output with UE version 4.22 or earlier, you may receive a warning indicating that the file you have uploaded is identical to an earlier one, as in the above image. This can occur if the OBB file that you are using has the same size in bytes as an OBB from a previous build that you have uploaded. However, the OBBs are not actually identical, and if you select earlier OBBs then it will result in errors when attempting to run the application. Ignore this warning and upload the OBBs output with your build as normal.
If you are using UE version 4.23 or later, this issue is resolved and the upload dialogue will not erroneously report OBBs as being identical.
Repeat the above steps for any additional OBB files you might have.
Источник


