- Урок 7. Room. Insert, Update, Delete, Transaction
- Insert
- Вставка нескольких объектов
- Получение id
- Режимы вставки
- Update
- Delete
- Транзакции
- Урок 5. Room. Основы
- Подключение к проекту
- Entity
- Database
- Практика
- UI поток
- Переход на Room
- 14.1B: Deleting and updating data with Room
- What you should already KNOW
- What you will LEARN
- What you will DO
- App overview
- Task 1. Initialize data only if the database is empty
- 1.1 Add a method to the DAO to get a single word
- 1.2 Update the initialization method to check whether data exists
- Task 2. Delete all words
- 2.1 Add deleteAll() to the WordDao interface and annotate it
- 2.2 Add deleteAll() to the WordRepository class
- 2.3 Add deleteAll() to the WordViewModel class
- Task 3. Add an Options menu item to delete all data
- 3.1 Add the Clear all data menu option
- Task 4. Delete a single word
- 4.1 Add deleteWord() to the DAO and annotate it
- 4.2 Add deleteWord() to the WordRepository class
- 4.3 Add deleteWord() to the WordViewModel class
- Task 5. Enable users to swipe words away
- 5.1 Enable the adapter to detect the swiped word
- Solution code
- Coding challenge
- Hints
- Challenge solution code
- Summary
- Writing database code
- ItemTouchHelper
- Related concept
- Learn more
Урок 7. Room. Insert, Update, Delete, Transaction
В этом уроке рассмотрим подробнее аннотации Insert, Update и Delete. А также узнаем, как использовать транзакции в Room.
Полный список уроков курса:
Insert
Аннотация Insert — это простой способ вставить объект в базу данных. Мы уже использовали ее в примерах прошлых уроков.
Использование этой аннотации выглядит так:
В Dao интерфейсе описываем метод, который на вход принимает Entity объект. К методу добавляем аннотацию Insert и Room сгенерирует необходимый код в реализации этого интерфейса.
Давайте посмотрим, какие еще возможности у нас есть.
Вставка нескольких объектов
Мы можем передавать в метод не один, а несколько объектов, используя varargs
Также, это может быть список:
Или это вообще может быть любой Iterable:
При вызове этого метода вы можете использовать массив или коллекцию.
Получение id
При вставке метод Insert может возвращать id только что добавленной записи. Для этого надо описать метод так, чтобы он возвращал long.
Если в Employee есть числовой первичный ключ, то именно его значение вы и получите.
В случае добавления нескольких записей, необходимо использовать long[]
Режимы вставки
Рассмотрим ситуацию, когда мы вставляем в таблицу запись, но обнаруживается, что запись с таким ключом там уже есть. По умолчанию мы получим ошибку: SQLiteConstraintException: UNIQUE constraint failed. И ничего в базу не запишется.
Но это можно поменять с помощью параметра onConflict.
В режиме REPLACE старая запись будет заменена новой. Этот режим хорошо подходит, если вам надо вставить запись, если ее еще нет в таблице или обновить запись, если она уже есть.
Также есть режим IGNORE. В этом режиме будет оставлена старая запись и операция вставки не будет выполнена.
Более подробно об этих режимах можно прочесть здесь.
Update
Эта аннотация аналогична Insert, но она не вставляет, а обновляет объекты в бд.
Так же, как и с Insert мы можем использовать коллекции и varargs, чтобы обновлять несколько объектов сразу.
Update ищет в бд запись по ключу. Если не найдет, то ничего не произойдет. Если найдет, то обновит все поля, а не только те, которые мы заполнили в Entity объекте.
Мы можем получить количество обновленных записей. Для этого опишите метод так, чтобы он возвращал int.
Как и Insert, Update поддерживает параметр onConflict.
Delete
Методы с аннотацией Delete будут удалять объекты.
В Delete методах мы также можем использовать коллекции и varargs, чтобы удалять несколько объектов сразу.
Delete ищет в бд запись по ключу.
Мы можем получить количество удаленных записей. Для этого необходимо описать метод так, чтобы он возвращал int.
Аннотации Insert, Update и Delete позволяют выполнить простые операции. Для более сложных действий необходимо использовать SQL запросы: INSERT, UPDATE и DELETE. Это можно сделать с помощью аннотации Query. В следующем уроке мы рассмотрим эту возможность.
Транзакции
Аннотация @Transaction позволяет выполнять несколько методов в рамках одной транзакции.
Рассмотрим пример, когда нам нужно добавить объекты Car и Employee:
EmployeeCarDao — отдельный Dao объект для работы с комбинацией Car и Employee. В нем описываем методы для вставки объектов по отдельности, а затем оба этих метода вызываем в одном методе с аннотацией Transaction. В итоге вставятся либо оба объекта, либо, в случае возникновения ошибки, ни один из них.
Обратите внимание, что в этом случае Dao — не интерфейс, а абстрактный класс.
Присоединяйтесь к нам в Telegram:
— в канале StartAndroid публикуются ссылки на новые статьи с сайта startandroid.ru и интересные материалы с хабра, medium.com и т.п.
— в чатах решаем возникающие вопросы и проблемы по различным темам: Android, Kotlin, RxJava, Dagger, Тестирование
— ну и если просто хочется поговорить с коллегами по разработке, то есть чат Флудильня
— новый чат Performance для обсуждения проблем производительности и для ваших пожеланий по содержанию курса по этой теме
Источник
Урок 5. Room. Основы
Библиотека Room предоставляет нам удобную обертку для работы с базой данных SQLite. В этом уроке рассмотрим основы. Как подключить к проекту. Как получать, вставлять, обновлять и удалять данные.
Полный список уроков курса:
Подключение к проекту
В build.gradle файл проекта добавьте репозитарий google()
В build.gradle файле модуля добавьте dependencies:
Если у вас студия ниже 3.0 и старые версии Gradle и Android Plugin, то подключение будет выглядеть так:
Room имеет три основных компонента: Entity, Dao и Database. Рассмотрим их на небольшом примере, в котором будем создавать базу данных для хранения данных по сотрудникам (англ. — employee).
При работе с Room нам необходимо будет писать SQL запросы. Если вы не знакомы с ними, то имеет смысл прочесть хотя бы основы.
Entity
Аннотацией Entity нам необходимо пометить объект, который мы хотим хранить в базе данных. Для этого создаем класс Employee, который будет представлять собой данные сотрудника: id, имя, зарплата:
Класс помечается аннотацией Entity. Объекты класса Employee будут использоваться при работе с базой данных. Например, мы будем получать их от базы при запросах данных и отправлять их в базу при вставке данных.
Этот же класс Employee будет использован для создания таблицы в базе. В качестве имени таблицы будет использовано имя класса. А поля таблицы будут созданы в соответствии с полями класса.
Аннотацией PrimaryKey мы помечаем поле, которое будет ключом в таблице.
В следующих уроках мы рассмотрим возможности Entity более подробно.
В объекте Dao мы будем описывать методы для работы с базой данных. Нам нужны будут методы для получения списка сотрудников и для добавления/изменения/удаления сотрудников.
Описываем их в интерфейсе с аннотацией Dao.
Методы getAll и getById позволяют получить полный список сотрудников или конкретного сотрудника по id. В аннотации Query нам необходимо прописать соответствующие SQL-запросы, которые будут использованы для получения данных.
Обратите внимание, что в качестве имени таблицы мы используем employee. Напомню, что имя таблицы равно имени Entity класса, т.е. Employee, но в SQLite не важен регистр в именах таблиц, поэтому можем писать employee.
Для вставки/обновления/удаления используются методы insert/update/delete с соответствующими аннотациями. Тут никакие запросы указывать не нужно. Названия методов могут быть любыми. Главное — аннотации.
В следующих уроках мы рассмотрим возможности Dao и его аннотаций более подробно.
Database
Аннотацией Database помечаем основной класс по работе с базой данных. Этот класс должен быть абстрактным и наследовать RoomDatabase.
В параметрах аннотации Database указываем, какие Entity будут использоваться, и версию базы. Для каждого Entity класса из списка entities будет создана таблица.
В Database классе необходимо описать абстрактные методы для получения Dao объектов, которые вам понадобятся.
Практика
Все необходимые для работы объекты созданы. Давайте посмотрим, как использовать их для работы с базой данных.
Database объект — это стартовая точка. Его создание выглядит так:
Используем Application Context, а также указываем AppDatabase класс и имя файла для базы.
Учитывайте, что при вызове этого кода Room каждый раз будет создавать новый экземпляр AppDatabase. Эти экземпляры очень тяжелые и рекомендуется использовать один экземпляр для всех ваших операций. Поэтому вам необходимо позаботиться о синглтоне для этого объекта. Это можно сделать с помощью Dagger, например.
Если вы не используете Dagger (или другой DI механизм), то можно использовать Application класс для создания и хранения AppDatabase:
Не забудьте добавить App класс в манифест
В коде получение базы будет выглядеть так:
Из Database объекта получаем Dao.
Теперь мы можем работать с Employee объектами. Но эти операции должны выполняться не в UI потоке. Иначе мы получим Exception.
Добавление нового сотрудника в базу будет выглядеть так:
Метод getAll вернет нам всех сотрудников в List
Получение сотрудника по id:
Обновление данных по сотруднику.
Room будет искать в таблице запись по ключевому полю, т.е. по id. Если в объекте employee не заполнено поле id, то по умолчанию в нашем примере оно будет равно нулю и Room просто не найдет такого сотрудника (если, конечно, у вас нет записи с >
Аналогично обновлению, Room будет искать запись по ключевому полю, т.е. по id
Давайте для примера добавим еще один тип объекта — Car.
Описываем Entity объект
Теперь Dao для работы с Car объектом
Будем считать, что нам надо только читать все записи, добавлять новые и удалять старые.
В Database необходимо добавить Car в список entities и новый метод для получения CarDao
Т.к. мы добавили новую таблицу, изменилась структура базы данных. И нам необходимо поднять версию базы данных до 2. Но об этом мы подробно поговорим в Уроке 12. А пока можно оставить версию равной 1, удалить старую версию приложения и поставить новую.
UI поток
Повторюсь, операции по работе с базой данных — синхронные, и должны выполняться не в UI потоке.
В случае с Query операциями мы можем сделать их асинхронными используя LiveData или RxJava. Об этом еще поговорим в следующих уроках.
В случае insert/update/delete вы можете обернуть эти методы в асинхронный RxJava. В моем блоге есть статья на эту тему.
Также, вы можете использовать allowMainThreadQueries в билдере создания AppDatabase
В этом случае вы не будете получать Exception при работе в UI потоке. Но вы должны понимать, что это плохая практика, и может добавить ощутимых тормозов вашему приложению.
Переход на Room
Если вы надумали с SQLite мигрировать на Room, то вот пара полезных ссылок по этой теме:
Присоединяйтесь к нам в Telegram:
— в канале StartAndroid публикуются ссылки на новые статьи с сайта startandroid.ru и интересные материалы с хабра, medium.com и т.п.
— в чатах решаем возникающие вопросы и проблемы по различным темам: Android, Kotlin, RxJava, Dagger, Тестирование
— ну и если просто хочется поговорить с коллегами по разработке, то есть чат Флудильня
— новый чат Performance для обсуждения проблем производительности и для ваших пожеланий по содержанию курса по этой теме
Источник
14.1B: Deleting and updating data with Room
Contents:
This practical gives you more practice at using the API provided by the Room library to implement database functionality. You will add the ability to delete specific items from the database. The practical also includes a coding challenge, in which you update the app so the user can edit existing data.
What you should already KNOW
You should be able to create and run apps in Android Studio 3.0 or higher. In particular, be familiar with the following:
- Using RecyclerView and adapters.
- Using entity classes, data access objects (DAOs), and the RoomDatabase to store and retrieve data in Android’s built-in SQLite database. You learned these topics in the previous practical, 15.1A: Working with Architecture Components: Room, LiveData, ViewModel.
What you will LEARN
You will learn how to:
- Populate the database with data only if the database is empty (so users don’t lose changes they made to the data).
- Delete data from a Room database.
- Update existing data (if you build the challenge app).
What you will DO
- Update the RoomWordsSample app to keep data when the app closes.
- Allow users to delete all words by selecting an Options menu item.
- Allow users to delete a specific word by swiping an item in the list.
- Optionally, in a coding challenge, extend the app to allow the user to update existing words.
App overview
You will extend the RoomWordsSample app that you created in the previous practical. So far, that app displays a list of words, and users can add words. When the app closes and re-opens, the app re-initializes the database, and words that the user has added are lost.
In this practical, you extend the app so that it only initializes the data in the database if there is no existing data.
Then you add a menu item that allows the user to delete all the data. 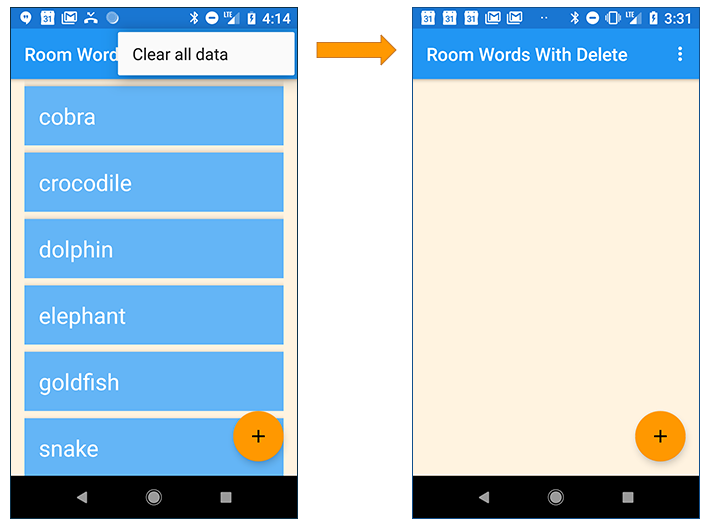
You also enable the user to swipe a word to delete it from the database. 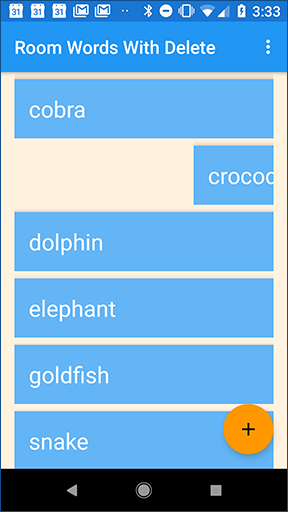
Task 1. Initialize data only if the database is empty
The RoomWordsSample app that you created in the previous practical deletes and re-creates the data whenever the user opens the app. This behavior isn’t ideal, because users will want their added words to remain in the database when the app is closed.
In this task you update the app so that when it opens, the initial data set is only added if the database has no data.
To detect whether the database contains data already, you can run a query to get one data item. If the query returns nothing, then the database is empty.
1.1 Add a method to the DAO to get a single word
Currently, the WordDao interface has a method for getting all the words, but not for getting any single word. The method to get a single word does not need to return LiveData , because your app will call the method explicitly when needed.
- In the WordDao interface, add a method to get any word: Room issues the database query when the getAnyWord() method is called and returns an array containing one word. You don’t need to write any additional code to implement it.
1.2 Update the initialization method to check whether data exists
Use the getAnyWord() method in the method that initializes the database. If there is any data, leave the data as it is. If there is no data, add the initial data set.
PopulateDBAsync is an inner class in WordRoomDatbase . In PopulateDBAsync , update the doInBackground() method to check whether the database has any words before initializing the data:
Task 2. Delete all words
In the previous practical, you used the deleteAll() method to clear out all the data when the database opened. The deleteAll() method was only invoked from the PopulateDbAsync class when the app started. Make the deleteAll() method available through the ViewModel so that your app can call the method whenever it’s needed.
Here are the general steps for implementing a method to use the Room library to interact with the database:
- Add the method to the DAO, and annotate it with the relevant database operation. For the deleteAll() method, you already did this step in the previous practical.
- Add the method to the WordRepository class. Write the code to run the method in the background.
- To call the method in the WordRepository class, add the method to the WordViewModel . The rest of the app can then access the method through the WordViewModel .
2.1 Add deleteAll() to the WordDao interface and annotate it
- In WordDao , check that the deleteAll() method is defined and annotated with the SQL that runs when the method executes:
2.2 Add deleteAll() to the WordRepository class
Add the deleteAll() method to the WordRepository and implement an AsyncTask to delete all words in the background.
In WordRepository , define deleteAllWordsAsyncTask as an inner class. Implement doInBackground() to delete all the words by calling deleteAll() on the DAO:
2.3 Add deleteAll() to the WordViewModel class
You need to make the deleteAll() method available to the MainActivity by adding it to the WordViewModel .
- In the WordViewModel class, add the deleteAll() method:
Task 3. Add an Options menu item to delete all data
Next, you will add a menu item to enable users to invoke deleteAll() .
3.1 Add the Clear all data menu option
- In menu_main.xml , change the menu option title and id , as follows:
In MainActivity , implement the onOptionsItemSelected() method to invoke the deleteAll() method on the WordViewModel object.
Task 4. Delete a single word
Your app lets users add words and delete all words. In Tasks 4 and 5, you extend the app so that users can delete a word by swiping the item in the RecyclerView .
Again, here are the general steps to implement a method to use the Room library to interact with the database:
- Add the method to the DAO, and annotate it with the relevant database operation.
- Add the method to the WordRepository class. Write the code to run the method in the background.
- To call the method in the WordRepository class, add the method to the WordViewModel . The rest of the app can then access the method through the WordViewModel .
4.1 Add deleteWord() to the DAO and annotate it
- In WordDao , add the deleteWord() method:Because this operation deletes a single row, the @Delete annotation is all that is needed to delete the word from the database.
4.2 Add deleteWord() to the WordRepository class
In WordRepository , define another AsyncTask called deleteWordAsyncTask as an inner class. Implement doInBackground() to delete a word bycalling deleteWord() on the DAO:
4.3 Add deleteWord() to the WordViewModel class
To make the deleteWord() method available to other classes in the app, in particular, MainActivity, add it to WordViewModel .
- In WordViewModel , add the deleteWord() method:You have now implemented the logic to delete a word, but as yet there is no way to invoke the delete-word operation from the app’s UI. You fix that next.
Task 5. Enable users to swipe words away
In this task, you add functionality to allow users to swipe an item in the RecyclerView to delete it.
Use the ItemTouchHelper class provided by the Android Support Library (version 7 and higher) to implement swipe functionality in your RecyclerView . The ItemTouchHelper class has the following methods:
- onMove() is called when the user moves the item. You do not implement any move functionality in this app.
- onSwipe() is called when the user swipes the item. You implement this method to delete the word that was swiped.

5.1 Enable the adapter to detect the swiped word
- In WordListAdapter , add a method to get the word at a given position.
In MainActivity , in onCreate() , create the ItemTouchHelper . Attach the ItemTouchHelper to the RecyclerView .
Things to notice in the code:
onSwiped() gets the position of the ViewHolder that was swiped:
Given the position, you can get the word displayed by the ViewHolder by calling the getWordAtPosition() method that you defined in the adapter:
Delete the word by calling deleteWord() on the WordViewModel :
Now run your app and delete some words
- Run your app. You should be able to delete words by swiping them left or right.
Solution code
Coding challenge
Challenge: Update your app to allow users to edit a word by tapping the word and then saving their changes.
Hints
Make changes in NewWordActivity
You can add functionality to NewWordActivity , so that it can be used either to add a new word or edit an existing word.
Use an auto-generated key in Word
The Word entity class uses the word field as the database key. However, when you update a row in the database, the item being updated cannot be the primary key, because the primary key is unique to each row and never changes. So you need to add an auto-generated id to use as the primary key
Add a constructor for Word that takes an id
Add a constructor to the Word entity class that takes id and word as parameters. Make sure this additional constructor is annotated using @Ignore , because Room expects only one constructor by default in an entity class.
To update an existing Word , create the Word using this constructor. Room will use the primary key (in this case the id ) to find the existing entry in the database so it can be updated.
In WordDao , add the update() method like this:
Challenge solution code
Android Studio project: Coming soon
Summary
Writing database code
- Room takes care of opening and closing the database connections each time a database operations executes.
- Annotate methods in the data access object (DAO) as @insert , @delete , @update , @query .
- For simple insertions, updates and deletions, it is enough to add the relevant annotation to the method in the DAO.
- For queries or more complex database interactions, such as deleting all words, use the @query annotation and provide the SQL for the operation.
ItemTouchHelper
- To enable users to swipe or move items in a RecyclerView , you can use the ItemTouchHelper class.
- Implement onMove() and onSwipe().
- To identify which item the user moved or swiped, you can add a method to the adapter for the RecylerView . The method takes a position and returns the relevant item. Call the method inside onMove() or onSwipe() .
Related concept
The related concept documentation is Architecture Components.
Learn more
Entities, data access objects (DAOs), and ViewModel :
- Defining data using Room entities
- Accessing data using Room DAOs
- ViewModel guide
- Dao reference
- ViewModel reference
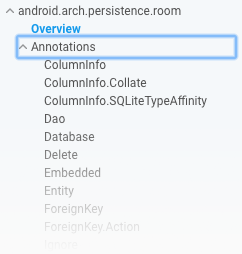
- To see all the possible annotations for an entity, go to android.arch.persistence.room in the Android reference and expand the Annotations menu item in the left nav.
Источник


