SQLite Database Update in Android
Please follow the below steps in order to update data in SQLite database using our Android app:
Step 1) First add one more button and this button we are going to use to update the data, so I’m going to change the name of the button as an update.
Step 2) And one more thing we want to do is, if you remember our database table contains four columns. First one was id, the second one was name, surname and the marks scored by the students. And to update the data we need a unique reference of the row so that we can tell SQLite that we want to delete the data from this row.
Because names can be same so if you want to change the name of one partner which shares the name with the other person then the data can be changed for both the names if you don’t know what is the unique you know row or unique column in this, So id we have defined as a unique column for this database table.
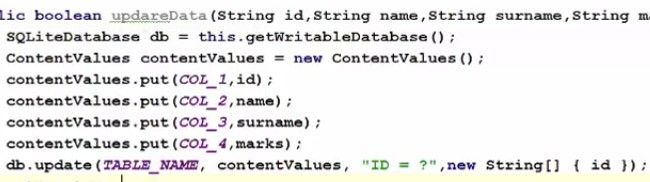
Step 3) Now we need to create a function in our database helper .javaclass which we have created in the last tutorial so go to the database helper .javafile and in here till now we have created insert data and get all data function right. Now we will create one more function here and we will call it as updateData.
So it will be public and it’ll return boolean and It’s going to take four arguments. The First argument we are going to pass here will be string id, second is string name, third is string surname and fourth is string marks.

basically, we want to pass all the four column data to it. Because our table will contain four columns, id, name, surname and marks right.
Step 4) Now in here what we’re going to do is, as we have done inserting data function. First of all, we will create SQLite database instance and then we are going to create an instance of content value.

Step 5) And then as we have done in this insert data function that we’re putting whatever data is passed from the argument to this content value using put. So let’s do it and one more column we need to add here and this will be for column 1 and its id in our case right. Because this contains extra id here. The only difference in update data functions and insert data function is, the method we are going to use now.

Step 6) So just take your database instance now and then call update here. And this update will update whatever argument you pass here. The first argument it takes is the name of your table okay. So give the name if you remember. we have declared table name here right so first argument is the table name right. Second is the content value. So it takes the second argument as a content value so we take this instance of content value and pass it here. The third argument is the condition which we want to pass here. So what we want to do, we want to update data on the basis of for example id because id is our unique primary key here and on the basis of primary key we can differentiate data. So in here we will write So we will you know ask whatever id is passed using this id parameter we are going to query this and fourth is the value on the basis of which we want to update our data so this is the column name on the basis of which we want to update the data and our column name is id so you can just write here column name, id is equal to and then in here, fourth argument. Lets go inside this update, so hover over control and click and see it takes the fourth argument as the string array right. So we will go back and pass string array here right.
And if everything goes well, we want to return, return to know that if the data is really updated or not.

Step 7) Now this is done, what we are going to do is we are going to move to our main activity .javafile and in here we will declare one more button variable which will be our button for update so button update and then we are going to take this button instance and we will cast it as a button using the id.
So go to the onCreate method where you have type casted all other tools or widgets and cast this button.
Источник
Полный список
— меняем версию и обновляем структуру БД в onUpgrade
С развитием приложения может возникнуть необходимость изменения структуры БД, которую оно использует. На одном из прошлых уроков я упоминал, что для этого используется метод onUpgrade класса SQLiteOpenHelper. Этот метод вызывается, если существующая версия БД отличается от той, к которой мы пытаемся подключиться. Версию мы обычно указывали при вызове конструктора супер-класса SQLiteOpenHelper в конструкторе DBHelper.
Попробуем воспользоваться методом onUpgrade и посмотреть, как происходит переход на новую версию БД. Для этого напишем небольшое приложение, аналогичное одному из приложений с прошлых уроков – про сотрудников и должности.
Первая версия БД будет содержать только таблицу people с именем сотрудника и его должностью. Но такая таблица будет не совсем корректна. Если вдруг у нас изменится название должности, придется обновлять все соответствующие записи в people. Поэтому мы решаем изменить БД и организовать данные немного по-другому.
Во второй версии добавим таблицу position с названием должности и зарплатой. И в таблице people вместо названия должности пропишем соответствующий ID из position.
Project name: P0391_SQLiteOnUpgradeDB
Build Target: Android 2.3.3
Application name: SQLiteOnUpgradeDB
Package name: ru.startandroid.develop.p0391sqliteonupgradedb
Create Activity: MainActivity
Экран снова не используем, будем выводить все в лог.
Открываем MainActivity.java и кодим:
Код несложен. Я сгруппировал операции по выводу в лог данных из Cursor – метод logCursor. Метод writeStaff – выбирает данные из таблицы people и вызывает метод для вывода данных в лог. В методе Activity onCreate мы создаем объект DBHelper, подключаемся к БД, выводим в лог версию БД, вызываем writeStaff и отключаемся.
В DBHelper все как обычно. В конструкторе вызываем конструктор супер-класса. Обратите внимание, DB_VERSION = 1 – мы будем подключаться к базе версии 1. В методе onCreate создаем таблицу и заполняем ее.
Все сохраним и запустим приложение. Смотрим лог:
— onCreate database —
— Staff db v.1 —
Table people. 8 rows
name = Иван; position = Программер;
name = Марья; position = Бухгалтер;
name = Петр; position = Программер;
name = Антон; position = Программер;
name = Даша; position = Бухгалтер;
name = Борис; position = Директор;
name = Костя; position = Программер;
name = Игорь; position = Охранник;
БД создалась, версия = 1 и данные из таблицы вывелись в лог. Приложение работает, все ок. Но тут мы (внезапно!) понимаем, что при проектировании структуры БД была допущена ошибка. Записывать название должности в поле таблицы people – неправильно. К тому же у нас еще добавляются данные по зарплатам. Надо создать таблицу должностей — position, и использовать из нее id в таблице people. Тем самым структура нашей БД меняется и мы присваиваем ей версию – 2.
Но наше приложение уже установлено у пользователей. Оно уже создало БД версии 1, и в этой БД уже есть данные. Мы не можем просто удалить существующие таблицы и создать новые, т.к. возможно пользователь уже хранит там свои данные. Нам надо будет написать скрипты для обновления без потери данных.
План обновления такой:
— создаем и заполняем данными таблицу position
— добавляем в таблицу people столбец – posid для хранения id из position
— заполняем people.posid данными из position в зависимости от значения people.position
— удаляем столбец people.position
Давайте менять MainActivity.java. Наше приложение теперь будет ориентировано на БД версии 2. Укажем это, изменив значение константы DB_VERSION на 2:
Метод writeStaff перепишем таким образом:
Будем выводить в лог данные из таблиц people, position и их объединения.
Реализуем метод обновления — onUpgrade в DBHelper:
Все в соответствии с планом обновления, который я приводил выше. Есть пара нюансов.
Во-первых, используем БД-транзакцию. Т.е. нам надо чтобы на БД накатились все наши обновления. А в случае ошибки в процессе обновления — все изменения должны быть отменены и БД должна остаться прежней. Тут транзакции очень выручают.
Во-вторых, в SQLite нельзя просто так удалить столбец, приходится создавать временную таблицу, перекидывать туда данные, удалять оригинал, создавать его снова с нужной структурой, скидывать в него данные из временной таблицы и удалять временную таблицу. Подробнее об этом можно почитать тут — How do I add or delete columns from an existing table in SQLite.
Наше приложение обновилось. И теперь, при запуске, оно попытается подключиться к БД версии 2, но увидит, что существующая версия = 1 и вызовет метод onUpgrade, дав нам возможность внести необходимые изменения в структуру БД. Но это произойдет в случае обновления приложения. А что будет если пользователь поставит наше новое приложение на свежий смартфон первый раз?
В этом случае приложение также попытается подключиться к БД версии 2. Но т.к. приложение только что установлено, то БД еще не существует. Приложение создаст БД и присвоит ей версию номер 2, т.к. оно умеет работать именно с такой версией. При создании будет вызван метод onCreate в DBHelper. Значит, в нем мы должны прописать код, который будет создавать нам БД версии 2 – т.е. обновленную таблицу people и новую таблицу position.
Пишем onCreate в DBHelper:
Создание и заполнение данными двух таблиц. Все понятно.
Теперь можно все сохранить и запустить приложение.
— onUpgrade database from 1 to 2 version —
— Staff db v.2 —
Table people. 8 rows
name = Иван; posid = 2;
name = Марья; posid = 3;
name = Петр; posid = 2;
name = Антон; posid = 2;
name = Даша; posid = 3;
name = Борис; posid = 1;
name = Костя; posid = 2;
name = Игорь; posid = 4;
Table position. 4 rows
name = Директор; salary = 15000;
name = Программер; salary = 13000;
name = Бухгалтер; salary = 10000;
name = Охранник; salary = 8000;
inner join. 8 rows
Name = Иван; Position = Программер; Salary = 13000;
Name = Марья; Position = Бухгалтер; Salary = 10000;
Name = Петр; Position = Программер; Salary = 13000;
Name = Антон; Position = Программер; Salary = 13000;
Name = Даша; Position = Бухгалтер; Salary = 10000;
Name = Борис; Position = Директор; Salary = 15000;
Name = Костя; Position = Программер; Salary = 13000;
Name = Игорь; Position = Охранник; Salary = 8000;
Видим, что вызывался onUpgrade и обновил нам БД с версии 1 на 2. Далее выводим все данные, чтобы убедиться, что обновление прошло корректно.
Можно также убедиться, что новый onCreate в DBHelper корректно отработает. Для этого надо удалить файл БД и запустить приложение. Приложение не найдет БД и создаст ее сразу в новом формате и с версией 2.
Сценарий выдуманный, есть к чему придраться и о чем поспорить, но смысл не в этом. Смысл в том, что мы увидели, как происходит обновление БД, если приложение запросило новую версию. Поначалу, возможно, покажется запутанным этот механизм создания и обновления. Но сложного реально ничего нет. С опытом придет полное понимание.
Еще хочу отметить, что у объекта Cursor есть метод close(), который освобождает занимаемые им ресурсы. Не забывайте про него.
Думаю, теперь можно смело сказать, что работу с SQLite в Android мы изучили достаточно основательно. И в дальнейших уроках сможем свободно использовать эти знания.
Полный код MainActivity.java:
На следующем уроке:
— разбираем как можно использовать LayoutInflater
Присоединяйтесь к нам в Telegram:
— в канале StartAndroid публикуются ссылки на новые статьи с сайта startandroid.ru и интересные материалы с хабра, medium.com и т.п.
— в чатах решаем возникающие вопросы и проблемы по различным темам: Android, Kotlin, RxJava, Dagger, Тестирование
— ну и если просто хочется поговорить с коллегами по разработке, то есть чат Флудильня
— новый чат Performance для обсуждения проблем производительности и для ваших пожеланий по содержанию курса по этой теме
Источник
How to Update Data to SQLite Database in Android?
We have seen How to Create and Add Data to SQLite Database in Android as well as How to Read Data from SQLite Database in Android. We have performed different SQL queries for reading and writing our data to SQLite database. In this article, we will take a look at updating data to SQLite database in Android.
What we are going to build in this article?
We will be building a simple application in which we were already adding as well as reading the data. Now we will simply update our data in a new activity and we can get to see the updated data. A sample video is given below to get an idea about what we are going to do in this article. Note that we are going to implement this project using the Java language.
Attention reader! Don’t stop learning now. Get hold of all the important Java Foundation and Collections concepts with the Fundamentals of Java and Java Collections Course at a student-friendly price and become industry ready. To complete your preparation from learning a language to DS Algo and many more, please refer Complete Interview Preparation Course.
Step by Step Implementation
Step 1: Creating a new activity for updating our course
As we want to update our course, so for this process we will be creating a new activity where we will be able to update our courses in the SQLite database. To create a new Activity we have to navigate to the app > java > your app’s package name > Right click on package name > New > Empty Activity and name your activity as UpdateCourseActivity and create new Activity. Make sure to select the empty activity.
Источник


