SDK Manager
The Android SDK separates tools, platforms, and other components into packages you can download using the SDK Manager. For example, when the SDK Tools are updated or a new version of the Android platform is released, you can use the SDK Manager to quickly download them to your environment.
You can launch the SDK Manager in one of the following ways:
- From Eclipse (with ADT), select Window >Android SDK Manager.
- From Android Studio, select Tools >Android >SDK Manager.
- On Windows, double-click the SDK Manager.exe file at the root of the Android SDK directory.
- On Mac or Linux, open a terminal and navigate to the tools/ directory in the location where the Android SDK is installed, then execute android sdk .
You can select which packages you want to download by toggling the checkboxes on the left, then click Install to install the selected packages.

Figure 1. The Android SDK Manager shows the SDK packages that are available, already installed, or for which an update is available.
There are several different packages available for the Android SDK. The table below describes most of the available packages and where they’re located in your SDK directory once you download them.
Recommended Packages
Here’s an outline of the packages required and those we recommend you use:
SDK Tools Required. Your new SDK installation already has the latest version. Make sure you keep this up to date. SDK Platform-tools Required. You must install this package when you install the SDK for the first time. SDK Platform Required.You must download at least one platform into your environment so you’re able to compile your application. In order to provide the best user experience on the latest devices, we recommend that you use the latest platform version as your build target. You’ll still be able to run your app on older versions, but you must build against the latest version in order to use new features when running on devices with the latest version of Android.
To get started, download the latest Android version, plus the lowest version you plan to support (we recommend Android 2.2 for your lowest version).
System Image Recommended. Although you might have one or more Android-powered devices on which to test your app, it’s unlikely you have a device for every version of Android your app supports. It’s a good practice to download system images for all versions of Android your app supports and test your app running on them with the Android emulator. Android Support Recommended. Includes a static library that allows you to use some of the latest Android APIs (such as fragments, plus others not included in the framework at all) on devices running a platform version as old as Android 1.6. All of the activity templates available when creating a new project with the ADT Plugin require this. For more information, read Support Library. SDK Samples Recommended. The samples give you source code that you can use to learn about Android, load as a project and run, or reuse in your own app. Note that multiple samples packages are available — one for each Android platform version. When you are choosing a samples package to download, select the one whose API Level matches the API Level of the Android platform that you plan to use.
Tip: For easy access to the SDK tools from a command line, add the location of the SDK’s tools/ and platform-tools to your PATH environment variable.
The above list is not comprehensive and you can add new sites to download additional packages from third-parties.
In some cases, an SDK package may require a specific minimum revision of another package or SDK tool. The development tools will notify you with warnings if there is dependency that you need to address. The Android SDK Manager also enforces dependencies by requiring that you download any packages that are needed by those you have selected.
Adding New Sites
By default, Available Packages displays packages available from the Android Repository and Third party Add-ons. You can add other sites that host their own Android SDK add-ons, then download the SDK add-ons from those sites.
For example, a mobile carrier or device manufacturer might offer additional API libraries that are supported by their own Android-powered devices. In order to develop using their libraries, you must install their Android SDK add-on, if it’s not already available under Third party Add-ons.
If a carrier or device manufacturer has hosted an SDK add-on repository file on their web site, follow these steps to add their site to the Android SDK Manager:
- Select Available Packages in the left panel.
- Click Add Add-on Site and enter the URL of the repository.xml file. Click OK.
Any SDK packages available from the site will now be listed under a new item named User Add-ons.
Troubleshooting
Problems connecting to the SDK repository
If you are using the Android SDK Manager to download packages and are encountering connection problems, try connecting over http, rather than https. To switch the protocol used by the Android SDK Manager, follow these steps:
Источник
Installing the Android SDK
Android Studio provides everything you need to start developing apps for Android, including the Android Studio IDE and the Android SDK tools.
If you didn’t download Android Studio, go download Android Studio now, or switch to the stand-alone SDK Tools install instructions.
Before you set up Android Studio, be sure you have installed JDK 6 or higher (the JRE alone is not sufficient)—JDK 7 is required when developing for Android 5.0 and higher. To check if you have JDK installed (and which version), open a terminal and type javac -version . If the JDK is not available or the version is lower than 6, go download JDK.
To set up Android Studio on Windows:
- Launch the .exe file you just downloaded.
- Follow the setup wizard to install Android Studio and any necessary SDK tools.
On some Windows systems, the launcher script does not find where Java is installed. If you encounter this problem, you need to set an environment variable indicating the correct location.
Select Start menu > Computer > System Properties > Advanced System Properties. Then open Advanced tab > Environment Variables and add a new system variable JAVA_HOME that points to your JDK folder, for example C:\Program Files\Java\jdk1.7.0_21 .
The individual tools and other SDK packages are saved outside the Android Studio application directory. If you need to access the tools directly, use a terminal to navigate to the location where they are installed. For example:
To set up Android Studio on Mac OSX:
- Unzip the downloaded zip file, android-studio-ide- -mac.zip .
- Drag and drop Android Studio into the Applications folder.
- Open Android Studio and follow the setup wizard to install any necessary SDK tools.
Depending on your security settings, when you attempt to open Android Studio, you might see a warning that says the package is damaged and should be moved to the trash. If this happens, go to System Preferences > Security & Privacy and under Allow applications downloaded from, select Anywhere. Then open Android Studio again.
The individual tools and other SDK packages are saved outside the Android Studio application directory. If you need access the tools directly, use a terminal to navigate into the location where they are installed. For example:
To set up Android Studio on Linux:
- Unpack the downloaded Tar file, android-studio-ide- -linux.zip , into an appropriate location for your applications.
- To launch Android Studio, navigate to the android-studio/bin/ directory in a terminal and execute studio.sh .
You may want to add android-studio/bin/ to your PATH environmental variable so that you can start Android Studio from any directory.
If the SDK is not already installed, follow the setup wizard to install the SDK and any necessary SDK tools.
Note: You may also need to install the ia32-libs, lib32ncurses5-dev, and lib32stdc++6 packages. These packages are required to support 32-bit apps on a 64-bit machine.
Android Studio is now ready and loaded with the Android developer tools, but there are still a couple packages you should add to make your Android SDK complete.
The stand-alone SDK Tools package does not include a complete Android development environment. It includes only the core SDK tools, which you can access from a command line or with a plugin for your favorite IDE (if available).
If you didn’t download the SDK tools, go download the SDK now, or switch to the Android Studio install instructions.
To get started on Windows:
Your download package is an executable file that starts an installer. The installer checks your machine for required tools, such as the proper Java SE Development Kit (JDK) and installs it if necessary. The installer then saves the Android SDK Tools to a specified the location outside of the Android Studio directories.
- Double-click the executable ( .exe file) to start the install.
- Make a note of the name and location where you save the SDK on your system—you will need to refer to the SDK directory later when using the SDK tools from the command line.
- Once the installation completes, the installer starts the Android SDK Manager.
To get started on Mac OSX:
Unpack the ZIP file you’ve downloaded. By default, it’s unpacked into a directory named android-sdk-mac_x86 . Move it to an appropriate location on your machine, such as a «Development» directory in your home directory.
Make a note of the name and location of the SDK directory on your system—you will need to refer to the SDK directory later when using the SDK tools from the command line.
To get started on Linux:
Unpack the .zip file you’ve downloaded. The SDK files are download separately to a user-specified directory.
Make a note of the name and location of the SDK directory on your system—you will need to refer to the SDK directory later when using the SDK tools from the command line.
Troubleshooting Ubuntu
- If you need help installing and configuring Java on your development machine, you might find these resources helpful:
- https://help.ubuntu.com/community/Java
- https://help.ubuntu.com/community/JavaInstallation
- Here are the steps to install Java:
-
If you are running a 64-bit distribution on your development machine, you need to install additional packages first. For Ubuntu 13.10 (Saucy Salamander) and above, install the libncurses5:i386 , libstdc++6:i386 , and zlib1g:i386 packages using apt-get :
For earlier versions of Ubuntu, install the ia32-libs package using apt-get :
The Android SDK tools are now ready to begin developing apps, but there are still a couple packages you should add to make your Android SDK complete.
Then, select which SDK bundle you want to install:
Источник
Android SDK Manager: установка версий платформ и сохранение обновлений SDK

Илья Дергунов
Автор статьи. ИТ-специалист с 20 летним стажем, автор большого количества публикаций на профильную тематику (разработка ПО, администрирование, новостные заметки). Подробнее.
ПроблемаНезависимо от того, используете ли вы инструменты Android Studio, Eclipse или командной строки, вы должны установить хотя бы одну версию комплекта Platform Edition, прежде чем сможете скомпилировать приложения. Комплекты SDK следует постоянно обновлять, чтобы работать с новейшими API-интерфейсами на развивающейся платформе Android.
Решение
Используйте для установки и последующих обновлений комплектов SDK программу Android SDK Manager.
Обсуждение
Платформа Android постоянно развивается, как и инструментарий Android Development Kit. Текущая разработка платформы Android обусловлена следующими факторами.
- Установка версий платформ и сохранение обновлений SDK
- Исследования и разработки
- Разработка новых и улучшенных моделей телефонов.
- Решение проблем безопасности и возможных уязвимых мест.
- Необходимость поддержки новых устройств.
- Поддержка новых аппаратных интерфейсов.
- Исправление ошибок.
- Улучшение функциональности (например, новый механизм JavaScript).
- Изменения в базовом ядре Linux.
- Устаревание избыточных программных интерфейсов.
- Новое использование (например, Android Wear, Android Auto).
- Более широкое сообщество разработчиков Android.
Следующее обсуждение дополнено снимками экрана из среды Android Studio, но тот же инструмент можно вызвать из среды Eclipse или вызвать инструмент командной строки с именем simple android .
Установка среды IDE и комплекта Android SDK рассмотрена в другом месте (см. инструкцию по установке Android Studio или эту страницу ). При запуске среды Android Studio она проверяет наличие обновлений как для Studio, так и для SDK. Если доступны обновления, появляется соответствующее сообщение. Большинство обновлений будет осуществляться через программу SDK Manager. Если вы подтвердите обновление, среда Studio закроется и будет запущена программа SDK Manager. Если вы не хотите принимать обновления, то позже можете получить доступ к программе SDK Manager из среды Studio (рис. 1) или непосредственно из места установки комплекта Android SDK.
Рис. 1. Пиктограмма панели инструментов SDK Manager
В процессе обновления нужно выполнить следующие шаги.
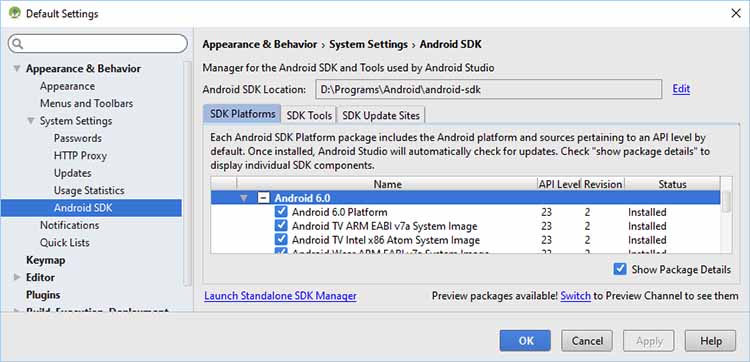
В среде Studio выберите программу SDK Manager с панели инструментов или с помощью команды Tools =>Android (Инструменты => Android). В меню Android отобразятся настройки Android SDK, в которых показано, какие пакеты установлены или доступны (рис. 2).
Рис. 2. Настройки комплекта Android SDK, демонстрирующие текущие параметры инсталляции
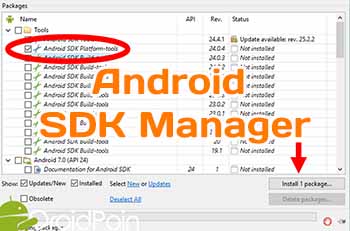
Чтобы внести изменения, щелкните на ссылке Launch Standalone SDK Manager (Автономный запуск SDK Manager), которая запускает внешнюю программу SDK Manager, показанную на рис. 3. Комплект Android SDK разделен на несколько пакетов. Программа SDK Manager автоматически сканирует обновления существующих пакетов и перечисляет новые пакеты. Доступные обновления будут показаны в списке наряду с доступными дополнительными пакетами.
Рис. 3. Автономная программа SDK Manager
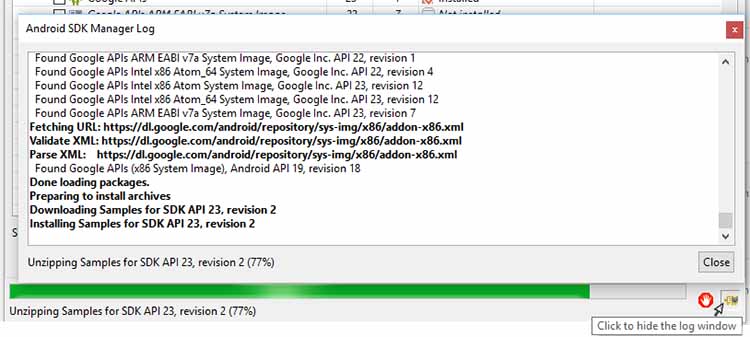
Доступные обновления будут проверены на готовность к загрузке и установке; сбросьте флажки, которые не требуются. (Если вам не хватает места на диске, вы можете оставить только API-пакеты, установленные по вашему желанию.) Затем щелкните на кнопке Install х packages (Установить х пакетов). Если обновление или пакет имеют лицензионные условия, требующие принятия, они будут перечислены. Выделите каждый пакет, чтобы прочитать условия лицензии, а затем примите или отклоните пакеты с помощью переключателей. (Отклоненные пакеты будут отмечены красным крестом.) В качестве альтернативы выделите родительский пакет и щелкните на Accept Аll (Принять все), чтобы принять все доступные пакеты. Все пакеты и обновления, готовые к загрузке и установке, будут помечены зелеными метками. Щелкните на кнопке Install (Установить); пока выполняется загрузка и установка, можете просмотреть журнал, щелкнув на пиктограмме журнала в правом нижнем углу диалогового окна Android SDK Manager (рис. 4).
Любые ошибки во время загрузки и установки будут отображаться красным цветом в диалоговом окне журнала. Обновления, которые влияют на пакет Android Debug Bridge (ADB), приведут к запросу перезапустить ADB. Щелкните на кнопке Yes (Да), чтобы перезапустить его. Во время загрузки и установки будут удалены устаревшие пакеты. После обновления всех пакетов у вас будет возможность просмотреть журнал. Вы можете закрыть диалоговое окно журнала, если оно открыто, и диалоговое окно Android SDK Manager.
Рис. 4. Журнал обновлений комплекта Android SDK
Android — это развивающаяся платформа, поэтому проверка обновлений каждые несколько недель позволит вам работать с новейшими инструментами и API.
Источник
-

 Проблема