- Transfer photos and videos from your iPhone, iPad, or iPod touch
- Use iCloud Photos
- Import to your Mac
- Import to your Windows PC
- Set up and use iCloud Photos on your Windows PC
- Turn on iCloud Photos
- Upload your photos and videos to iCloud Photos
- In iCloud for Windows 10 or later
- In older versions of iCloud for Windows
- Download your photos and videos from iCloud Photos
- In iCloud for Windows 11.1 or later
- In older versions of iCloud for Windows
- Find your photos on your PC
- Learn more
- Move Photos from iPhone to iCloud Storage: A Complete Guide
- Part 1: How to Move Photos from iPhone to iCloud Storage
- Optional: Disable iCloud Photo Library
- Bonus: Take a Backup of your iPhone on iCloud
- Part 2: A Better Alternative: Back up Photos from iPhone to Computer With One Click
Transfer photos and videos from your iPhone, iPad, or iPod touch
Learn how to transfer photos and videos from your iPhone, iPad, or iPod touch to your Mac or PC. You can also make your photos available on all your devices with iCloud Photos.
Use iCloud Photos
iCloud Photos keeps your photos and videos safe, up to date, and available automatically on all of your Apple devices, on iCloud.com, and even your PC. When you use iCloud Photos, you don’t need to import photos from one iCloud device to another. iCloud Photos always uploads and stores your original, full-resolution photos. You can keep full-resolution originals on each of your devices, or save space with device-optimized versions instead. Either way, you can download your originals whenever you need them. Any organizational changes or edits you make are always kept up to date across all your Apple devices. Learn how to set up and use iCloud Photos.
The photos and videos that you keep in iCloud Photos use your iCloud storage. Before you turn on iCloud Photos, make sure that you have enough space in iCloud to store your entire collection. You can see how much space you need and then upgrade your storage plan if necessary.
Import to your Mac
You can use the Photos app to import photos from your iPhone, iPad, or iPod touch to your Mac.
- Connect your iPhone, iPad, or iPod touch to your Mac with a USB cable.
- Open the Photos app on your computer.
- The Photos app shows an Import screen with all the photos and videos that are on your connected device. If the Import screen doesn’t automatically appear, click the device’s name in the Photos sidebar.
- If asked, unlock your iOS or iPadOS device using your passcode. If you see a prompt on your iOS or iPadOS device asking you to Trust This Computer, tap Trust to continue.
- Choose where you want to import your photos. Next to «Import to,» you can choose an existing album or create a new one.
- Select the photos you want to import and click Import Selected, or click Import All New Photos.

- Wait for the process to finish, then disconnect your device from your Mac.
Import to your Windows PC
You can import photos to your PC by connecting your device to your computer and using the Windows Photos app:
- Make sure that you have the latest version of iTunes on your PC. Importing photos to your PC requires iTunes 12.5.1 or later.
- Connect your iPhone, iPad, or iPod touch to your PC with a USB cable.
- If asked, unlock your iOS or iPadOS device using your passcode.
- If you see a prompt on your iOS or iPadOS device asking you to Trust This Computer, tap Trust or Allow to continue.
If you have iCloud Photos turned on, you need to download the original, full resolution versions of your photos to your iPhone before you import to your PC. Find out how.
When you import videos from your iOS or iPadOS device to your PC, some might be rotated incorrectly in the Windows Photos app. You can add these videos to iTunes to play them in the correct orientation.
If you’re having trouble importing photos from your iOS or iPadOS device to Windows 10, try these steps:
- On your iOS or iPadOS device, open the Settings app. Tap Camera, then tap Formats.
- Tap Most Compatible. From now on, your camera will create photos and videos in JPEG and H.264 formats.
Источник
Set up and use iCloud Photos on your Windows PC
iCloud Photos safely stores all your photos and videos in iCloud, so they’re available on all your devices.
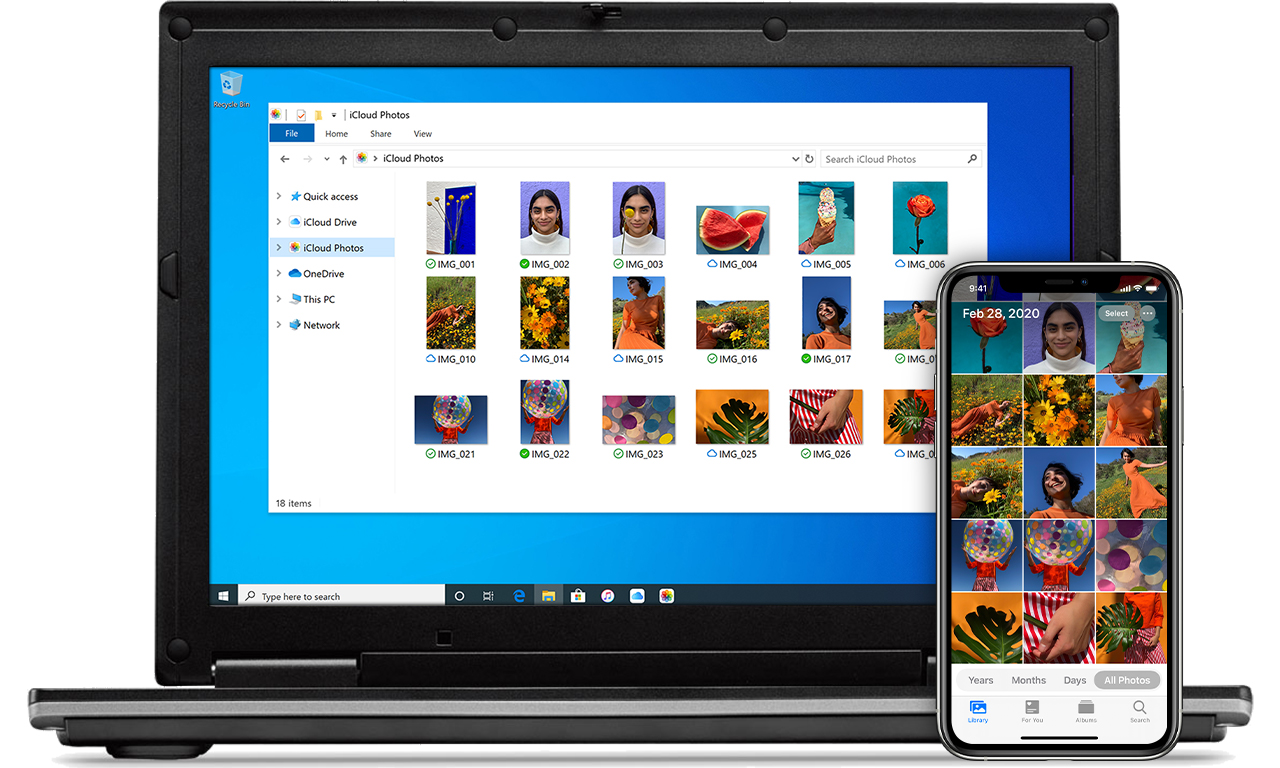
iCloud Photos uploads new photos and videos from your Windows PC so you can view them in the Photos app on your iPhone, iPad, iPod touch, Mac, and on iCloud.com. New photos that you take automatically show up on your PC, and you can download them with a double-click.

Turn on iCloud Photos
Make sure that you set up iCloud on your iPhone, iPad, or iPod touch or Mac, that you turned on iCloud Photos, and that you’re signed in with your Apple ID.
- Download iCloud for Windows.
- Open iCloud for Windows. Make sure you’re signed in with your Apple ID.
- Next to Photos, click Options.
- Select iCloud Photos.
- Click Done, then click Apply.
- Turn on iCloud Photos on all of your Apple devices.
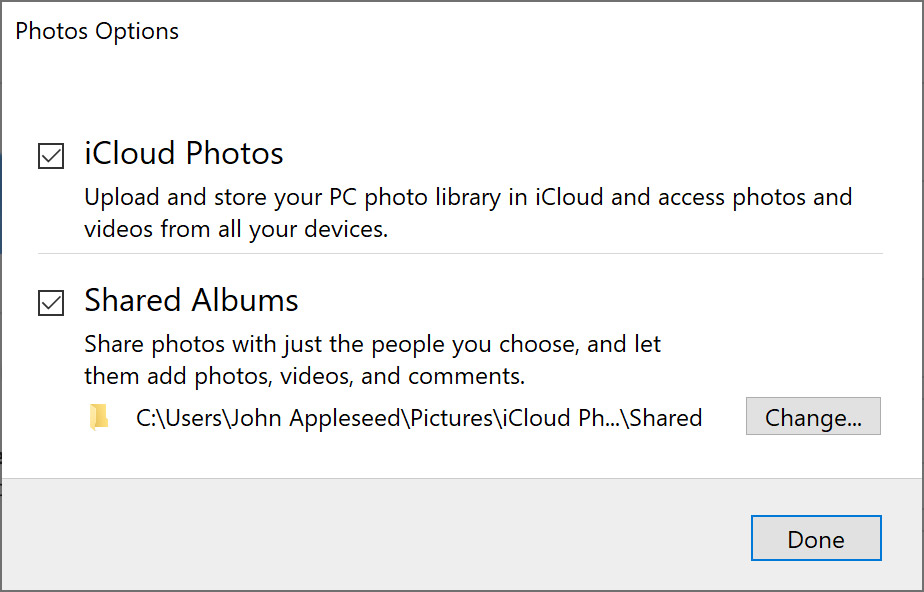
In iCloud for Windows 10 or later, you can also choose to use Shared Albums, and customize the location of your Shared Albums folders. If you’re using iCloud for Windows 7, you can also choose to use My Photo Stream.
When you turn on iCloud Photos on your PC in iCloud for Windows 7, My Photo Stream is turned off automatically. If you want to send new photos to your devices that don’t use iCloud Photos, you can turn My Photo Stream back on.
Upload your photos and videos to iCloud Photos
You can upload your photos and videos from your PC to iCloud Photos when you follow these steps:
In iCloud for Windows 10 or later
- Open a File Explorer window.
- In the Navigation pane, click iCloud Photos.
- In another window, open the folder where you currently store the photos that you want to add to iCloud Photos.
- Select the photos that you want to add.
- Drag them into the iCloud Photos folder.
You can view the photos and videos you uploaded in the Photos app on iCloud.com and on all your Apple devices.
In older versions of iCloud for Windows
- Open a File Explorer window.
- Under Favorites, click iCloud Photos.
- Click Upload photos and videos.
- Choose the photos and videos you want to upload and click Open.
You can view the photos and videos you uploaded in the Photos app on iCloud.com and on all your Apple devices.
Download your photos and videos from iCloud Photos
![]()
In iCloud for Windows 11.1 or later
New photos and videos you add to iCloud Photos are shown on your PC automatically. To download the file from iCloud when you view it, double-click its thumbnail. You can also keep your photos downloaded on your PC with these steps:
- Open File Explorer.
- In the Navigation pane, click iCloud Photos.
- Select the images you want to keep on your PC.
- Right-click the selection and choose «Always keep on this device.»
If you change a photo or video on another device or on iCloud.com, it updates automatically on your PC.
In older versions of iCloud for Windows
New photos and videos you add to iCloud Photos will automatically download to your PC. You can also download older photos and videos with these steps:
- Open File Explorer (Windows 10) or Windows Explorer (Windows 7).
- Click iCloud Photos in the Navigation pane. If you don’t see iCloud Photos, click Pictures in the Navigation pane, then double-click iCloud Photos.
- In iCloud for Windows 10, click the Notification area in the taskbar, then click Download Photos in the iCloud Photos notification. Choose the photos and videos you want to download by year.
- In iCloud for Windows 7, click “Download photos and videos” in the Windows Explorer toolbar. Choose the photos and videos you want to download by year, then click Download.
Your photos and videos download to the location you set in iCloud Photos Options.
In iCloud for Windows 10 or later, if you change a photo or video on another device or on iCloud.com, it updates automatically on your PC. In iCloud for Windows version 7, you need to re-download the photos to see any updates.
Find your photos on your PC
To find your photos, follow the steps for the version of Windows you use on your PC.
- Open File Explorer.
- Click iCloud Photos from the Navigation pane.
- Go to the Start screen. If you use Windows 8.1, click the down arrow in the bottom-left corner.
- Select iCloud Photos.
- Click the Windows Start button, then click Pictures.
- Click iCloud Photos or Photo Stream under the Favorites menu in the panel on the left.
- Double-click My Photo Stream to view your photos. This also shows up as a folder in the window that appears.
My Photo Stream isn’t available in iCloud for Windows 10 or later.
Learn more
- If your iCloud Photos aren’t loading on your PC, learn what to do.
- Learn more about iCloud system requirements.
Information about products not manufactured by Apple, or independent websites not controlled or tested by Apple, is provided without recommendation or endorsement. Apple assumes no responsibility with regard to the selection, performance, or use of third-party websites or products. Apple makes no representations regarding third-party website accuracy or reliability. Contact the vendor for additional information.
Источник
Move Photos from iPhone to iCloud Storage: A Complete Guide

One of the best things about iOS devices is their seamless integration with iCloud. Once you have connected your iCloud account with your iPhone, you can easily move photos from iPhone to iCloud. Apart from maintaining a backup, it also makes our photos available on various connected devices. Though, sometimes people face issues while uploading photos from iPhone to iCloud. If you also wish to know how to move photos from iPhone to iCloud storage, then you have come to the right place. In this post, I will discuss how to move photos from iPhone to iCloud in every possible way.

Part 1: How to Move Photos from iPhone to iCloud Storage
It is extremely easy to transfer photos from iPhone to iCloud using the iCloud Photo Library. This dedicated feature in iCloud makes a library of your photos that you can access on any synced device. Before you move photos from iPhone to iCloud, please note that only 5 GB of free space is allocated to every iCloud account. Therefore, if you have exhausted this storage and have a lot of photos to upload, then you might consider upgrading your iCloud account.
After making sure that you have enough iCloud storage available, follow these steps to learn how to transfer pictures from iPhone to iCloud.
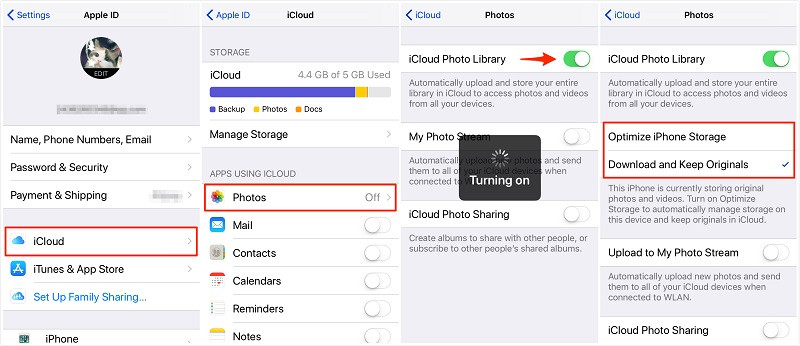
Step 1: Enable iCloud Photo Library
To start with, just go to your iPhone’s Settings and tap on your avatar to visit the iCloud settings. Also, make sure that you have already signed-in to an active iCloud account here. Now, just browse to iCloud > Photos and enable the “iCloud Photo Library” option. From here, you can select if you wish to optimize the size of your photo or retain their original size.
Step 2: Access synced photos on iCloud
Once you have turned on the iCloud Photo Library option, you have to wait for a while and maintain a stable internet connection. After transferring your photos, you can just go to the official iCloud website on your system, log-in to your account, and visit the “Photos” option from here. You can also use the iCloud desktop application on your Mac or Windows to sync your photos.

Optional: Disable iCloud Photo Library
After uploading photos from iPhone to iCloud, you can disable this feature whenever you want. Apart from iCloud > Photos > iCloud Photo Library, you can also go to its iCloud Settings > Manage Storage > iCloud Photo Library to delete and disable this feature.

Bonus: Take a Backup of your iPhone on iCloud
If you have an old device and the feature of iCloud Photos is not there, then you can consider taking an entire backup of your iPhone. To do this, you can go to its Settings > iCloud > Backup and turn on the iCloud Backup option. You can tap on the “Back Up Now” button to take a backup of your device right away.

Part 2: A Better Alternative: Back up Photos from iPhone to Computer With One Click
As you can see, by uploading photos from iPhone to iCloud, a substantial amount of iCloud storage is consumed. Since we only get 5 GB of free space on iCloud, most people have to buy a premium plan to get more storage. To avoid that, you can just use MobileTrans as it can take an extensive backup of your iPhone data to your computer.
- • MobileTrans – Backup is an extremely user-friendly application that can back up your photos, videos, audios, contacts, call logs, and so much more.
- • You can take a backup of your iPhone data directly to your computer as many times as you want.
- • The application will maintain different versions of your backup content, letting you restore any backup file to your device whenever you want.
- • You can also use MobileTrans – Restore to extract the existing backup of MobileTrans or iTunes to the same or any other device.
- • The tool is compatible with every major iOS device and does not need jailbreak access as well.
To take an extensive backup of your iPhone photos to your computer, you can just install MobileTrans – Backup and follow these steps:
Step 1: Launch the Backup tool
Firstly, just install MobileTrans on your system and launch it whenever you wish to back up your data. From the provided options on its home, you have to select the “Backup&Restore” module and go to Backup phone data.

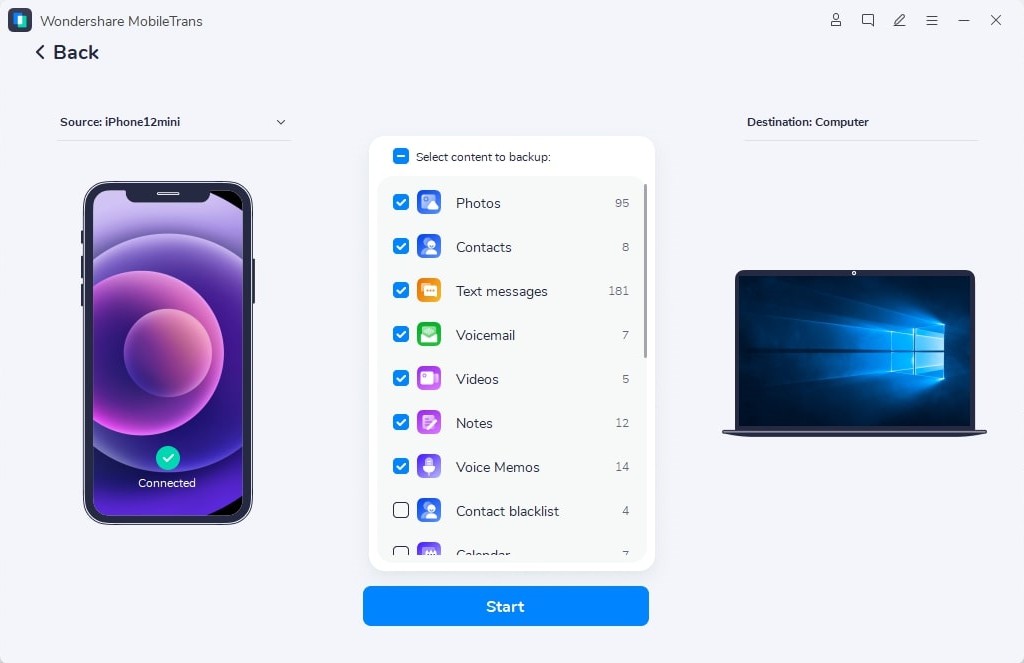
Step 2: Select what you wish to back up
Now, connect your iOS device to your computer and let the application detect it automatically. Afterward, you can view a list of various data types that you can back up. From here, just select “Photos” or any other type of data that you wish to move and click on the “Start” button.
Step 3: Back up your data
That’s it! You can now just wait for a while as the application would save your selected data to your computer. When the process is completed successfully, you will be notified so that you can safely remove your iPhone from your computer.
This brings us to the end of this extensive guide on how to move photos from iPhone to iCloud storage. As you can see, I have listed a stepwise solution for uploading photos from iPhone to iCloud. Since the process can be time-consuming, you can consider a better alternative. MobileTrans – Backup is one of the best ways to back up your iPhone data directly to your system. Since it supports all the major data types, you can also save your contacts, notes, calendar, call logs, browser data, and so much more. Go ahead and try these solutions and feel free to share this guide with others to teach them how to move photos from iPhone to iCloud.
Источник


